
For many photographers, their photos look good on the camera’s LCD. The exposure is right and the scene looks exactly how it was envisioned. That confidence lasts until they open it on a larger screen and zoom in.
At full resolution, the file that looked clean in the field starts falling apart: visible noise in the shadows, soft edges, maybe a dust spot or five from a dirty sensor. There is a critical step between capturing the image on the camera and the editing software that most workflows skip entirely. DxO PureRAW 6 is that step.
Full disclosure: This article was brought to you by DxO. Use the code PetaPixel at check out to get 15% off of any DxO product, including Nik Collection 8 and PureRAW 6
All photos taken in New Mexico by Chris Niccolls and Michael Bonocore for an upcoming issue of the PetaPixel travel show, ‘Trail Camera’.
At a Glance
What Is PureRAW 6 and What’s New
The usual fix for RAW files is to spend twenty minutes in Lightroom or Photoshop pulling sliders and cloning dust spots until the result looks passable. Lightroom and Photoshop have lens profiles, but they stop at distortion, vignetting, and chromatic aberration. DxO calibrates each camera-and-lens combination in its own lab, building correction data that also maps your sensor’s noise signature at every ISO.
PureRAW 6 is a specialist. It has one job: process your RAW files using that lab-measured data for your exact camera and lens, then hand the improved file back to your editor. That per-sensor intelligence is why DxO’s processing engine DeepPRIME consistently outperforms generic noise reduction and lens correction.
What PureRAW Does
PureRAW is a pre-editing tool that sits between your camera and your editing software. You feed it RAW files before you begin editing in Adobe Lightroom or Photoshop, DxO PhotoLab, or Capture One.
Before editing, the software applies AI-powered noise reduction, optical corrections, and automatic sensor dust removal to your RAW files. The output is a cleaned-up DNG, TIFF, JPEG, or Photoshop Smart Object that you import into your editing software.
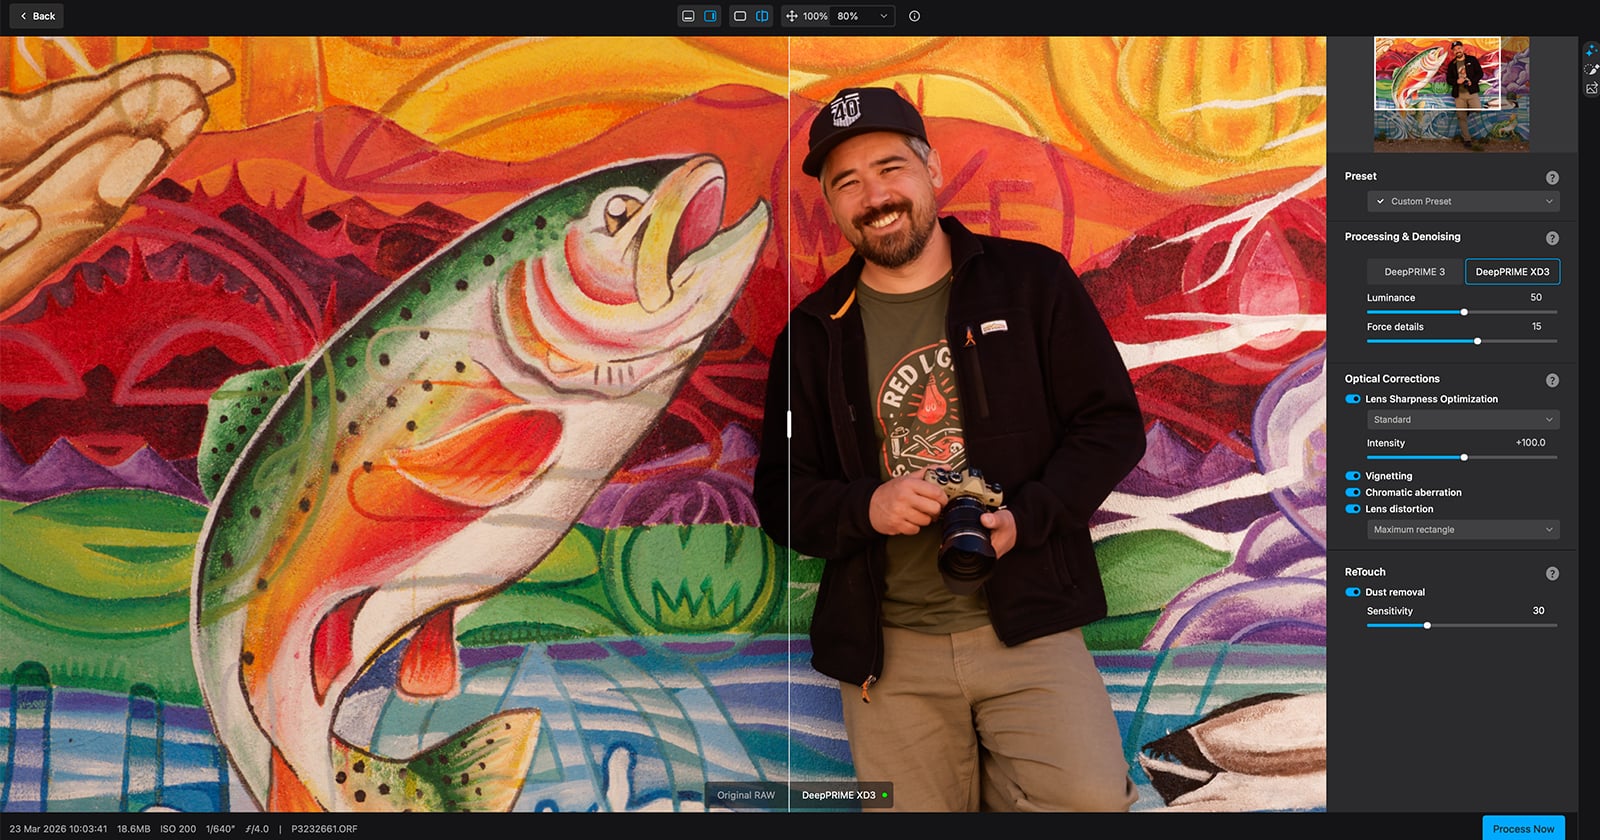
 DxO’s PureRAW 6 Preview and Overview Screen. Here, you can make adjustments and compare the before and after.
The optical corrections are where PureRAW sets itself apart from editing software’s built-in tools. DxO supports over 110,000 camera and lens combinations through lab-measured profiles. Each profile maps that combination’s specific distortion, vignetting, chromatic aberration, and sharpness falloff. The corrections are calibrated to your exact gear, not a generic profile.
Your editing software can only work with what it receives. A file that’s already had its noise removed and its lens issues fixed is a better starting point for editing.
Your original RAW files are never modified. PureRAW creates new output files and leaves the originals untouched.
DxO has created a database to allow users to see if a camera or lens is supported in PureRAW 6. If a camera or lens is not supported, photographers can suggest a module directly to DxO.
What’s New in Version 6
DeepPRIME XD3 for Bayer sensors: DxO’s most advanced noise reduction engine was previously limited to Fujifilm’s X-Trans cameras. Version 6 brings it to Canon, Nikon, Sony, OM SYSTEM, and every other Bayer-sensor camera.
High-Fidelity DNG Compression: Processed files shrink dramatically. A 57.8MB RAW file that previously became a 136MB uncompressed DNG now becomes a 17.2MB compressed DNG.
AI Sensor Dust Removal: PureRAW detects and removes dust spots automatically across entire batches. An adjustable Sensitivity slider controls how aggressive the detection is.
Faster Batch Processing: The CPU now prepares the next image while the GPU renders the current one, reducing total processing time for multi-image batches.
PureRAW doesn’t replace your photo editor. It makes your photo editor’s job easier by giving it better data to work with.
Installing and Launching
Download PureRAW 6 from the DxO website and run the installer. The setup process handles license activation and plugin registration in a single pass. Use the code PetaPixel at check out to get 15% off of any DxO product, including PureRAW 6.
Standalone Mode
The standalone app has no built-in file browser. You add photos through your operating system’s standard file dialog (the “Add RAW images to Lightbox” button) or by dragging files and folders directly onto the app window. Drag-and-drop is the faster path for large batches.
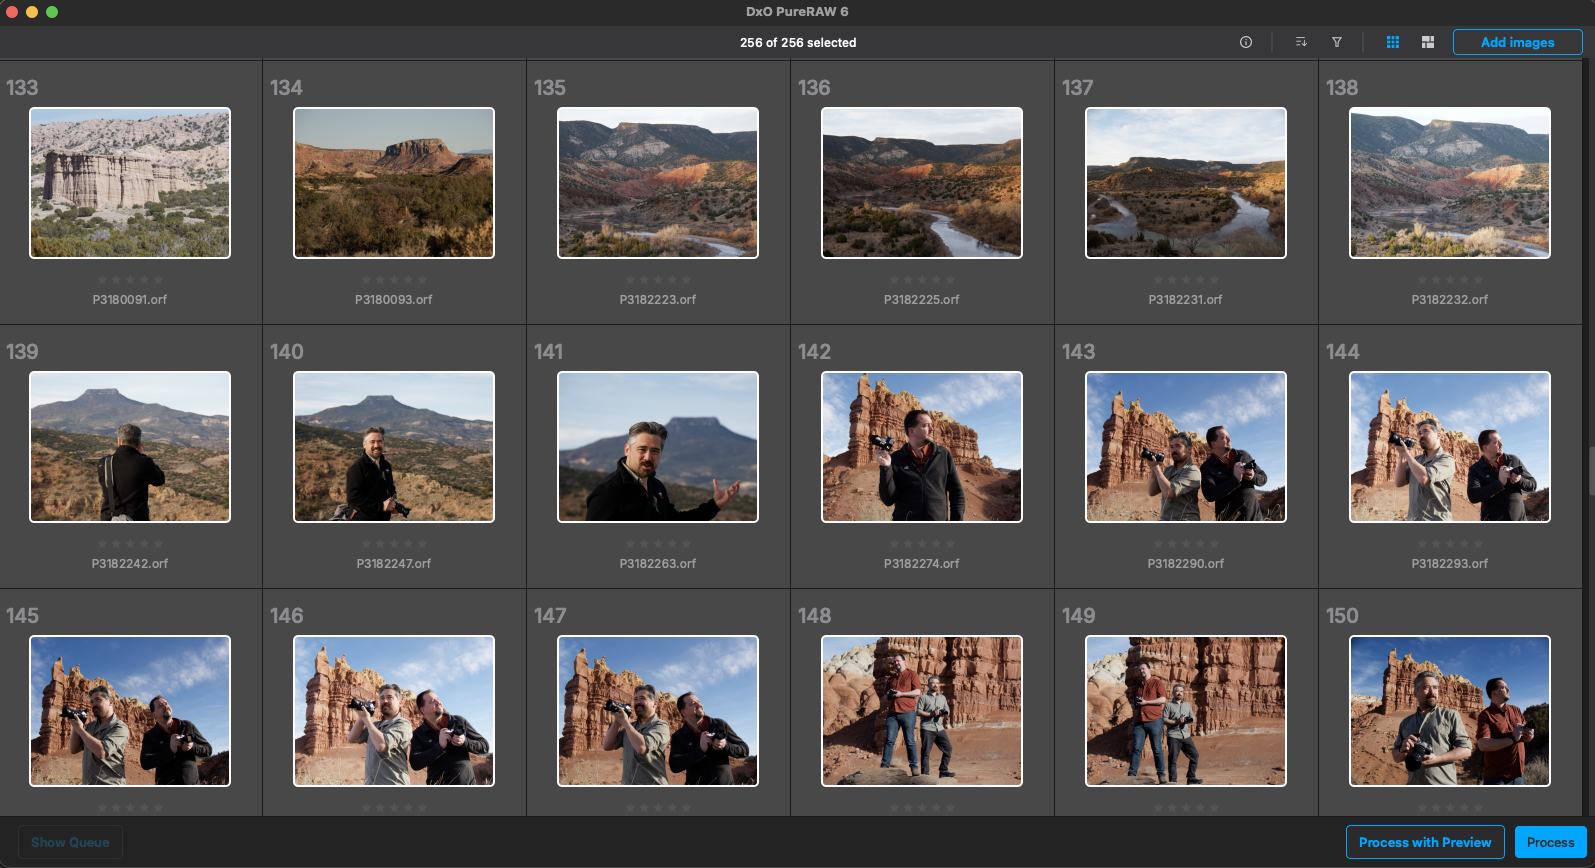 DxO PureRAW 6 standalone lightbox with Michael Bonocore’s New Mexico photos loaded
When you add photos for the first time with a new camera or lens, PureRAW will prompt you to download a DxO Module for that specific combination. These modules contain the optical correction data DxO has measured for your exact camera body and lens pairing. Select the matching equipment from the list and click Save. The download takes a few seconds, and PureRAW only asks once per combination.
Lightroom Classic Plugin
PureRAW installs its Lightroom Classic plugin automatically during setup. Three commands appear under File > Plug-in Extras: Preview and Process with DxO PureRAW 6, Process instantly with DxO PureRAW 6, and Process directly using last settings DxO PureRAW 6.
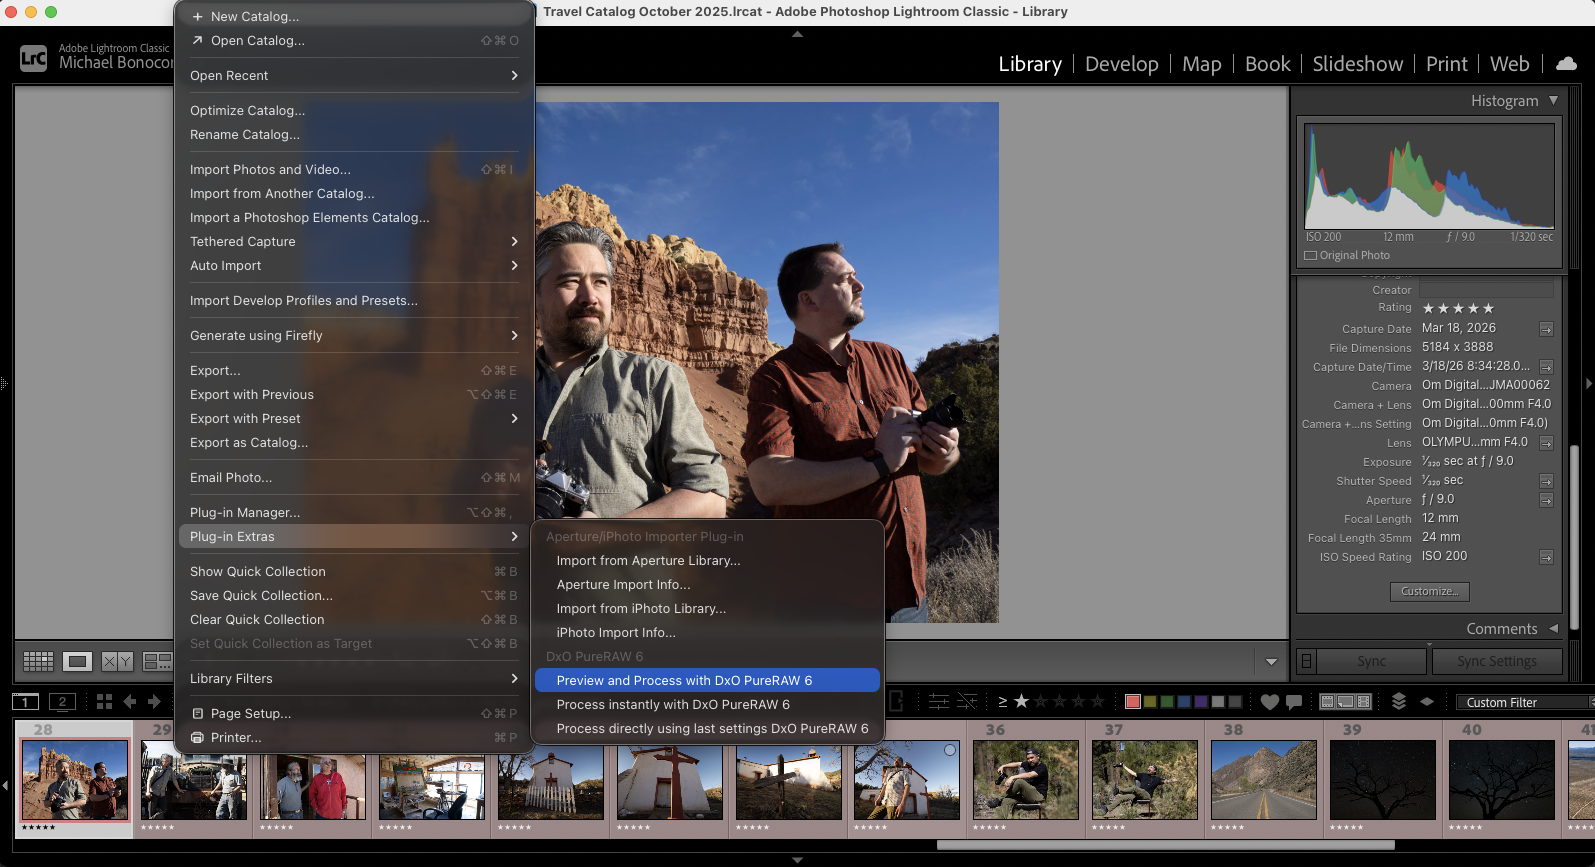 Lightroom Classic File menu showing File > Plug-in Extras with three DxO PureRAW 6 commands.
Do not use Lightroom’s “Edit In” command for PureRAW. “Edit In” forces Lightroom to render its own interpretation of the RAW file first, then sends a TIFF or PSD; PureRAW needs the original RAW data to apply its processing. Use File > Plug-in Extras, or right-click the image(s) and go to Export > DxO PureRAW 6, for every PureRAW operation.
If the plugin does not appear after installation, open the standalone app and go to File > Install DxO PureRAW plugin for Adobe Lightroom Classic.
Photoshop Integration
PureRAW does not appear in Photoshop’s Filter menu. Instead, you process your image in PureRAW (either using the standalone app or Lightroom), which generates a DNG file that can be opened automatically in Photoshop as a special layer that you can double-click to re-adjust later.
Widget (Auto-Launch)
A Widget option in PureRAW’s Preferences lets a small status monitor appear in either your Mac menu bar or Windows taskbar whenever you connect a memory card or external drive. It shows processing progress and notifies you when batches are complete.
Workflow Integration
Lightroom Classic Workflow
PureRAW integrates with Lightroom Classic via plugin and works seamlessly with Photoshop through its DNG output workflow. Cloud-based Lightroom (CC) does not support the plugin; those users should follow the Standalone Workflow section below.
Three commands appear under File > Plug-in Extras after you select images in the Library module:
- Preview and Process with DxO PureRAW 6 (recommended for beginners): opens the full preview workspace where you compare before and after, adjust settings, and process when ready.
- Process instantly with DxO PureRAW 6: skips the preview. A smaller settings window lets you choose your processing options and start immediately.
- Process directly using last settings DxO PureRAW 6: applies your previous session’s settings with no dialog, showing only a progress bar.
All three commands are also available by right-clicking selected images and choosing Export. Do not use the Edit In submenu, which sends a pre-rendered file instead of the original RAW.
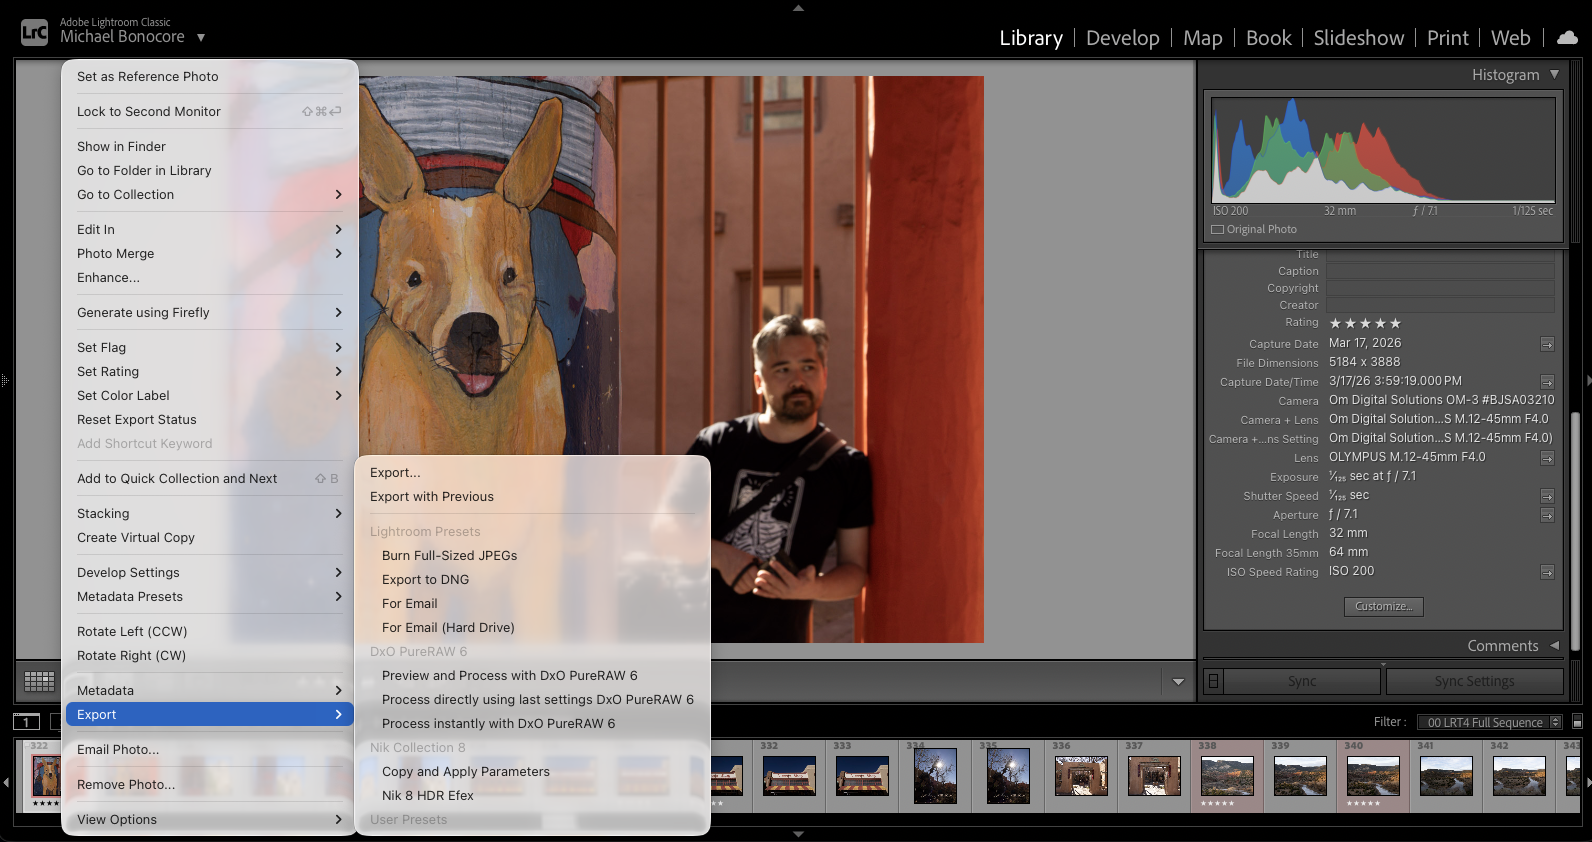 Right-click context menu showing Export submenu with DxO PureRAW 6 commands
Processing steps (using Preview and process):
- Select your images in Lightroom Classic.
- Go to File > Plug-in Extras > Preview and Process with DxO PureRAW 6. (You can also right-click the image(s) and go to Export > Preview and Process with DxO PureRAW 6.)
- Adjust processing settings in the preview. Use the before-and-after slider to compare before and after.
- Click Process Now. The new DNG files appear in your Lightroom Classic catalog automatically.
- Edit the processed DNGs as normal.
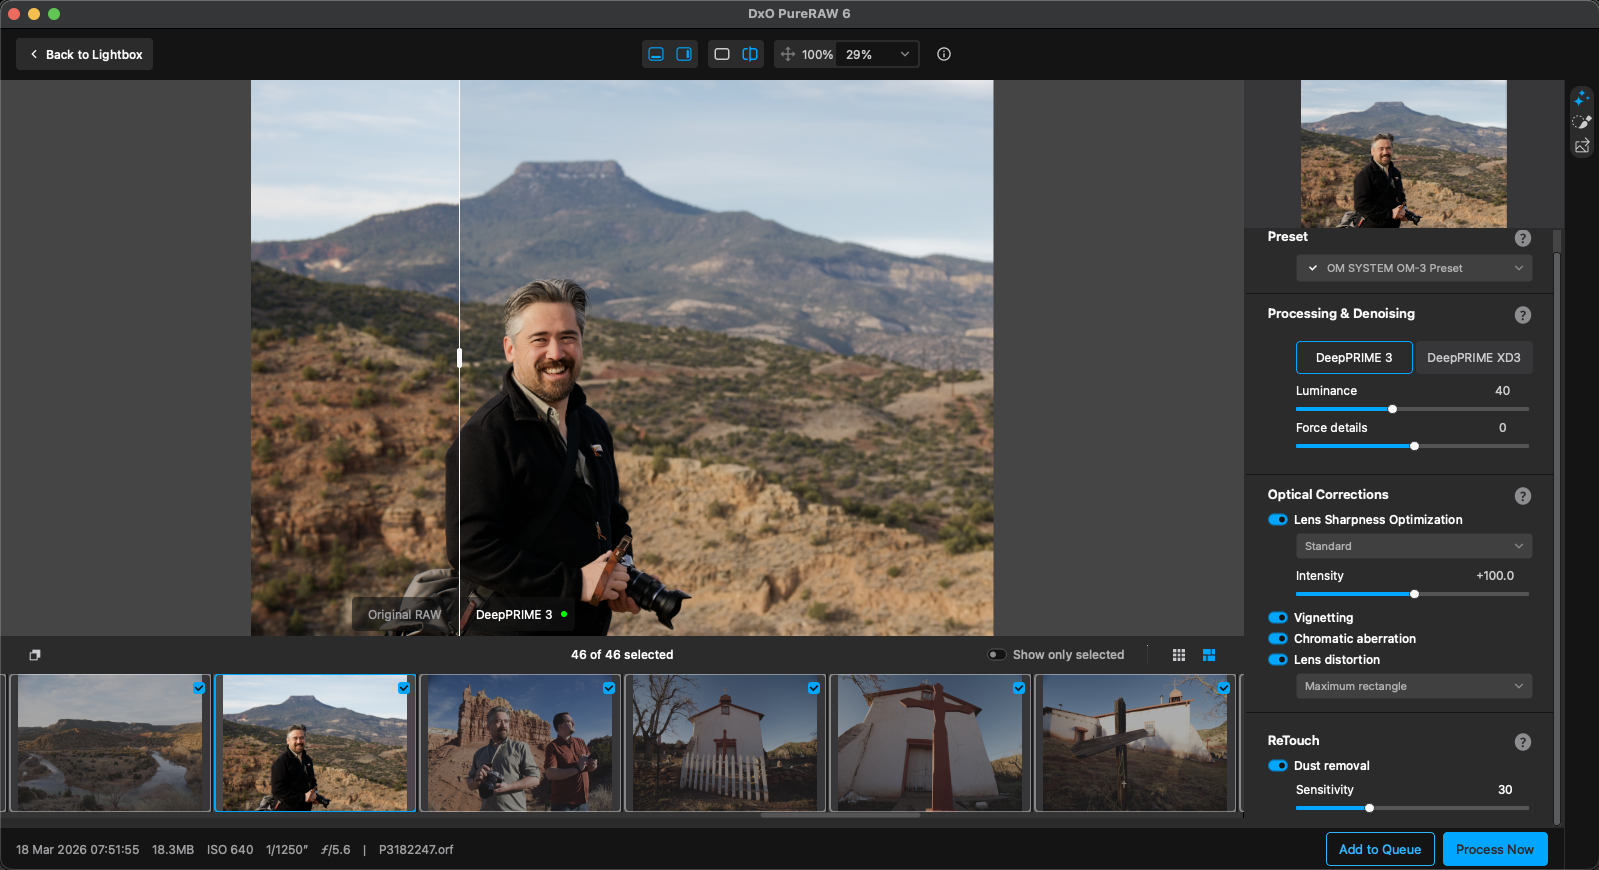 DxO PureRAW 6 preview window showing before-and-after slider comparison
After processing, PureRAW creates a “DxO PureRAW” Collection Set in Lightroom Classic with date-named collections from the time of processing. You can target an existing collection or create a new one in the output settings. All metadata transfers: star ratings, keywords, IPTC fields, GPS coordinates, and copyright info.
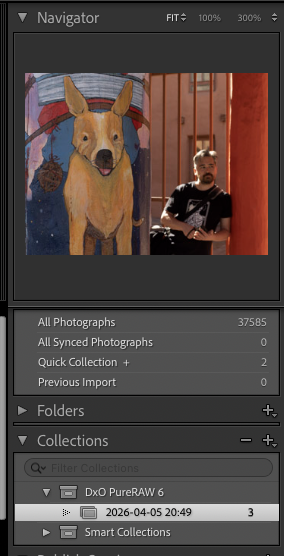 Lightroom Classic Collections panel showing DxO PureRAW Collection Set
If you forget to run your files through PureRAW 6 before applying edits in Lightroom Classic, existing Develop adjustments (exposure, curves, color grading, masks, crop, etc) can carry over to the processed DNG, but only if Lightroom is set to save edits as metadata. Go to Lightroom Classic > Catalog Settings > Metadata and enable ‘Automatically write changes into XMP.’ Without this setting, the processed DNG comes back with all Develop sliders at their defaults and you will need to re-apply your edits.
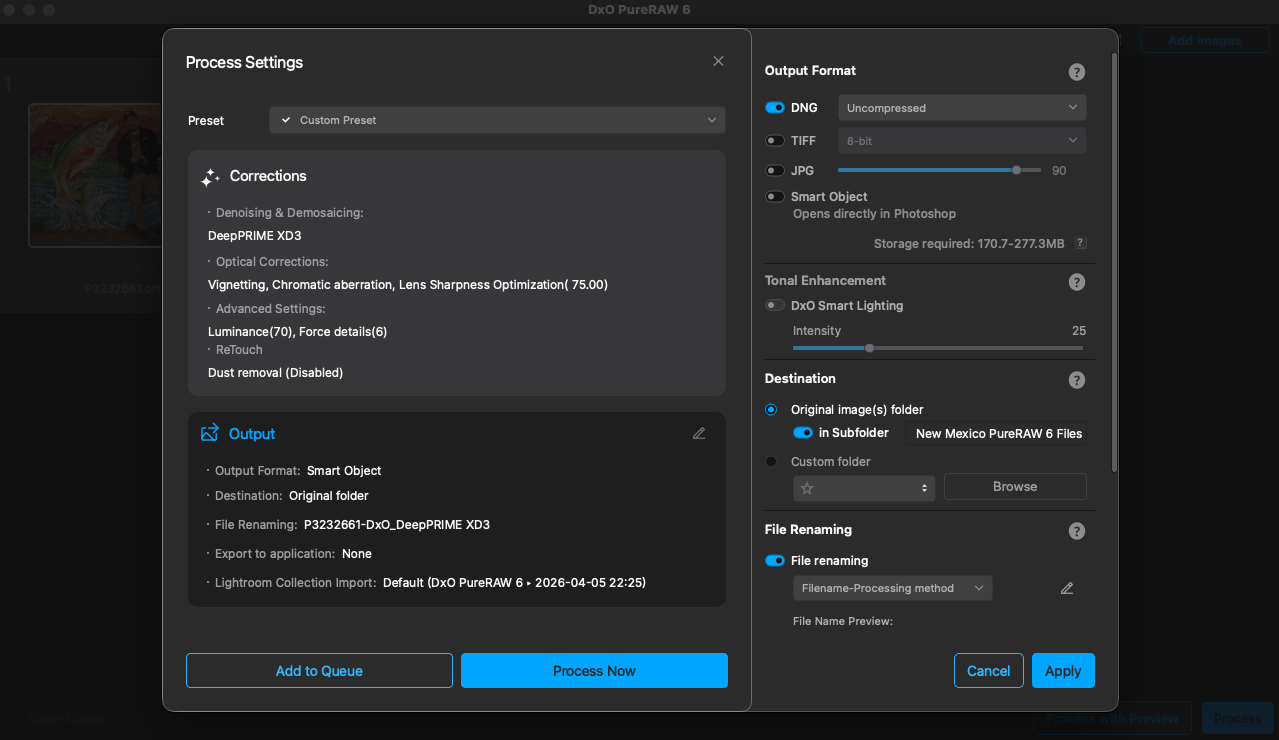
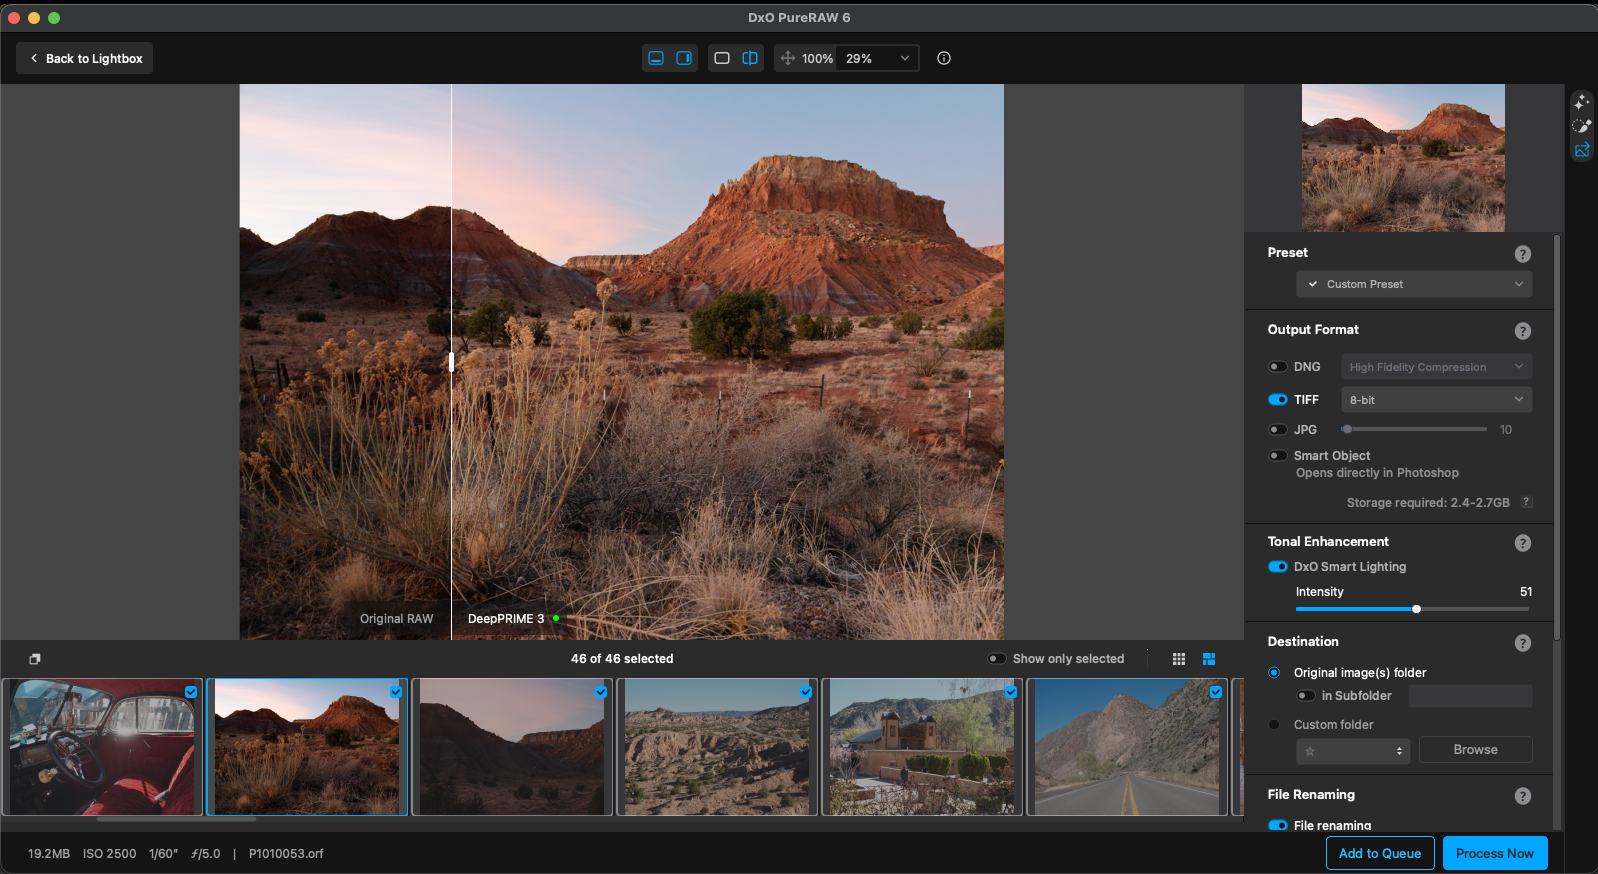 DxO PureRAW 6 Output Settings panel
After processing, disable two Lightroom modules on your processed DNGs. Turn off Lens Corrections and Noise Reduction (including AI Denoise) in the Develop module. PureRAW already applied both using DxO’s lab-measured profiles; running Lightroom’s versions on top doubles the correction and creates artifacts.
Photoshop Integration
PureRAW does not appear in Photoshop’s Filter menu. The connection runs through a Smart Object workflow. A Smart Object is a special Photoshop layer that preserves the original processing inside it. Instead of baking changes permanently into your image, it keeps PureRAW’s work editable: you can double-click the layer to reopen PureRAW and adjust your settings at any time.
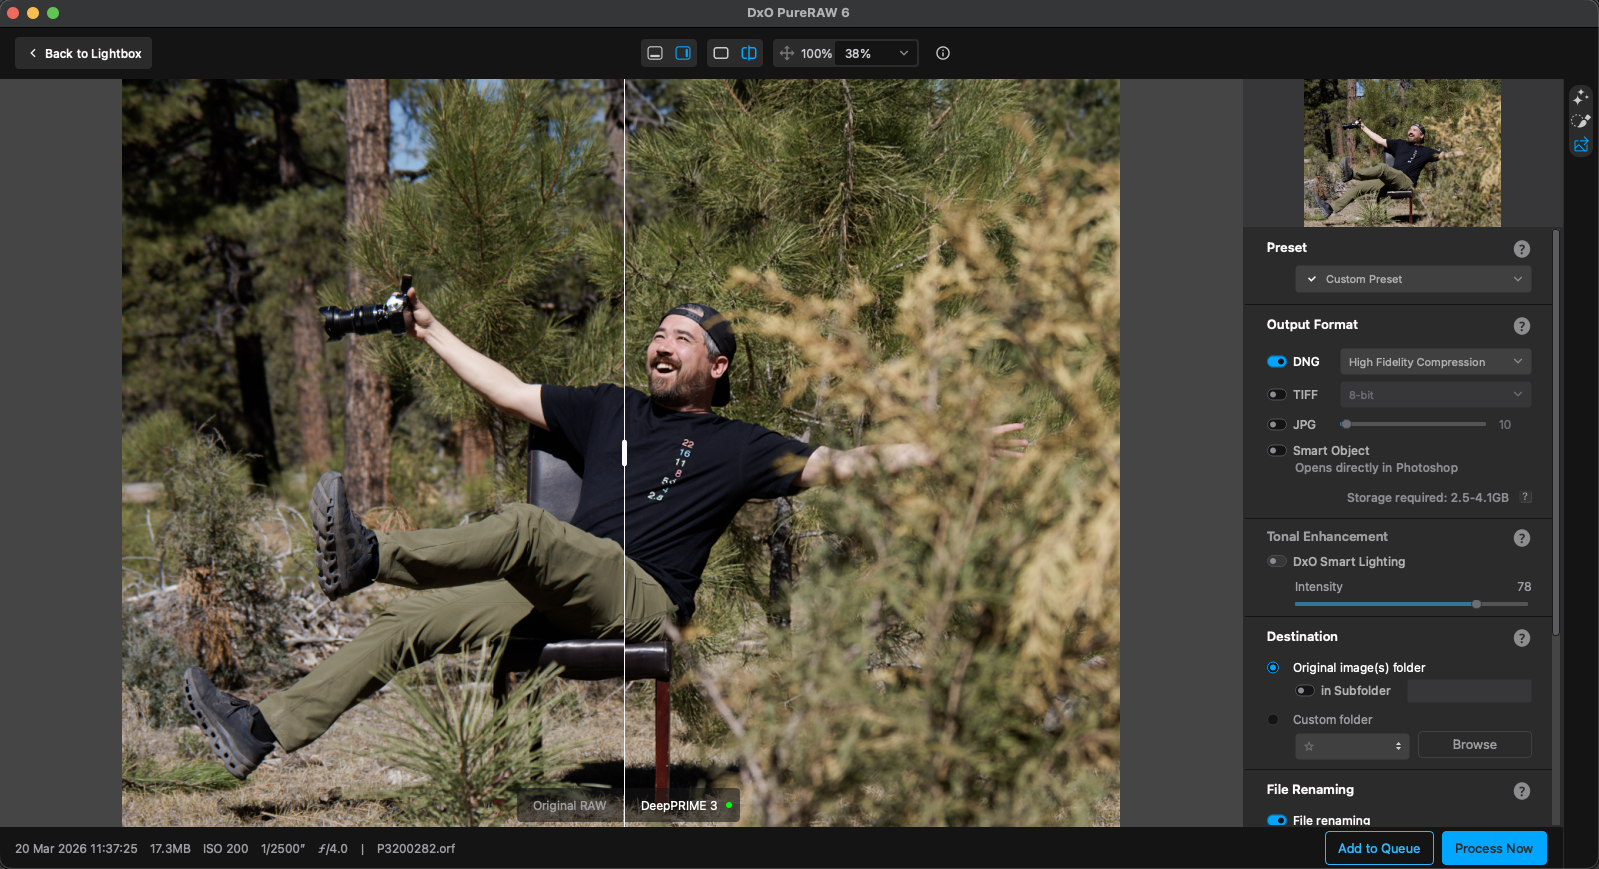
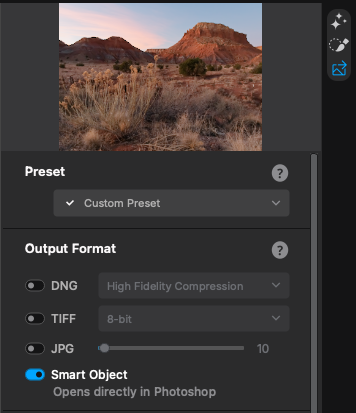 Output Format panel showing DNG and Smart Object toggles
- Open your image in PureRAW (standalone or via Lightroom’s Preview and process).
- In Output Settings, choose “Smart Object for Photoshop.” Make sure the ‘DNG’ toggle is set to Off, otherwise the file will open in Adobe Camera Raw before Photoshop. This may be desired though, if you wish to have Camera Matching Profiles.
- Click Process Now. The result opens in Photoshop automatically as a Smart Object.
- In Photoshop’s Layers panel, a “DxO PureRAW” Smart Filter appears under the layer.
- To re-adjust processing: double-click the “DxO PureRAW” Smart Filter name. PureRAW reopens with your image, and any changes update the Photoshop result after you reprocess.
Smart Object mode handles single images only, not batches. Also, flattening the layer (Layer > Flatten Image) makes the processing permanent.
The Smart Object pipeline uses TIFF internally, so Camera Matching Profiles from Adobe Camera Raw are not available. Only Adobe’s standard profiles appear. If you need full profile access, activate the DNG toggle during step 2; the DNG opens in Camera Raw first.
Standalone Workflow
The standalone app accepts files via drag-and-drop, the “Add RAW images to Lightbox” button, or File > Add all photos from folder. Output goes to the original folder by default, or you can select a custom folder of your choice. Import the resulting DNGs, TIFFs, or JPGs into your editor.
 DxO PureRAW 6 standalone app interface
Loading a very large folder of images at once can cause the app to slow down. If you’re working with hundreds of images, add them in smaller batches.
Interface
PureRAW 6 has three areas.
The Lightbox is your starting screen. Images appear here after you add them using any of the methods above. You can sort by name, date, or ISO, and filter by processing state (Unprocessed, Awaiting processing, Processed), rating, color label, ISO, or f-stop. Each thumbnail carries a status overlay. A clock icon means the image is queued, a progress bar means it is processing, and a white checkmark means it is finished.
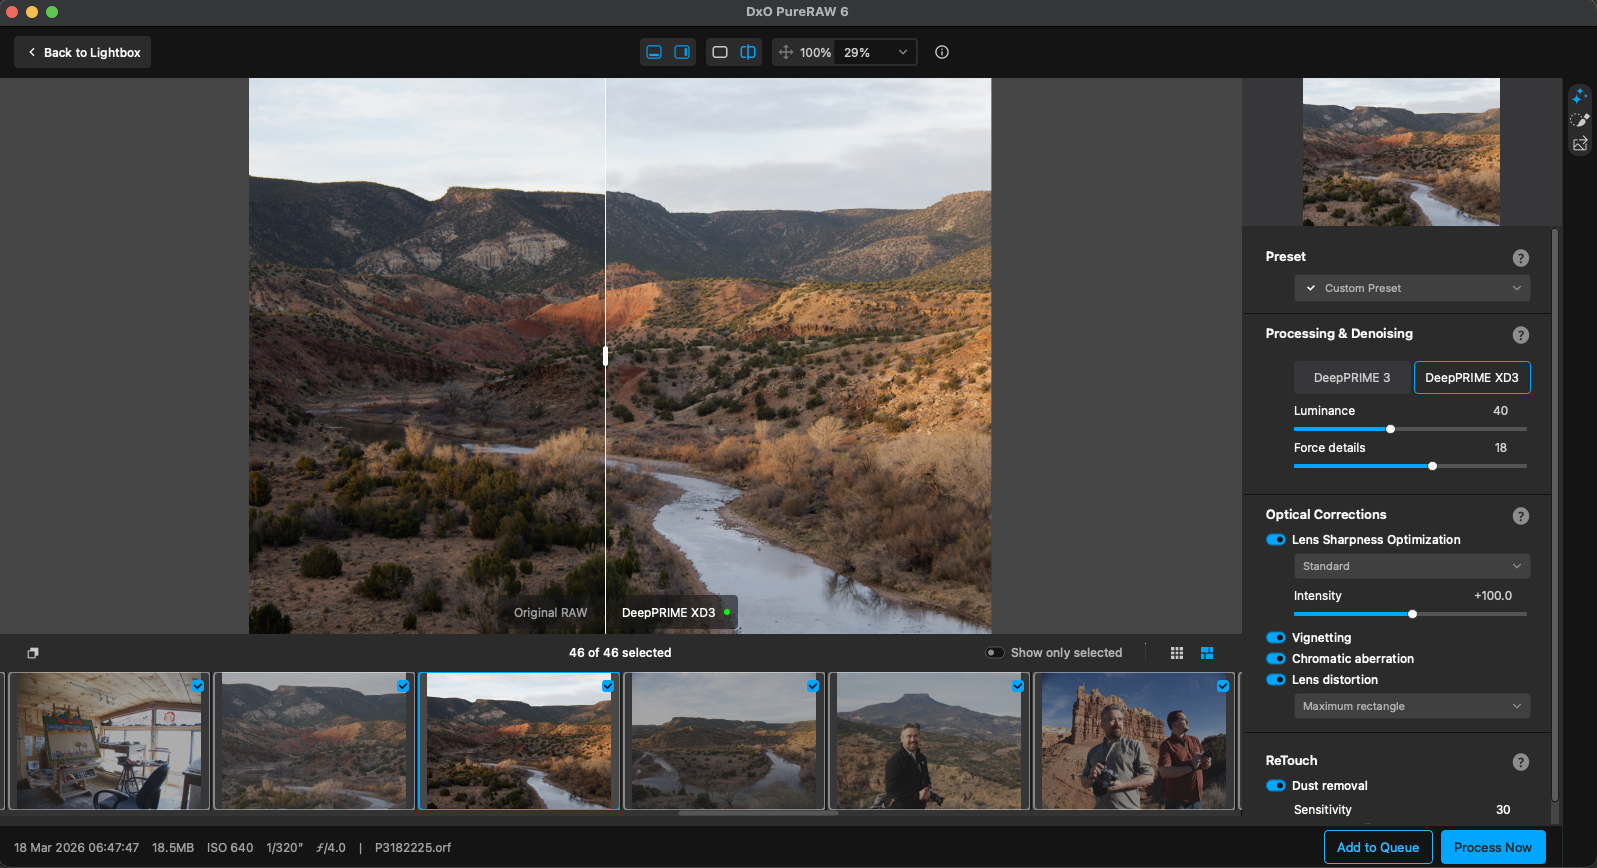
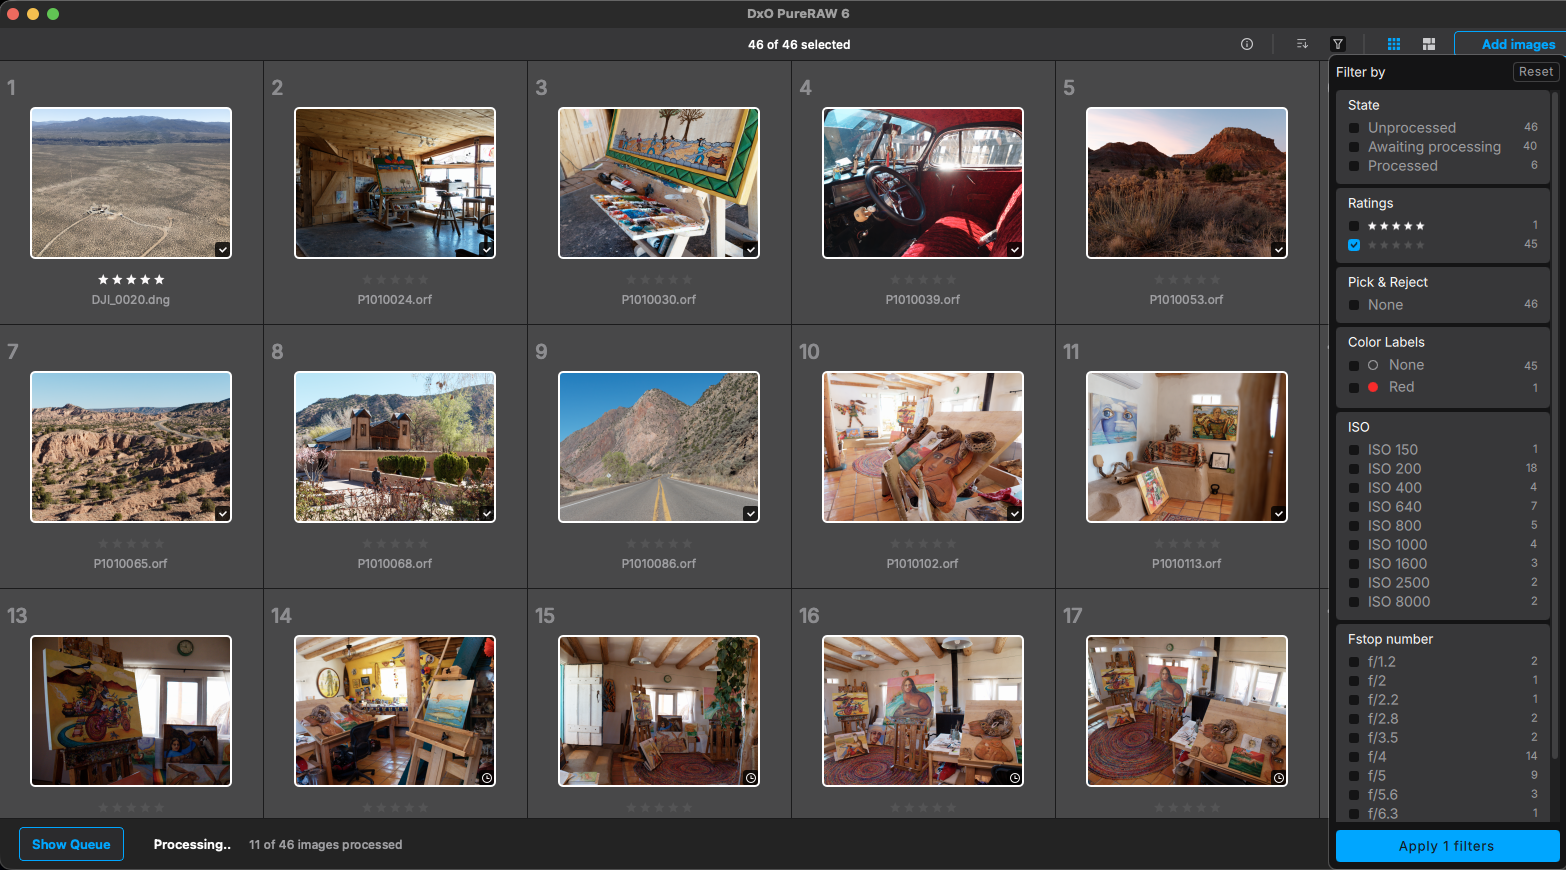 DxO PureRAW 6 Lightbox interface showing 46 images with filter panel
Process with Preview is where you make your corrections. A vertical icon toolbar on the right side opens three tabs: Corrections (global denoising and optical settings), Local Adjustments (brush-based masks), and Output (format, destination, renaming).
Two comparison views let you evaluate your settings. A draggable before-and-after slider divides the before and after side by side; a whole-pane toggle swaps the full view between them.
Preview with slider showing live preview detailWatch for the preview status indicator in this mode. A green dot means the preview reflects your current settings; a red “Update” label means you have changed a setting since the last render. Enabling Instant Preview in Preferences provides real-time updates but requires significant GPU power.
Process Now skips the preview entirely. A compact floating window summarizes your Corrections and Output settings with edit icons to update each one; use this mode when you already know your settings. An “Add to Queue” button lets you stack multiple batches before processing them all at once.
You can save any combination of Corrections and Output settings as a preset. Presets store everything except local adjustments (brush-based masks), so brushed edits must be applied manually each time.
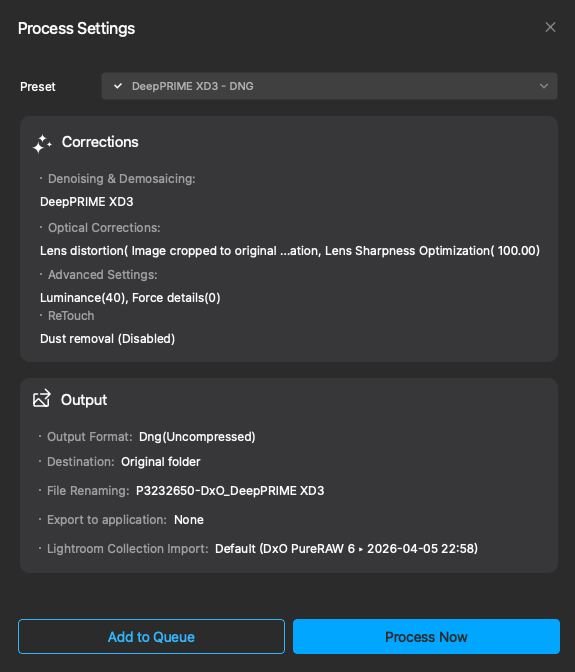 Process Settings compact window showing Corrections and Output summary
Noise Reduction Engines
PureRAW 6 ships with two processing engines: DeepPRIME 3 and DeepPRIME XD3.
DeepPRIME 3 is the general-purpose engine. It handles demosaicing, denoising, and pixel-level chromatic aberration correction in a single pass. On a capable GPU, it processes a 20-megapixel file in roughly 5 seconds. For portraits, architecture, landscapes, and most everyday work, it delivers excellent results.
DeepPRIME XD3 is the maximum-detail engine. It extracts more fine texture and micro-contrast from demanding subjects: feathers, fur, fabric weave, and insects.
In previous versions, XD3 only worked with Fujifilm’s X-Trans sensors. PureRAW 6 brings it to every Bayer-sensor camera, including Canon, Nikon, Sony, OM SYSTEM, and the rest. Processing time runs roughly 2x longer than DeepPRIME 3, though the gap narrows on newer GPUs.
On a landscape at ISO 200, the two engines produce nearly identical results. A cityscape at ISO 400: DeepPRIME 3 does the job. XD3 earns its processing time on challenging images, such as a red-tailed hawk at ISO 6400, cropped to 50% of the frame.
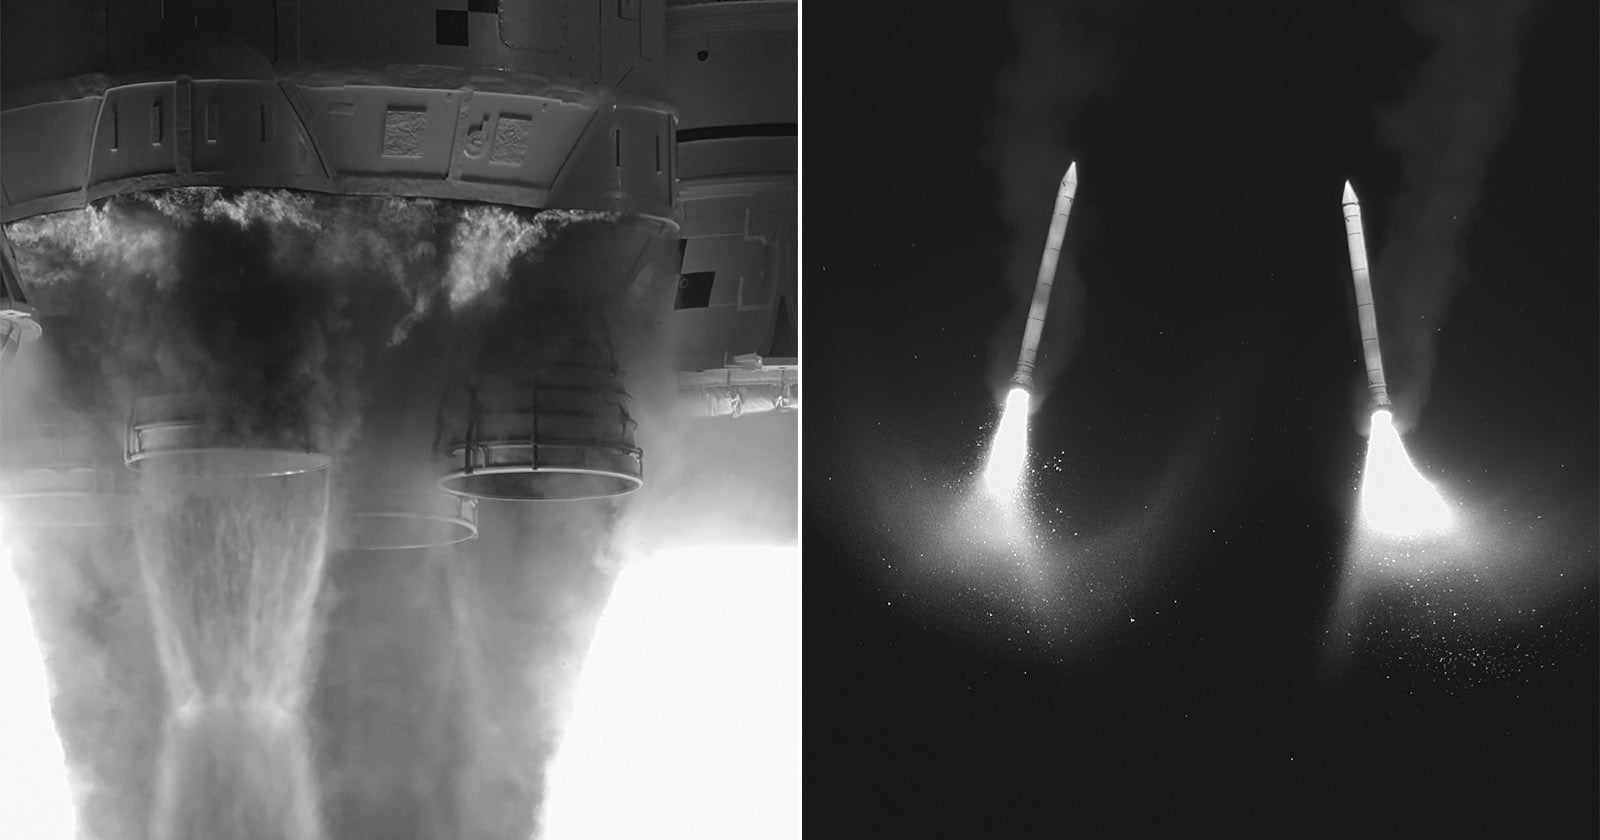
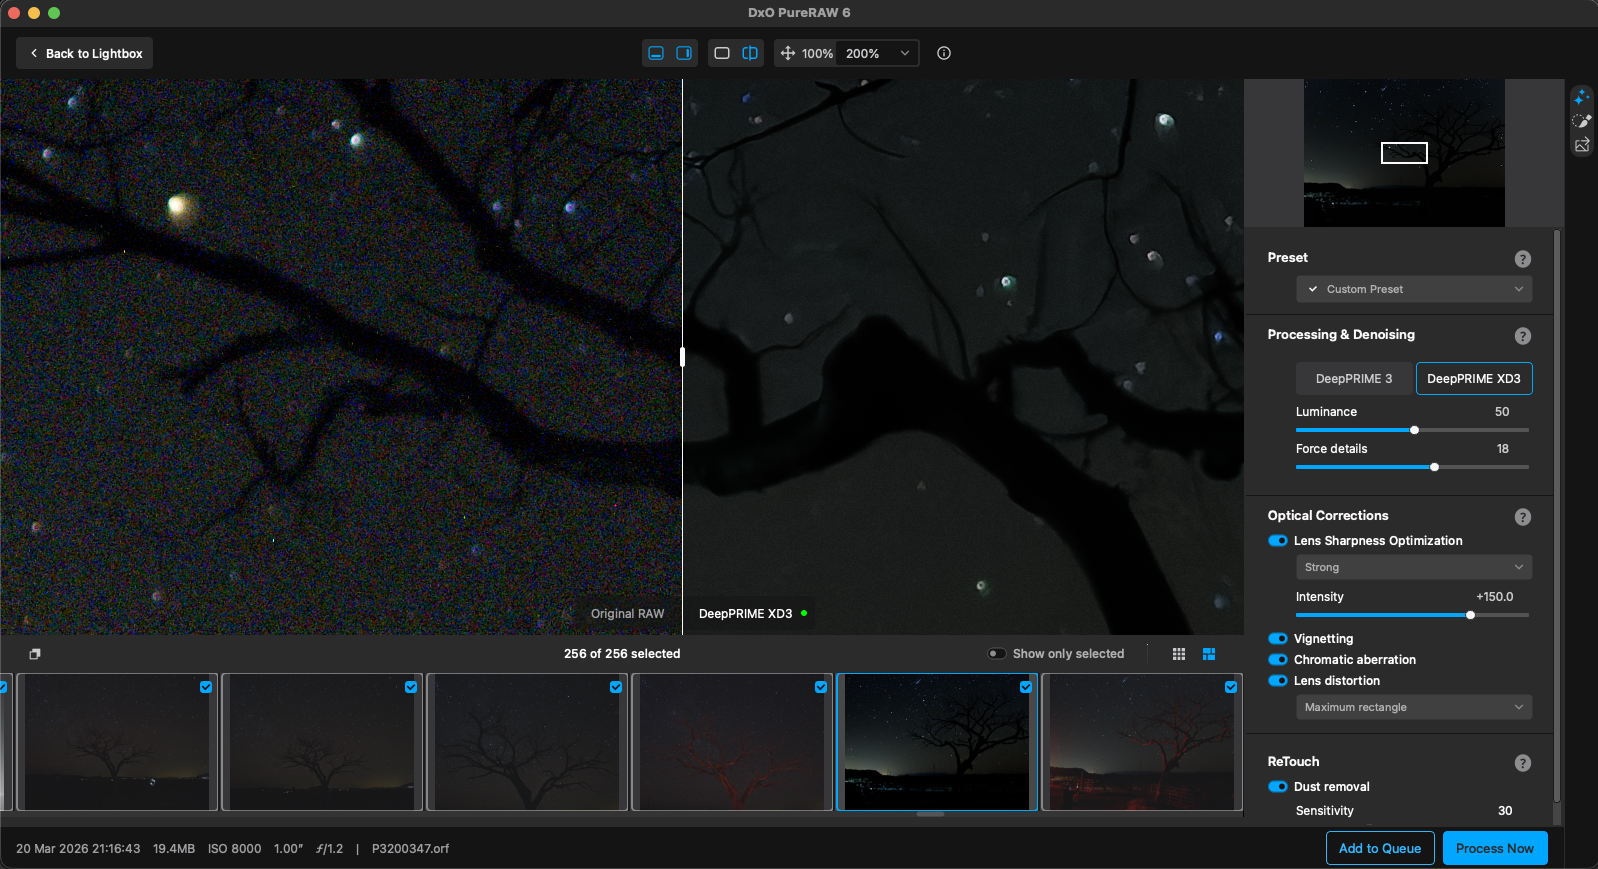 A handheld astro photograph benefits from the more powerful DeepPRIME XD3 Noise Reduction Engine.
Start with DeepPRIME 3 and switch to XD3 for high-ISO images, heavy crops, or subjects with fine detail like feathers and fur. For portraits and architecture, stay with DeepPRIME 3. XD3’s detail extraction can occasionally produce artifacts on smooth surfaces.
Here’s how to dial it in.
Both engines share the same two sliders.
Luminance controls how aggressively the engine smooths noise. Higher values remove more grain. Lower values preserve film-like texture.
Start at 40. For a clean landscape at ISO 200, drop to 20-30. For wildlife at ISO 6400 or events at ISO 12,800, push to 50-60.

Force Details has a range of -50 to +50 and it adjusts how much fine detail the engine recovers. Positive values extract more texture. Negative values soften. Start at 0. For feather detail on a bird portrait, nudge to +10 or +15. For smoother skin in a headshot, try -10 to -20.
Double-click either slider to reset to default.
Pushing Luminance above 70 on low-ISO images creates a waxy, over-smoothed look. Pushing Force Details above +30 can introduce artifacts on smooth surfaces like sky gradients and skin.
If the image looks plasticky, drop Luminance by 10 points and pull Force Details back to 0, then compare against the original using the before-and-after slider.
Once you have settings dialed in on one image, use the paste button in the filmstrip to apply them across all selected photos before processing.
Optical Corrections
Each optical correction option is individually toggleable. You control what gets fixed.
Lens Sharpness uses five presets: Soft (+75), Standard (+100), Strong (+150), Hard (+200), and Custom. If you shoot with your aperture wide open and want sharper corners, move to Strong. For portraits where you don’t want PureRAW adding sharpness to skin texture, drop to Soft. Custom lets you tweak an Intensity slider for granular control.
Vignetting (corner light falloff) correction is on by default. Leave it on for most lenses.
Chromatic Aberration (color fringing, those purple or green edges along high-contrast boundaries) removal: on by default and usually safe to leave on for almost all RAW files.
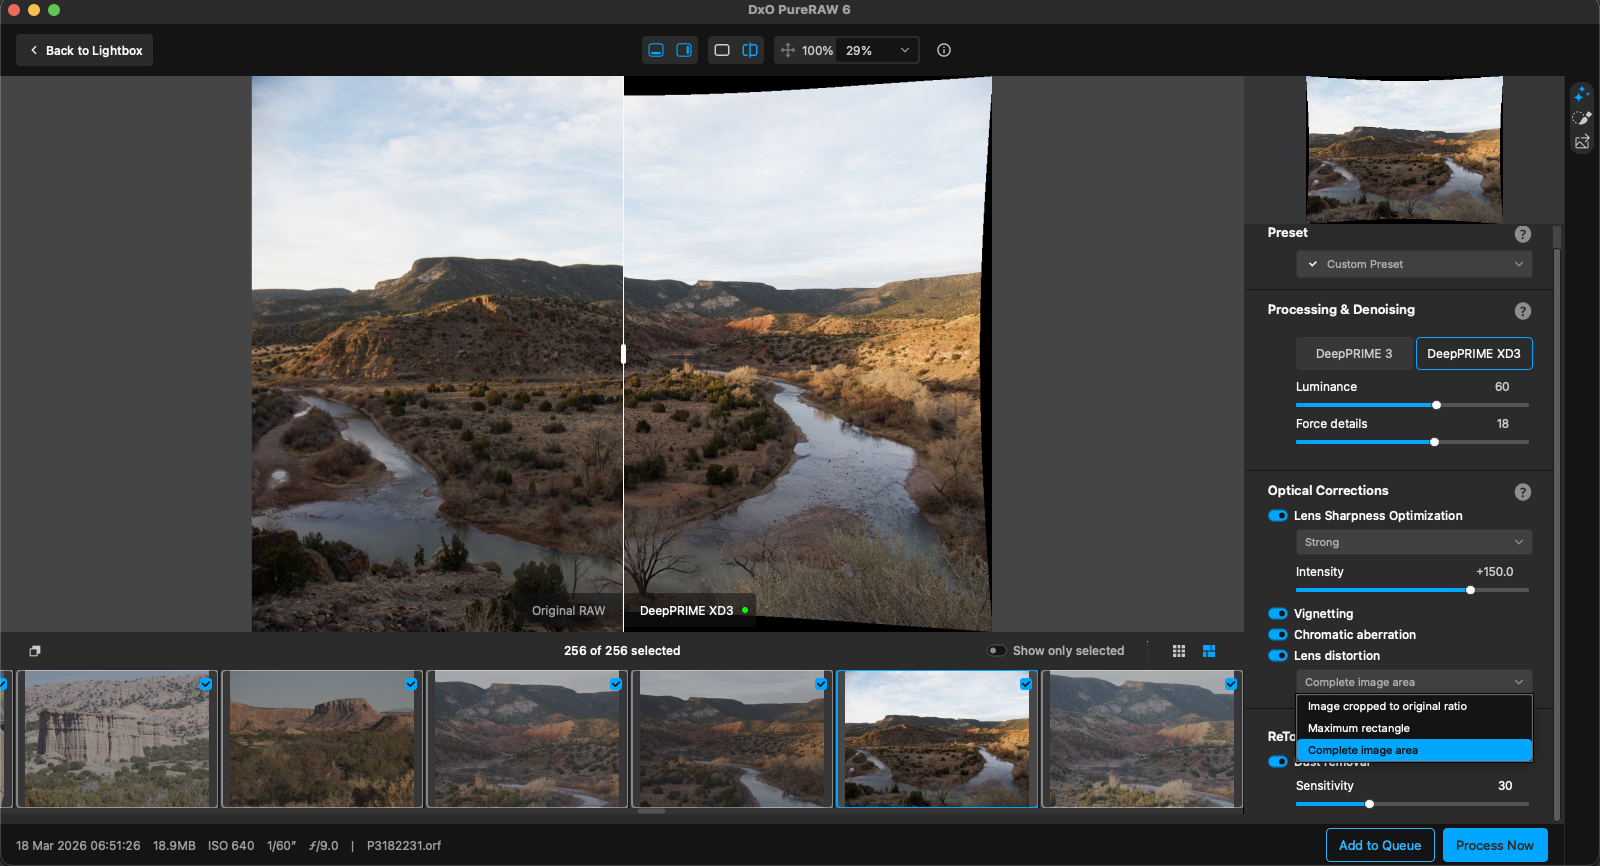 Lens Distortion correction applied to a wide angle photo and set to ‘Complete Image Area’ to show the correction.
Lens Distortion correction: on by default. A crop dropdown offers three options: original ratio (keeps the image at its original aspect ratio after correction), maximum rectangle (crops to the largest clean rectangle with no black edges), or complete image area (shows everything, including any black edges where the correction shifted pixels). Turn it off for fisheye lenses where the distortion is intentional.
These are not generic corrections. DxO physically tests camera and lens combinations in their lab, measuring each pairing’s specific optical flaws. The profiles loaded for a 24-70mm f/2.8 on a Nikon Z8 are different from the profiles loaded for the equivalent lens on a Canon R5.
If your lens is not in DxO’s database, optical corrections will be grayed out. Some third-party lenses (certain Meike, Viltrox, and older Sigma models) lack profiles. Mixing unsupported lenses with supported ones in a single batch can disable optical corrections for the entire batch. Process unsupported-lens images separately.
AI Sensor Dust Removal
Sensor dust spots land in the same position on every frame. Shoot 200 images at f/11 on a dusty sensor and all 200 files carry identical smudges. PureRAW 6 detects and removes them across an entire batch using AI.
The Sensitivity slider has a range of 0-100 and controls how aggressively PureRAW searches for dust spots. Higher values flag more spots but risk false positives on legitimate details. Lower values are more conservative, catching only obvious spots.
Start at 20. Process 5-10 test images and check results at 100% zoom.
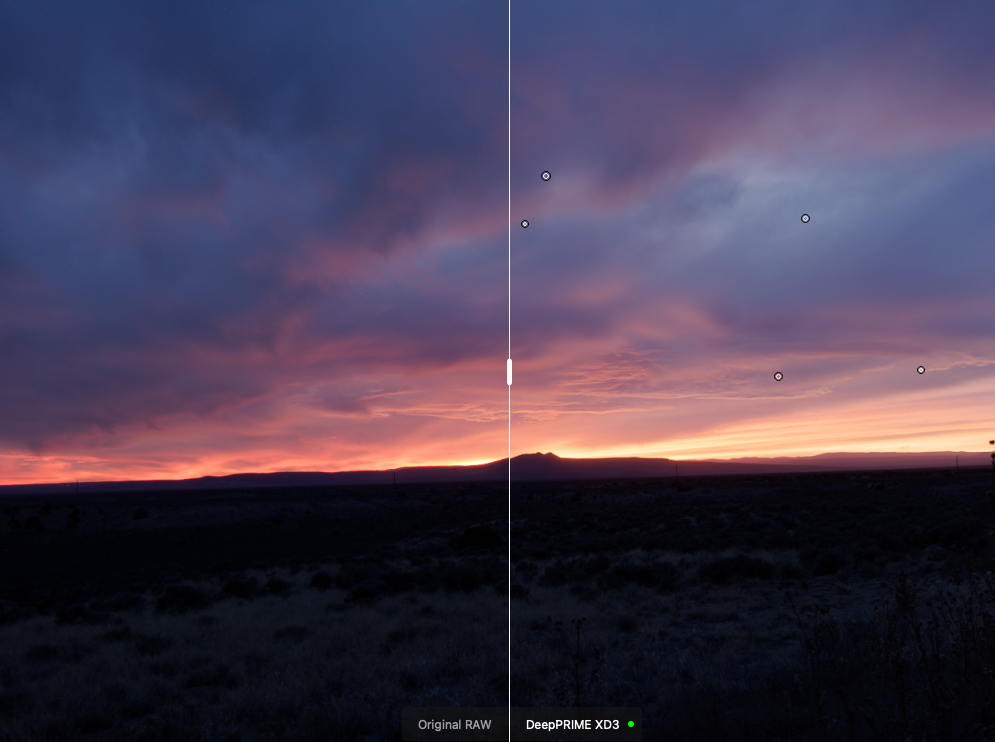 Dust spots that will be fixed during processing are shown in the Instant Preview.
If spots remain, raise to 50 or 60. If the AI flags birds, stars, or small foreground details as dust, lower to 30 or 40.
PureRAW displays each flagged location visually, allowing you to deselect false positives simply by clicking on the circle before processing. Leave dust removal on for every batch. It runs during the same processing pass as noise reduction and optical corrections, so it adds no extra processing time. If you know you shot at narrow apertures with a dusty sensor, raise the Sensitivity value and review the flagged spots carefully. Spot-check at 100% zoom on images with small subjects against clean backgrounds, like birds in sky, aircraft, or stars.
At high Sensitivity values, the AI can erase legitimate details that resemble dust. Astrophotography and distant wildlife carry the highest risk. Always review the detection overlay before committing.
Output Formats and Compression
For most Lightroom and Capture One users, the right choice is DNG with High-Fidelity Compression enabled. Start there.
PureRAW can output multiple formats from a single processing pass. DNG preserves full editing flexibility. TIFF gives you 8-bit, 8-bit compressed, or 16-bit output. JPEG provides a quality slider (range 10-100). Smart Object for Photoshop (single-image only) opens with a re-editable DxO PureRAW Smart Filter.
 DxO PureRAW 6’s Export settings with High-Fidelity Compression applied to the DNG selection.
DNG has a sub-option dropdown: “No compression” or “High-Fidelity Compression.” Without compression, processed files balloon well beyond your original RAW size. A 57.8MB RAW becomes a 136MB uncompressed DNG. High-Fidelity Compression reverses that, dropping it to 17.2MB. Luminar Neo and Darktable cannot open High-Fidelity Compressed DNGs. Lightroom Classic and Capture One have no issues.
TIFF and JPEG outputs offer two additional controls. An “Apply ICC Profile” dropdown sets the color space: As Shot, sRGB, Display P3, Adobe RGB (1998), Rec.2020, DxO Wide Gamut, or ProPhoto RGB. A Smart Lighting slider (range up to 75) applies balanced exposure correction.
Local Adjustments
In most photo editing apps, local adjustments control exposure, color, or sharpening for a selected region. PureRAW works differently. Here, local adjustments control which processing engine and which noise reduction settings apply to each part of the image.
Unlike dodging and burning, you are telling PureRAW to process one area with DeepPRIME 3 and another with XD3, each with independent slider values.
Local adjustments require using the Process with Preview mode.
All brushing is manual. You paint the mask yourself using PureRAW’s brush tools rather than automated selections.
The brush has multiple controls. Size sets the diameter. Feather (0-100%) controls edge hardness: 0% for a sharp boundary, 100% for a soft gradient.
Flow (0-100%) sets correction strength per stroke. Opacity (10-100%) controls transparency of the effect. A color picker changes the mask overlay from its default red, and Show Mask toggles the overlay on or off.

Hold Option on Mac or Alt on PC to switch from brush to eraser, or select the Eraser brush icon above the Layers list.
Each mask gets its own correction sliders: Luminance, Force Details, and Lens Sharpness Optimization Intensity. These are the same noise reduction and sharpness controls covered earlier, applied only within the brushed region.
You can create multiple masks per image. The toolbar provides Add, Duplicate, Invert, Reset, and Trash icons. Rename any mask by double-clicking its label; toggle visibility with the eye icon.
Local Blend is the new local adjustment feature in version 6. It lets you assign different processing engines to different masks within the same image. Paint XD3 over a bird’s plumage for maximum feather texture; then paint DeepPRIME 3 over the smooth, blurred background where extra processing time adds no visible benefit.
Presets cannot store local adjustments. If you build a complex multi-mask setup, you will need to recreate it manually on each image.
Beginner Workflow
These eight steps take you from RAW files to processed results. Each setting uses the recommended starting values from Sections 5 through 8. Adjust from there once you see how the defaults handle your images.
- Select your RAW files. Follow the launch steps for your workflow in Section 3 (Lightroom Classic, Photoshop, or standalone).
- Choose DeepPRIME 3 as your processing engine. It handles demosaicing, denoising, and chromatic aberration correction in a single pass. Switch to XD3 only for high-ISO images, heavy crops, or subjects with fine detail like feathers and fur.
- Set Luminance at 40 and Force Details at 0. These defaults work well across most subjects and ISO ranges. Adjust only after analyzing using the before-and-after slider.
- Enable all four optical corrections. Set Lens Sharpness to Standard. Turn on Vignetting correction, Chromatic Aberration removal, and Distortion correction.
- Enable AI Dust Removal. Leave Sensitivity at 20.
- Choose your output format. Lightroom and Capture One users: DNG with High-Fidelity Compression. Photoshop users: Smart Object.
- Click Process. When processing finishes, review the results at 100% zoom. Compare against the original to check noise reduction and fine detail. If the results need adjustment, reprocess with different settings.
- In Lightroom, disable Lens Corrections and Noise Reduction on the processed DNG. PureRAW already applied both corrections. Leaving them on doubles the processing and introduces visible artifacts: softened detail, color shifts, or over-corrected geometry.
Tips
- Process before you edit, not after. PureRAW works on original RAW data; running it on an already-edited file defeats the purpose.
- Start with DeepPRIME 3 for most work. Switch to XD3 for wildlife, macro, heavy crops, or anything above ISO 6400.
- Enable High-Fidelity Compression for DNG output. Without it, a 57.8MB RAW becomes a 136MB DNG.
- Process a test batch of 5-10 images before committing to a full shoot’s worth.
- Check dust removal results at 100% zoom before using it across an entire batch.
- Your original RAW files are never modified. PureRAW always creates new output files.
PureRAW handles the technical foundation: noise, corrections, and dust removal. For creative color grading after that clean starting point, DxO’s Nik Collection picks up where PureRAW leaves off. If you want DxO’s processing plus a full editing suite with AI auto-masking, PhotoLab is the all-in-one alternative.
Strong edits start with strong RAW files. Every correction you make in Lightroom or Photoshop builds on whatever the RAW file gives you. If that file carries noise, lens distortion, and dust spots into your editing workflow, you’re spending time fixing problems instead of making creative decisions. PureRAW 6 builds that foundation before you ever open your photo editor. Clean the RAW file first, then edit with confidence.
Full disclosure: This article was brought to you by DxO. Use the code PetaPixel at check out to get 15% off of any DxO product, including Nik Collection 8 and PureRAW 6
All photos taken in New Mexico by Chris Niccolls and Michael Bonocore for an upcoming issue of the PetaPixel travel show, ‘Trail Camera’.


 English (US) ·