
 5 hours ago
5
5 hours ago
5
Find the best charms in Beast of Reincarnation, and Koo will truly become your dream sidekick. Whereas Emma wields a blade and wears armor, Koo's main equipment piece is a charm: A magical necklace that can offer more attack power, better health, extra critical rate, and more.
Here's how charms work along with an overview of all charm types and effects in Beast of Reincarnation.
Where to find charms in Beast of Reincarnation
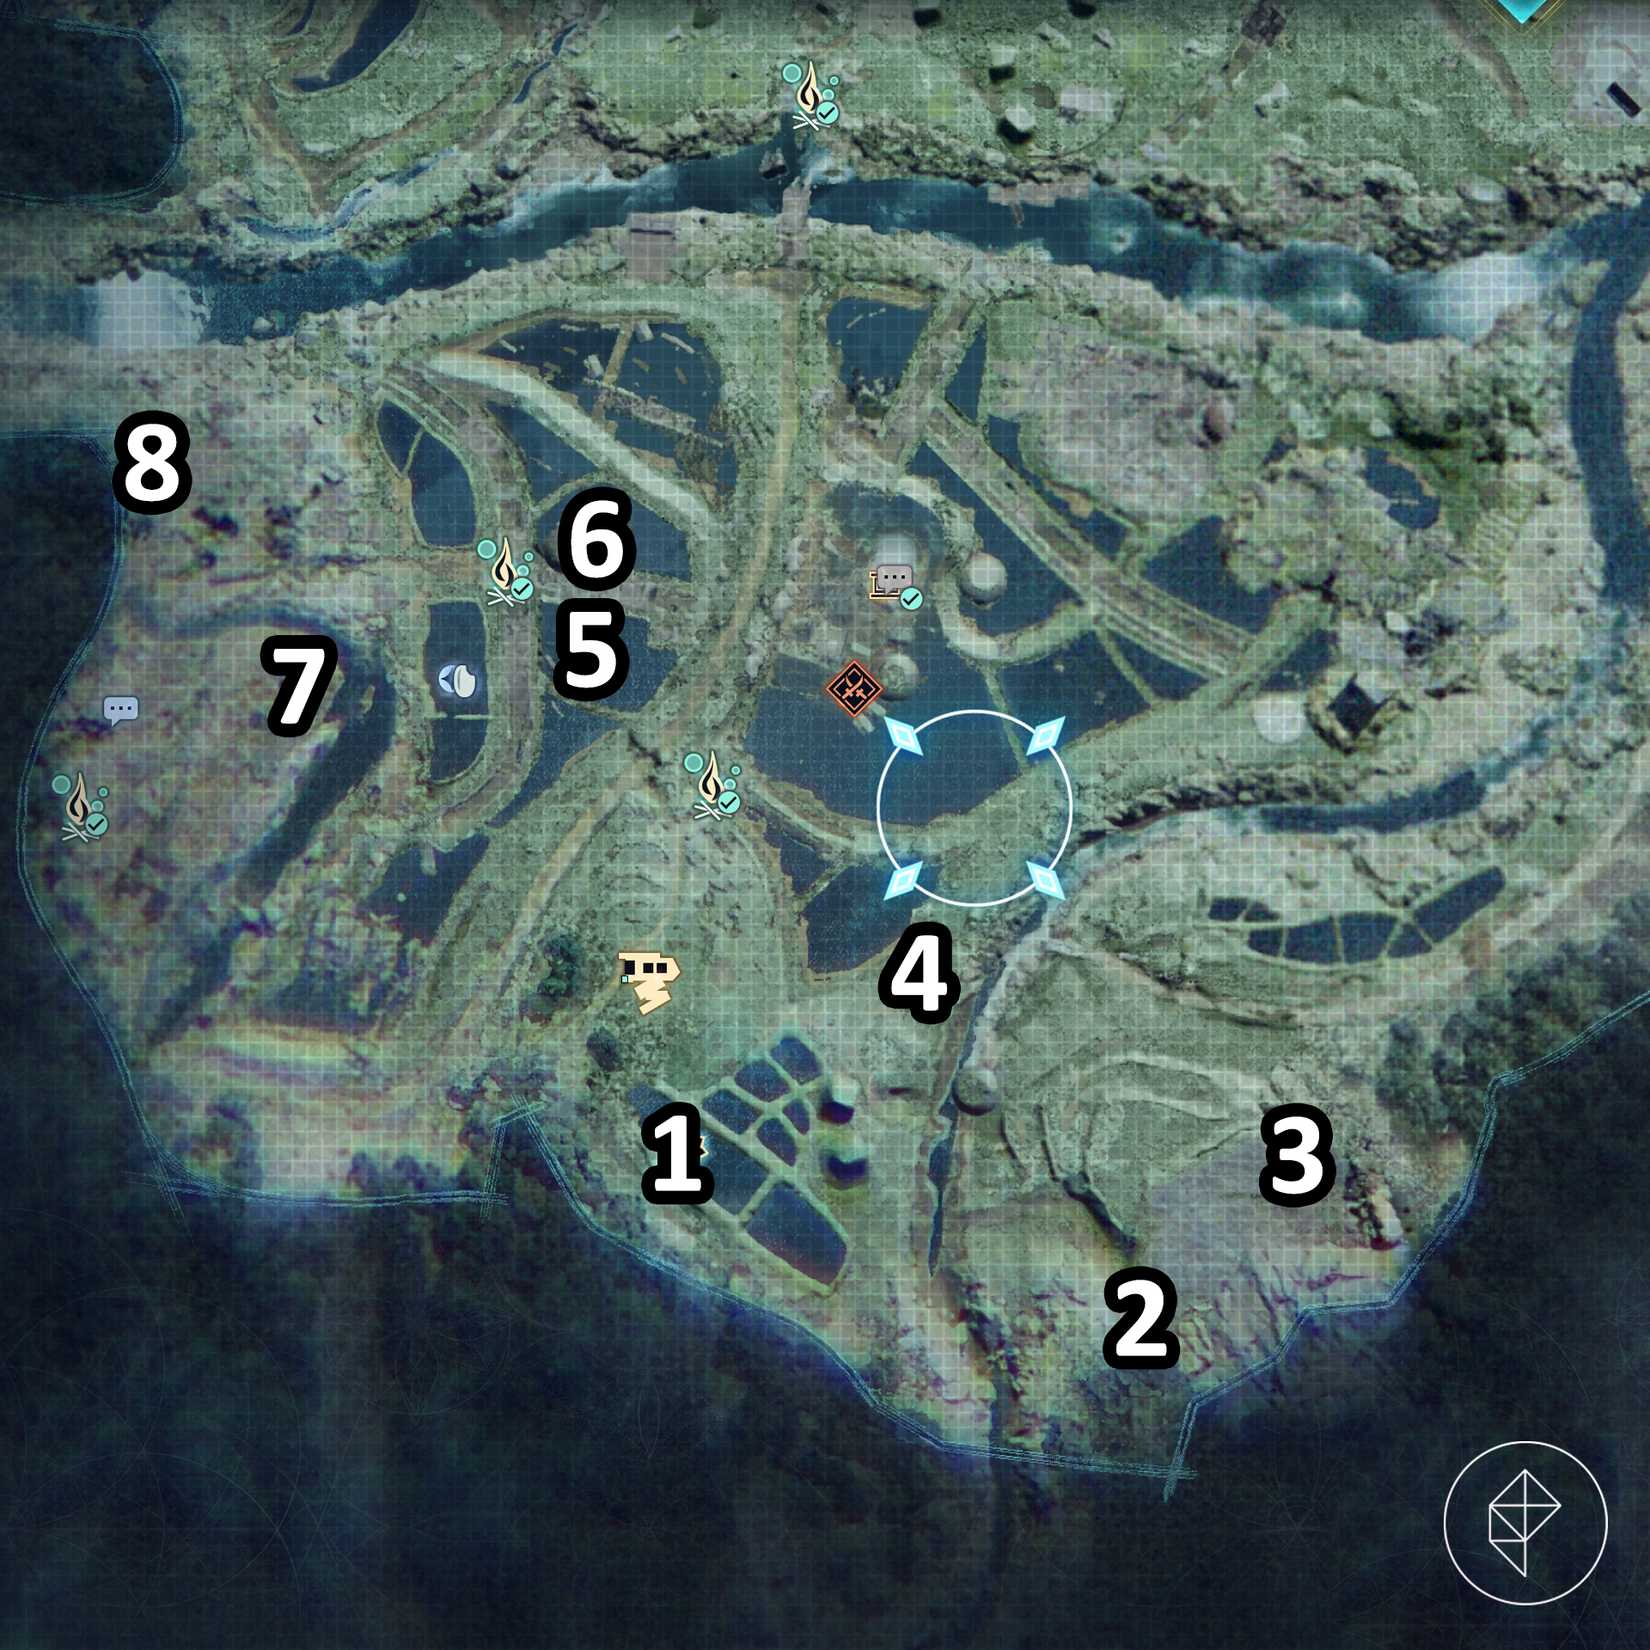
If you open Koo's equipment menu, you'll find that the upper slot is reserved for a charm. This may be confusing to new players, as the only charms available on the first map are hidden in optional areas, so they're easy to miss. While charms will eventually become a common enemy drop, here are a few early-game charm locations in the Ogouchi Buffer Zone.
 Graphic: Marloes Valentina Stella/Polygon | Source images: Game Freak/Fictions via Polygon
- On a rusted golem in a rice field.
- On a rusted golem near the large roots.
- On the rusted golem sat before the small tree with the pink blossoms. Beware that you'll be attacked when you grab it.
- Inside the rusted container, just north of the Upstream campsite.
- Drop down into the sewers. Starting from the Cliffside Village: Outskirts campsite, walk east across the rubble, then go right at the first opportunity to find a charm behind some crates.
- It's on the higher ledge opposite the previous charm location.
- In a wooden crate, inside a large tent on the cliff's edge.
- West of the Cliffside Village: Outskirts campsite, defeat the elite golem to obtain a code: 08110. Use this code on the strongbox in the tent behind the elite golem, and you'll receive a charm.
These eight charms should make a nice starter set. Before you collect them all, consider making a save file to reroll the charms' stats (more on that below). The fourth charm location on this map is especially well-suited for rerolls, since it's next to a campsite.
From the Great Wall Terraces region (the third map) onward, enemies have a chance to drop charms upon defeat. Since the world is littered with the stuff, and you can only equip one at a time anyway, there's no need to find every charm location in the game. Generally speaking, here's where to look for charms in Beast of Reincarnation:
- Strongboxes
- Toolboxes
- Wooden crates
- Rusted golems (golem remains)
- Dropped by enemies, especially golems
How to use charms in Beast of Reincarnation
Every charm you find in Beast of Reincarnation is a "decayed charm," meaning it's unidentified. To remove this "decayed" status and turn the charm into an equippable item with randomized stats, visit a campsite — just interact with the campfire; there's no need to rest. Upon identification, the charm receives one primary stat and one secondary stat, and each stat boost comes with a random rarity level ranging from level 1 to level 3. Since the rarity levels aren't linked, it's possible to receive a level 1 attack charm with a level 3 secondary stat, and vice versa.
If you'd like to boost your chances of receiving good stats, you can save the game before collecting and identifying a charm. Beware that this isn't always possible since you need to rest at a campsite to save your game manually, but if you find a charm in a box near a campsite, you can close the box without collecting the charm, save the game, then return to collect and identify the charm as many times as you like. Don't try to reroll charms dropped by enemies, though, as enemy drops will disappear if you log out before collecting them.
All charm stats in Beast of Reincarnation
Remember that charms are Koo's primary equipment, so it's Koo who'll receive the stat boost, not Emma. According to their rarity level, charms can receive the following primary stats:
- Attack: Boosts attack power by 3/5/7%.
- Critical: Boosts critical rate by 3/5/8%.
- Defense: Boosts defense by 20/40/70%.
- HP: Boosts max HP by 20/40/70%.
- Skill: Boosts skill power by 10/15/20%.
Each primary stat is accompanied by one of the following secondary effects. Again, the strength of the effect is determined by the stat level, which ranges from level 1 to level 3.
- Burn: Normal attacks inflict +5/10/15 burn.
- Corrode: Normal attacks inflict +5/10/15 corrosion.
- Critical: Boosts critical rate by 15/20/25%.
- Critical blast: When Koo defeats an enemy with a critical hit, the enemy explodes in a 2/3/5-meter radius.
- Critical boost: When Emma and Koo land a critical hit, Koo's damage increases by 2%. Max bonus of 50/60/70%. Lasts 10 seconds.
- Critical regeneration: When Emma and Koo land a critical hit, Koo recovers 5/8/12% HP.
- Drain: Koo recovers HP equal to 30/40/50% of his damage dealt.
- Drench: Normal attacks inflict +5/10/15 drench.
- Entangle: Normal attacks have a 5/10/15% chance to recover 1 FP.
- Experience: Boosts experience points gained by 5/7/10%.
- Extra hit: All attacks on enemies with a status effect receive a 1.05x/1.07x/1.1x bonus.
- Follow-up: When Koo launches a follow-up attack, his damage increases by 1.1/1.2/1.3 for 10 seconds.
- Lightning: Calls down a lightning strike instead of a normal attack. Strikes 1/2/3 times.
- Lucky: Boosts amber gained by 10/20/30%.
- Oil: Normal attacks inflict +5/10/15 oily buildup.
- Perfect dodge: Boosts dodge rate by 30/40/50%.
- Poison: Normal attacks inflict +5/10/15 poison.
- Puppet: Normal attacks have a 30/40/50% chance to make an enemy a puppet.
- Shock: Normal attacks inflict +5/10/15 shock.
- Storm: Replaces your normal attack with a slicing blast. Blast damage is equal to 50/70/100% of a normal attack.







 English (US) ·