
 3 weeks ago
45
3 weeks ago
45
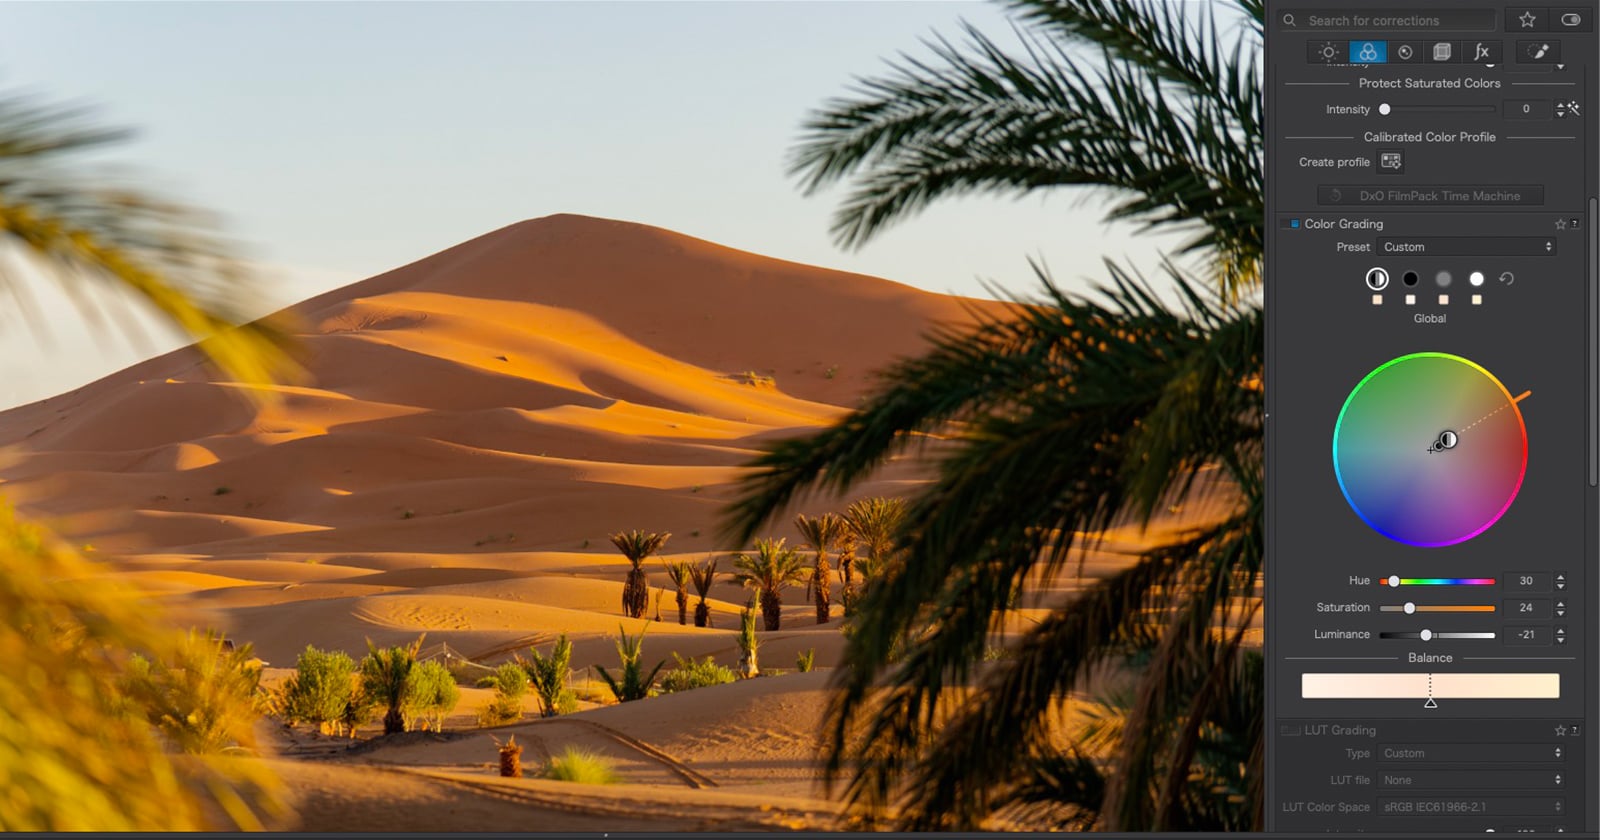
Photographers often know how they want an image to look before they begin editing, but reaching that result can require both changes across the entire scene and adjustments limited to specific areas. Selecting one person in a group, isolating the midground without affecting the foreground or background, or removing dozens of dust spots can take longer than the exposure or color adjustment that follows. DxO PhotoLab 10 introduces new tools that make this process faster while giving photographers control over the final result.
Full disclosureThis article was brought to you by DxO. Use the code PetaPixelLD2026 at checkout to get 20% off any DxO software, including PhotoLab 10, Nik Collection 9, and PureRAW 6, through September 7, 2026 (valid for new customers only).
All photos taken in 2018 in Morocco by Michael Bonocore while working with Open Doors Morocco.
At a Glance
Several of DxO PhotoLab 10’s new tools reduce the repetitive setup that often takes time away from the creative decisions in an edit. Automatic dust removal handles repeatable cleanup, AI Masks can quickly identify individual people and facial features, and Depth Masks select areas according to their distance from the camera.
U Point refinement and the Control Brush can correct an imperfect mask, while Color Grading brings shadow, midtone, highlight, and overall color controls into one view. Together, these tools reduce repetitive setup while letting the photographer focus their energy on the creative decisions.
Select the People Who Need the Adjustment
A group portrait can require several local adjustments even when everyone was photographed under the same light. One face may need to be brighter, another may have a color cast, and the rest may already look right. The adjustment itself might be simple once the correct person is selected, but drawing a clean mask around that person can take much longer, especially where people overlap one another or objects behind them.
A mask defines which part of the photograph a local adjustment affects. PhotoLab 10 expands AI Masks so the software can recognize the individual people in a photograph instead of treating the group as a single subject. You can select everyone, combine only the people who need the same adjustment in one mask, or create a separate mask for each person who needs different treatment.
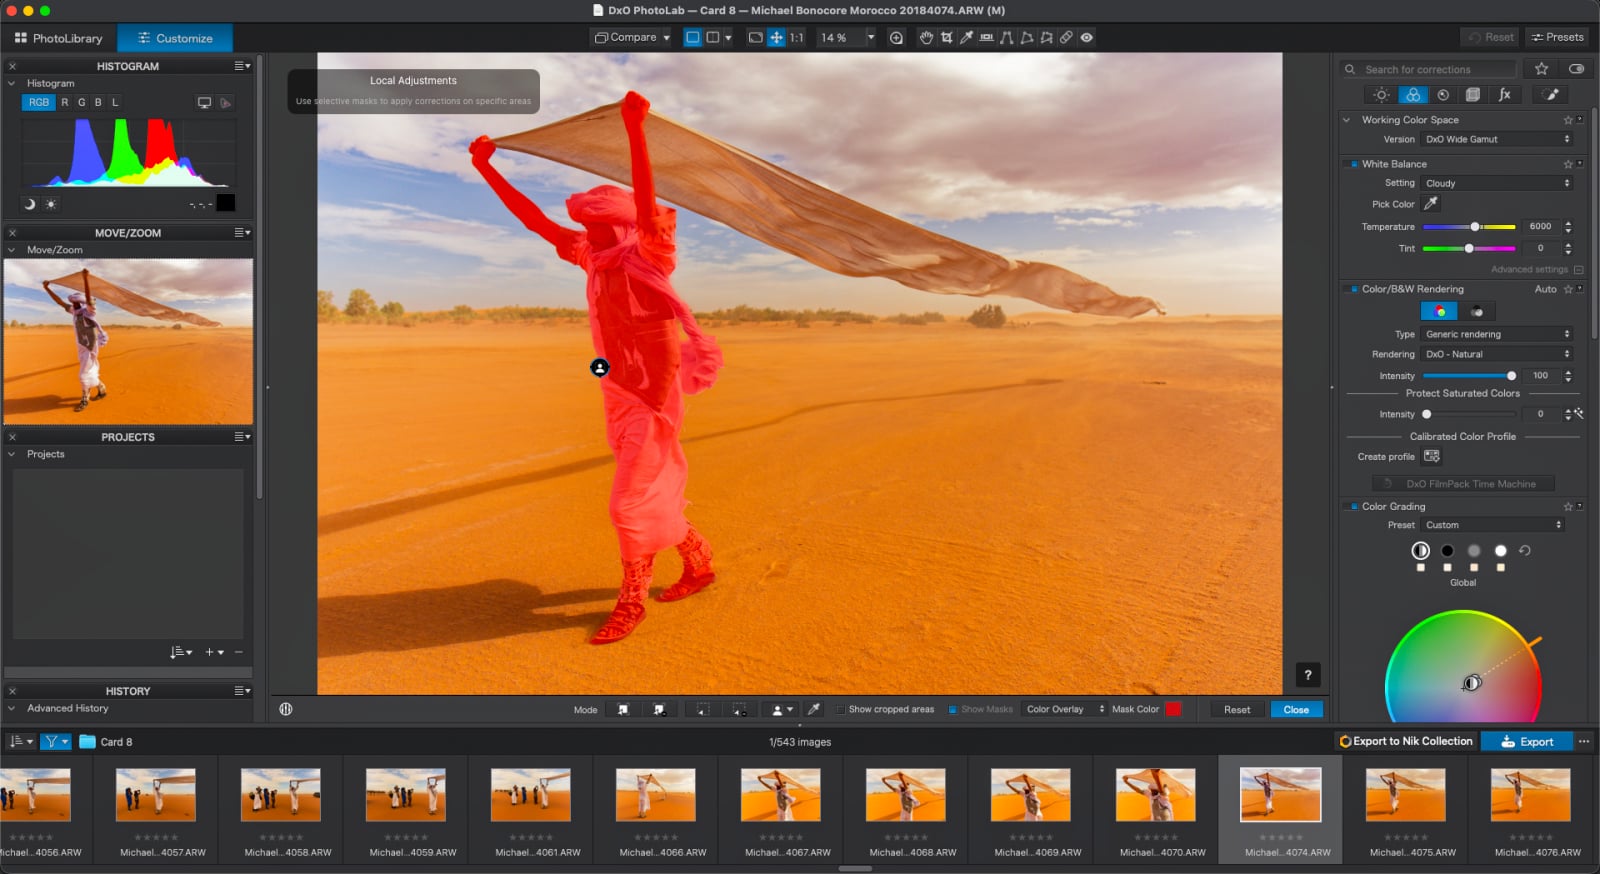 An AI mask selection over the entire person
Open the photograph in Customize and choose AI Mask under Local Adjustments. Below the photograph in the main window, click the person-shaped icon. After PhotoLab analyzes the image, the Custom Mask Creation window shows the people it detected.
Select All when the same correction should reach the whole group. To target only certain people, click their numbered portraits in the same Custom Mask Creation window.
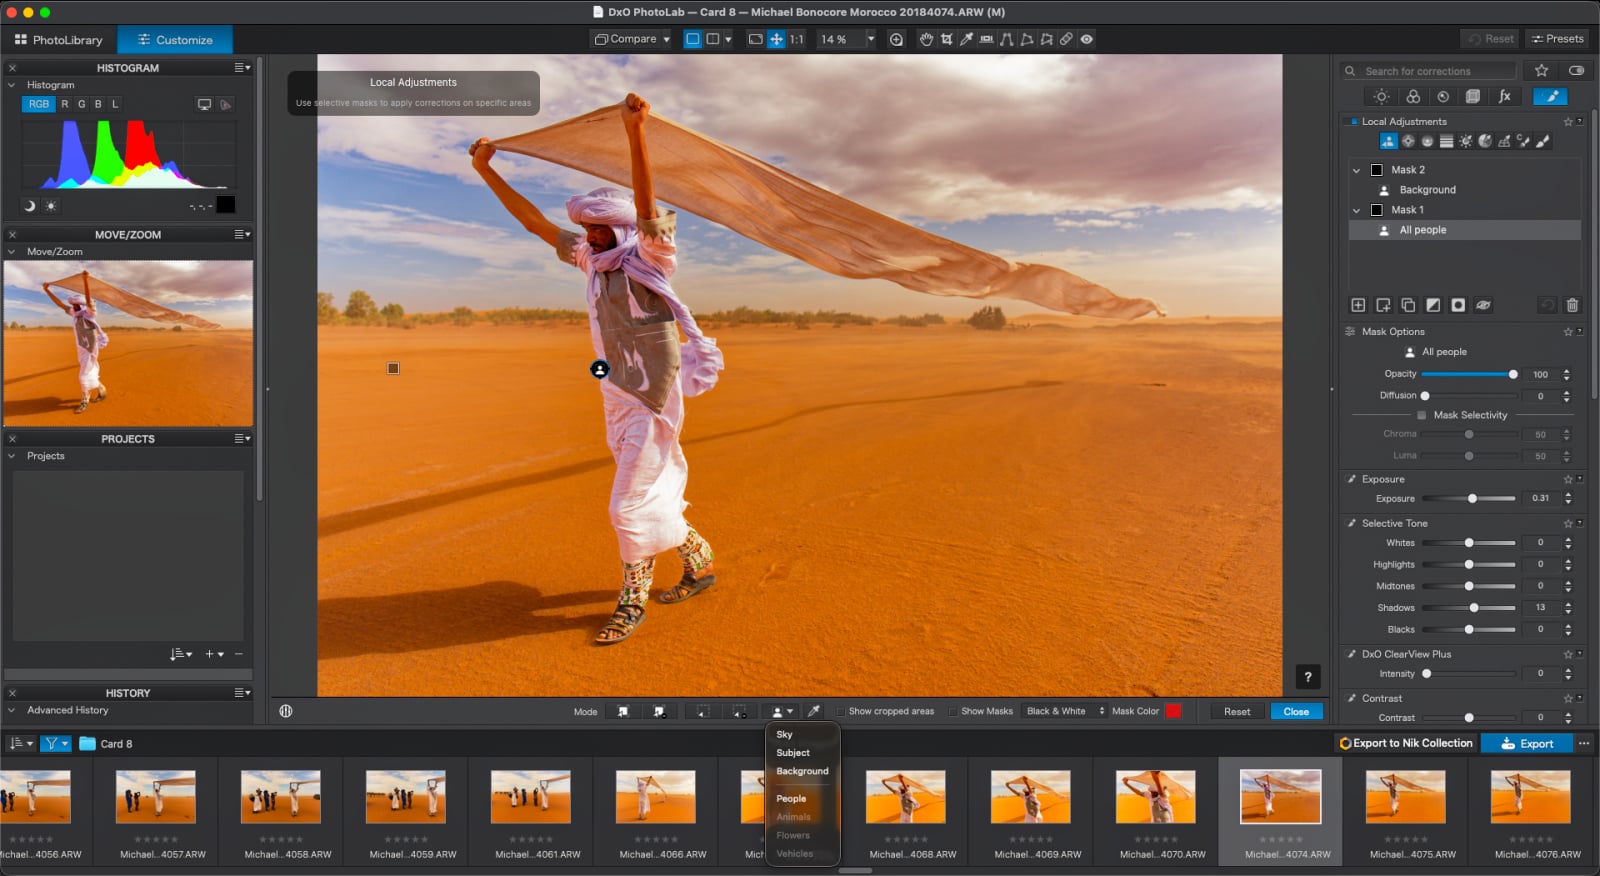 The same photo with the exposure corrections applied using the AI People Mask
Decide whether those people should share one correction or receive different ones. Leave Create individual masks unchecked to combine the selected people in one mask. Enable it to generate a separate mask for each selected person in one step. PhotoLab creates all of those masks together, so you do not have to reopen AI Mask for every person.
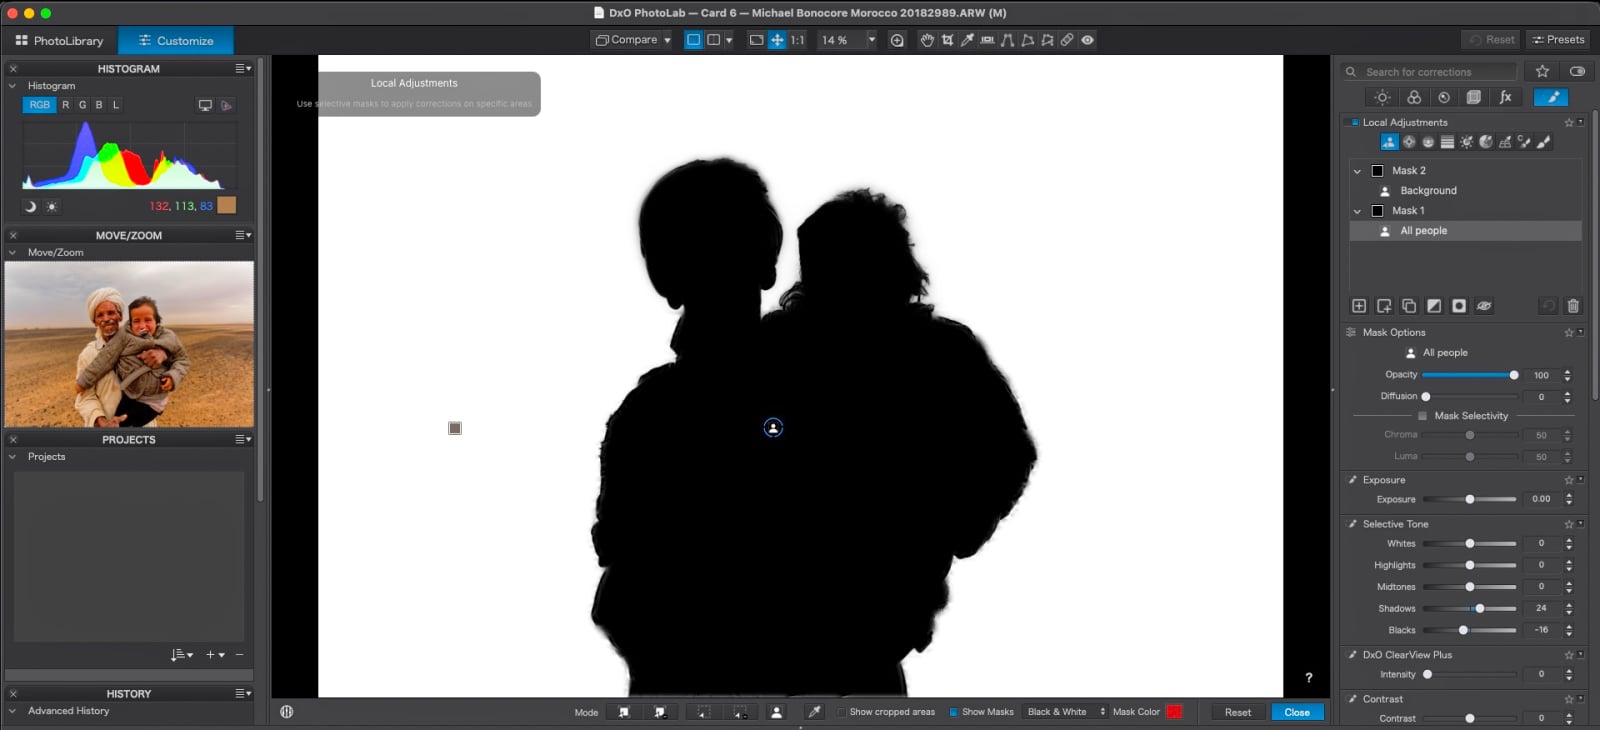 One AI Masks selects the people while another paints the background
Selecting a person is only the first level. Face segmentation means the software divides a detected face into selectable areas. PhotoLab 10 can create masks for facial skin, eyes, teeth, lips, and facial hair, allowing a portrait adjustment to affect the relevant area without needing a hand-painted outline.
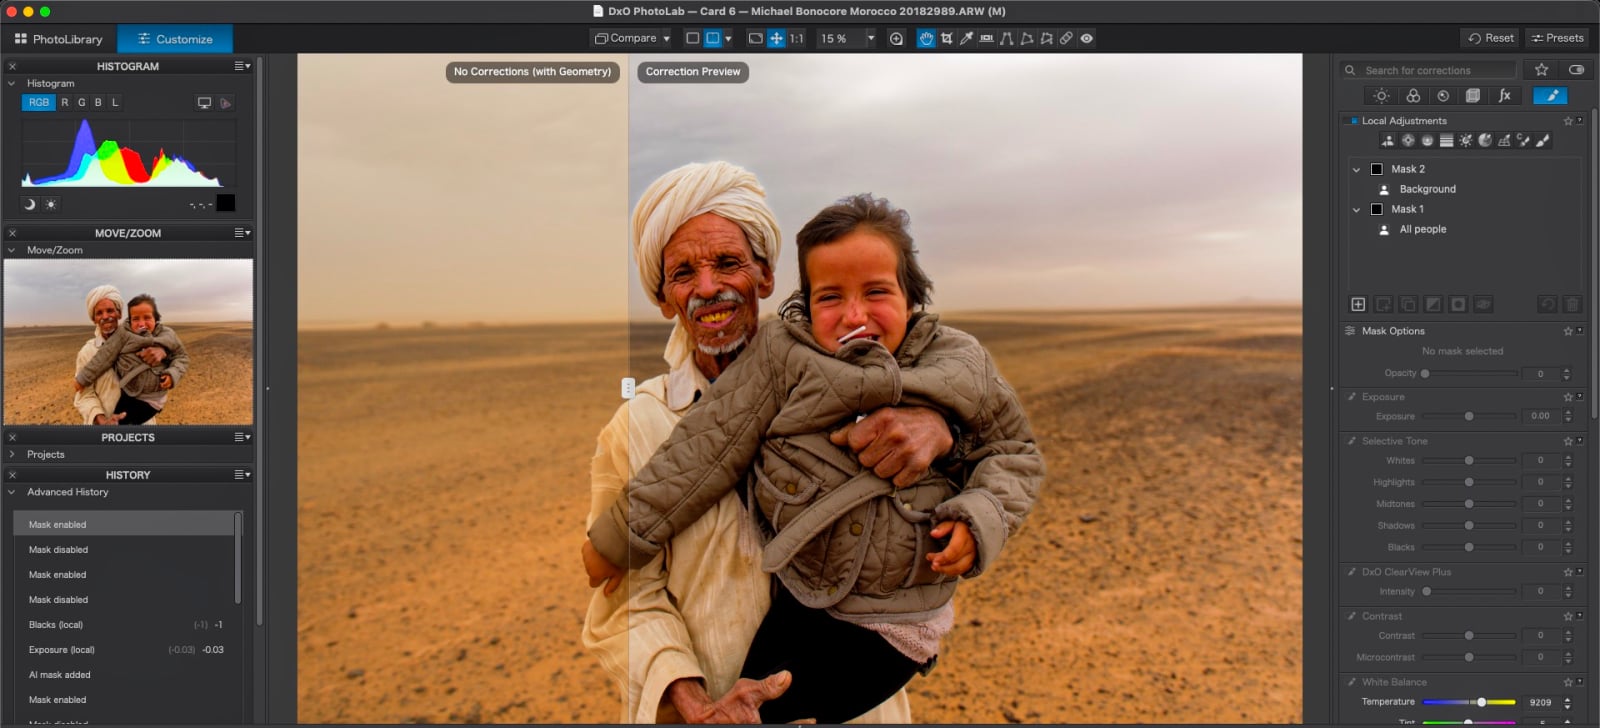 Brightening the people in the foreground AI mask while darkening the AI background mask helps to separate the subjects
The advantage for photographers comes before the adjustment itself. You spend less time tracing people and facial areas by hand, and more time working on exposure, color, and other local corrections. And like Nik Collection 9, all AI features in PhotoLab 10 run entirely on the user’s local hardware, so you can apply accurate AI-powered masks on your subjects anywhere, like an airplane or a hotel with unreliable Wi-Fi.
Select by Distance Instead of Subject or Color
The midground in a landscape can contain roads, trees, rocks, and buildings, while similar colors may also appear closer to or farther from the camera. A color mask may include those unwanted areas. Painting each element into the mask by hand takes time, and a gradient filter changes everything along its path.
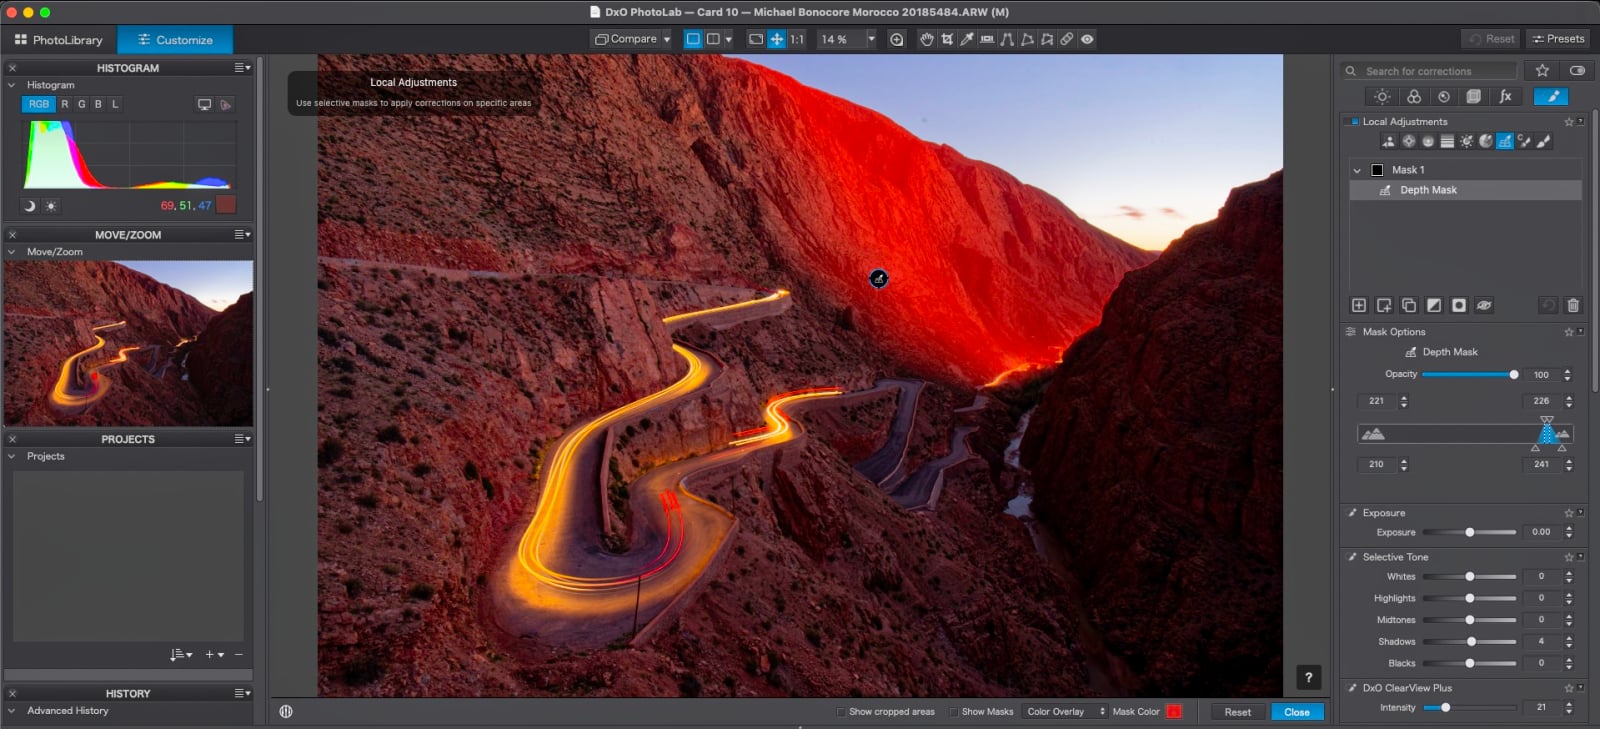 Adding detail to the background of the canyon by creating a Depth Mask and adding DxO ClearView Plus
Depth Masks in PhotoLab 10 select areas according to how far they appear to be from the camera. The software builds a depth map showing which parts of the photograph are closer to or farther from the lens, without requiring embedded depth data. This lets a single mask include unrelated parts of the photograph that sit within the same distance range.
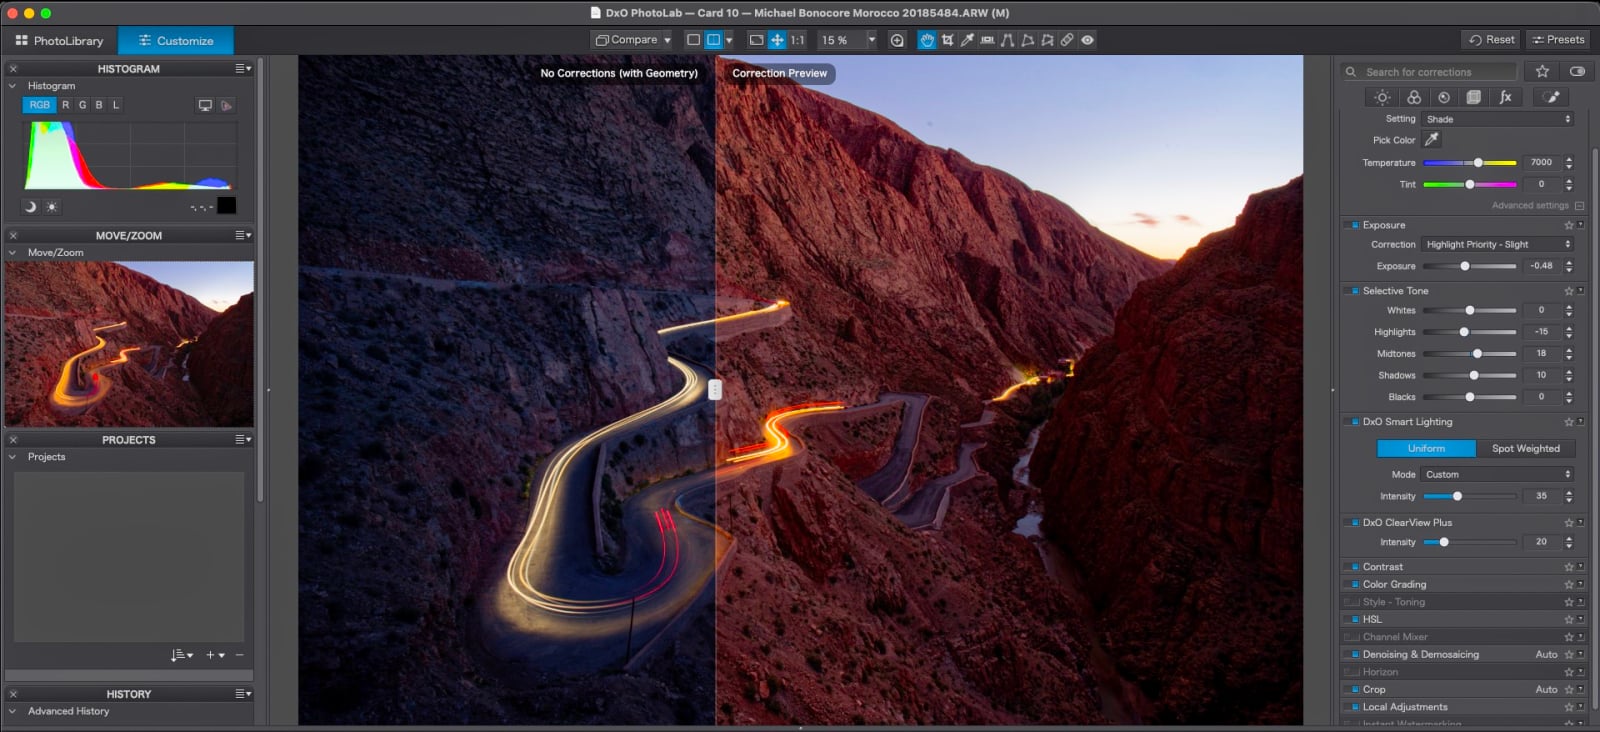 The Before and After after a light exposure and color edit while also adding detail to the background of the canyon by creating a Depth Mask and adding DxO ClearView Plus
In the Customize workspace, choose Depth Mask under Local Adjustments. Place the eyedropper over the part of the photograph at the depth you want to use as the starting point, then click. PhotoLab creates an initial mask at that estimated distance and displays the selected area as an overlay.
Keep Show Masks enabled and use either the color or black-and-white overlay while refining the selection. In Mask Options, the top pair of handles sets the selected depth range. Move them apart to include more distance, or move them closer together to target a narrower band.
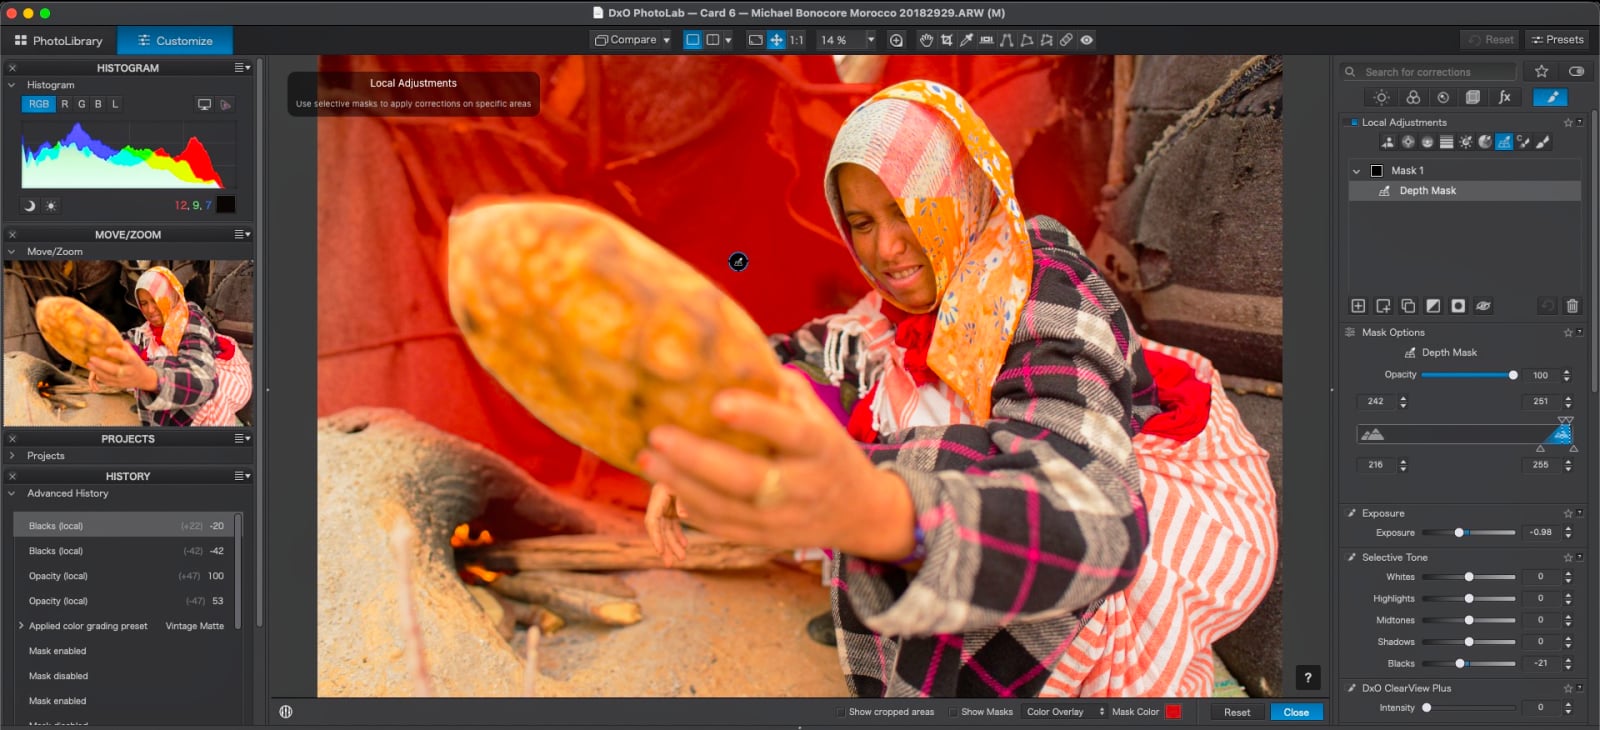 The depth mask applied to darken the background
The bottom pair controls feathering at both ends of that range. Pull those handles outward to create a more gradual transition into the unmasked areas. Matching the top and bottom handles removes the feathering and creates a sharper edge around the selected depth range.
Once the mask covers the intended distance band, hide the overlay and apply the exposure, color, or contrast adjustment.
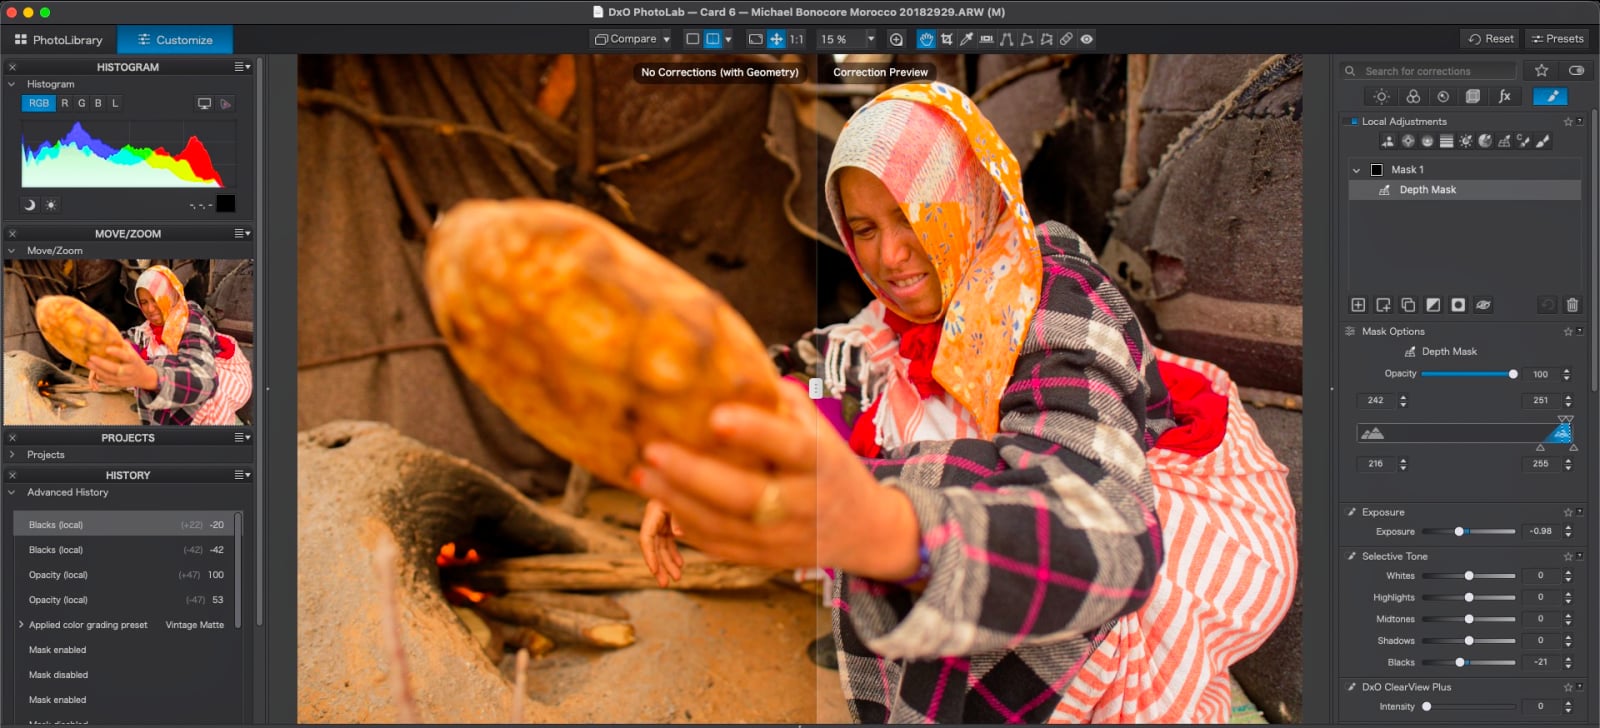 The before and after comparison of the original RAW and the depth mask applied to darken the background
Depth Masks are most useful when you want to edit areas at a particular distance, regardless of the subjects or colors they contain. One mask can reach different elements across the foreground, middle distance, or background without requiring you to paint around each one.
Correct a Mask Without Starting Over
An AI Mask, especially in complex scenes, can select most of the right area and still include a nearby object or miss part of the subject. Starting again may simply replace one mistake with another.
DxO’s U Point technology selects pixels by comparing their color and brightness. The Control Brush applies that matching within an area you paint: the brush tells PhotoLab where to look, while U Point decides which pixels inside that area belong in the submask.
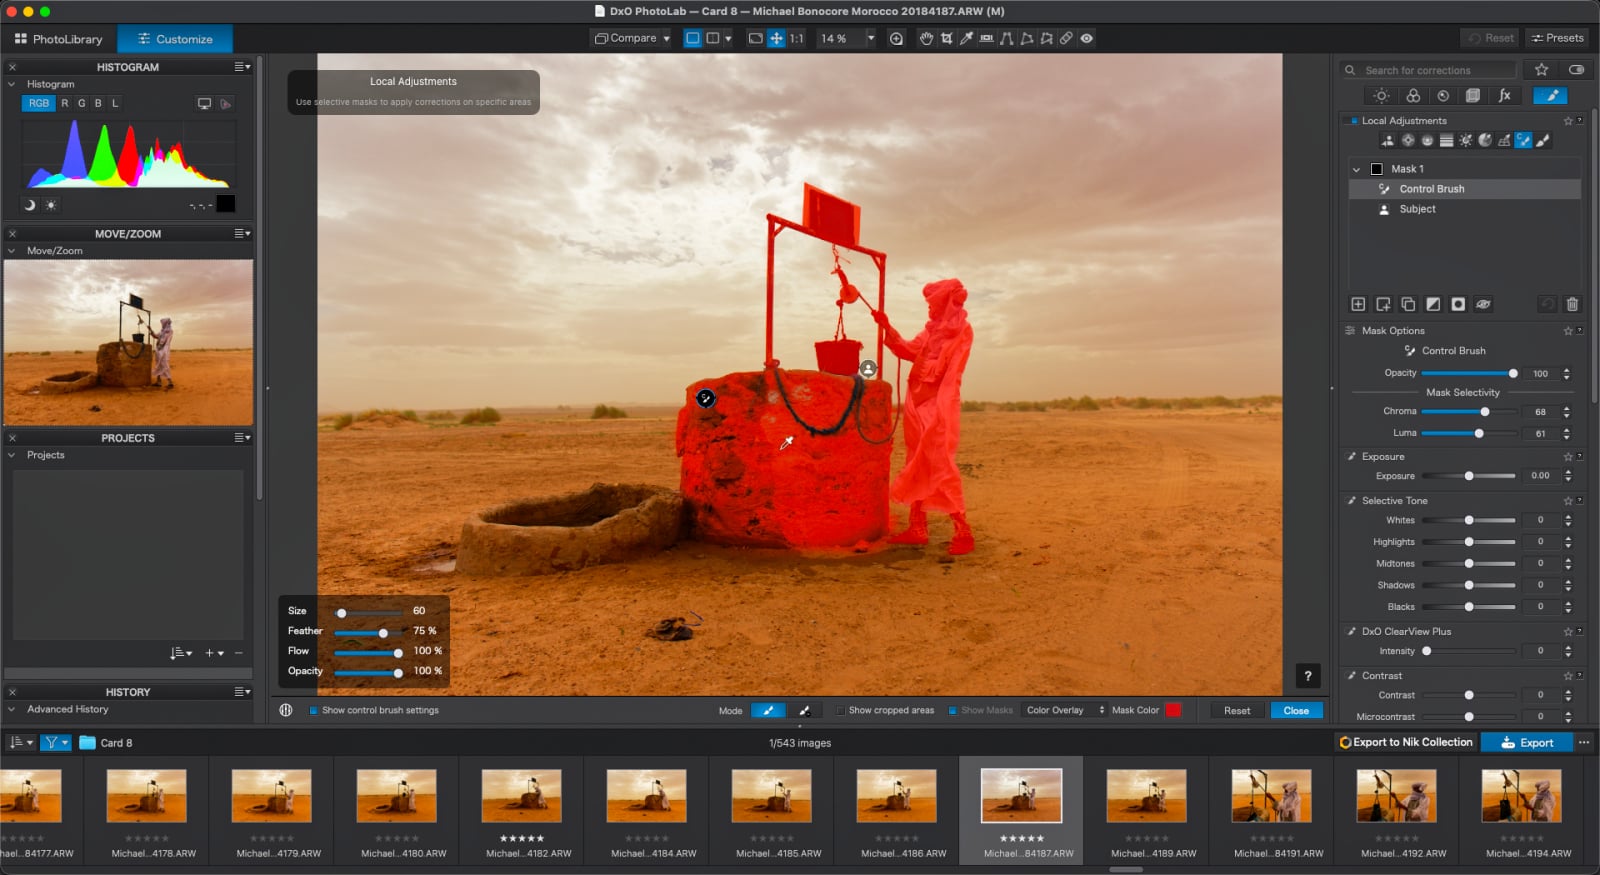 The original AI Subject mask didn’t cover the base of the well, so I added the base using the Control Brush and U Point Technology. I intentionally left parts of the base not selected by adjusting the Chroma and Luma sliders
To use a Control Brush alongside an existing AI submask, select the parent mask that contains the AI selection. Choose New Sub Mask, or press Shift+J, and then select Control Brush beneath the same parent.
Paint roughly over the missing area, then place the eyedropper on a part of it that you want included in the mask. In Mask Options, use the Chroma slider to include a wider or narrower range of colors, and the Luma slider to include a wider or narrower range of brightness levels. Both the color overlay and black-and-white view show which pixels the Control Brush selected, but black-and-white can make small gaps or unwanted areas easier to see.
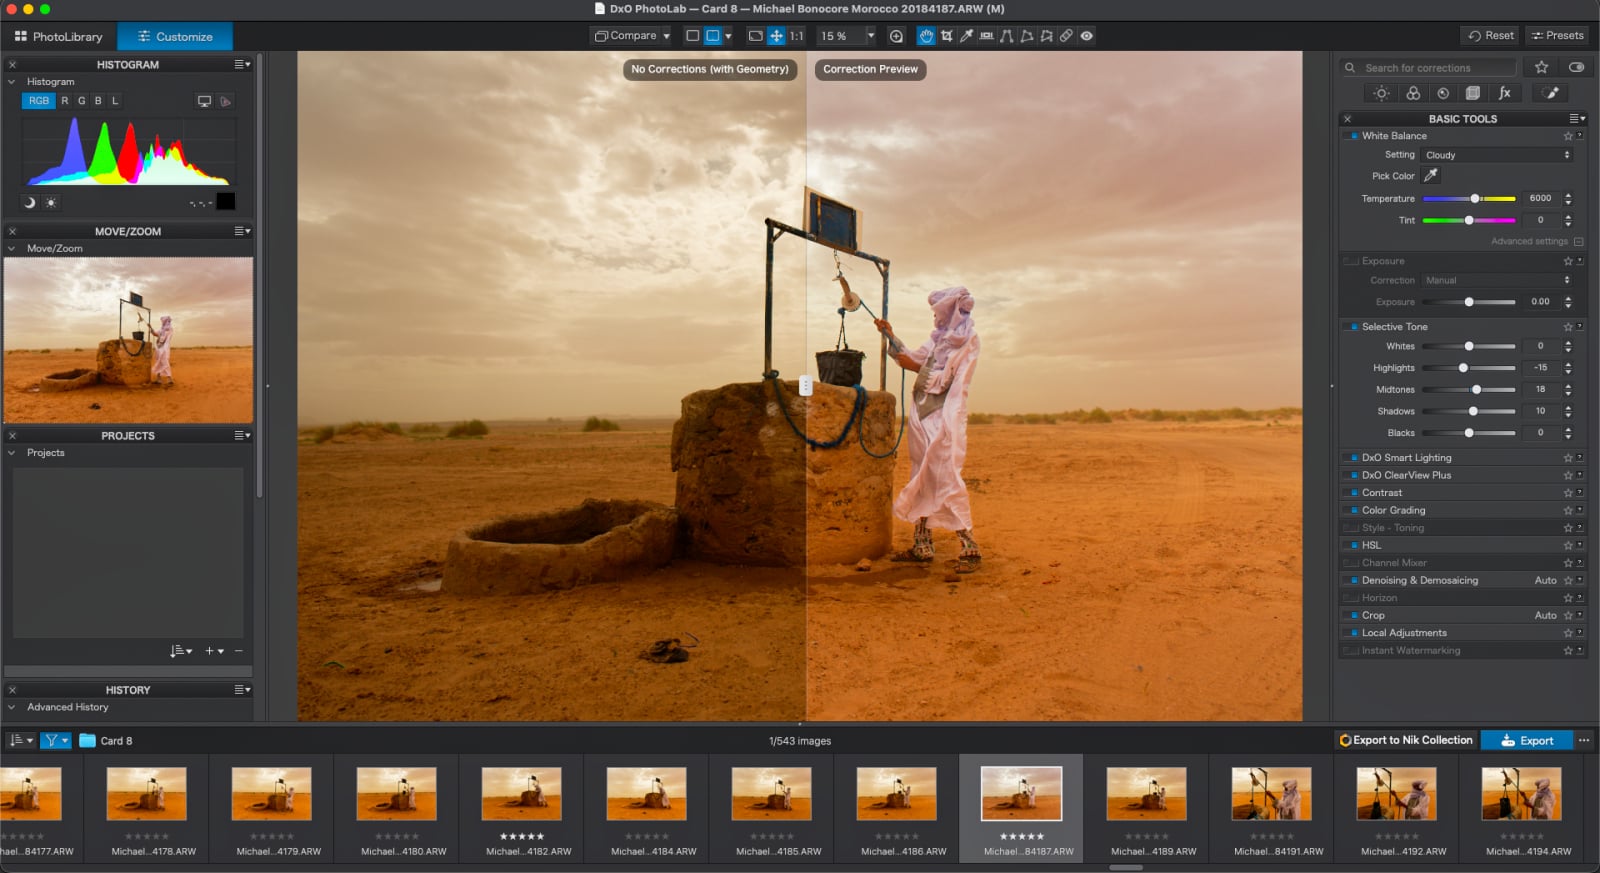 The Before and After comparison after applying the AI subject mask and Control Brush mask edits
A Control Point can be added as a new Sub Mask when you would rather place a selection area than paint it with the Control Brush. Place the point over the area and adjust Chroma and Luma to narrow or broaden the selection. Control Points begin as circles, but PhotoLab 10 lets you drag the edge into an ellipse so the working area can better fit a face, sign, or another subject that is longer than it is wide.
Mask Options controls only the selected submask, with controls such as Opacity, Diffusion, Chroma, and Luma. The Exposure, color, and contrast panels below belong to the parent mask, so their corrections apply across every submask beneath it.
PhotoLab 10 lets you keep the useful part of the first mask and correct only the areas that need more work.
Coordinate Color Across Shadows, Midtones, and Highlights
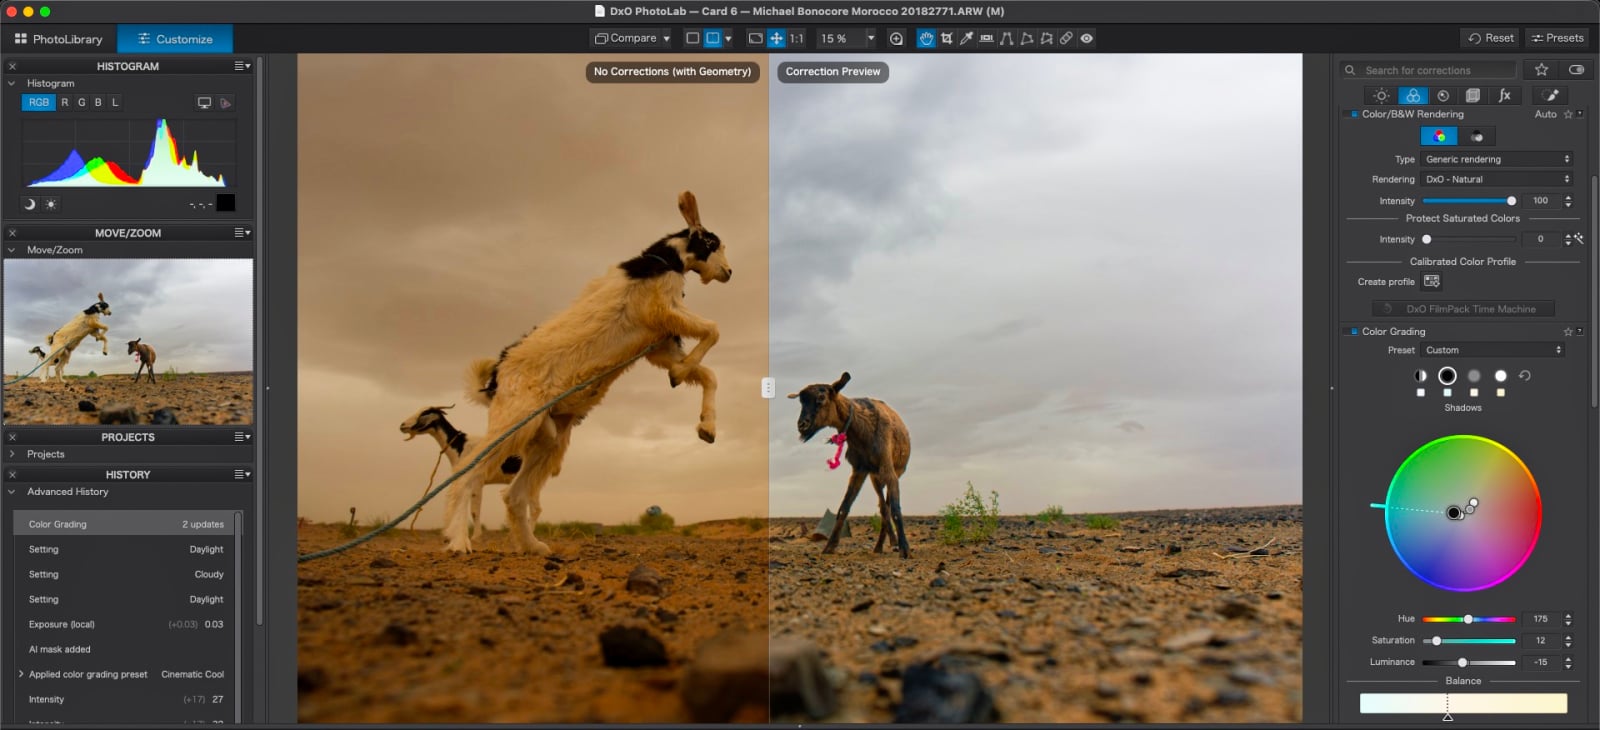
After correcting white balance and any unwanted color cast, the photographer can deliberately shift the image’s colors to change its mood. This is color grading. The challenge is keeping the darkest, middle, and brightest parts of the photograph working together while building the creative look.
Shadows are the darkest areas, midtones sit between them, and highlights are the brightest. Hue controls which color a tonal range shifts toward, while saturation controls the strength of that shift. The Global control applies the hue and saturation adjustments across the photograph instead of limiting it to one range.
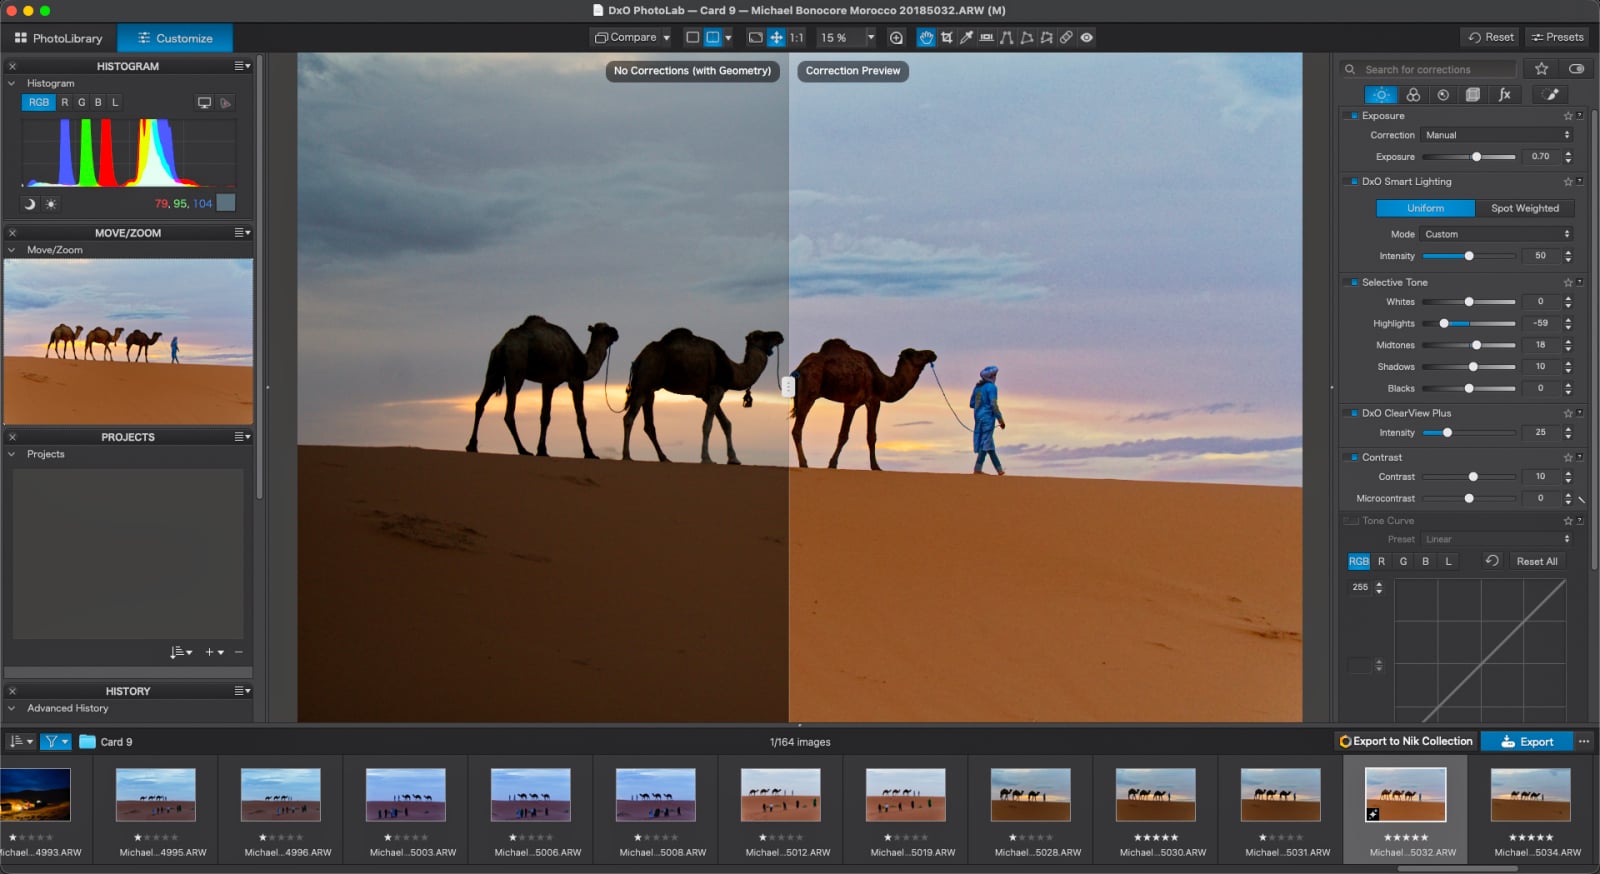 A Before and After Comparison after Color Grading applied using the new Color Grading wheel
In Customize, click the Color button at the top of the corrections palette, then open Color Grading. PhotoLab 10 places the Shadows, Midtones, Highlights, and Global controls on one wheel. Select a tonal range, then click or drag its marker around the wheel to choose the color you want that range to shift toward. Work through the ranges one at a time and keep the changes small enough to see how each one affects the full grade.
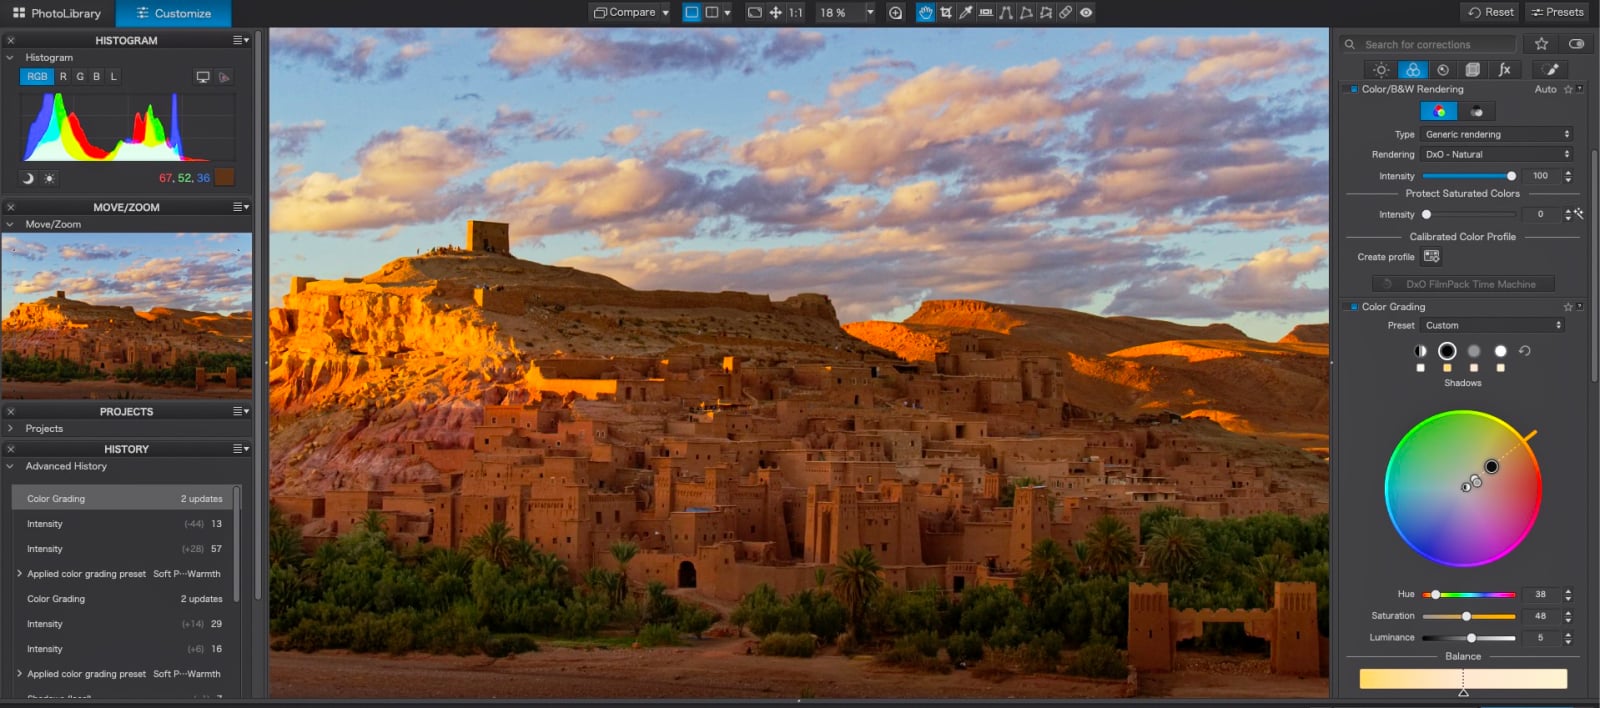 A Before and After Comparison after Color Grading applied using the new Color Grading wheel
When the shadows, midtones, and highlights already work together but the grade needs a different direction, they can be moved as a group. On a Mac, click the Shadows button above the wheel, then hold Command while clicking Midtones and Highlights. The label changes to Multiple Selection.
Dragging one of the selected markers moves all three together while keeping the same spacing between them, so you can explore another color direction without rebuilding the three tonal ranges separately. This is different from Global, which applies one adjustment across the photograph.
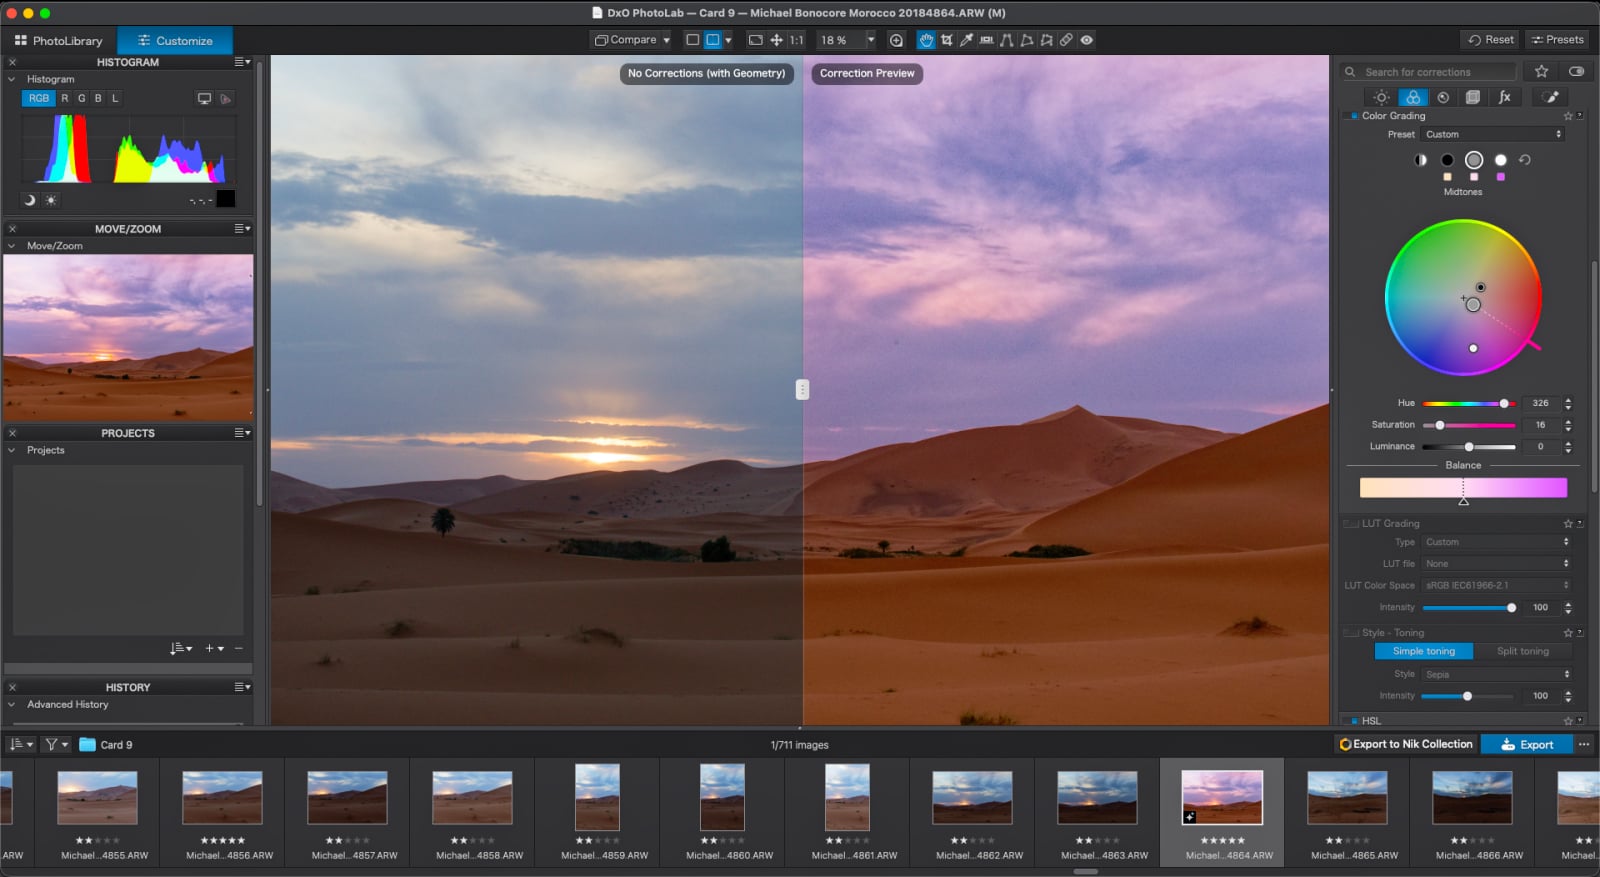 A Before and After Comparison after Color Grading applied using the new Color Grading wheel
Compare the photograph with and without the grade before finishing. Check skin, white or gray surfaces, and other familiar colors. If one looks wrong, identify whether it falls in the shadows, midtones, or highlights, then reduce the saturation or change the hue in that range. The wheel helps keep the color adjustments coordinated, but the photographer still decides which mood belongs in the photograph.
Start With the Aspect Ratio Chosen in Camera
Some photographers choose a square, widescreen, or other aspect ratio in their camera before taking a photograph because that frame affects where they place the subject and how much of the surrounding scene they include. If a RAW editor does not recognize the choice recorded by the camera, the photograph may open in a different ratio and the photographer has to recreate the intended frame before the rest of the edit begins.
PhotoLab 10 supports as-shot crop ratios. When it recognizes a supported ratio recorded with the RAW file, it uses that ratio as the starting crop.
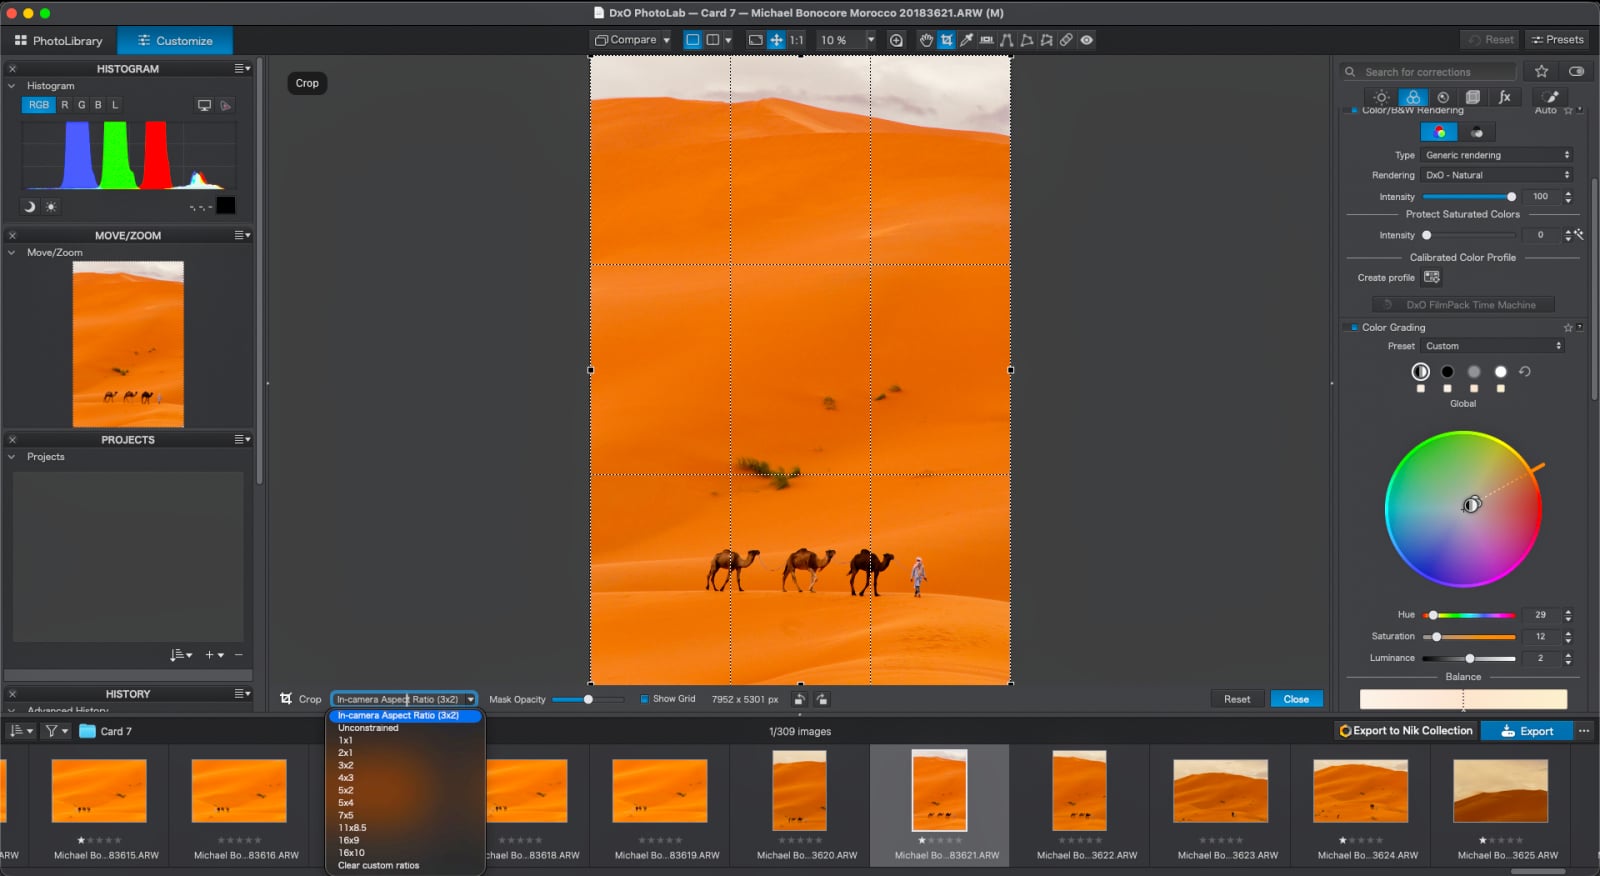 The Crop menu showing the supported as-shot crop ratios
On cameras that preserve the full sensor image in RAW, choosing a square or widescreen aspect ratio does not discard the wider capture. The memory card holds one RAW file containing the sensor’s native image area, while metadata records the framing chosen in camera. The camera and compatible editors can initially display the square or widescreen crop even though the wider RAW data remains in the file. JPEG and HEIF files are normally rendered at the selected ratio, so the cropped-away pixels are not available in those files.
Open the RAW file in Customize and choose Crop from the top toolbar, or press R. In the Crop panel, open the Aspect Ratio dropdown menu under the photo and choose In-camera Aspect Ratio. The crop rectangle keeps the recorded ratio while you adjust its size or position.
The in-camera ratio is a starting point, but not the only option. If the desired composition changes during editing, choose another preset ratio, enter a custom ratio, or select Unconstrained before drawing a new crop. Set the composition you want before building detailed local adjustments, because a later crop changes which parts of the photograph remain visible.
A deliberate in-camera aspect ratio no longer has to be reconstructed at the start of each RAW edit. Across a large batch, those saved steps leave more time to edit additional photographs.
Remove Sensor Dust Before It Slows the Edit
A speck of dust on a camera sensor can leave the same soft, dark mark in frame after frame. It is easiest to see against a clear sky, but removing it manually still means finding the spot, repairing it, and repeating the work on every affected photograph.
PhotoLab 10 adds AI-powered automatic sensor dust removal at the RAW level, analyzing the original capture to detect sensor dust and other small imperfections so you have a clean base for the rest of the edit.
Working at the RAW level means the cleanup happens while PhotoLab develops the camera’s original sensor data, keeping defect removal inside the same editing workflow instead of turning each spot into a separate retouching task later.
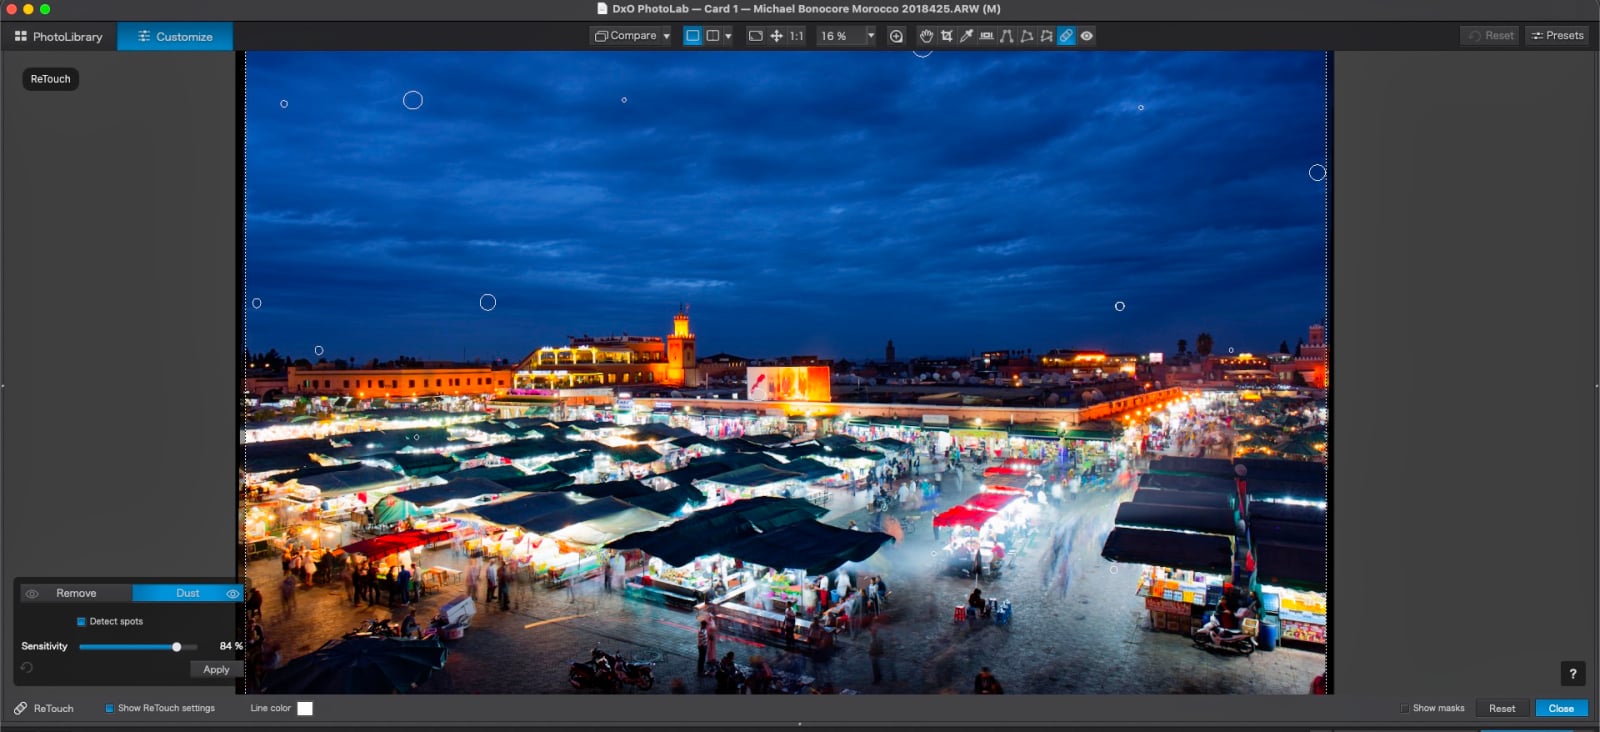 PhotoLab 10 adds AI-powered automatic sensor dust removal at the RAW level
Open the RAW file in Customize and choose ReTouch from the top toolbar. Select the Dust tab and leave Detect spots enabled.
PhotoLab marks each detected spot with a circle. The Sensitivity slider defaults to 60%. Moving it left produces fewer detections, while moving it right produces more. The trade-off is that setting Sensitivity too low may miss hard-to-see dust, while setting it too high may mistake fine image details for dust.
Review the circles and click Apply, then hold the eye icon in the Dust button to compare the corrected image with the starting file. If PhotoLab detects no dust, a message appears below the Sensitivity slider.
Move to Affinity When the Edit Needs Pixels
A RAW editor is built to interpret the camera’s sensor data. Exposure, white balance, noise reduction, optical corrections, cropping, and local color or tonal adjustments determine how the RAW capture is developed. Other jobs require changing the rendered image itself. Building a layered composite, adding text, removing or replacing image elements, and detailed retouching are pixel-editing tasks.
Once a photographer needs to alter the image’s actual content instead of interpreting the original capture, it is time to move to a pixel editor. In addition to Adobe Photoshop, PhotoLab 10 is designed to integrate with Affinity.
Although PhotoLab 10 will not include the Export to Affinity button at launch, DxO plans to add an improved version in an update later in September. This will give photographers a direct route from PhotoLab to Affinity.
 Screenshot
Until that update arrives, finish the RAW corrections that should appear in the exported file, export the photograph in the format needed for the next stage, and open the resulting file manually in Affinity.
This handoff separates two different jobs. PhotoLab develops the RAW capture, while Affinity changes pixels in the rendered file. The coming button will place that transition inside PhotoLab once the September update is released.
Faster Edits Without Giving Up Creative Control
PhotoLab 10’s new tools solve different problems, but many of them remove work that happens before the creative adjustment. Finding dust, building and repairing a mask, or preparing a file for another editor can take longer than changing exposure or color, especially with the new Color Grading tool. Shortening those steps gives the photographer more time to work on the creativity of the photograph itself.
That is where automation is most useful. It does not need to finish the photograph. It needs to produce a useful starting point that can be refined when necessary. Hide the overlays, give the finished edit one last look, and correct anything the faster workflow may have missed.
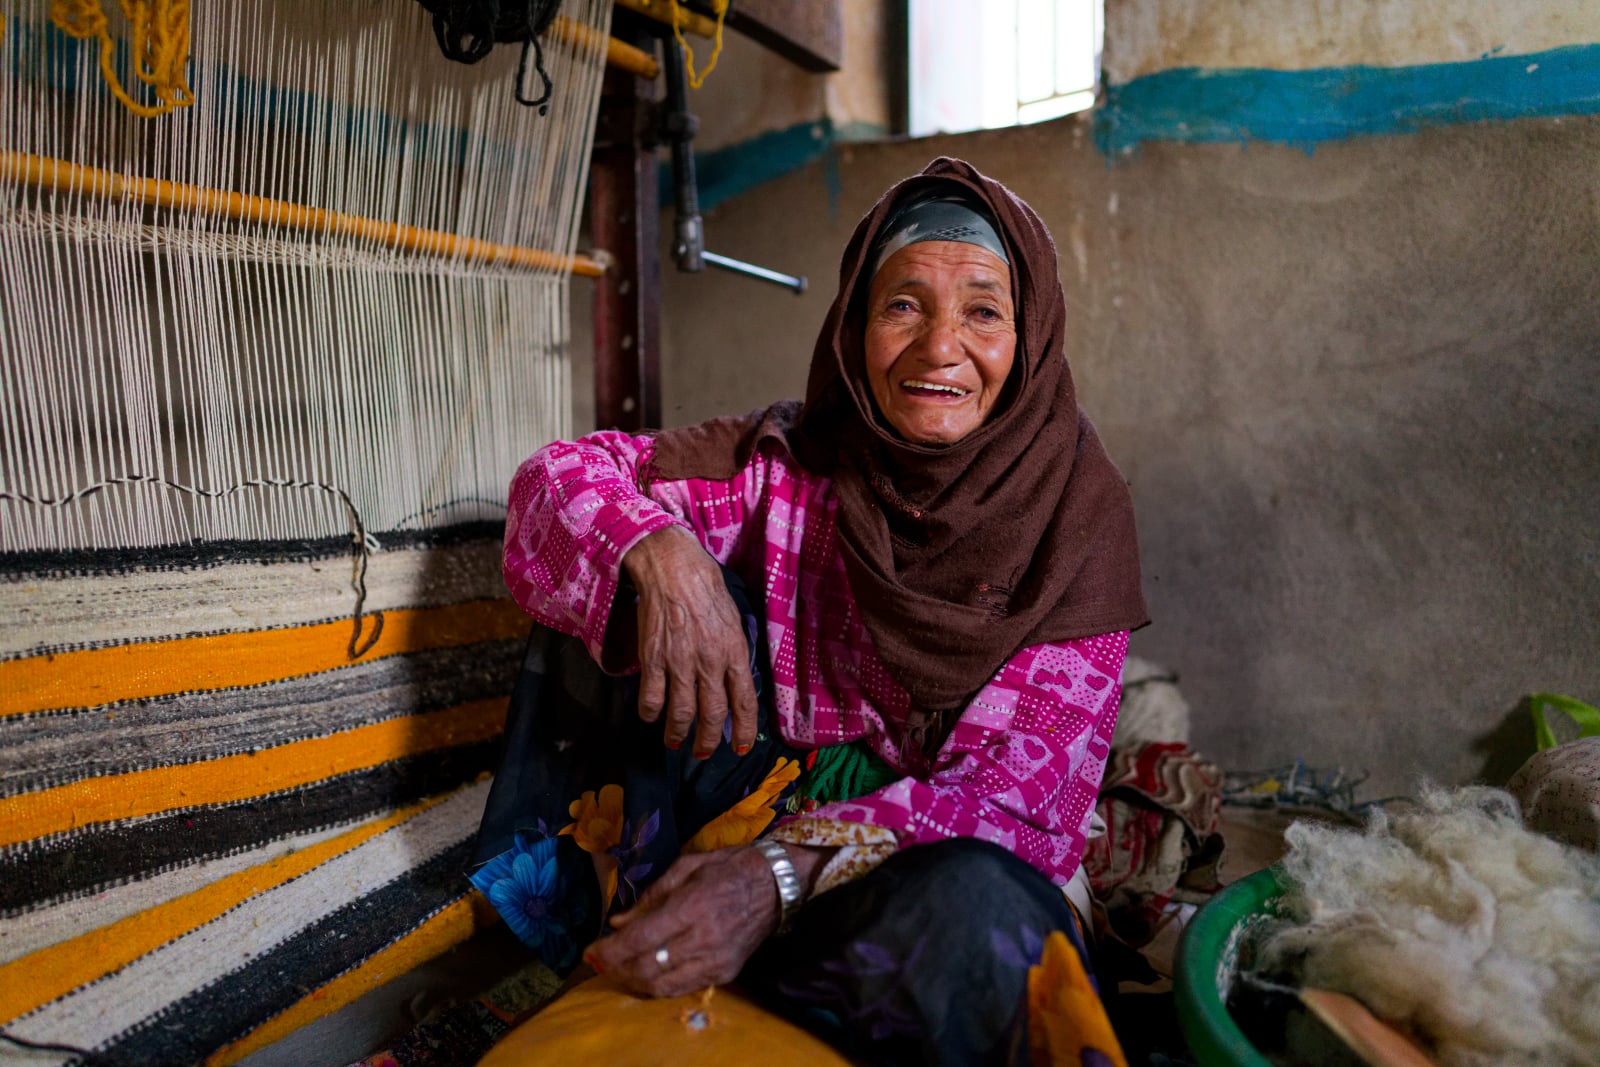
PhotoLab 10 now handles more of the work between opening a RAW file and sending the finished image out of the editor. For us modern day photographers who can take thousands of images across one project, this means we can spend less time on repetitive setup and more time using our creativity, making the photograph look the way the we intended.
Full disclosureThis article was brought to you by DxO. Use the code PetaPixelLD2026 at checkout to get 20% off any DxO software, including PhotoLab 10, Nik Collection 9, and PureRAW 6, through September 7, 2026 (valid for new customers only).
All photos taken in 2018 in Morocco by Michael Bonocore while working with Open Doors Morocco.
Affiliate Disclosure PetaPixel articles may include affiliate links; we may earn a commission if you buy through one.


 English (US) ·