
Collecting Shards of Life in The Adventures of Elliot: The Millennium Tales is as important as saving the world. These small red gem pieces can make you stronger, but only if you find enough of them.
Every time you collect four shards, they combine into one tear, which represents Elliot's health — similar to Link's hearts in Zelda games. The tear cap is 20, and obtaining all of them requires collecting 60 shards of life.
If you're ready to explore every corner of this game looking for shards, then we can help you. Below, you find all shard of life locations in The Adventures of Elliot, split by ages.
[Ed. note: If you're viewing this guide on a mobile device, you may need to swipe left and right to see the full tables listed below.]
All Age of Safekeeping Shard of Life locations in The Adventures of Elliot
There are 16 Shards of Life in the Age of Safekeeping, but obtaining some of them becomes easier after you have progressed in the campaign and unlocked more skills.
|
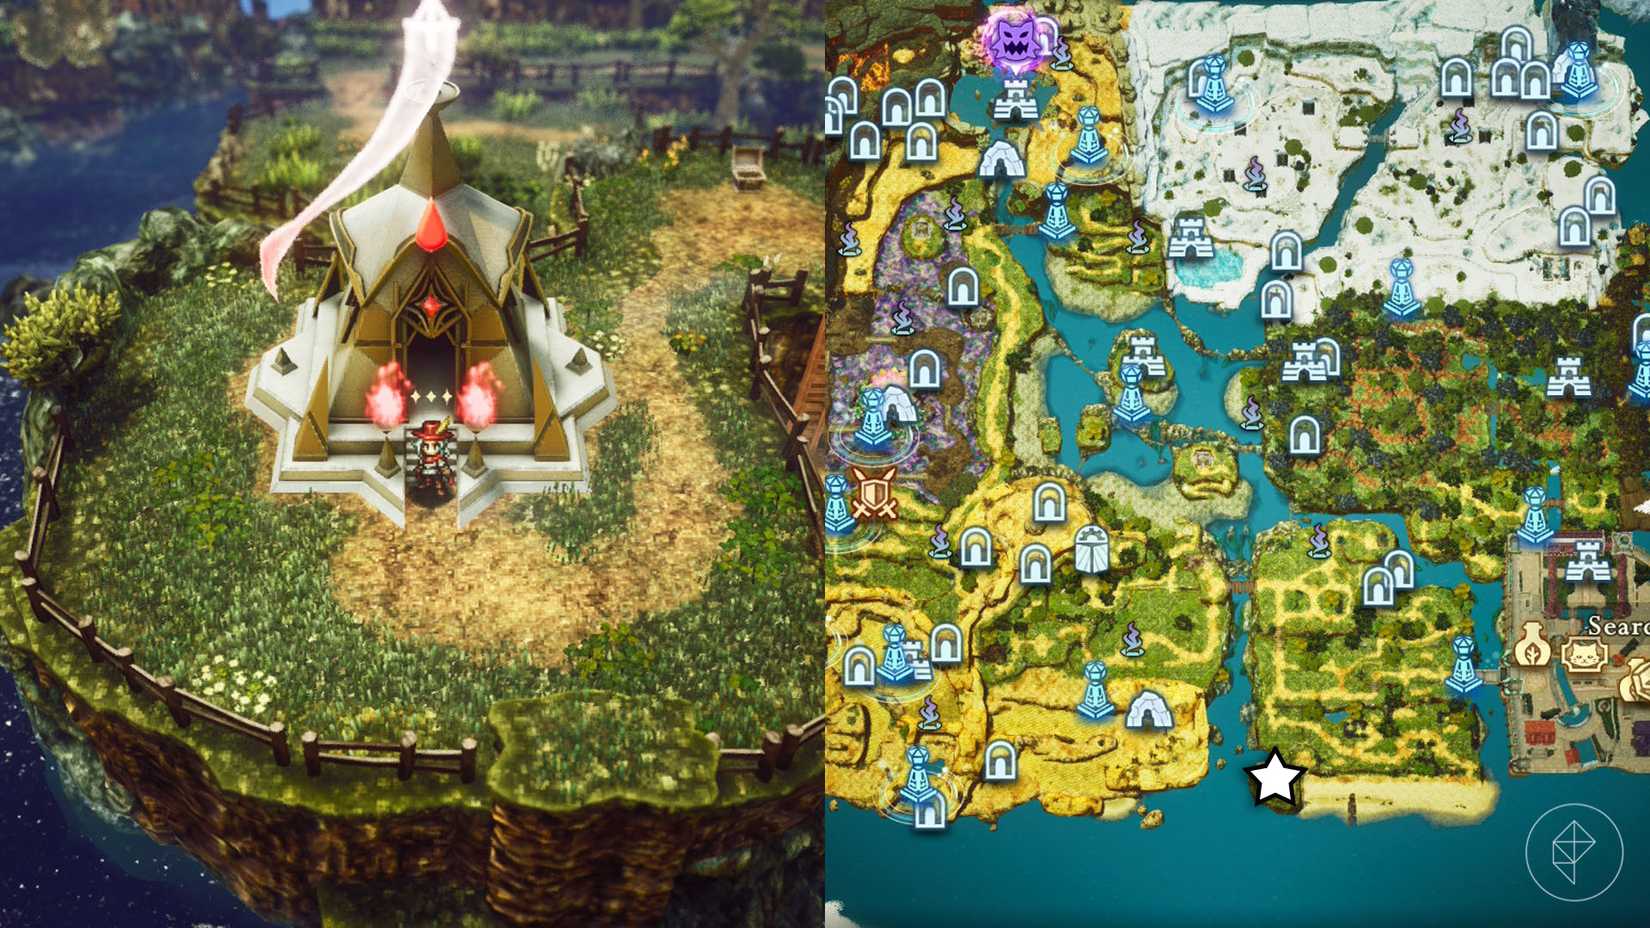
Eastern Fields of Flon |
On the southwestern side of the Eastern Fields of Flon, you will find the Shrine of Life 1. |
|
Western Fields of Flon |
Follow the path to the southwest through the remains of an old house, then follow the upper path that passes in front of a locked door until you find a blue chest behind a tree. Open it to obtain a shard of life. |
|
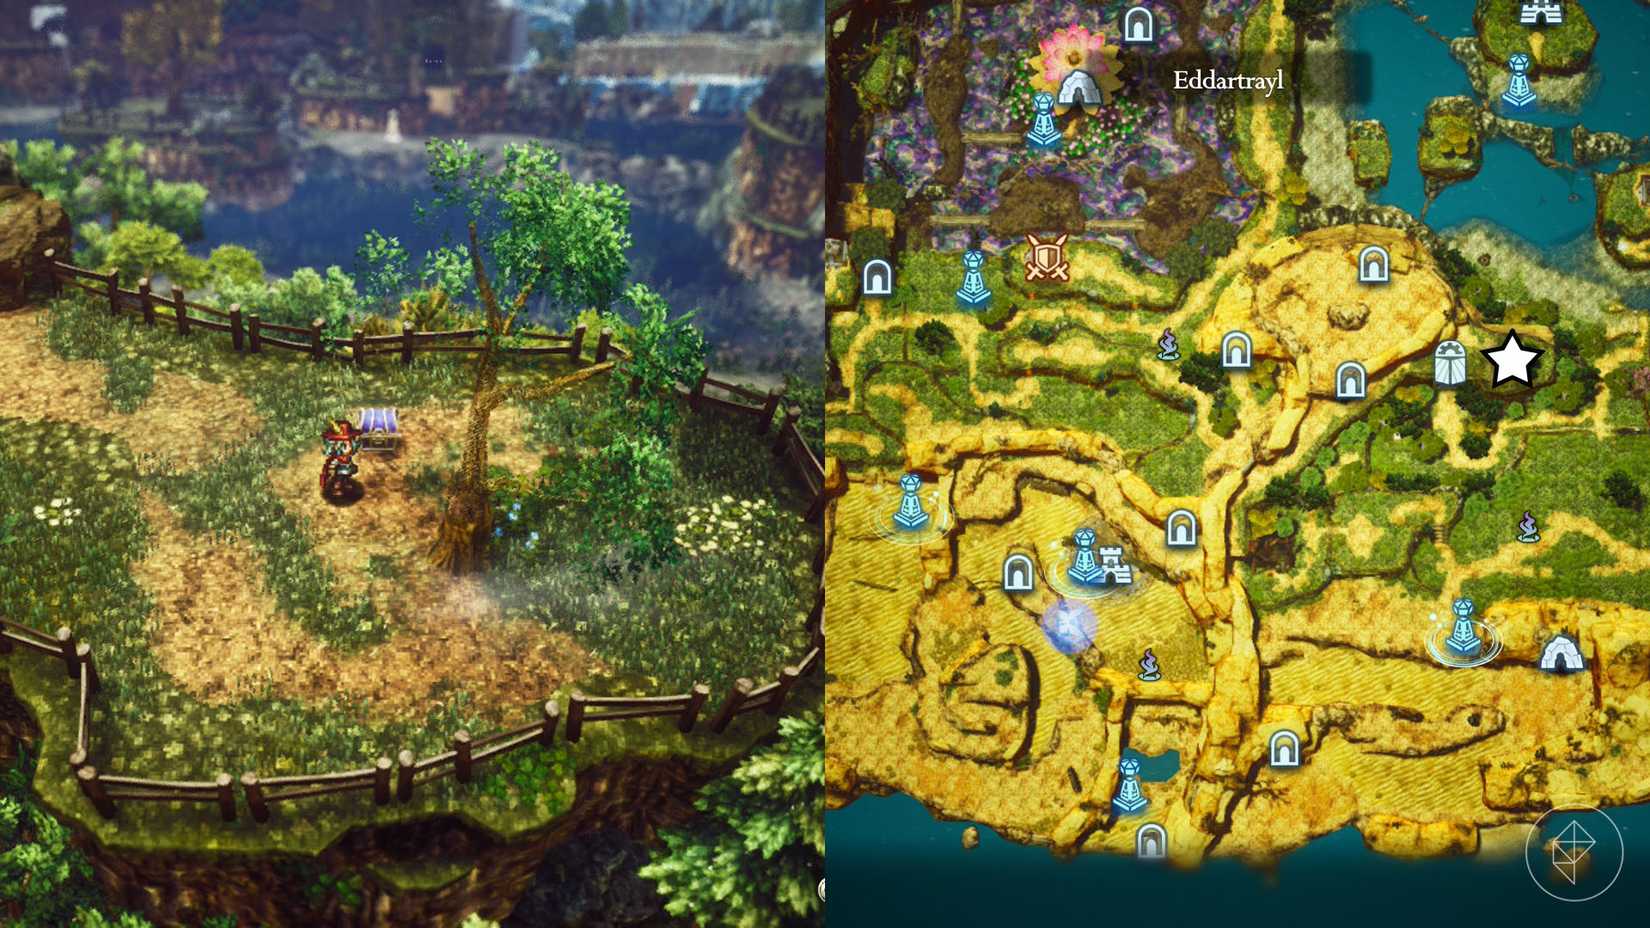
Eddartrayl |
Use the Southern Caves — Desert Exit and head west to enter a small area with a guidepost and a chest to the northern side. Open it to find the shard. |

|
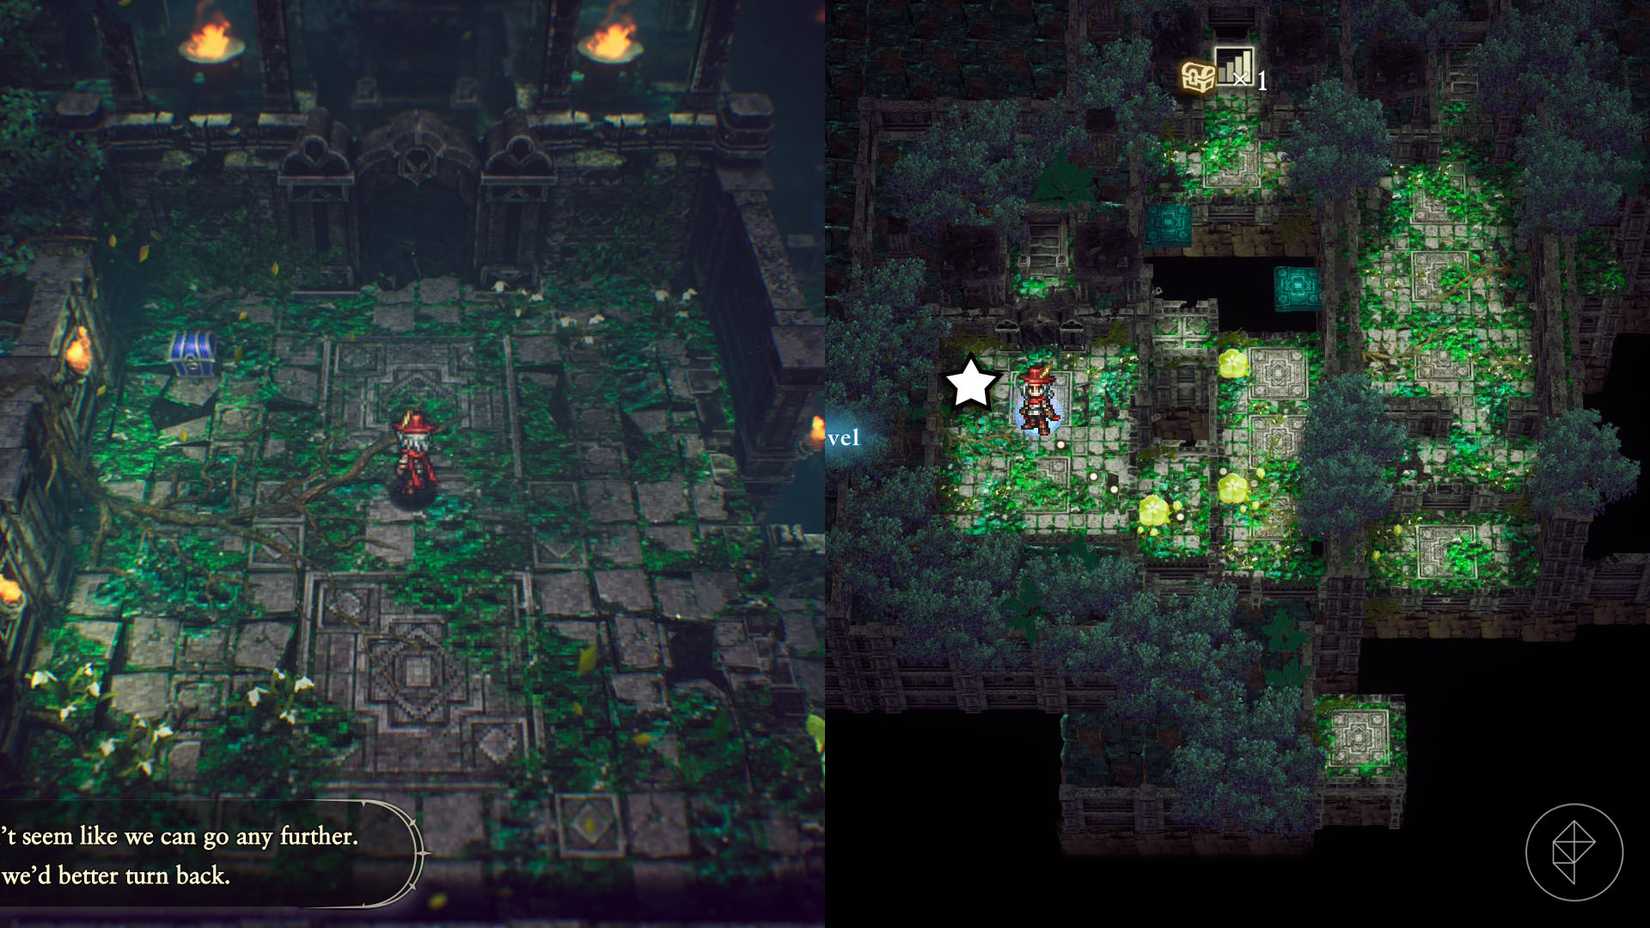
Mist Ruins - Neverwither |
You find the chest containing this shard of life in a room on the eastern side of sublevel two. |
|
Western Fields of Flon |
You must go through the Secret Shortcut 1 to reach the chest containing this shard. To unlock its entrance, located southwest of the chest, you must have unlocked the bombs in the Age of Reconstruction. |
|
Forest Ruins - Neverwither |
The Forest Ruins are located on the western side of Neverwither. After entering the place, go to the second level. Use the moving platforms to cross to the south side and jump on the plant trampolines to reach the upper floor where there's a blue chest. |
|
Westerea |
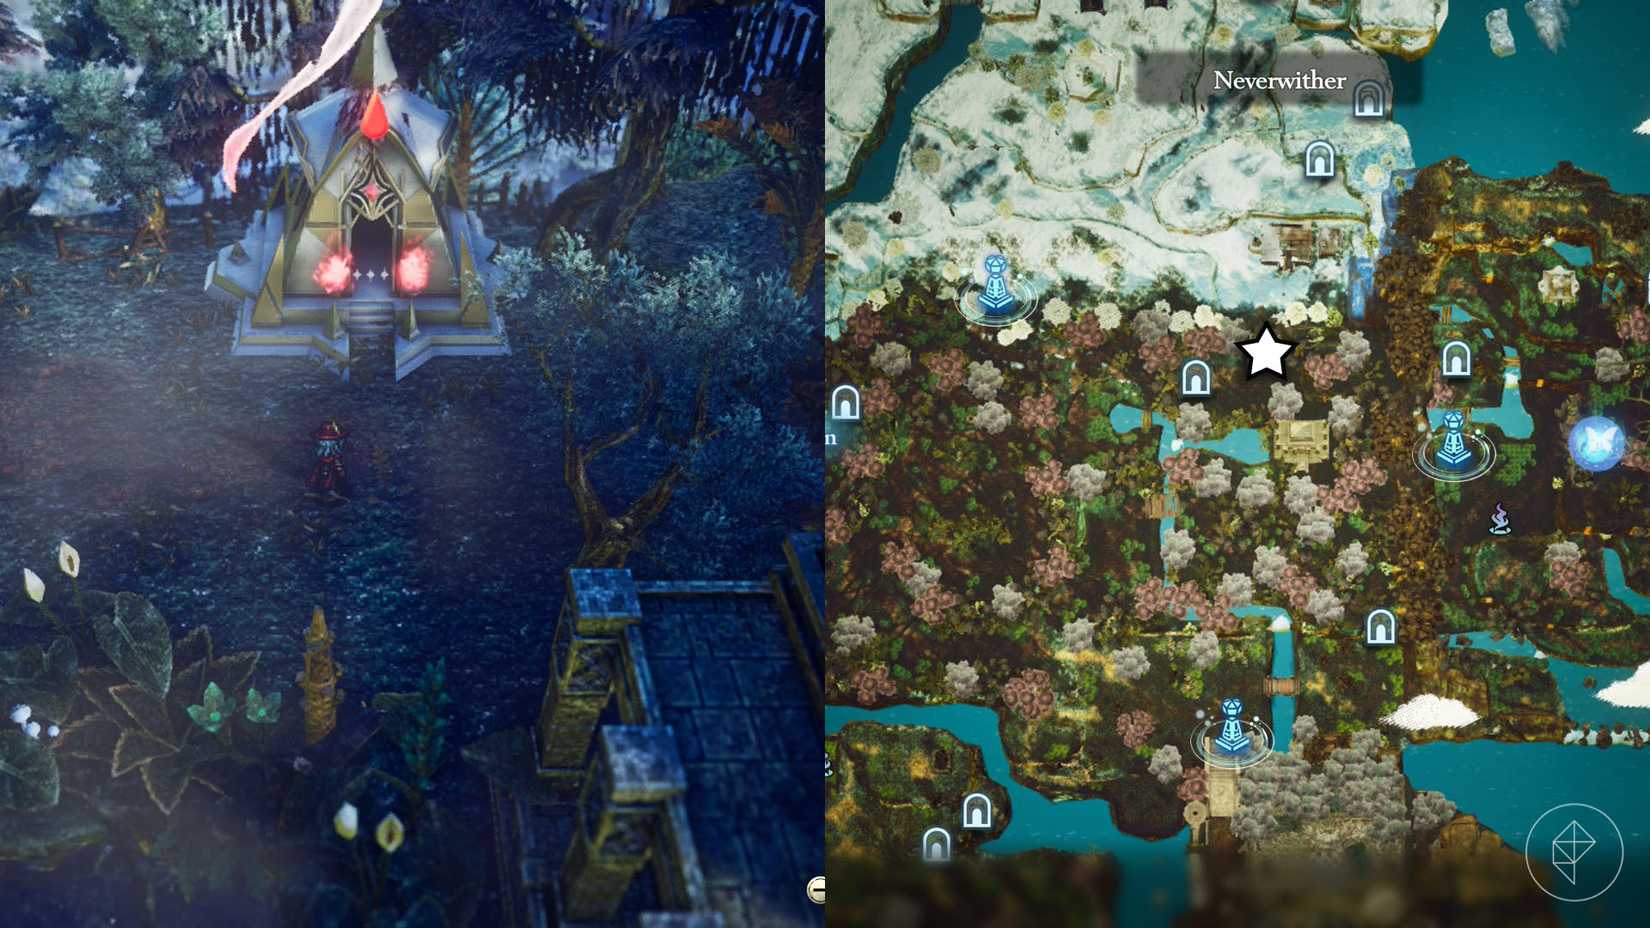
You find the Shrine of Life 9 southwest of the Rainbow Lotus dungeon. |
|
Westerea |
Head north of the Rainbow Lotus dungeon using the ladder on the west side, and enter Monster Trail 3. Next, use Secret Shortcut 6 to reach the blue chest. |
|
Westerea |
To reach the Shrine of Life 10, you must use Monster Trail 2. Its entrance is hidden among poisonous vegetation northeast of the Raindow Lotus dungeon. |
|
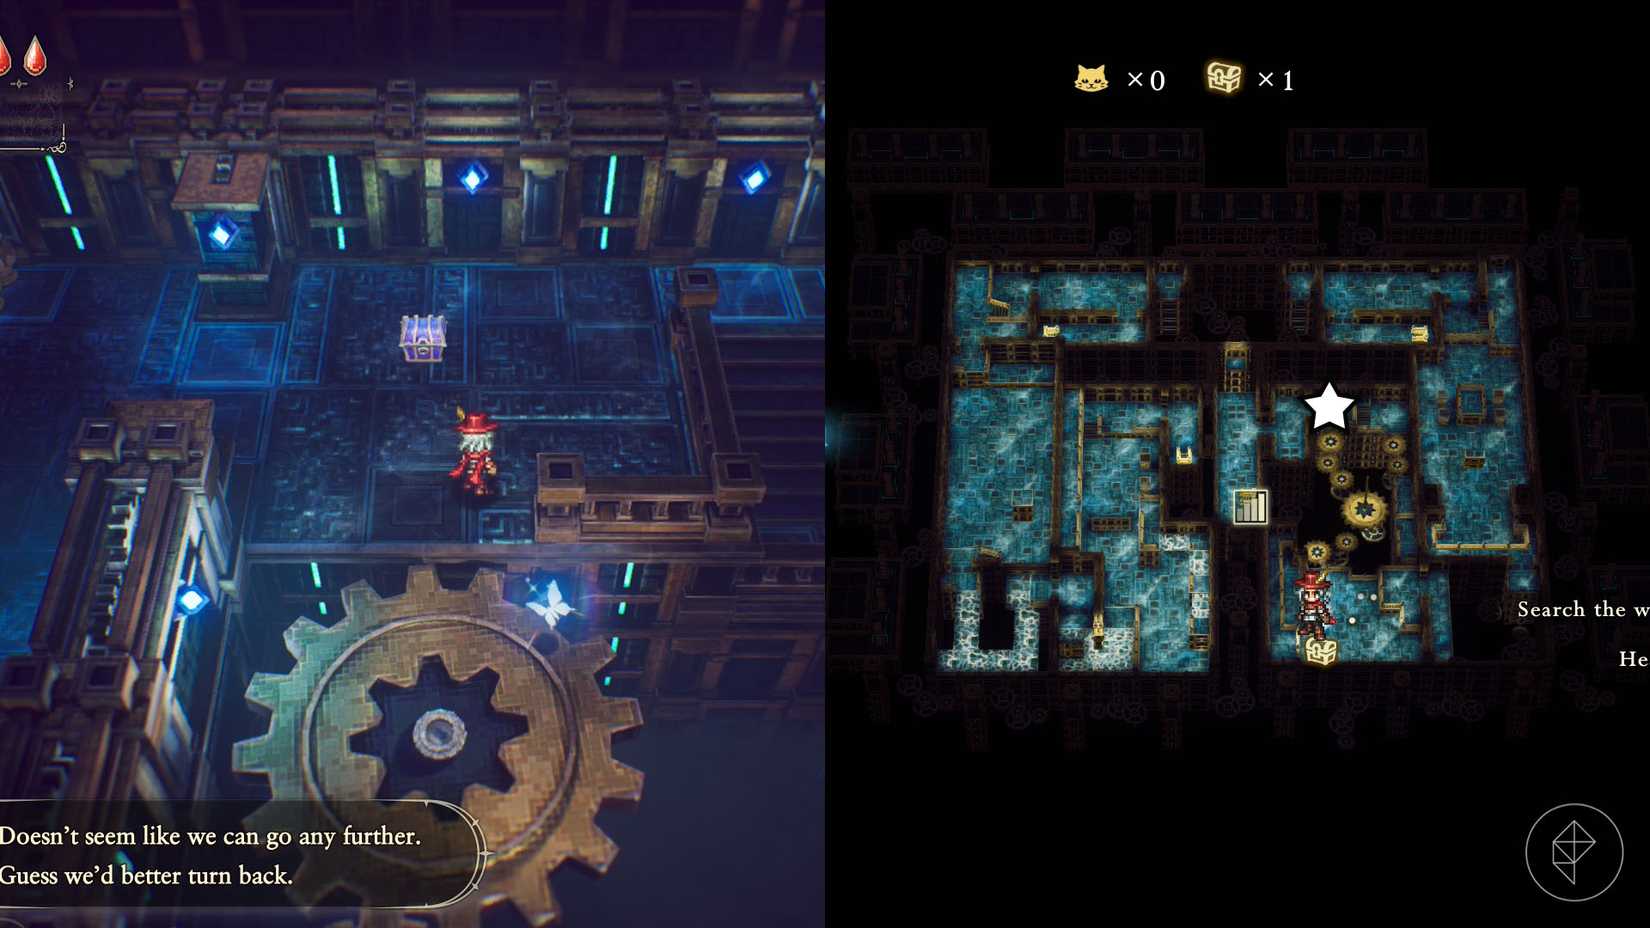
Geared Ruins |
Reach the second level then head to the east side. Jump over the gears that form a bridge to reach the chest. |
|
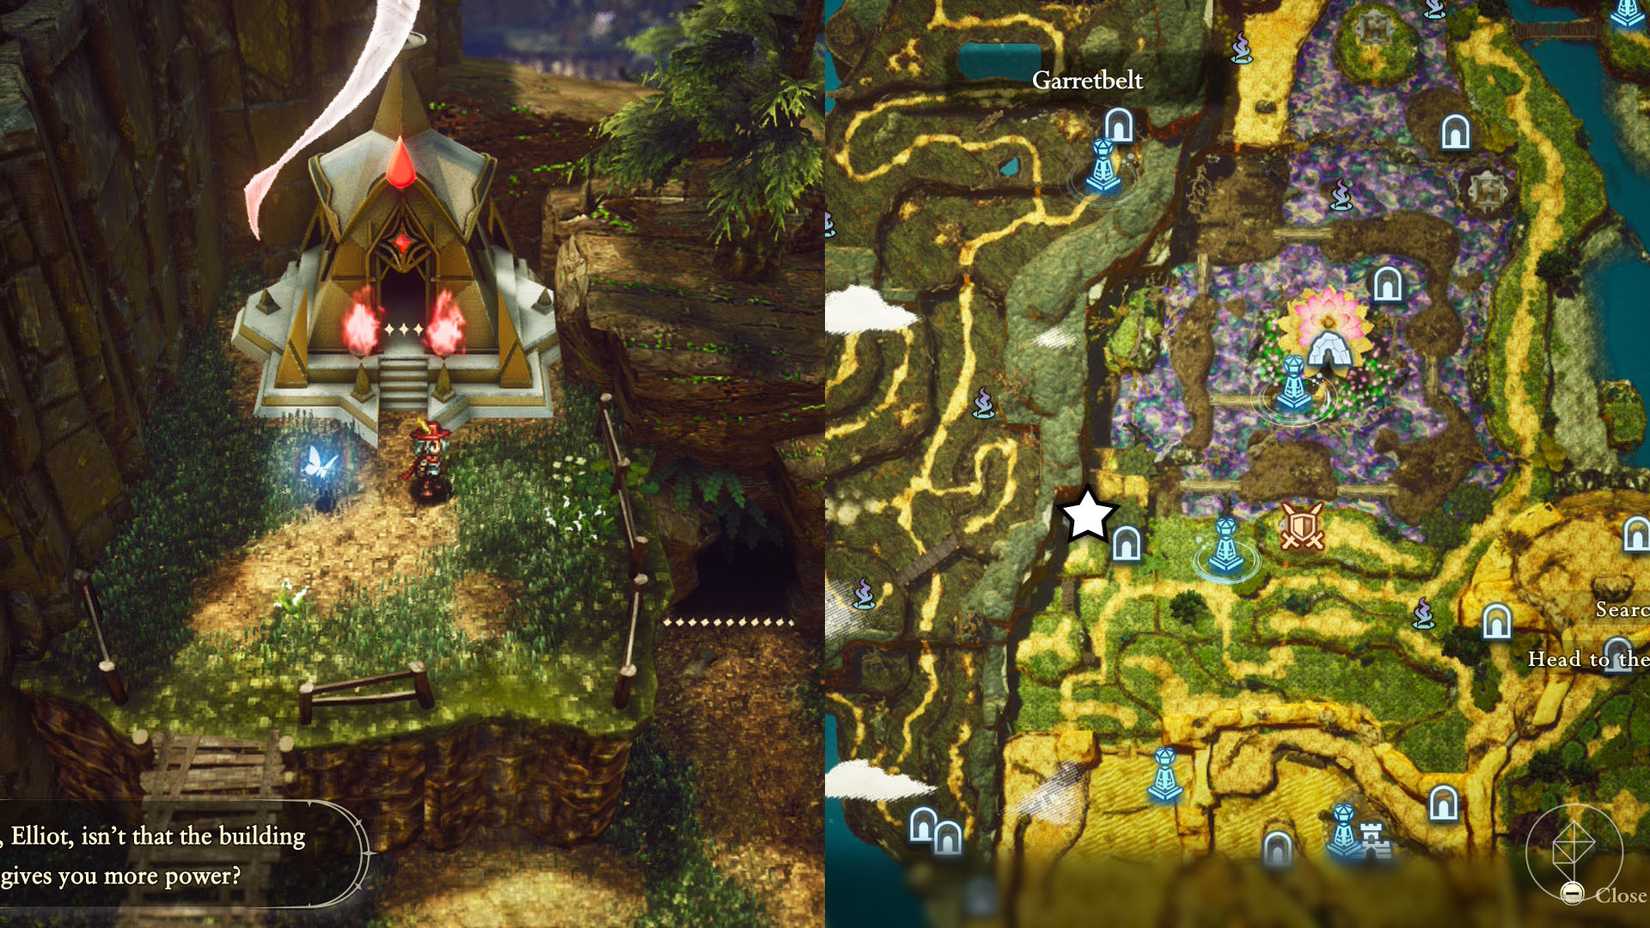
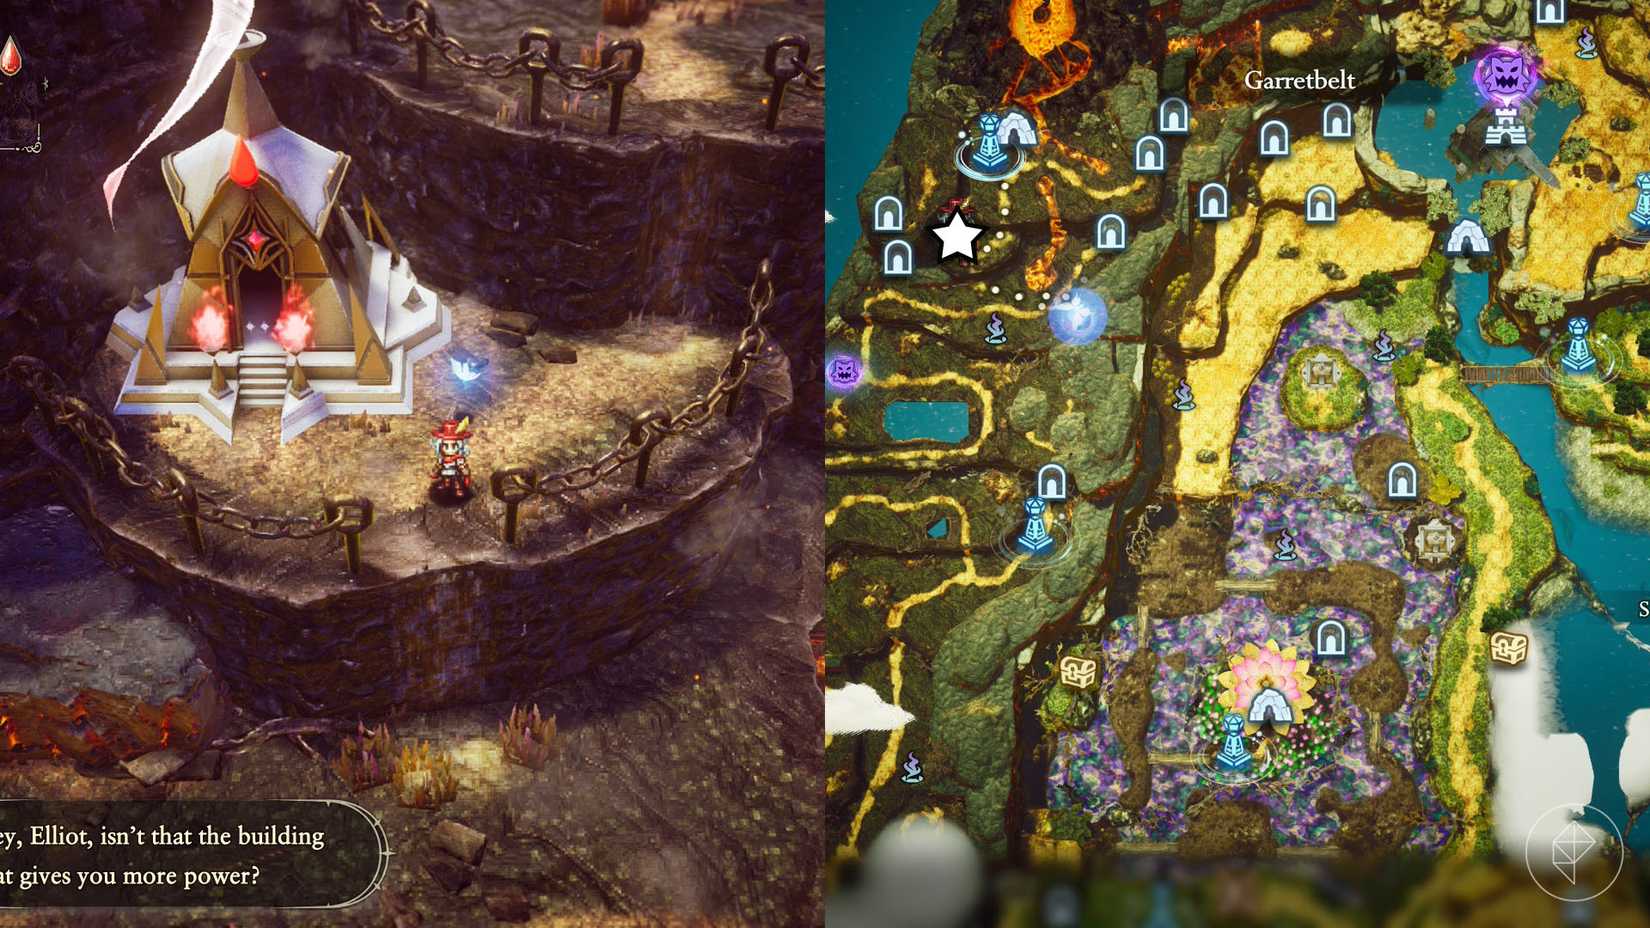
Garretbelt |
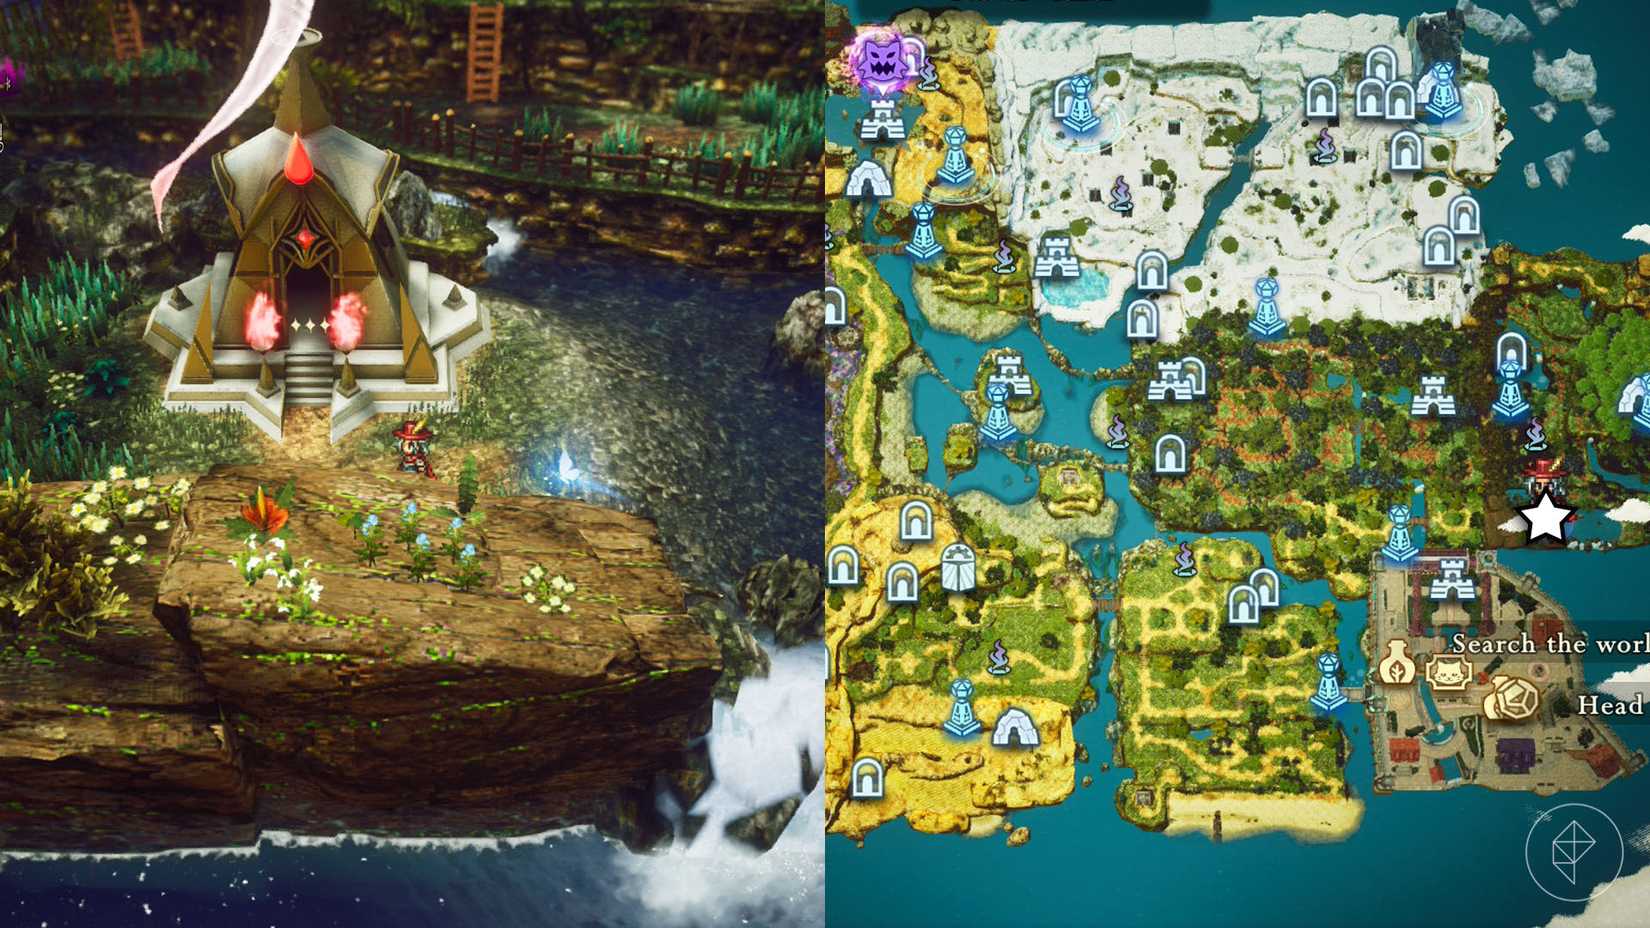
Go to the northern part of Garretbelt and reach the Mount Phoenix – Approach guidepost. From there, head south and drop off the edge to reach the Shrine of Life 18. |
|
Westerea |
Go east of the Northern Westera guidepost to find the chest with this shard. |
|
Whiterea |
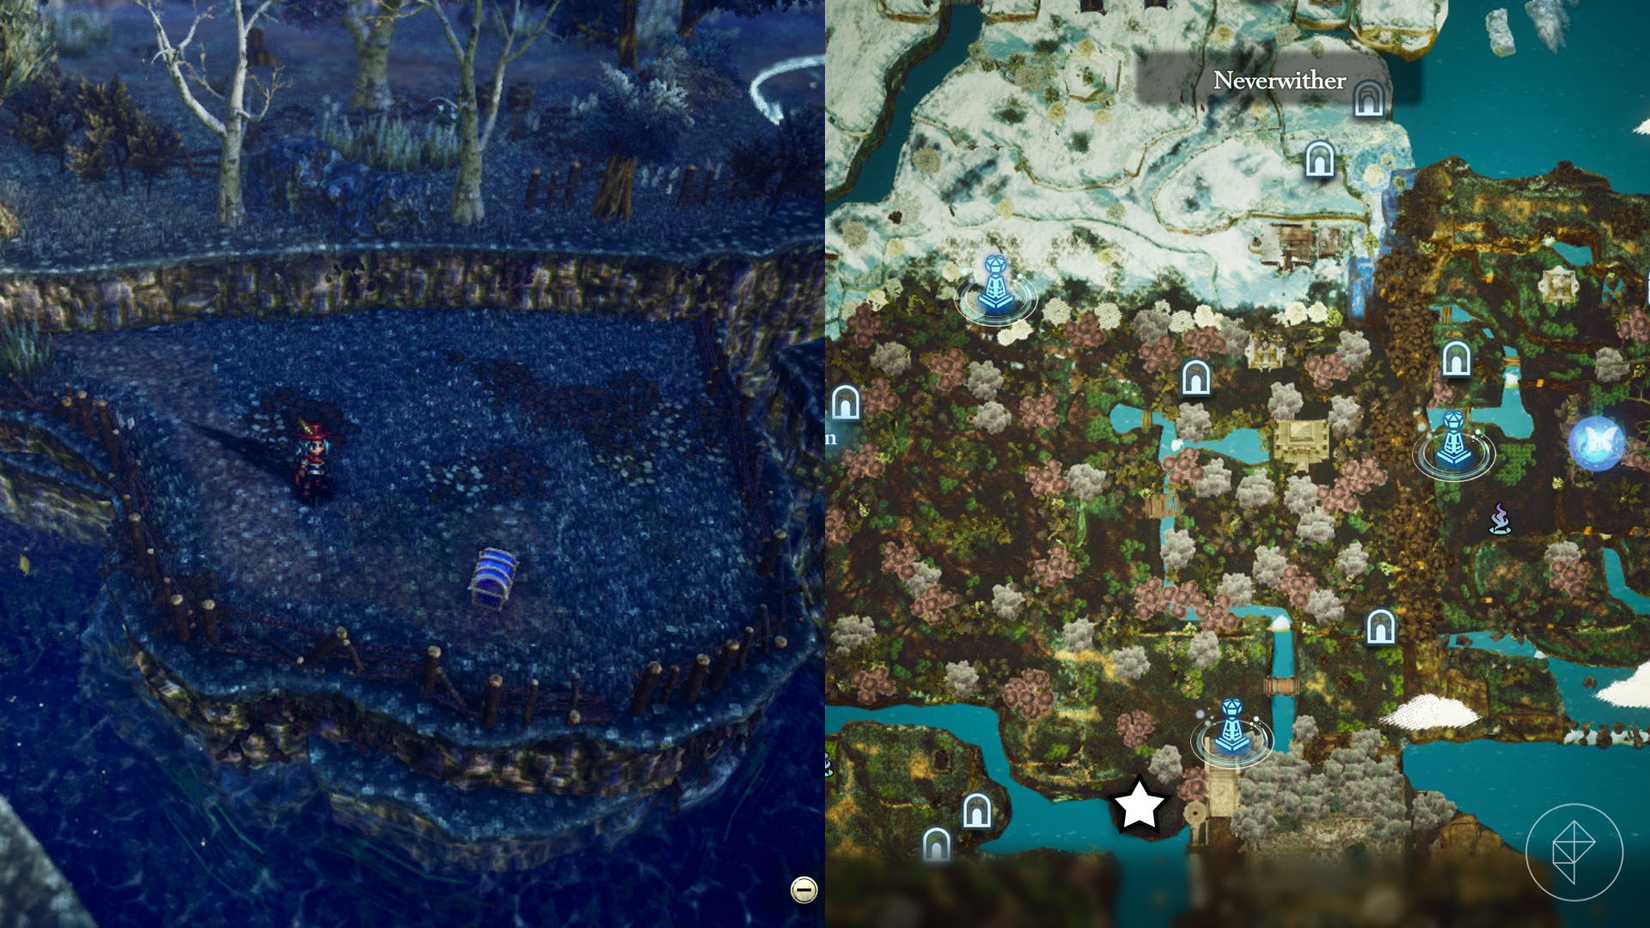
Use Secret Shortcut 3 in Whiterea to reach the area, near the river, where you can find this shard. |

|
Whiterea |
You find the Shrine of Life 5 north of Whiterea, and you must use Secret Shortcut 3 to reach the place. |
|
Neverwither |
The Shrine of Life 16 is located in the southeastern part of Neverwither. |
|
Westerea |
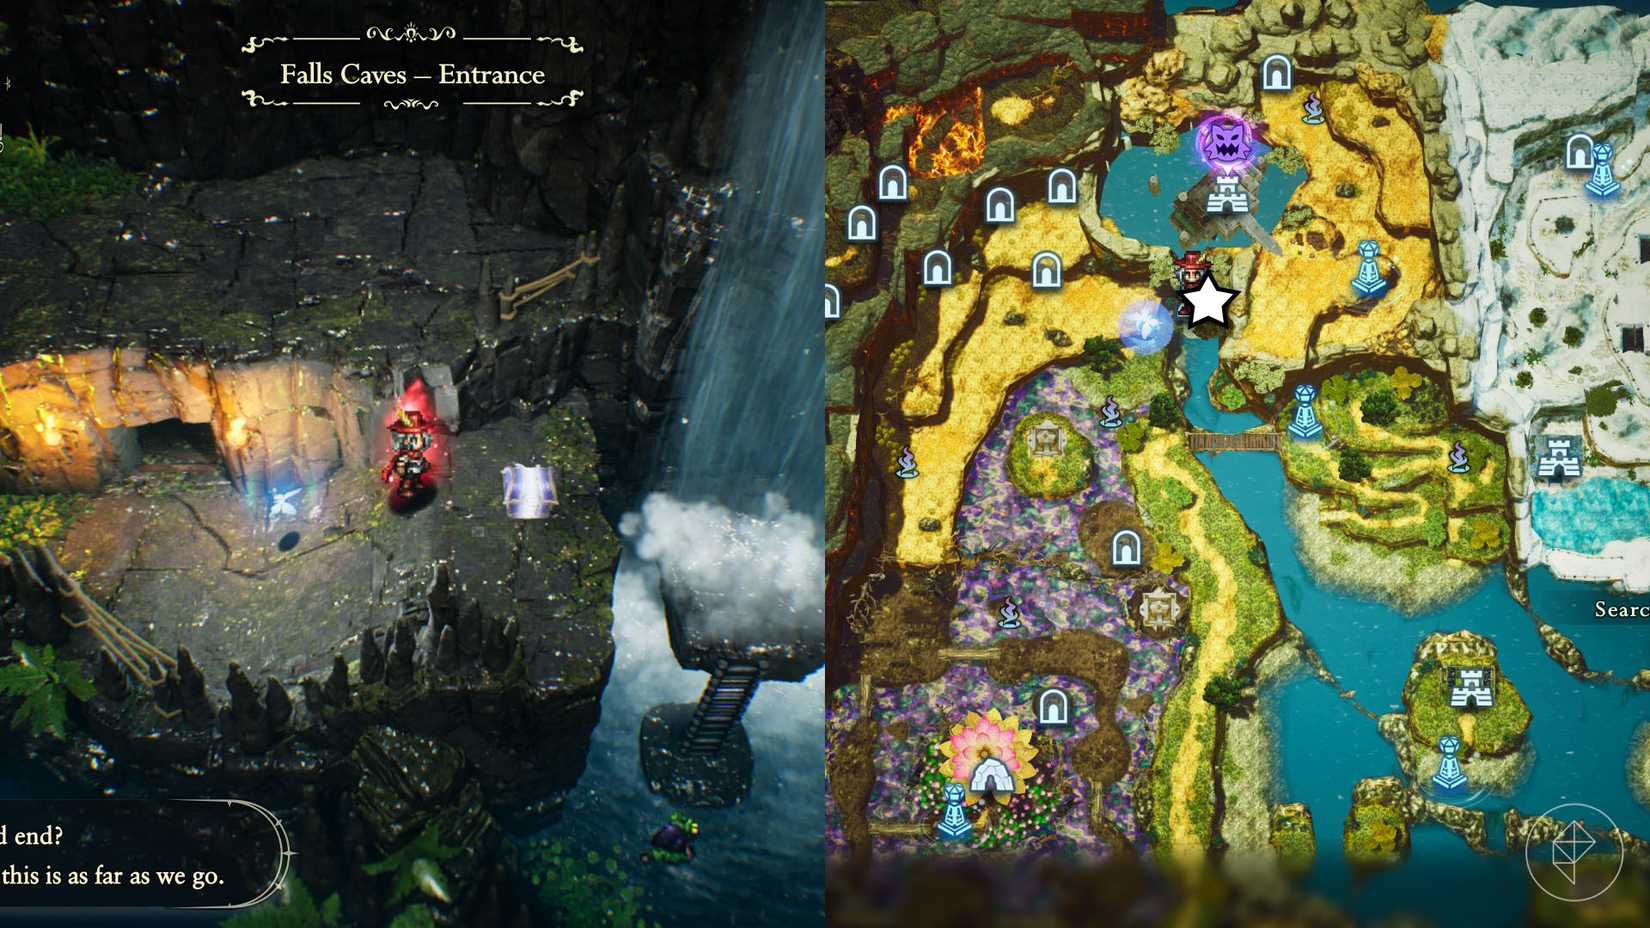
This shard is located in the Falls Caves, south of the Northern Tower. Use the Northern Westerea guidepost, head to the river on the left side and swim your way north to find the caves. |
Table images: Graphic: Paulo Kawanishi/Polygon | Source images: Square Enix and Claytechworks/Square Enix via Polygon
All Age of Reconstruction Shard of Life locations in The Adventures of Elliot
You can find 18 Shards of Life in the Age of Reconstruction. While most of them you can obtain without too much trouble, you will need to learn the dive ability to collect a few shards.
|
Neverwither |
To reach the Shrine of Life 3, you must use Secret Shortcut 2 southeast of Neverwither. You must have unlocked the bomb to open the entrance. |
|
Neverwither |
Go west of the Littlehope Village – Northern Entrance guidepost to find some boulders blocking a ladder. Use a bomb to destroy them and get to the chest. |
|
Whiterea |
You must use Secret Shortcut 3's northwest entrance to make your way to where the Shrine of Life 4 is located. |

|
Whiterea |
This chest is located inside the Northern Caverns and you find its entrance on the northwestern side of Whiterea. Inside, on the east side of the cave, there's a blue chest. To reach it, use the spear to break the vases and jump to where it's located. |

|
North of Western Fields of Flon |
You will find this chest on a small island north of the Western Fields of Flon. |

|
Western Fields of Flon |
The Shrine of Life 2 is located north of the Western Fields of Flon. |

|
Northern Tower - Westerea |
East of the sublevel one, enter a room with two pillars. Align them to bridge your way to the platform with a blue chest that contains the shard. |

|
Westerea |
Find this chest to the right of the Southern Westerea guidepost. |

|
Eddartrayl |
From the Geared Ruins, head southwest and follow the path that takes you upwards to find this chest. |

|
Eddartrayl |
The Shrine of Life 8 is located northwest of Eddartrayl, but to reach it you must use a bomb to open the entrance to Secret Shortcut 4 on the southwestern side of Eddartrayl. |

|
Southern Caves (Desert exit) - Eddartrayl |
You pass through the Southern Caves during the campaign to reach the Shrine of Mystic - Ignite. The chest is behind a path, and you must have unlocked the hammer to open the way for the platforms that take you to the chest containing this shard. |

|
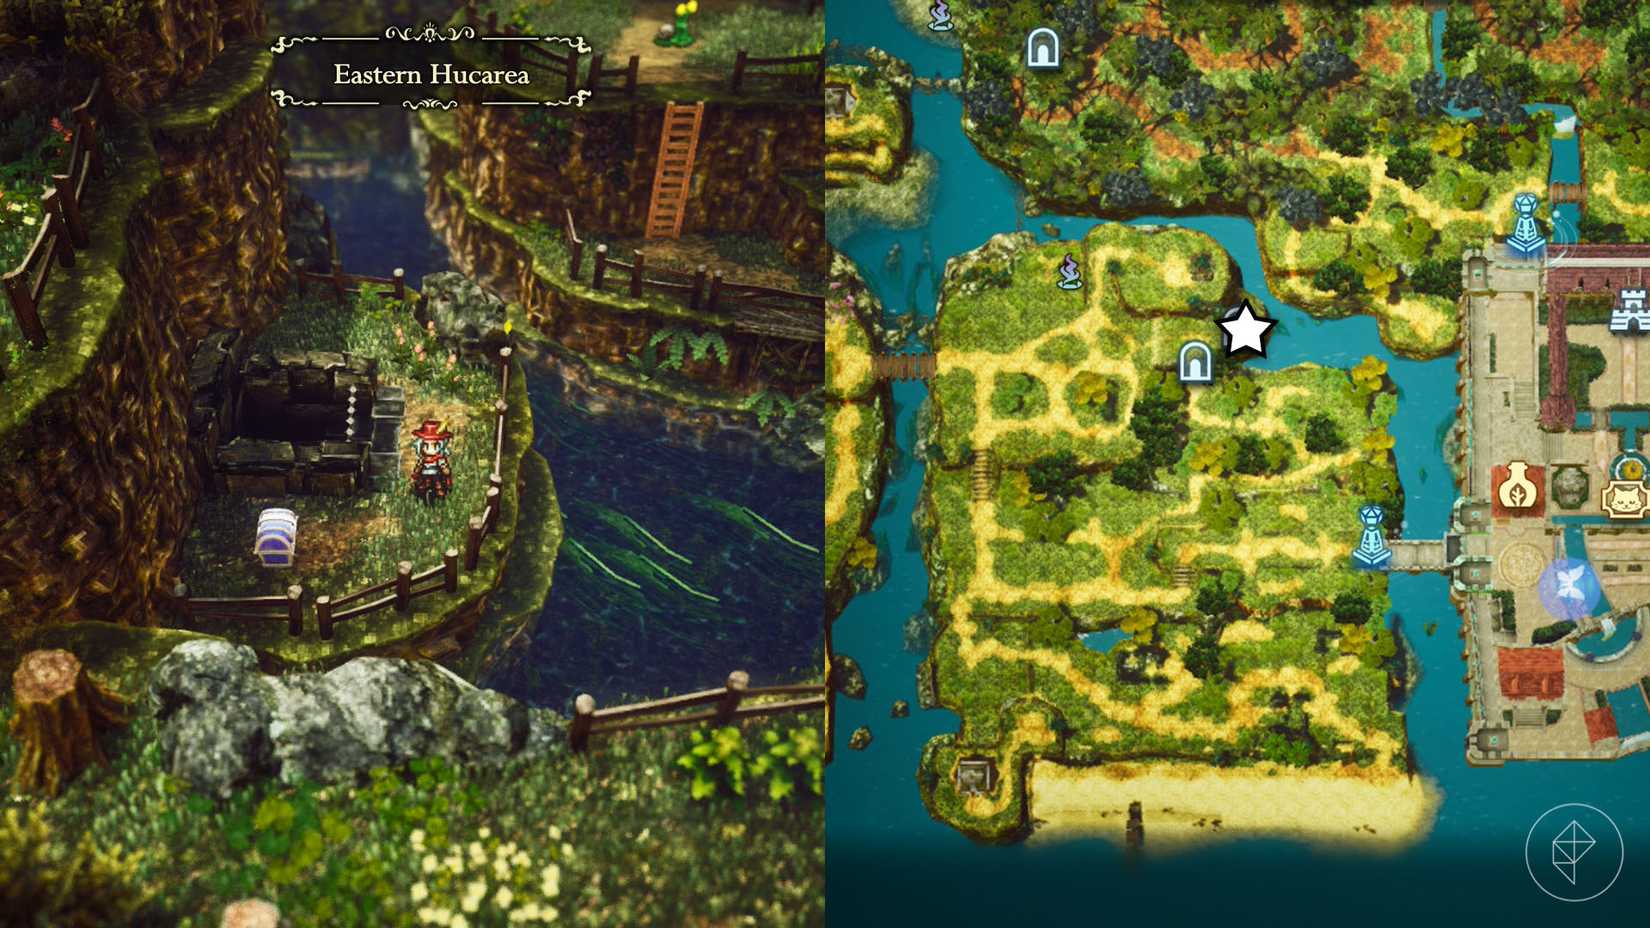
Neverwither |
This Shard of Life is inside a chest on the southeast side of Neverwither. Go south from the guidepost outside the Eastern Cave, take the route to the east and swim to the other side of the small lake to find it. |

|
Grandtree - Neverwither |
The chest containing is located on the northern side of the first level in the Grandtree. To reach the place, you must drop from the southwest area on the second level. |

|
Doorway Ruins - Neverwither |
On the west side of sublevel two, there's a room with two moveable mirrors and on the south side of it, you will find the chest on a platform. |

|
Garretbelt |
Shrine of Life 7 is located on the western side of Garretbelt. You can reach the area by using the Western Caves. |

|
Westerea |
Southwest of the Water Ruins, there are two elevated platforms. You can access the one on the left using a ladder, then jump on the one to the east to find a blue chest containing the shard. You can only access this area after having unlocked the ability to dive. |

|
Water Ruins surroundings |
Shrine of Life 6 is located to the right of the Water Ruins. |

|
Dragonpillar - Whiterea |
Use the stairs to reach sublevel three. As soon as you're on the level, you will see the chest containing this shard. |
Table images: Graphic: Paulo Kawanishi/Polygon | Source images: Square Enix and Claytechworks/Square Enix via Polygon
All Age of Magic Shard of Life locations in The Adventures of Elliot
Among the 13 Shards of Life in the Age of Magic, you will only need to have unlocked specific abilities to collect a couple of them.

|
Eastern Fields of Flon |
On the northeastern side of the Eastern Fields of Flon, to the right of the Secret Shortcut 1 entrance. |

|
Eastern Fields of Flon |
The Shrine of Life 11 is located on the north side of the Eastern Fields of Flon. |

|
Eddartrayl |
You find the Shrine of Life 13 on the southeastern side of Eddartrayl. |

|
Westerea |
Head northeast of the Rainbow Lotus dungeon to find the Shrine of Life 12. |

|
Garretbelt |
This chest is north of Garretbelt. You must go through Monster Trail 5 to reach the place after having obtained the key to the Western Caves. |

|
Garretbelt |
The Shrine of Life 17 is on the southern side of Garretbelt, near the Doorway Ruins. |

|
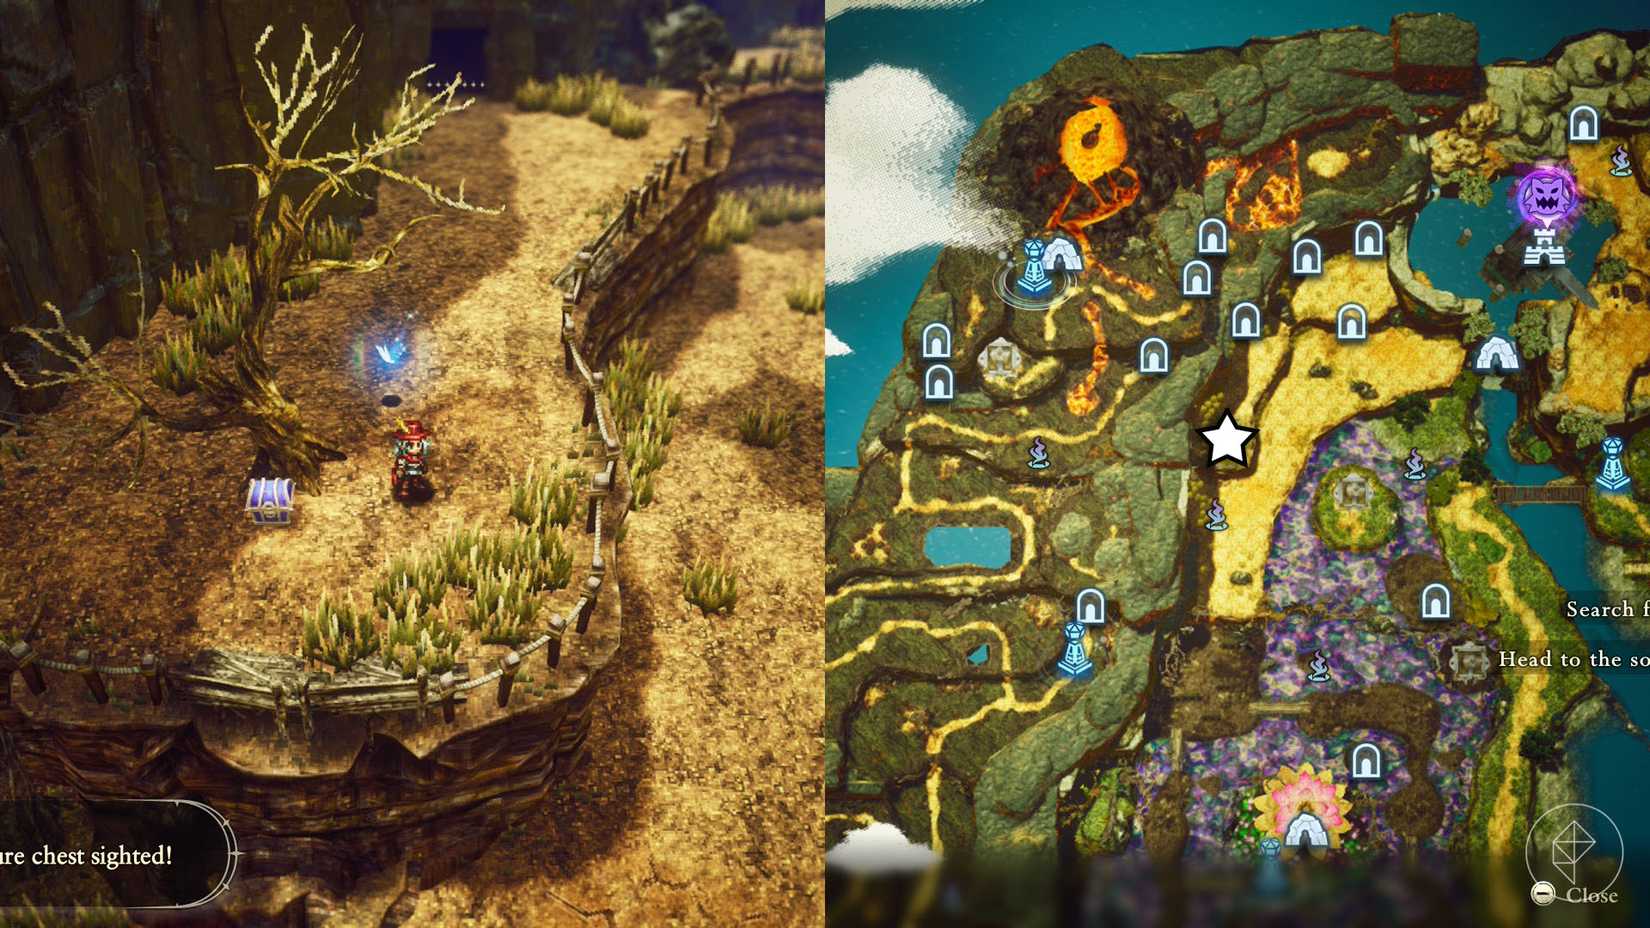
Fire Ruins - Garretbelt |
You find this chest inside the Fire Ruins, on the northwest side of the first level, coming from the sublevel one. |

|
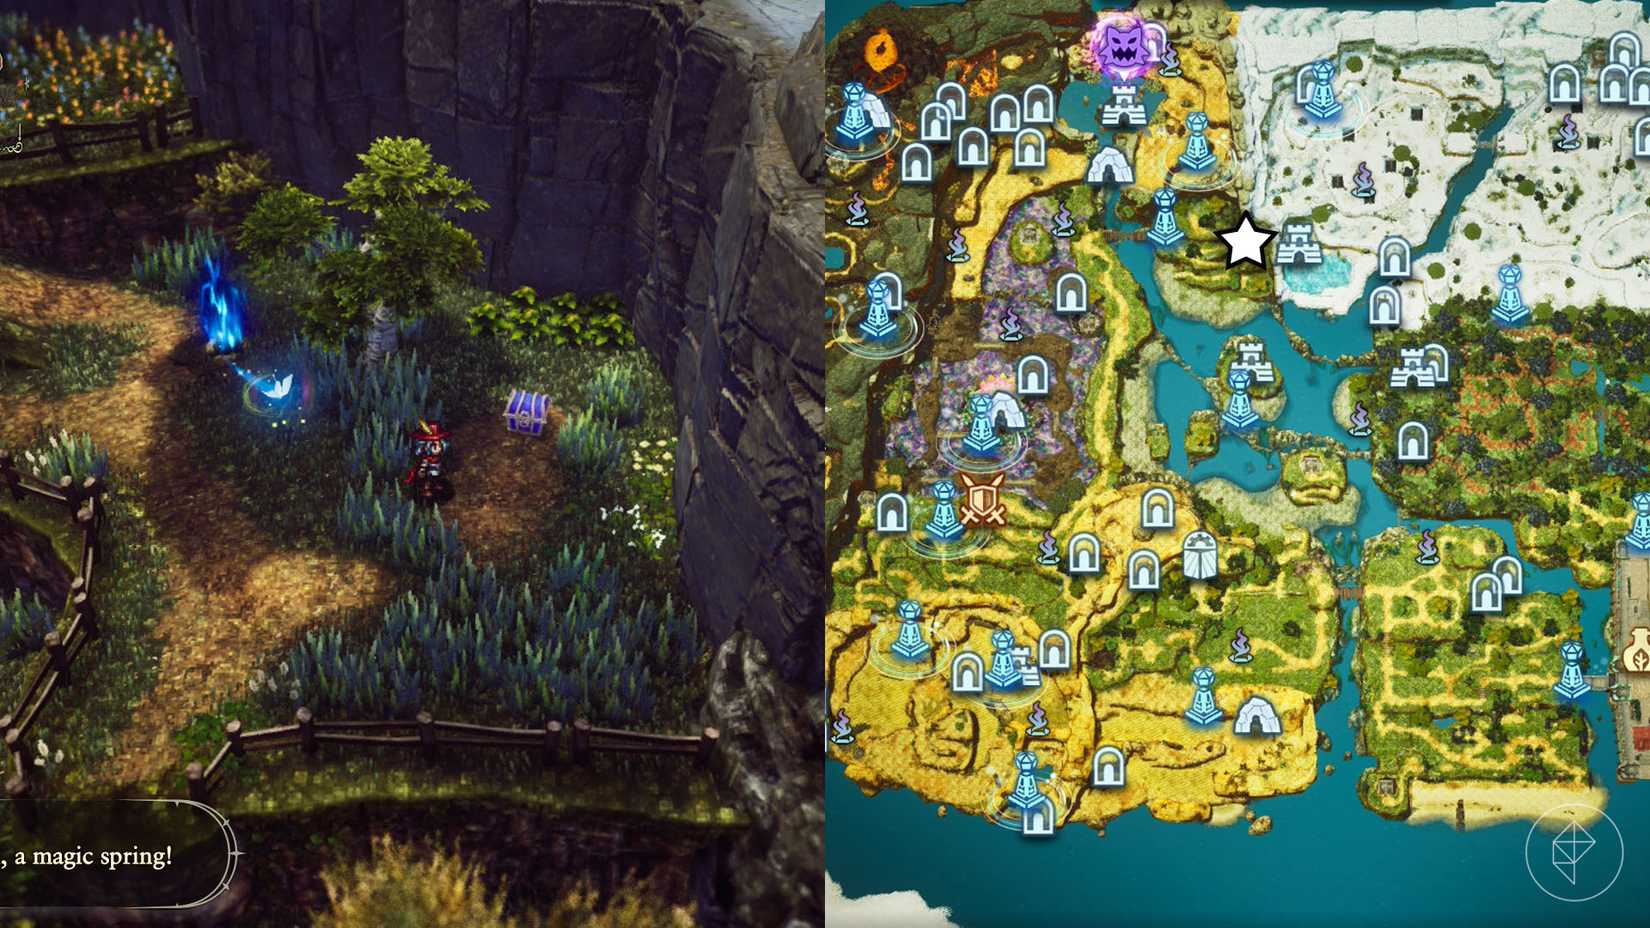
Eddartrayl |
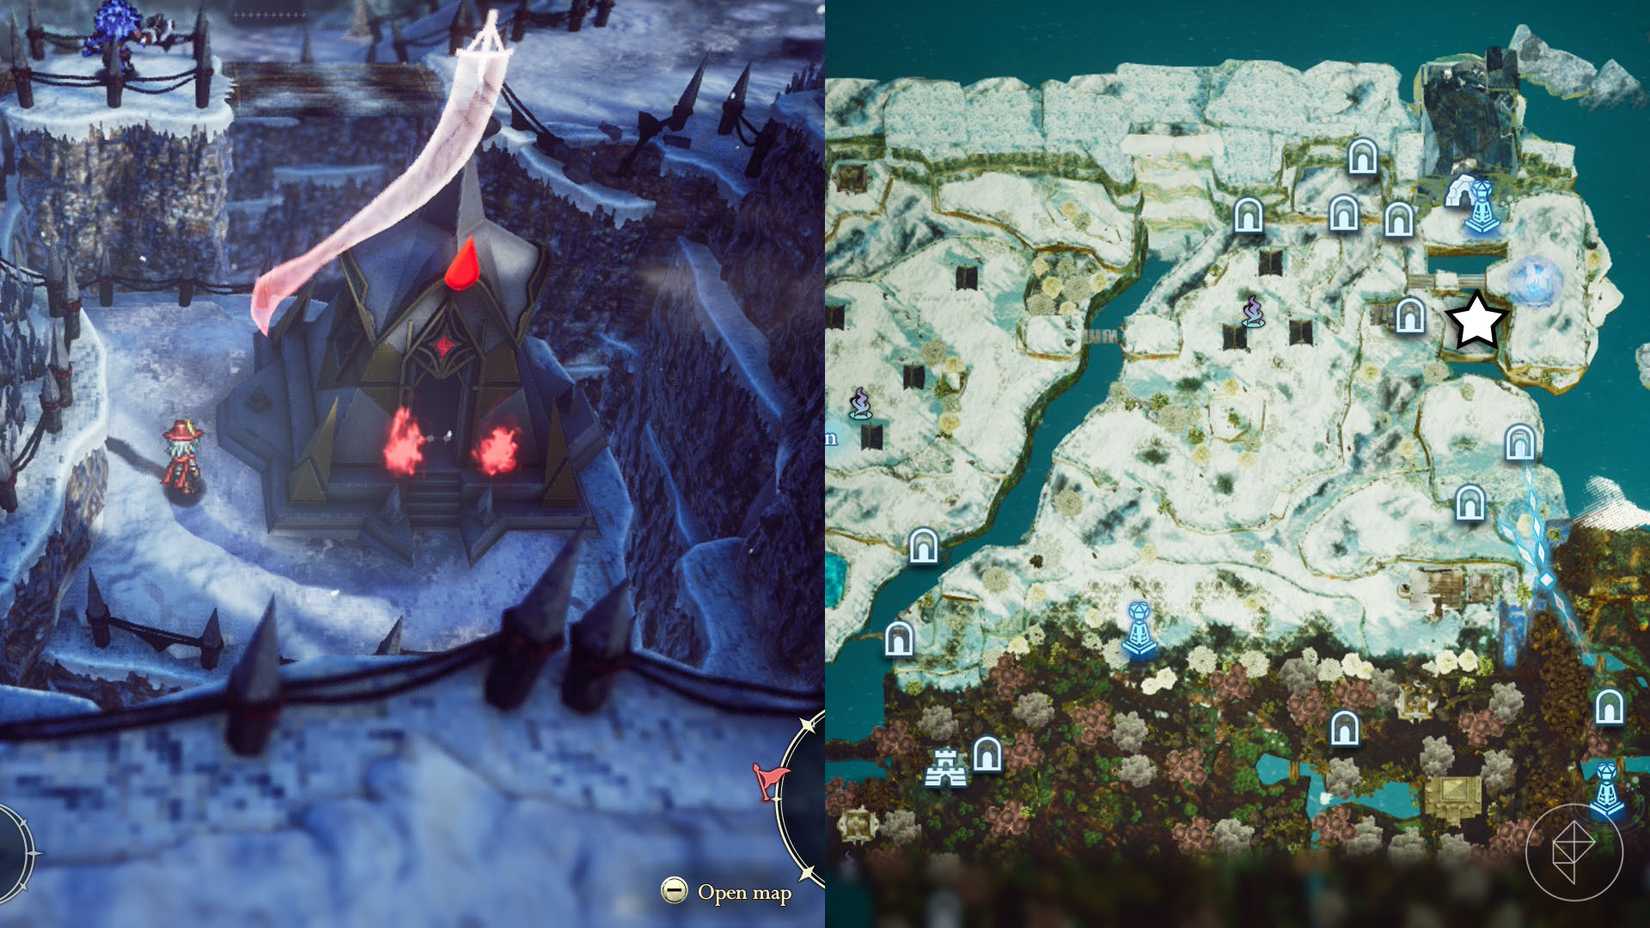
To reach the Shrine of Life 14, use Secret Shortcut 3 to reach the upper part of the snowfield in Whiterea, where you will find a chest containing this shard. |

|
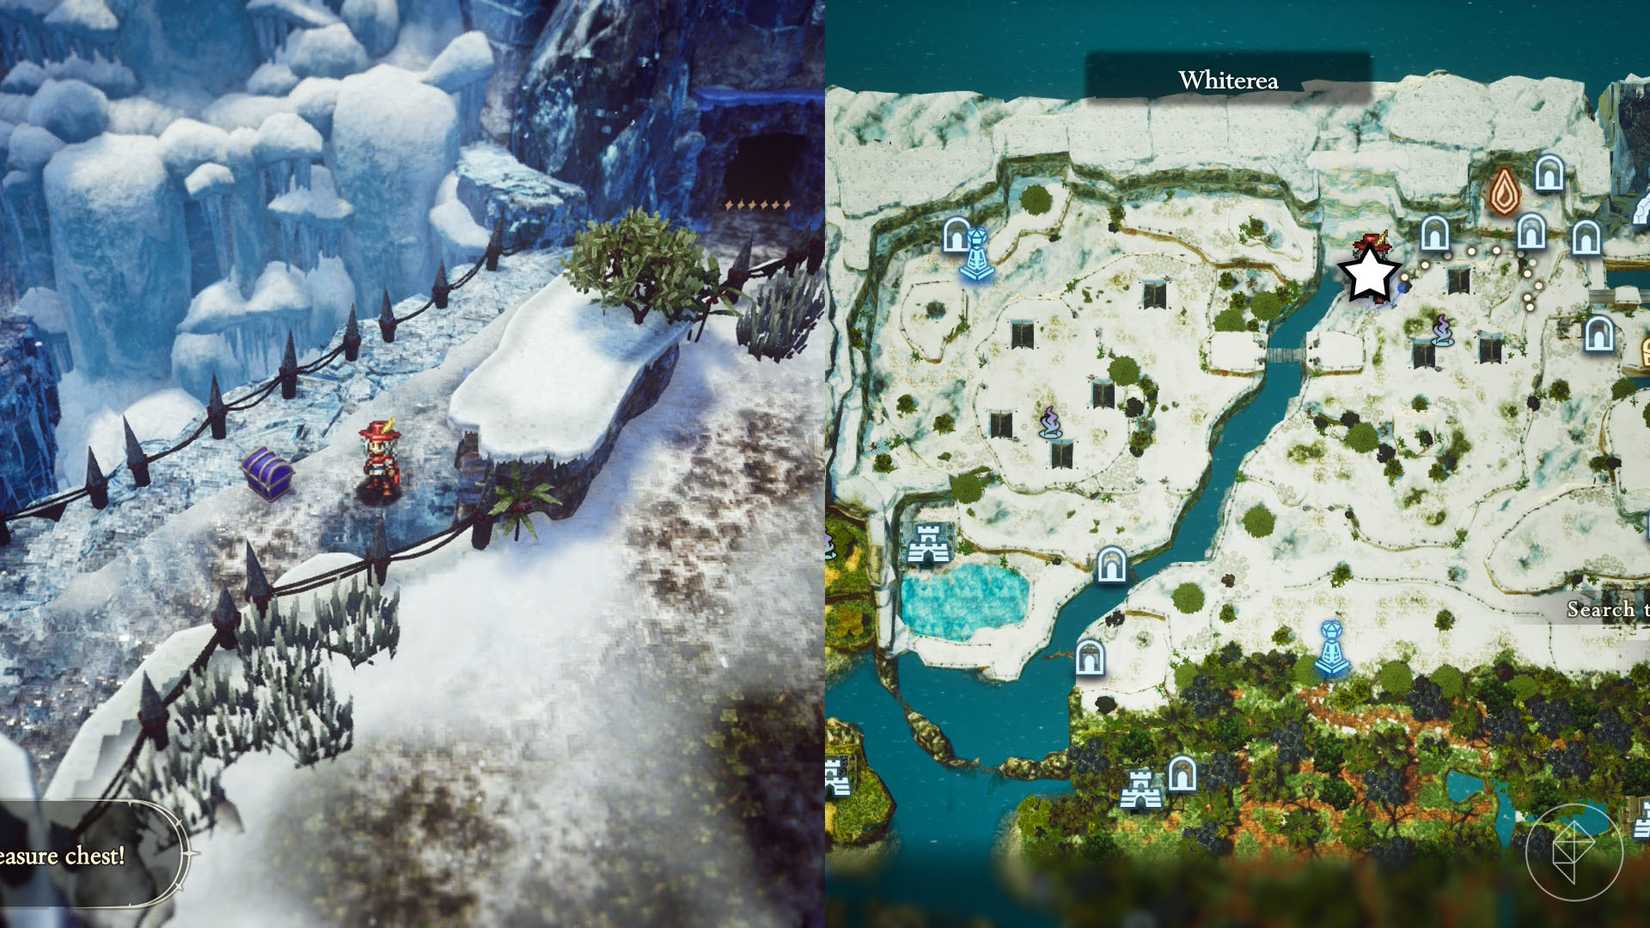
Whiterea |
Use Secret Shortcut 3 to reach the upper part of the snowfield in Whiterea, where you will find a chest containing this shard. |

|
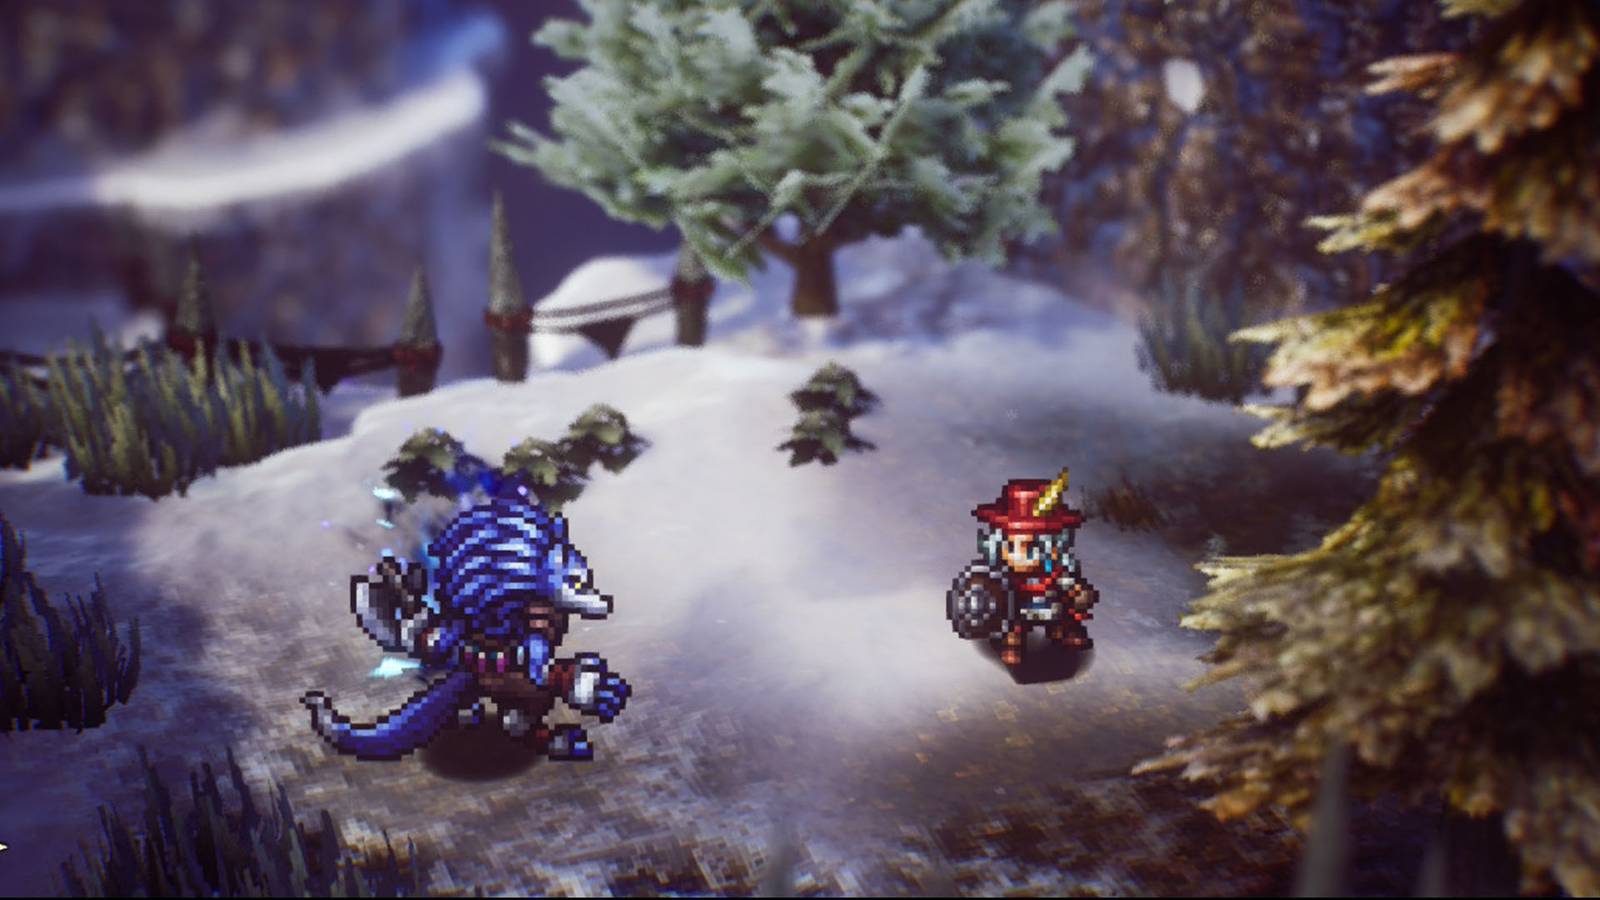
Ice Ruins - Whiterea |
After unlocking Faie's Vacuum spell, go to the west wing of the Ice Ruins. Use her ability to open the door and head northeast to find this chest. |

|
Whiterea |
The Shrine of Life 15 is located on the west shore of Whiterea. To access this shrine, you must unlock the dive ability and enter Monster Trail 4 east of the Ice Ruins in Whiterea. From there, the only exit available will take you to the shrine. |

|
Water Ruins - North of Western Fields of Flon |
Use the stairs to reach sublevel two, then activate the orbs on the east side to raise the water level. Swim to the south side of the map then head right to find the chest. |

|
Rainbow Lotus - Westerea |
The chest is on the first level, but you must go to the sublevel one to find the stairs that will lead up to the area from where you can reach the chest. |
Table images: Graphic: Paulo Kawanishi/Polygon | Source images: Square Enix and Claytechworks/Square Enix via Polygon
All Age of Budding Shard of Life locations in The Adventures of Elliot
By the time you reach the Age of Budding, you might have already unlocked most abilities and spells you will need to collect all 13 Shards of Life in this age.

|
North of Western Fields of Flon |
Head to the north Western Fields of Flon and use a bomb to break the wall and enter the lake. Swim to the west and dive to reach the beach that gives you access to the ladder to climb the small island. |

|
Western Fields of Flon |
The Shrine of Life 19 is located on the northern side of the Western Fields of Flon, but you must go around it to reach the ladder that gives you access to the shrine. |

|
Desert Caves - Eddartrayl |
Reach sublevel two by dropping off the hole in the first level, then taking the stairs to the northwest side of sublevel one. Then, open the chest to get this shard. |

|
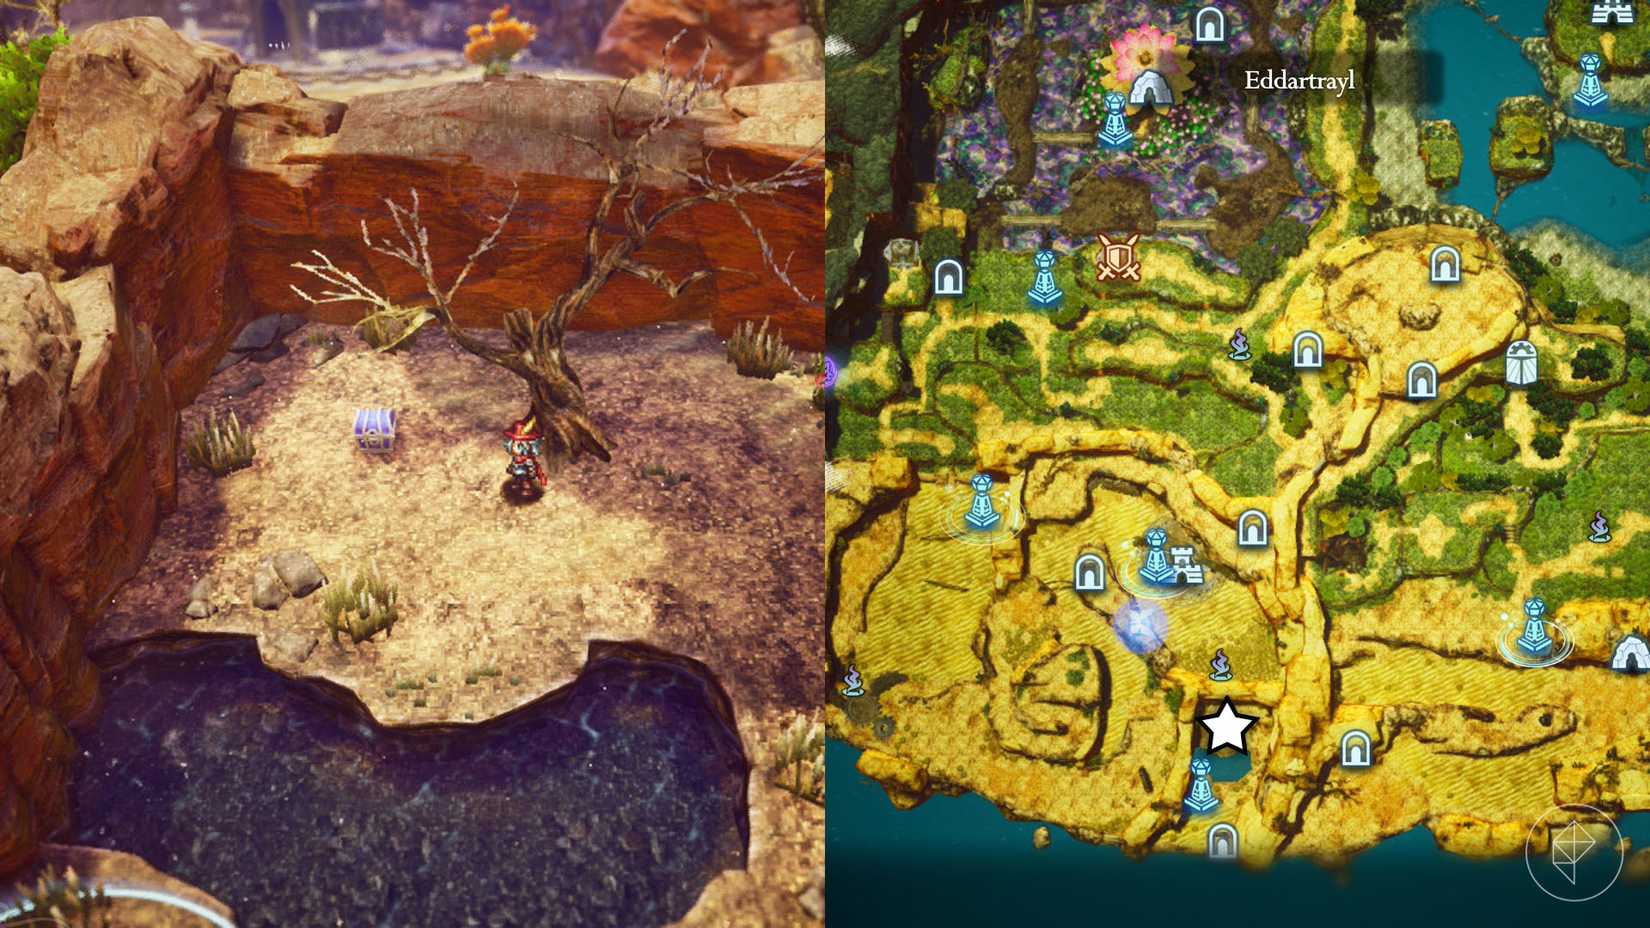
Eddartrayl |
Shrine of Life 20 is on the southwest side of Eddartrayl. Take the Southern Caves – Desert Exit and head southwest to reach the area where the shrine is located. |

|
Western Fields of Flon |
Enter the Southern Caves – Desert Exit on the southwest side of Eddartrayl and head north to reach the area where you will find the chest containing this shard. |

|
Neverwither |
The Shrine of Life 23 is near the Grandtree in Neverwither. The only path to its location is along Monster Trail 6. The trail's entrance is on the river located southeast of the shrine. |

|
Dragonpillar - Whiterea |
Head to sublevel three and, on the west side, use the Warp magic to reach the chest. |

|
Whiterea |
This shard of life is located on the northwest side of Whiterea, near the Northern Whiterea guidepost. |

|
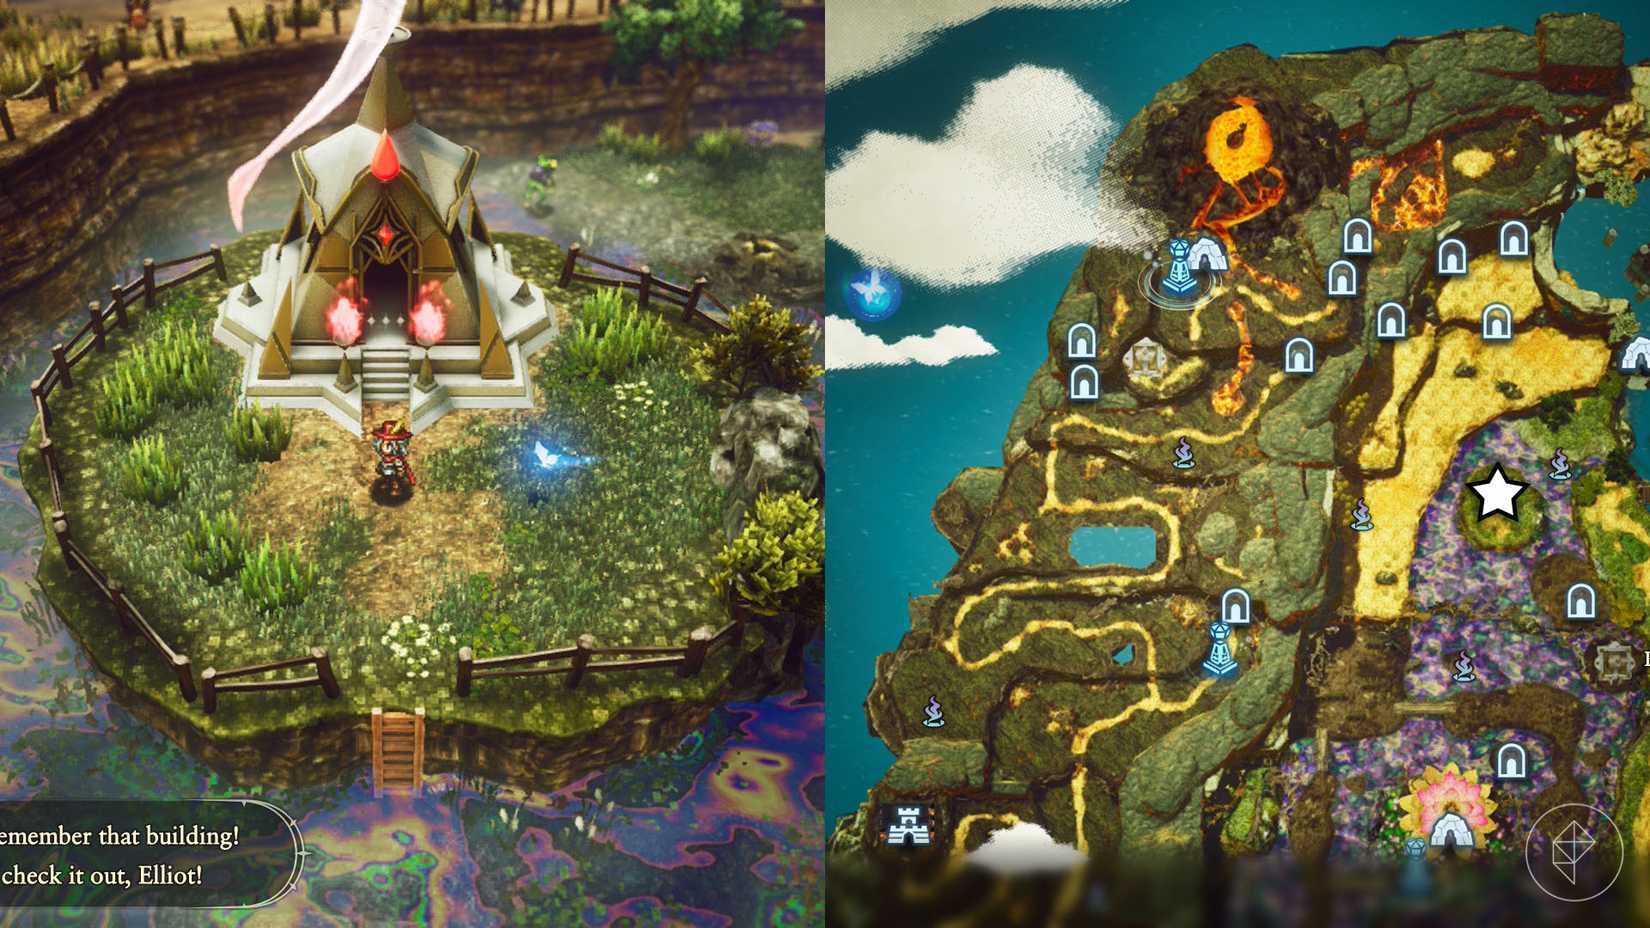
Mount Phoenix - Garretbelt |
On the first level, on the west side of the map, you can open this chest after having raised the bridge by lighting a pillar near the area. |

|
Garretbelt |
You find the Shrine of Life 24 on the northern side of Garretbelt. Go through the monster trail 5 to reach the place. |

|
Westerea |
Shrine of Life 22 is located northwest of Westerea. To reach the location, you must use Monster Trail 3. |

|
Water Ruins surroundings |
This chest is located on the largest island southeast of the Water Ruins. You can reach it by heading to the northern side of the Western Fields of Flon. |

|
Garretbelt |
Use the Secret Shortcut 7 passage, southwest of Mount Phoenix to reach this chest. |
Table images: Graphic: Paulo Kawanishi/Polygon | Source images: Square Enix and Claytechworks/Square Enix via Polygon


 English (US) ·