
 6 months ago
117
6 months ago
117
If you’re into practical printing and crave more build volume than the Bambu Lab X1 Carbon can provide, the QIDI Plus4 might be just what the doctor ordered. With its 305 x 305 x 280 mm build area and toasty heated chamber, the Plus4 can knock out incredible prints in technical filaments like ABS, ASA, or Nylon while also doing a nice job with PLA and TPU - if you don’t mind popping the lid off.
At $799 for a single-color machine, the Plus4 delivers all the perks you would expect from a high-class printer: hands-free calibration and automatic leveling, lightning speed with input shaping, a high flow hotend, a built-in camera, and plenty of fans for cooling and air filtration. The heated chamber is a newer feature I love to see, and it really helps when you’re printing with a squirrelly filament prone to warping.
QIDI is also teasing the release of a four-color “QIDI Box”, which is promised to release in the coming months. The Plus4 is ready to go with the internal filament cutter and wiper it would need for swapping colors, which suggests this machine can be easily upgraded. This is wonderful news for anyone who wants a high-end Core XY now and doesn’t mind waiting around for the color upgrade.
My only problem with the QIDI 4Plus was filament loading. I found you really have to jam the filament in to get it through to the extruder. Since it purges straight into a black chute at the back of the machine, it can be hard to tell if the new material is feeding unless you stand squinting at it. Several times, I found the machine air printing because I walked away while it was heating up and didn’t watch it go through its rather long loading song and dance. It’s not quite one of the best 3D printers you can buy, but it's close.
Specifications: QIDI Plus4
Swipe to scroll horizontally
Build Volume | 305 x 305 x 280 mm (12 x 12 x 11 in) |
Material | PLA/PETG/TPU/ABS (up to 370 degrees) |
Extruder Type | Direct drive |
Nozzle | .4mm (dual metal high flow) |
Build Platform | Double sided PEI flex plate, heated |
Bed Leveling | Automatic |
Filament Runout Sensor | Yes |
Connectivity | LAN, WiFi, USB Flash Drive |
Interface | 6 inch Color touch screen |
Machine Footprint | 505 x 487 x 550 mm (19.8 x19.1 x 21.6 in) |
Machine Weight | 27 KG (59.5 lbs) |
QIDI Plus4 : Included in the Box

The QIDI Plus4 comes with everything you need to get your printer set up. You get tools to maintain the printer, a scraper, and a USB stick. There’s also a small sample coil of black PLA to start your printing journey.
The printer comes with a PDF copy of the manual, a copy of QIDI Slicer and presliced sample model.
Design of the QIDI Plus4

The QIDI Plus4 is a well-built, boxy, fully-enclosed Core XY printer with a solid internal metal frame wrapped in faux metal plastic side panels with a glass lid and doors. It’s such a beast of a machine that the engineers gave it top-mounted handles so you’d have something to grab onto when slinging the 59-pound behemoth onto a table.
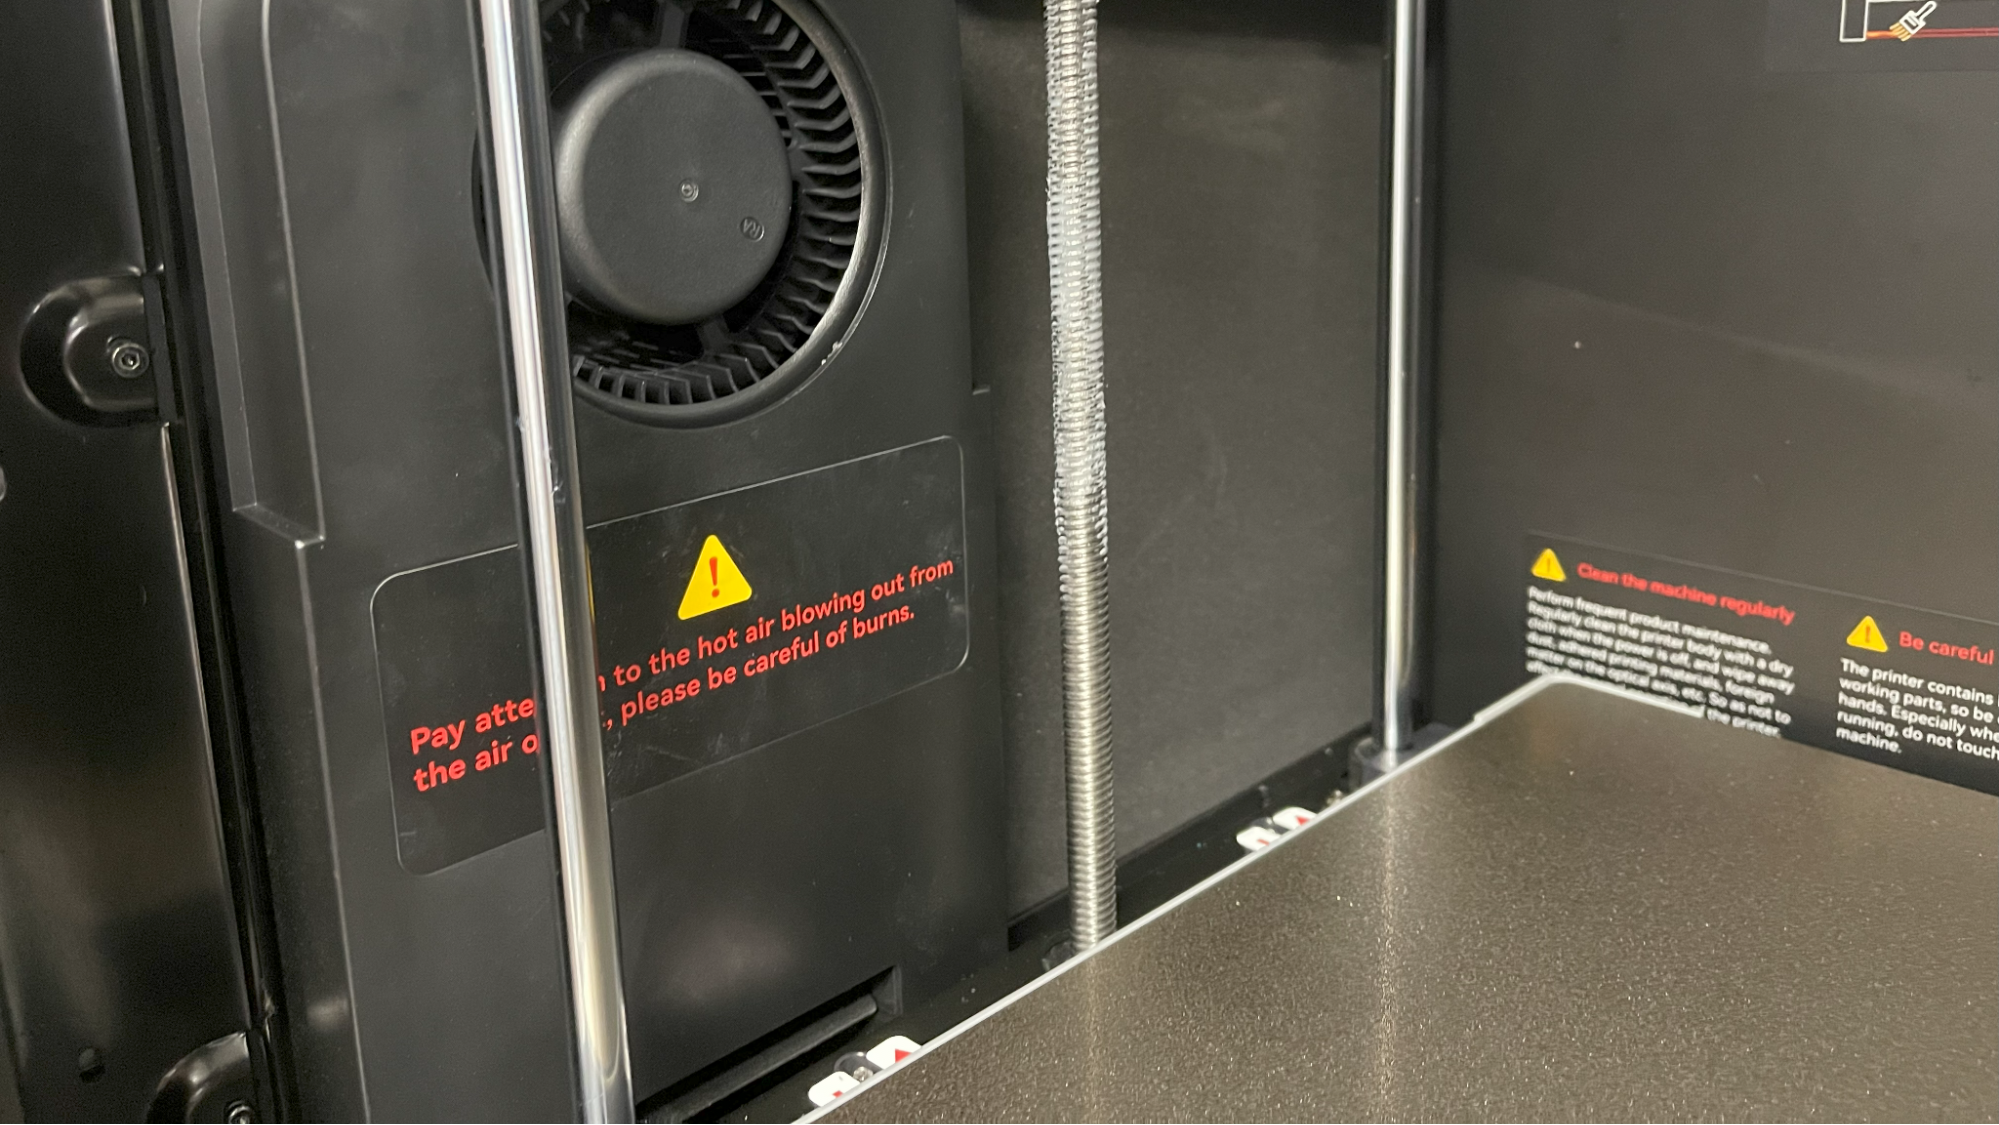
The Plus4 is tailor-made for engineering filaments. It has a heated chamber that can hit 55°C, a build plate that goes to 100 °C, and a nozzle that can reach 370°C – much hotter than most consumer printers. This allows the printer to handle more industrial grade materials like Polymaker’s Fiberon PPS-CF.
QIDI is using a fork of regular Klipper that has been customized for its machines. Unlike some companies, the firmware is still open and accessible for tweaking. Klipper’s input shaping and pressure advance are used to cancel out vibrations for nice smooth prints even at speed.
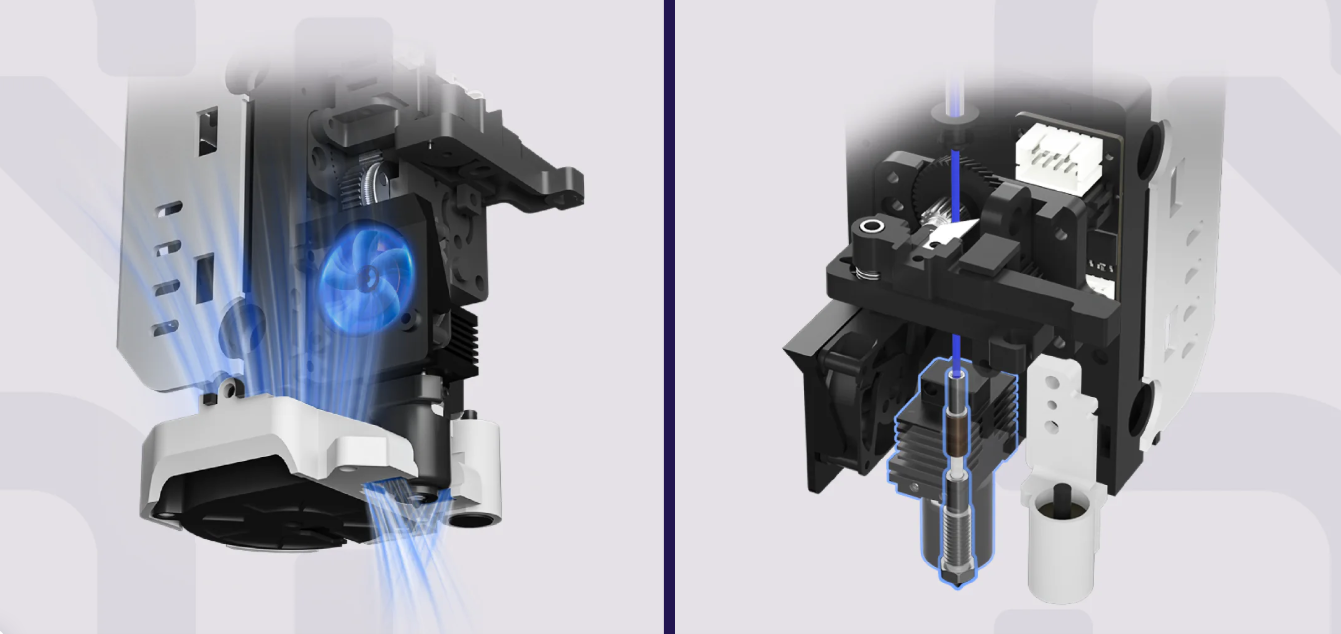
Like the previous QIDI Q1 Pro we reviewed, the Plus4 has been future-proofed with an internal filament cutter and nozzle wiper, making it compatible with a yet-to-be-released multicolor “QIDI Box” for color printing.
Its build plate is 305 x 305 mm with 280mm build height, making it bigger than its predecessor and the Bambu Lab’s core XY machines, and similar in size to the Creality K1 Max. It has a standard, double-sided, textured PEI plate, which doesn’t need glue for ordinary materials like PLA. The build platform has a 6mm aluminum plate to provide an extra flat surface, but requires a little extra time to warm up.
The lid is easily removed to provide air flow for PLA, PETG, and TPU. But when you want to run ABS, ASA, or anything else that needs a toasty warm enclosure, a separate heater is located inside the chamber for an extra boost. Unlike the Q1’s dubious heater, this one is completely covered for your safety.
The hotend is similar to the Q1 Pro, but has been updated with an 80W heater, a longer bi-metal composite nozzle with a hardened tip, and more cooling with a wrap-around fan.
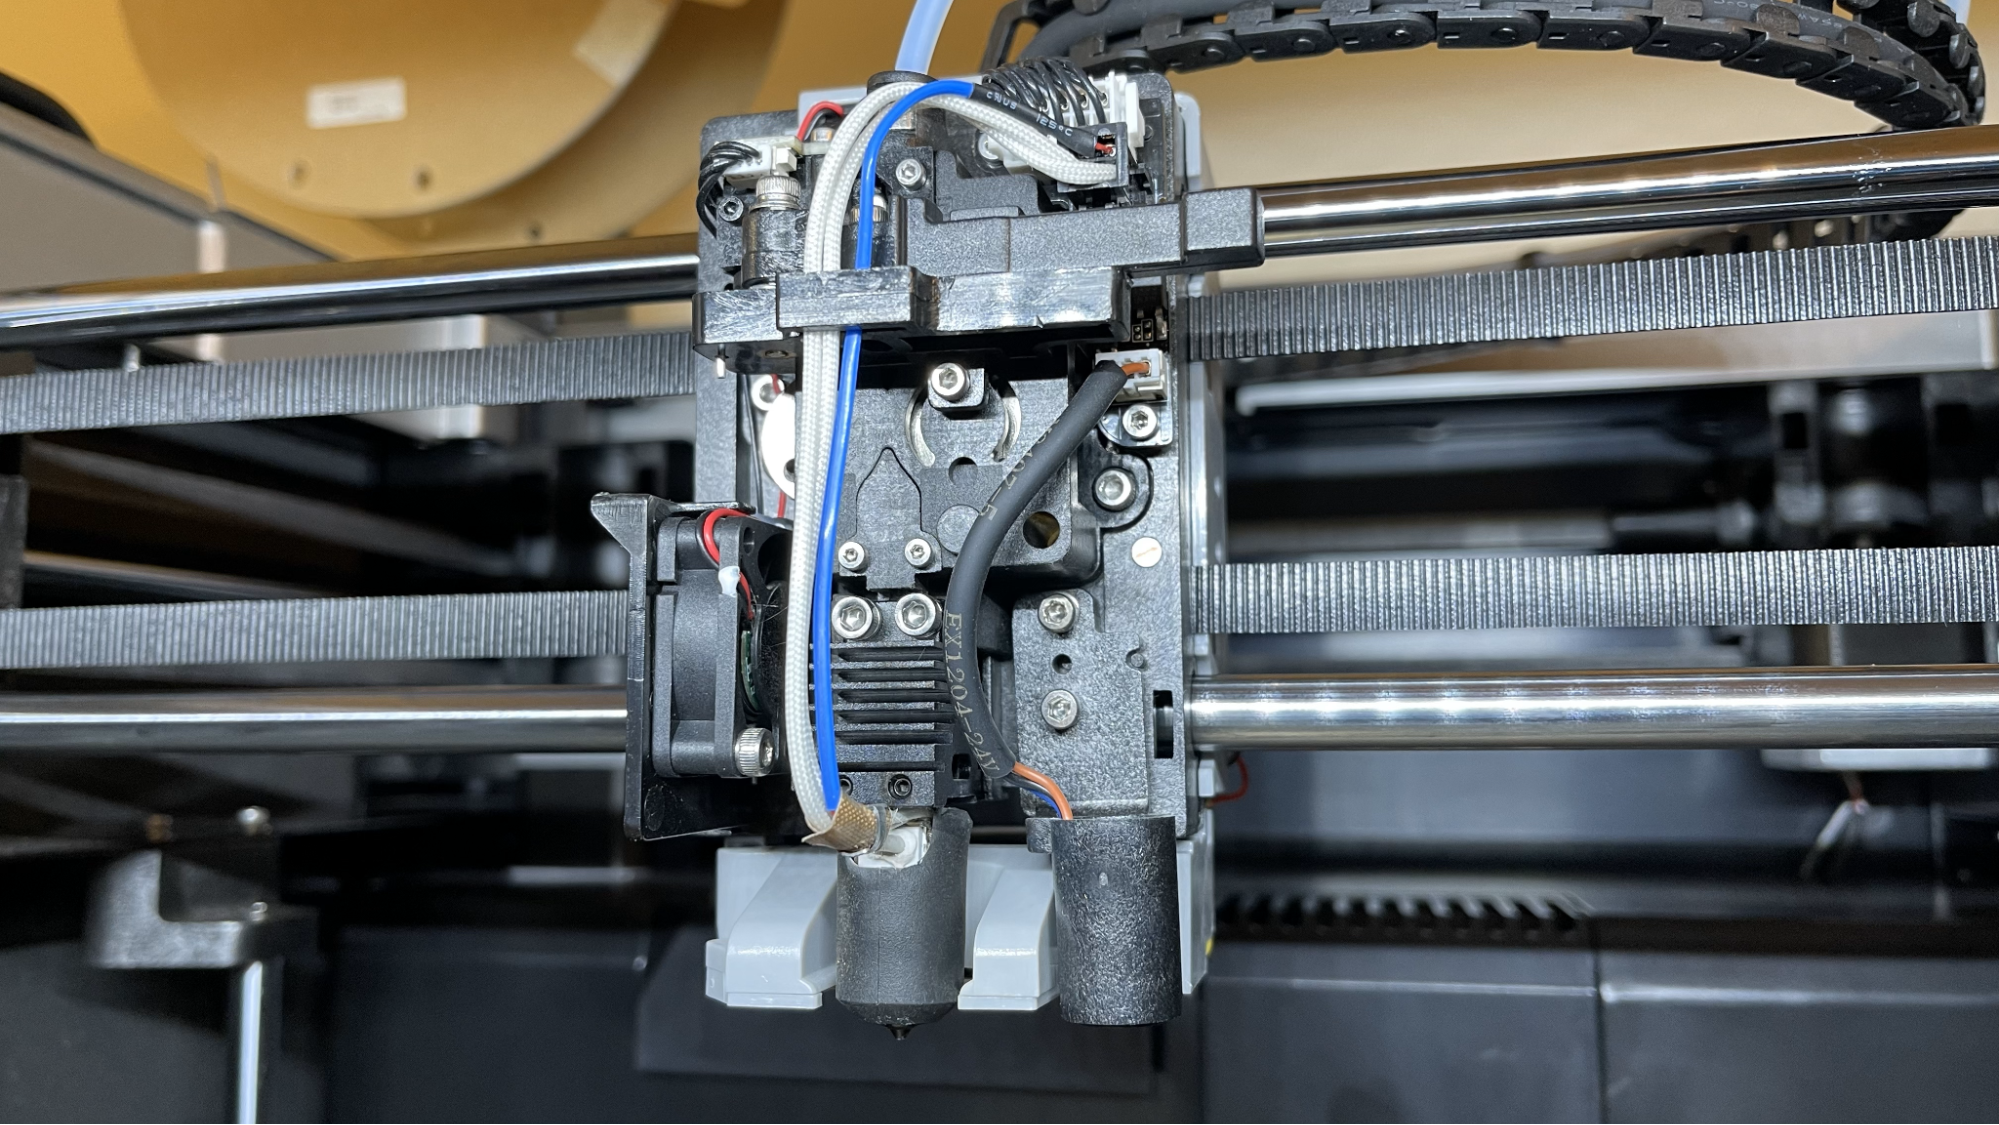
The new high flow nozzle is a more expensive ($20) “all-in-one” style with the throat attached, allowing for easier replacement. The hardened tip shouldn’t wear out anytime soon, but QIDI suggests having one nozzle for each type of filament to prevent clogs when switching from PLA to high-temperature filament. I did experience some clogging switching between TPU, PC Carbon Fiber, and PLA, but learned to use higher temperatures when loading materials to avoid trouble. Running a bit of extra filament through to make sure the nozzle is well flushed is also a good idea.
Another perk included with the Plus4 is a built-in 1080p camera for monitoring prints and creating timelapses. The camera feed pops up immediately when you access the Klipper interface. The chamber is brightly lit with LED, so you’ll get a good picture even if your room lights are off.
Assembling the QIDI Plus4

The QIDI Plus4 is 95% assembled and only needs to be unboxed and unpacked. You’ll need to remove all the packing foam, unscrew a few shipping screws, and pop on the filament holder, door handle and screen. After the screen is plugged in, you can power up the machine for a handy unboxing guide to make sure you’ve found (and removed) all the packing materials.
Leveling the QIDI Plus4
The screen walks you through loading filament for the first time, then asks you to run the calibration program, which includes leveling. The printer will also double-check the level before every print. Leveling is completely hands-free and works quite well.
Loading Filament on the QIDI Plus4
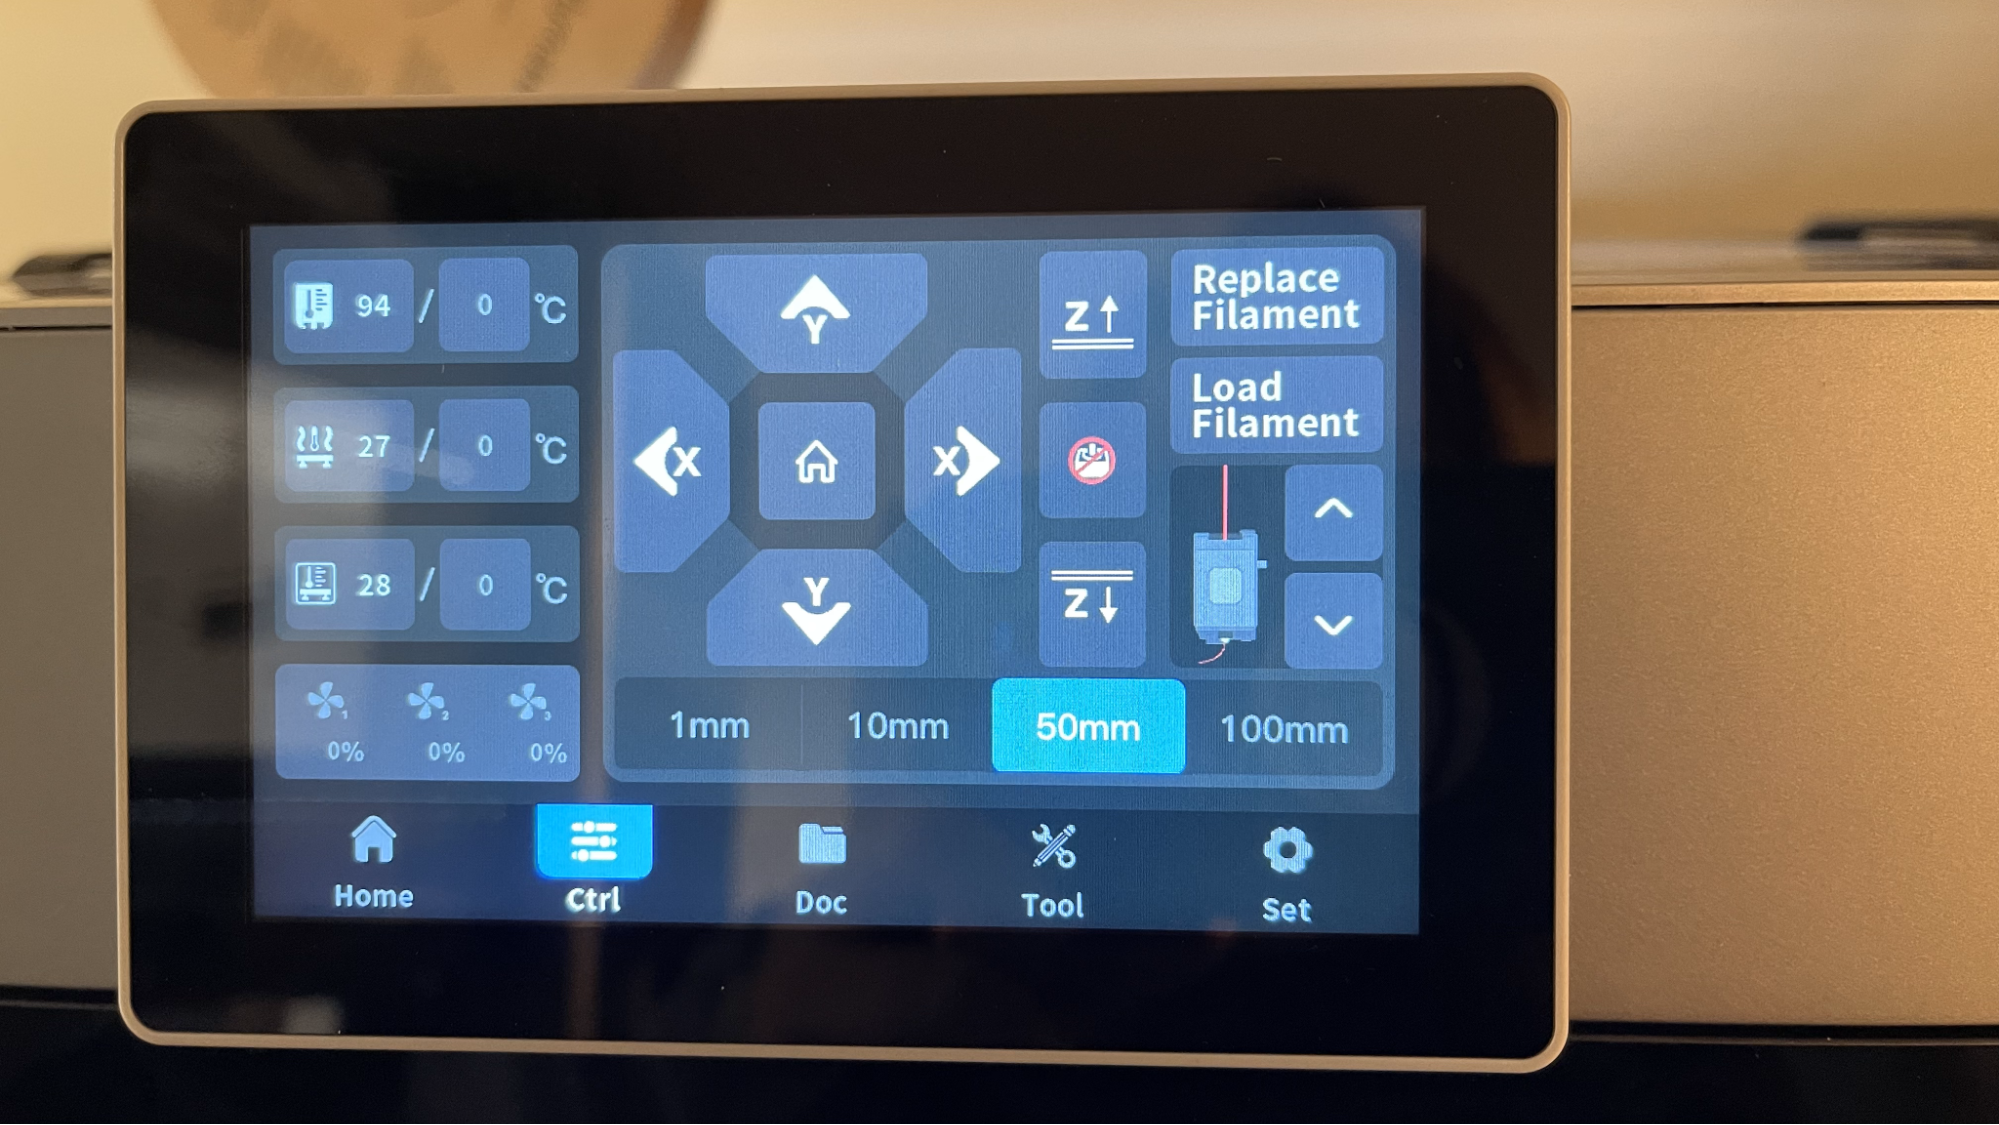
Loading filament is a straightforward process and much improved over the previous Q1. Press “Replace Filament” from the control screen, and it will ask if it should heat up to 220, 250, or 300 degrees Celsius. Pick the higher temperature if you’re going to or from engineering filament, or go with the lower temperature if moving from one PLA to another. The machine will back out the filament (something the Q1 didn’t do) and then wait for you to push new filament into place. It purges right into the chute at the back of the machine, which can be difficult to see. Once the purge is complete, it will wipe the nozzle and kick the poop out the back door.
Preparing Files / Software for QIDI Plus4
QIDI included a copy of QIDIStudio, a custom program based on Bambu Lab’s slicer, which is based on PrusaSlicer, which is based on Open Source Slic3r. The program will look very familiar to anyone coming from those fan bases.
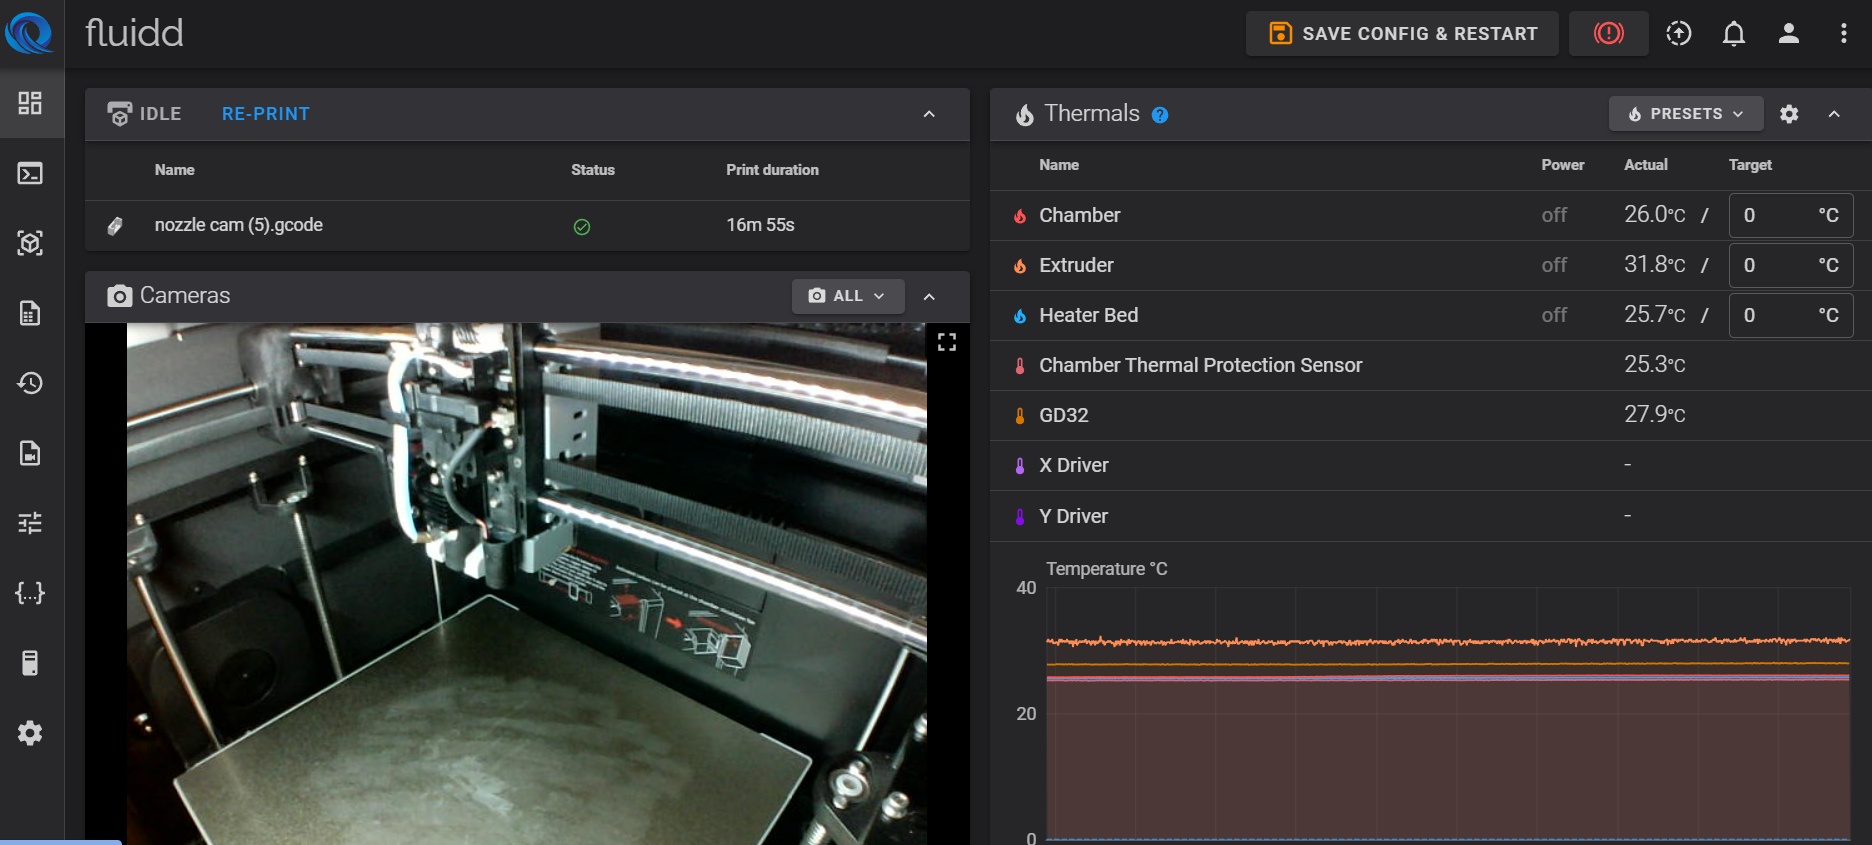
The Device tab opens the Klipper interface (Fluidd), where you can see printer information like temperature and speed, all the files in memory, the camera, and all the Klipper console commands. This is unhampered stock Klipper, so you are free to tinker with the settings as you like. If you don’t want to register your printer with QIDI’s cloud services, you can access Fluidd directly to drag and drop files without obstruction.
Printing on the QIDI Plus4
The QIDI Plus4 comes with a small sample coil of PLA. If you want more colors and materials like silks and multicolor filaments, you should check out our guide to the best filaments for 3D printing for suggestions.
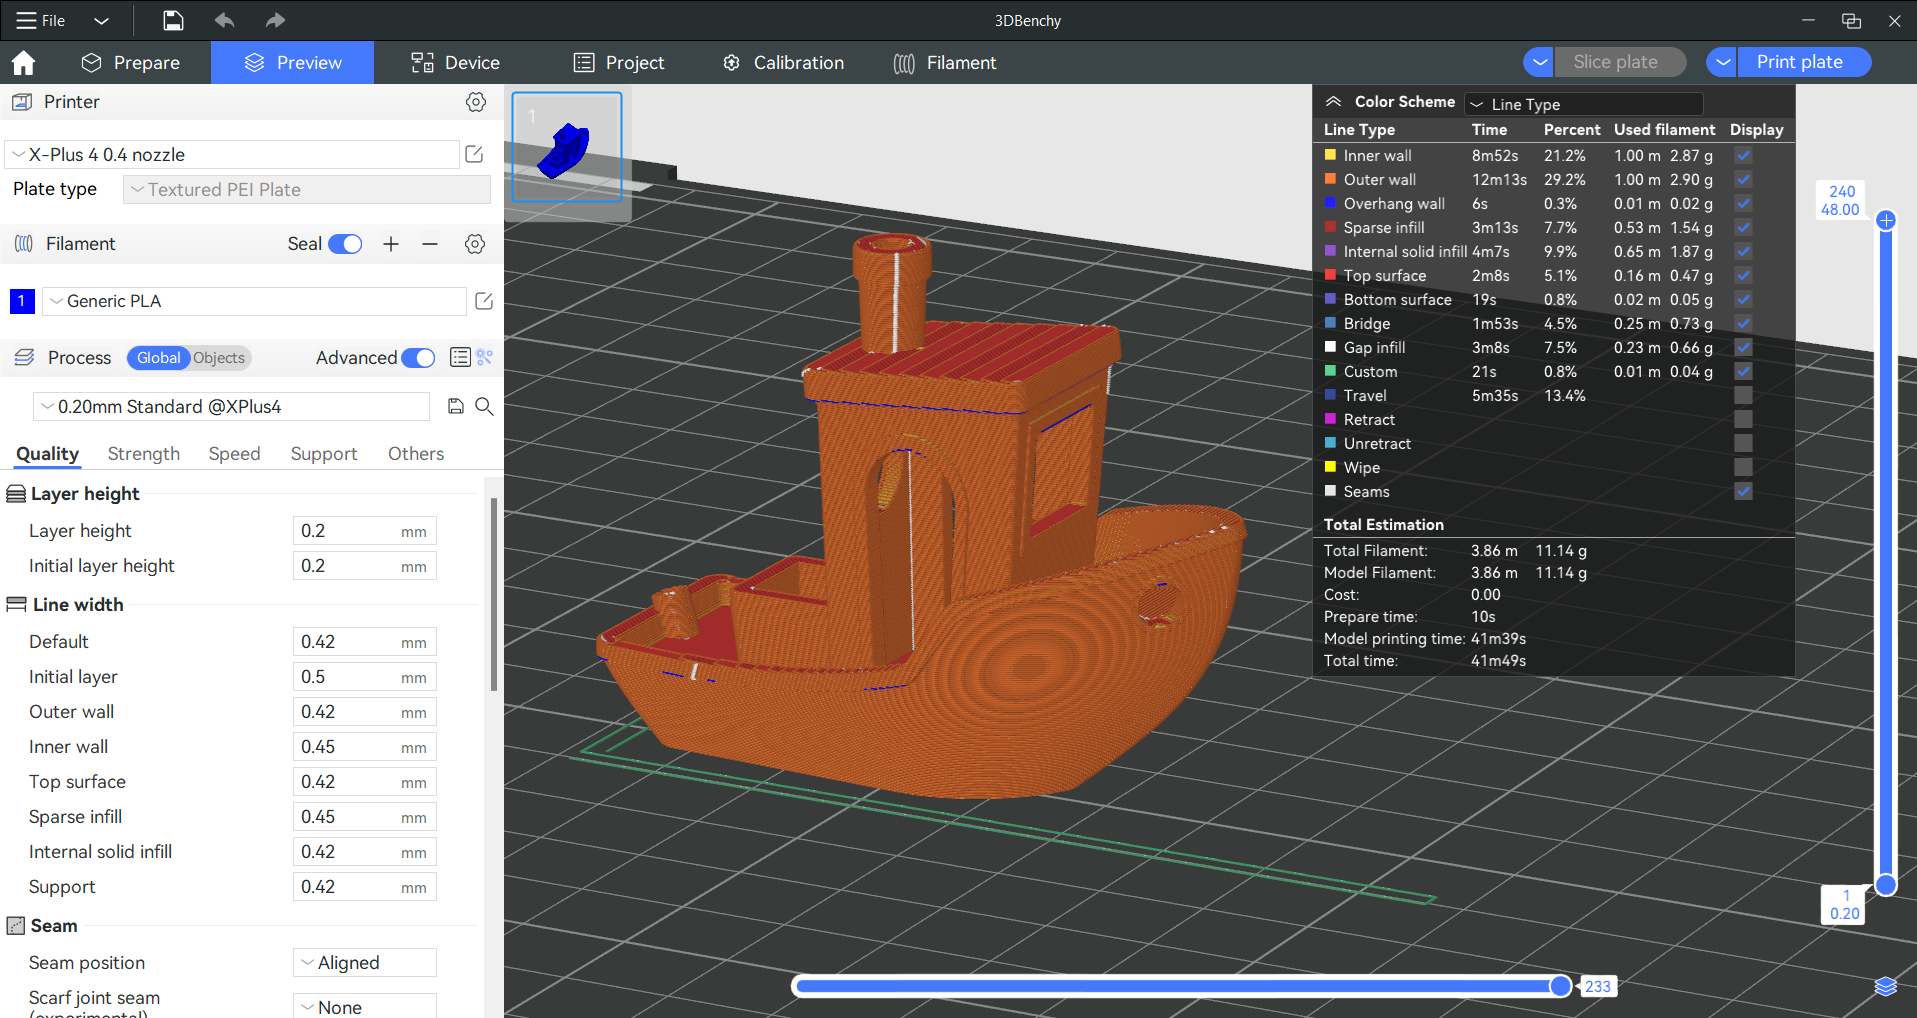
I ran a Benchy using “speed benchy” rules: 0.25mm layer height, 2 walls, 3 top and bottom layers, 10% infill. I also turned off everything that could slow the printer, cranked the acceleration, and let her rip using the default speed of 300 mm/s. I used Inland’s gray PLA – an everyday filament that is brutally honest in photos.
The resulting Benchy is a bit of a squishy mess, but printed at a blazing 12 minutes and 58 seconds, which puts it in the top five of our fastest 3D printers. For comparison, an Ender 3 S1 running at its top speed of 100mm/s would take 55 minutes to print a standard Benchy.
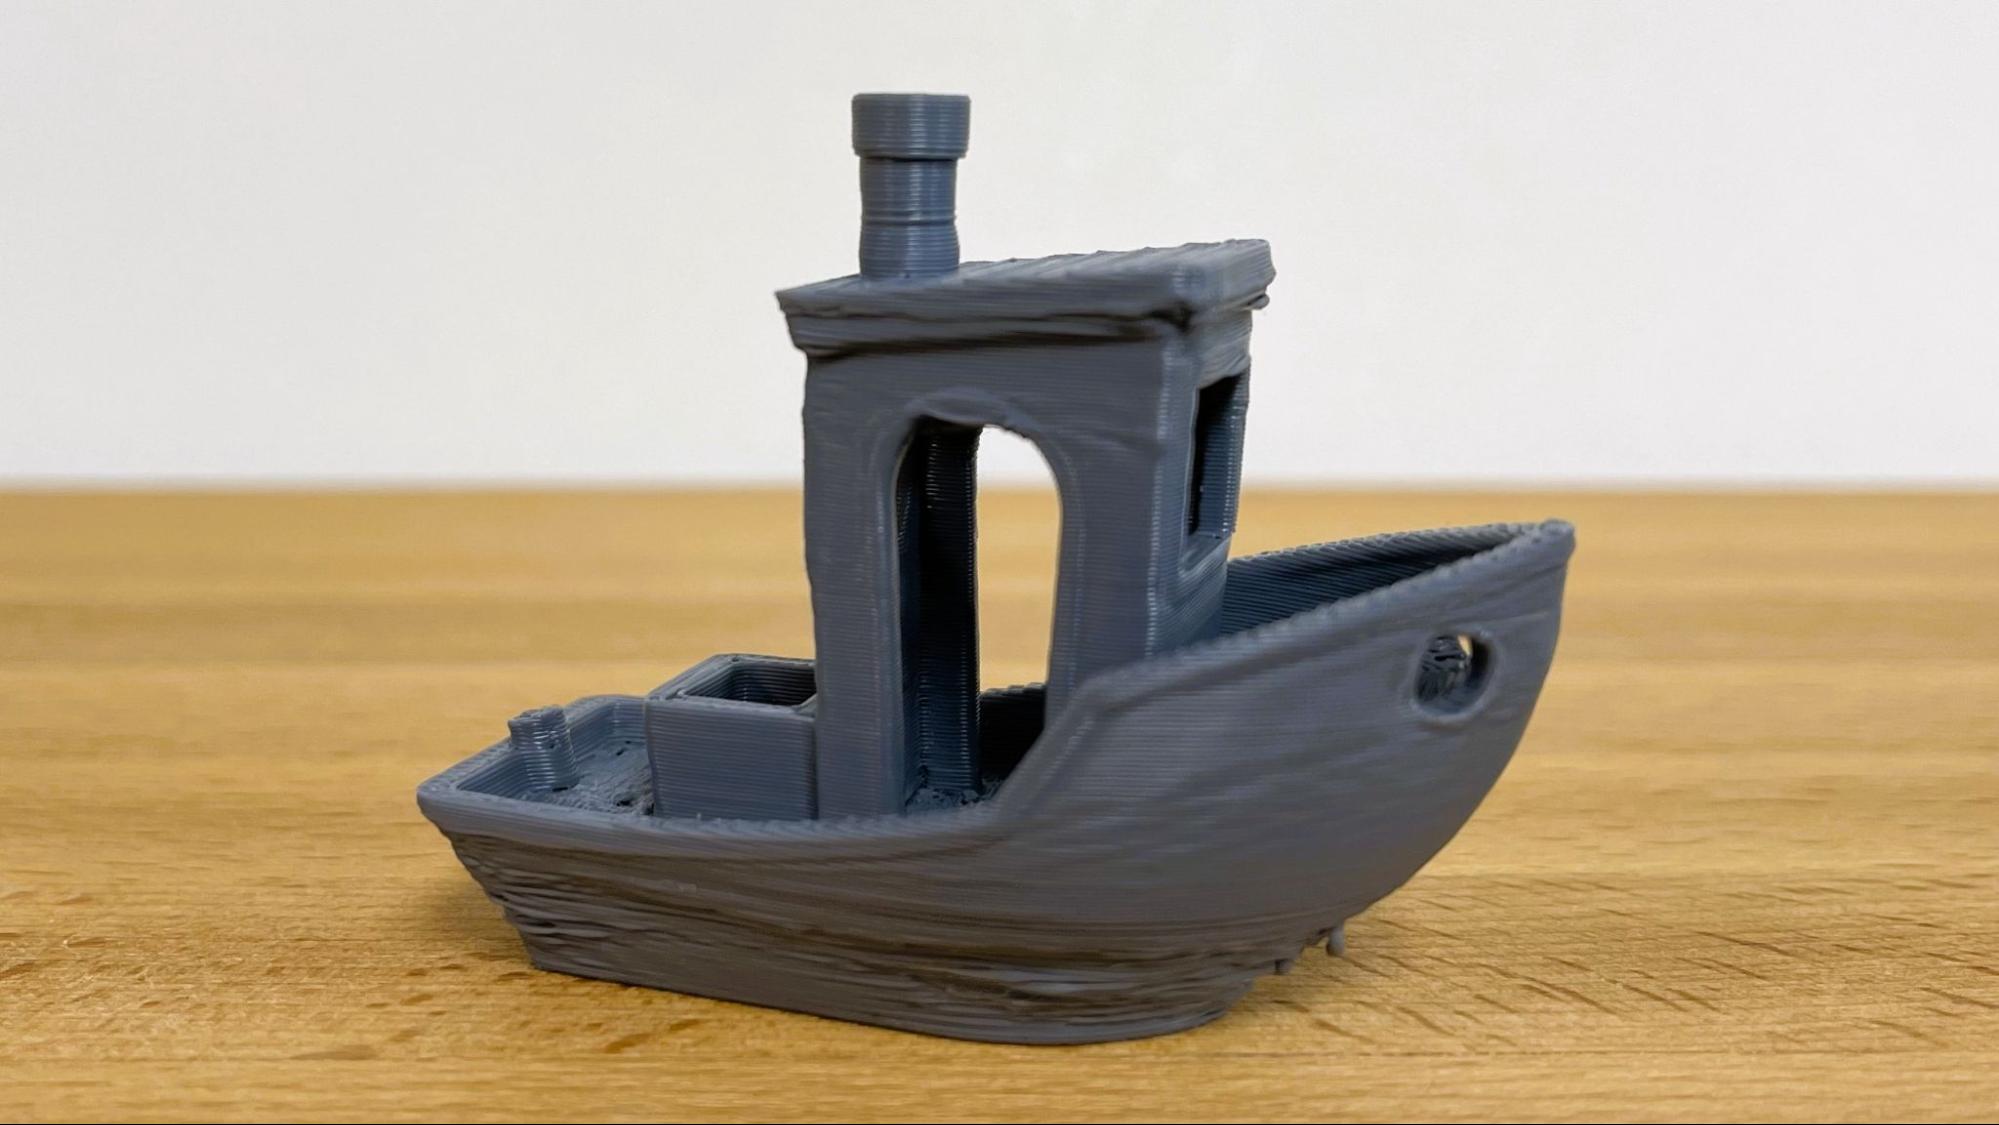
Obviously, the speed benchy is no mark of this printer’s quality, only it’s ability to smash out a “benchy shaped object”. When the printer was run at ordinary speeds (around 200 to 300mm/s) it produced spectacularly fine prints.
These pen holder cups were printed in Prusament Woodfill Linden Light PLA (inner sleeve) and Prusament Mystic Brown PLA (outer sleeve). The inner wooden sleeve printed incredibly smooth, though there was some stringing, which is hard to avoid with any woodfill PLA. The outer log used a fuzzy skin feature to better mimic real wood. The two parts slipped together with perfect accuracy. Both parts were printed with a 0.28 layer height for extra speed, with a PLA default setting, and took about five and a half hours altogether.

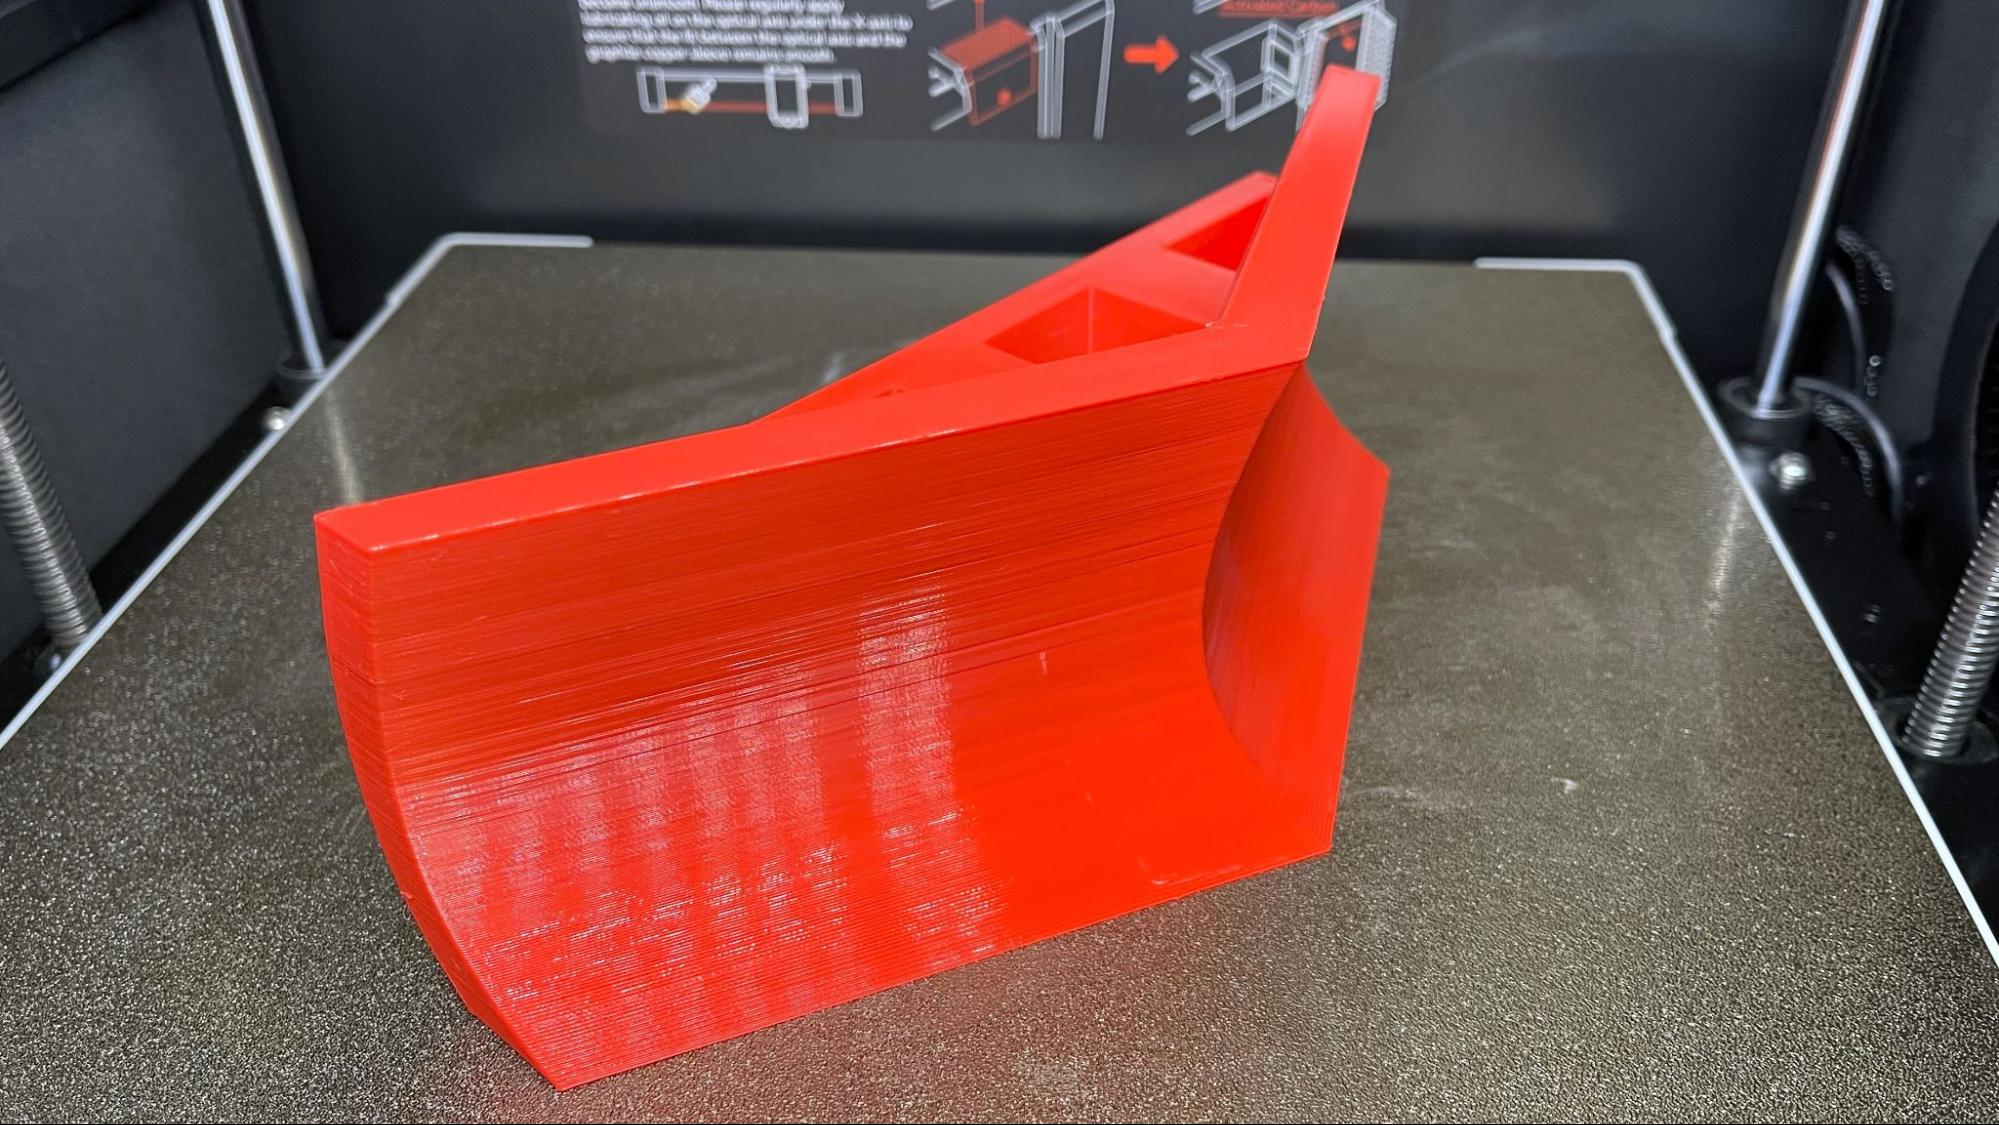
The 4Plus did a great job with TPU. I printed a plow for our RC Death Racer (aptly named Mr. Plow) that I made with TinkerCad. This is a new tough TPU for AMS by Bambu Lab with a Shore hardness of 68D, which is much easier for any printer to run and can achieve speeds closer to PLA. I printed it with rather thick 0.28 mm layers, which did leave layer lines in the print. The plow is 150mm tall, and I used four walls and 50% infill for maximum bashing strength, and was able to print at a speed averaging 200mm/s. It only took 14 hours and 36 minutes to complete.
I also ran parts for the same RC Death Racer in Polymaker PA12 Carbon Fiber, and the QIDI 4Plus was able to print this material well without any warping. I used a bit of glue stick on the build plate for insurance. This was printed using a 0.2 layer height and QIDI’s default setting for PA-12 CF. The layer lines absolutely vanished, and all the supports within the boxy portion snapped off with ease. This printed in seven hours and nine minutes.

Bottom Line
The QIDI Plus4 is a great machine, especially if you’re interested in high temperature filaments. It’s fast, easy to use, and masters just about any material you throw at it. Once the QIDI Box comes out, this printer will give Bambu Lab a run for its money. However, we’ll wait and see how that goes, as companies often struggled to follow through on their promises of color systems. I’m really rooting for QIDI to make good on it’s promise.
Currently priced at $799, the QIDI Plus4 is a decent price for a quality larger format 3D printer with all the perks. It’s the same price as the Creality K1 Max, which has similar features but includes a LIDAR sensor. If you don’t need the extra space or high temperatures, we recommend checking out the Bambu Lab P1S, which can also do four colors when bought as a combo, and has been reduced in price to $799.


 English (US) ·