
 1 month ago
23
1 month ago
23
From the newest and smallest Raspberry Pi, we now get the largest! Yes, the Pico Jumbo is not a clever name. At 3.5 times the normal size of a Raspberry Pi Pico 2, the $19 Pico Jumbo “Megacontroller” (a play on microcontroller) is more than just a comedy prop. It is an educational tool that can be used to build circuits with younger makers, and for classroom circuit debugging with the clarity of oversized components and electronics. Rather than soldering pins, kids can use removable alligator clips.
But is this just for jest? Can it be used in a project and should it be? Let's find out.
Pico Jumbo Specifications
Swipe to scroll horizontally
| Feature | Raspberry Pi Pico 2 surface mount soldered |
| SoC | RP2350, Dual Core Arm Cortex M33 or Dual Core RISC-V Hazard3 running at up to 150 Mhz |
| SRAM | 520 KB |
| Flash Storage | 4MB QSPI |
| Security | Arm TrustZone, 8KB OTP, Secure Boot |
| Wi-Fi / Bluetooth | None |
| Language Support | MicroPython, CircuitPython, C, C++ |
| USB Interface | USB 1.1 Device and Host |
| GPIO Logic Level | 3.3V |
| GPIO | 26 x Digital IO (3.45mm in diameter) M3 and M3.5 compatible |
| Row 10 - Cell 0 | 4 x 12-bit ADC (Analog pins) |
| Row 11 - Cell 0 | 2 x UART, 2 x I2C, 2 x SPI, 24 x PWM |
| Programmable IO | 12 PIO State Machines |
| Power | 1.8 to 5.5V via Micro USB or VSYS |
| MCU Sleep Mode | <10uA |
| Dimensions | 180 x 73.5 x 5.5 mm |
| Price | $19 (Board) $30 (Kit) |
Design of Pico Jumbo

The PCB is designed to ape the original Raspberry Pi Pico 2 form factor (used with the permission of Raspberry Pi) and the “front” of the board is a full-color silkscreen print of the Raspberry Pi Pico 2. Around the back is where the electronics are housed. At the top center of the board is a surface-mount soldered Raspberry Pi Pico 2. The castellations of the Pico 2 (and the older Pico and Pico W) enable off-the-shelf Pico 2s to be used. Should the Pico 2 W (with Wi-Fi) follow the same form factor, which it will, then we will no doubt see the Pico 2W Jumbo.
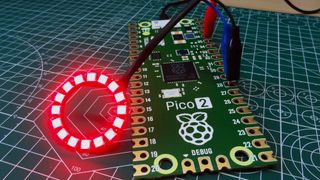
Pico Jumbo has an onboard reset button, which can be used along with the PIco 2’s BOOTSEL button to reset the Pico 2 into bootloader mode, ready to receive a new firmware.The next notable feature are the GPIO pins. Yes, they are also comically large, and for good reason. They are now compatible with croc clips and M3 / M3.5 sized screws. We can now make quick connections using croc clips, and Pimoroni has a $30 kit that has plenty of components for projects.
The GPIO pinout is clearly marked. On the “front” of the board we have the physical pin references, on the reverse we have the Broadcom pin mapping which shows us the voltages, GNDs and analog pins. There are also pinouts for the SWD software debug pins.
Using croc clips with microcontroller boards is not new. My first encounter with them was via Codebug, then micro:bit and then Redfern Electronics’ Crumble. All of these boards are geared towards education, and younger hackers. What Pimoroni are doing with Pico Jumbo though is making the tiny microcontroller more visible.
Using Pico Jumbo
Essentially this is a Raspberry Pi Pico 2 and that means it behaves and operates in the same manner. We just need croc clips and compatible components. Power and data connectivity comes directly from the Pico 2’s micro USB port. With the castellations soldered to the Pico Jumbo providing the GPIO access.
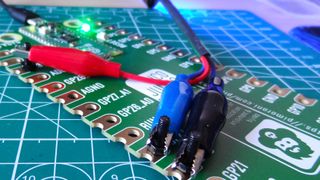
Using croc clips will be the first choice for many, but a semi-permanent way to secure your components are M3/M3.5 countersunk screws and ring terminals. I’ve done this with the BBC micro:bit back in 2016 (yes the screws are too big, it was all that I had on hand.) It works surprisingly well both mechanically and electrically. Just don’t over tighten the screws as countersunk screws are made to force materials apart. Button head screws would work better, but keep an eye on their diameter as you don’t want to stray outside that particular GPIO pin.
So why do we need a comically large Pico 2? It boils down to education. Having a large “prop” device means that classes can see where connections are made, enabling the educator to help the class debug issues without the need for optical enhancement.
A few of these kits in the classroom is enough to help inquisitive minds to learn new skills. Once they get the swing of things, they can progress to the smaller Raspberry Pi Pico 2.
3D Printing for Pico Jumbo
Need a cosmetic, non-functional GPIO header for your Pico Jumbo? Or an oversized “micro” USB connector? You can 3D print these thanks to the work of Alex McIntyre. All you need is one of the best budget 3D printers (or an acceptable one), and some of the best filaments for 3D printing to make your dream come true. The GPIO header will not be conductive, so you can’t use them with your clown-sized breadboard. Unless you print the pins in a conductive filament that is.
Who is Pico Jumbo for?
Educators (formal and informal) and for those of us who enjoy comically oversized microcontrollers wired up in strange and unusual ways will find this product appealing. Pico Jumbo would be a great way to demonstrate a Raspberry Pi Pico 2 for a trade stand at an event, or as a wearable with lots of flashing lights.
Bottom Line
Pimoroni’s Pico Jumbo is a bit of fun, but it has some practicalities that make it useful for education and promotion. This isn’t the Pico 2 for everyone. If you just need a $5 Pico 2, buy one of those instead. If you want a prop for debug, discussion and possibly trade show promotion, then this is the laughably large megacontroller that you need.


:quality(85):upscale()/2024/10/17/848/n/1922729/9dece426671163b35dcb11.60305022_.jpg)


 English (US) ·