
 1 month ago
10
1 month ago
10
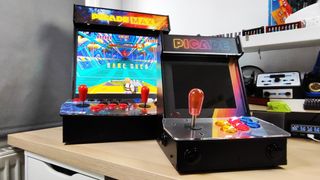
I love arcades. I grew up in a seaside town famed for its arcades. As a kid, I would spend hours playing the classics. Star Wars, Kung Fu Master, Out Run etc. I’ve now made four arcade cabinets in the last decade. My first was the original Picade back in 2015/6, followed by a Raspberry Pi Zero based unit that I laser cut myself. I then made version 2 of Picade, a cabinet which has been part of my set dressing and playtime for a few years.
All of these DIY arcade machines were fun, but the screens were fairly small and there was only one set of controls. If you wanted to play a coop game such as Joust or a versus fighting game like Mortal Kombat, you were out of luck.
Picade Max is not just a clever name. The cabinet is much larger than its predecessors, and for good reason. This is Pimoroni’s first two player cabinet. Now we can play games with a friend, without giving them the crappy third-party controllers. Everybody gets great controls and a glorious 19 inch IPS screen.
Picade Max will retail for $500 and will be available from October 2024. You’ll need to bring your own Raspberry Pi 5 (or any other 40 pin Raspberry Pi) or you could install an ITX based PC. We chose the Raspberry Pi route.
We had special access to a beta unit, which we have used for this review. The beta nature of the kit means that we encountered issues during the build process. We have reported these to Pimoroni and changes to the instructions have been made. The beta units may differ slightly from the final kits, available from October, but not by a great deal.
Is Picade Max worth the money, or should we just take a chance on a cheap eBay kit? Let's find out.
The build process
Set aside a few hours and keep hydrated as this is an involved build process. Pimoroni may hold the record at 1 hour 59 minutes, but it took me a fair while longer. Was it an arduous process? No! Did I enjoy myself? 99% of the time, yes! I put on a few Alien movies in the background and got to work.
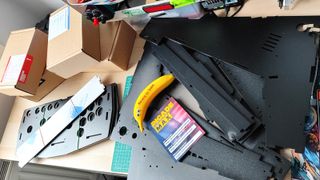
The build is a mix of building the cabinet, wiring up the electronics and connecting your Raspberry Pi. Everything you need is in the rather large box, and Pimoroni has packed everything with enough protection to survive the postal service.
The cabinet build process requires a screwdriver, and I used the legendary Hoto NEX 01 PRO, the same one that our Managing Editor, Matt Safford raves about in his 10 under-$50 gadgets guide. In the box are all of the parts, screws and fastenings along with what looks like an IKEA flat-pack wardrobe amount of powder coated 6mm thick MDF parts. These parts make up the cabinet, held together with plastic angle braces, slots, tabs and M3 screws.
With the HOTO NEX 01 PRO electric screwdriver and a few Wera drivers, I made good progress with the build. There were a few times where I encountered an issue. Sometimes the M3 screws wouldn’t bite into the plastic, or a space would be a little too tight for my hands. The latter issue can be solved by changing how you approach the step, the former just needs a little “light” widening of the screw holes, but not too much!
<<GALLERY
build1.jpg to build10.jpg
>>

The electronics process is broken down into the large screen, Raspberry Pi 5, interface boards for the audio, display and controls, power and the arcade controls. We’ll take a look at the Raspberry Pi 5 setup first. I chose to install all of our software and games to Pimoroni’s NVMe Base. using a 256GB NVMe SSD. I had plenty of space and speed for even the largest games. Here is where we encountered a hiccup in the beta documentation that caused us to remove the Pi from the cabinet. Not a big issue, just a few screws and some lost time. Future instructions will have a correction to prevent this from happening.
Moving on to the interface boards. The first board to look at is the Power HAT that connects to the GPIO and provides 12V to the screen and its backlight. Using a step down converter the voltage is dropped to 5V for the Raspberry Pi and supplied via the GPIO. Pimoroni thought things through and cut out a hole in the Power HAT so that the official Active Cooler could breathe. Note that this cut out is not compatible with Argon’s THRML 30 as the fan is in a different position.
The next add-on board is Picade Max Audio, a USB sound card and audio amplifier designed by Pimoroni and powered by the RP2040. Yes this is a Raspberry Pi Pico-powered USB soundcard, something which is becoming rather popular with PicoGUS (an emulated Gravis Ultrasound card) being one of the standouts.
MAX Audio is rather useful. Connecting to the Raspberry Pi 5 via a USB C to USB A connector, the board receives power and audio data. The Picade Max Audio board features an I2S audio DAC, volume control and has 3W of amplification for the provided speakers. The speakers connect securely via screw terminals. The aforementioned volume control is via a QW/ST (Stemma QT) connected rotary encoder
Could you use this as a USB soundcard in another project? Of course! We hope that Pimoroni will release the Picade Max Audio board as a separate product for arcade builders and retro gamers alike.
The next RP2040-powered board is the Picade Max USB Controller. One solitary RP2040 handles all 25 buttons (including the hotkey) and the joysticks for a typical two player setup. That is rather impressive and surely eats a large majority of the RP2040’s GPIO, but it has enough pins for up to 30 arcade buttons and an analog input. This makes us wonder if we could attach a spinner for a few games of Tempest? Connections between the buttons and the Picade Max Controller are made using DuPont connectors, those commonly used with the GPIO and breadboards. They offer a secure connection, but if you snag a cable, it can pull loose. To counter this, Pimoroni has designed cable tie points into the chassis. Tying a bunch of ten DuPont connectors together makes for a tidier and stronger build.
This is another board that we hope Pimroni will offer for general sale.
Moving away from the boards, we come to the display, a lovely 19 inch IPS screen in a 5:4 aspect ratio (1280x1024). This display is much better than the previous Picade display, and the 19 inches of screen offers an immersive experience for both players. The panel connects to an HDMI breakout board, not a Pimoroni bespoke board, which provides power for the screen and the backlight via dedicated connections. Just make sure to observe the cable orientation before powering on.
Right now the build process is still undergoing refinements, I noticed a few issues in the four-part tutorial and fed the information back to the team for editing. By the time these units make their way to eager customers, the beta will be long over and all of the feedback will have improved the process.
The Two Player Experience
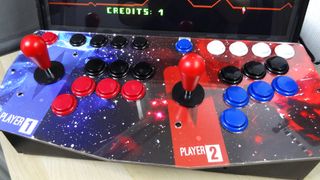
This is the first Picade to feature two player controls. The older models were designed for solo play and while they worked great, the whole arcade experience is enhanced when you have friends over for a few games.
The control panel is well laid out, and there is enough space to stand shoulder to shoulder with your gaming companion. The best test for this is the classic side-scrolling beat-em-up and my partner and I loaded up The Simpsons, Konami’s fun brawler based on the early series of The Simpsons. We dropped a fair number of virtual quarters into completing the game and during that time we did bump shoulders, but that is all part of the arcade experience. We moved on to Teenage Mutant Ninja Turtles, another Konami brawler, and the heroes in a half-shell prevailed over the evil Shredder with ease, and lots of virtual quarters.
Picade Max doesn’t come standard with a Raspberry Pi or emulation software. However, there are plenty of great free choices for software, including Recalbox and Retropie, two emulation platforms you can easily write to a boot disk with Raspberry Pi Imager.
With the power of the Raspberry Pi 5 4GB and the latest version of Recalbox, we had the history of gaming at our fingertips. Even up to Nintendo’s GameCube era. Your mileage may vary. Certain games are not as easy to emulate as others (we’re looking at you Star Wars Rogue Squadron 2: Rogue Leader) but as each emulator update is released, and CPU power increases, more games become playable. My golden era is the 16-bit leading to 32-bit games consoles and arcade cabinets. Although I am rather partial to a Tempest session
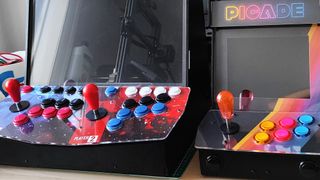
The button layout feels a little weird to start with. The original Picades had just six face buttons, which I typically mapped into the SNES layout (Y,B,X,A and L R). For Picade Max, we have seven buttons right by the joystick; these are mapped using Picade Max Controller’s default setup, but we can remap these buttons using our emulation software suite. The weirdness can be mitigated by mapping the buttons to your preferred pattern.
If you are into fighting games, then you’ll already have your ideal setup in mind. For me, Street Fighter 2’s layout, with the punches and kicks in ascending order of power. Punches at the top, kicks at the bottom. Each player has additional buttons along the top row of the controls. These are extra L and R buttons for more recent console games. There are also buttons to insert virtual quarters in MAME games, and for player selection. You’ll notice that these buttons are smaller than the main buttons. The main buttons measure 30mm in diameter whereas the smaller buttons are only 24mm. Both of these button diameters are common in the world of arcade modifications, with the larger usually affording a greater choice, including our favorite type.
Modding Picade Max
Your own arcade cabinet should be “your own arcade cabinet” and Pimoroni is aware that many customers will be enthusiastic about modding their cabs. All of the buttons and joysticks are common arcade components. This means we can purchase after-market upgrade kits which can be dropped into the cabinet.
We’d keep the joysticks as they are, complete with licky microswitches that provide a wonderful noise when used. You can replace them, quite easily in fact. I would personally recommend that if you do want to replace them, use the same five pin connector instead of the multi-micro switch alternative which sees many more wires added to the joystick interface, typically for GND.
Don’t forget that the ball top from the joystick can be replaced with a bat top. The merits of bat versus ball are a long held conversation. It all depends on what games you play, and how you play. I prefer bat tops as I like to play side-scrolling brawlers and “run and gun” games. I swapped my preferred bat tops onto the joysticks and everything just screwed into place, no drama. Note that the kit only comes with ball tops.
The main buttons are decent, but, and this is a personal preference, I prefer the screw-in buttons to the clip-in versions provided. The clip-in buttons are great and they have lots of travel, ideal for frantic button mashing, but the issue I have faced is the plastic clips breaking. Once they break, the button can be loose. There is also the issue of breaking the acrylic when trying to remove a clip-in button. Ask me how I know.
The screw-in buttons use the same lug contacts as the clip-in, so we can drop them straight into Picade Max; they secure using a thread on the length of the button stem. This locks into place using a nut. I noticed that the nuts for each button would overlap when secured in place. Not a deal breaker, but something to consider when swapping them out.
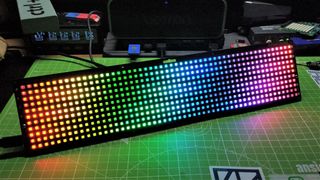
Pimoroni has some of its own mods in mind, and the first one to tackle will be adding a Galactic Unicorn to replace the marquee artwork. The plan is to have custom scrolling text, images and possibly the marquee for the game you are playing on the wonderful NeoPixel display. It's early days, but when I have it working, we will show it off on our show, The Pi Cast.
Who is Picade Max for?
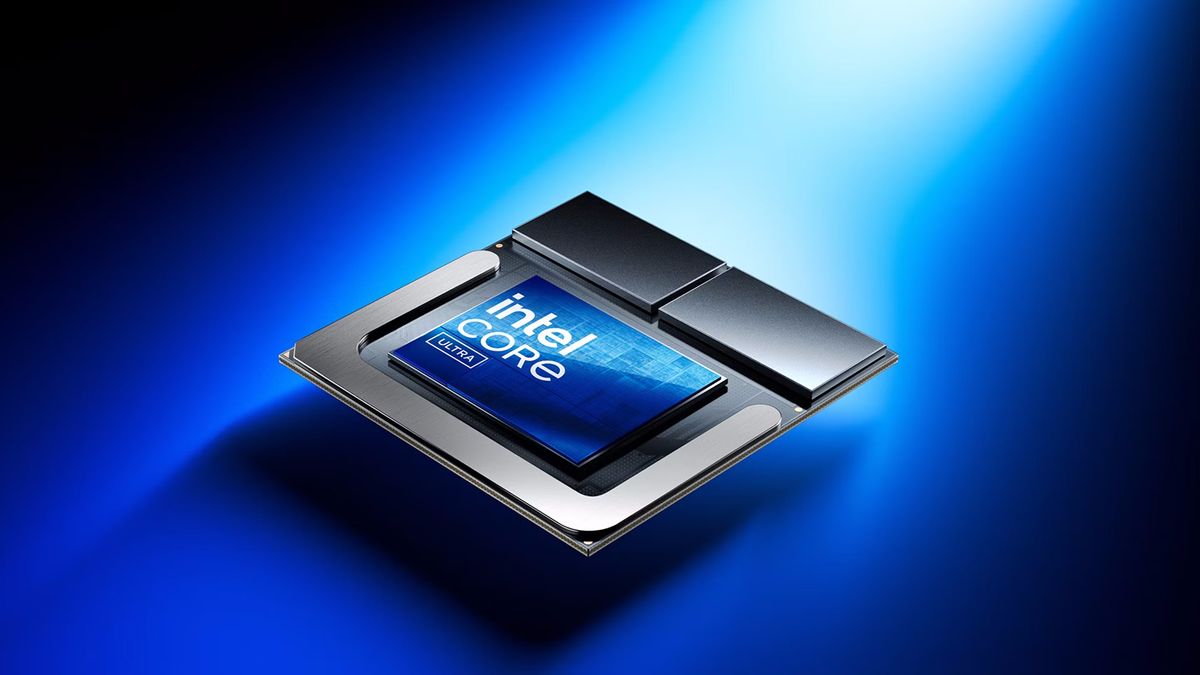
This is perhaps the easiest question to answer. Picade Max is for retro gaming enthusiasts who want to play their games shoulder to shoulder with a friend. Be it Pong or something more modern, you can do it all with Picade Max and the power of the Raspberry Pi 5. if you need something with a little more power, then you could swap out the Raspberry Pi for an ITX based PC build. Something around the AMD Ryzen 5 5600X would be more than enough for most games. Heck, you could even emulate “newer” retro consoles like the Xbox 360 (it pains me to write that, but the Xbox 360 is approaching 20 years of age) and the Sony PlayStation 3.
Bottom Line
Yes this is a lot of money but for the money you get everything that you need, apart from the Raspberry Pi 5 / ITX PC that will power your build. The cabinet pieces are 6mm powder coated MDF and they are strong and durable. The cabinet is strong enough to take a few knocks, and the bartop design makes it big enough for two players, but small enough so that it doesn’t dominate your home. The screen is superb, the controls are well thought out and the sound from the stereo speakers is loud and proud (perhaps too loud sometimes, be thankful Pimoroni added a volume control.)
If you want to build an arcade cabinet, then Picade Max is the new gold standard of kit builds. You can get a random kit from eBay, but it won’t come with this level of finish nor will it come with Pimoroni’s excellent customer service.

:quality(85):upscale()/2024/10/17/848/n/1922729/9dece426671163b35dcb11.60305022_.jpg)


 English (US) ·