
 9 months ago
346
9 months ago
346
The latest board on our budget AMD review tour is the MSI’s B850 Tomahawk MAX Wifi. Priced at $229.99, it’s designed for gamers and looks on paper to be a stable, durable, and DIY-friendly foundation for PC builds. For the money, you get fast networking (Wi-Fi and wired), ample USB ports including three Type-C ports, supplemental PCIe power, some DIY-friendly features, capable power delivery, and a neutral design that will fit most build themes.
Hardware-wise, you get integrated Wi-Fi 7 and a 5GbE, which are both fast options in this price range. Although you won’t see USB 4 (40 Gbps), the Tomahawk does offer three Type-C ports on the rear IO, each running at 3.2 Gen2 (10 Gbps) speeds (20 Gbps Type-C on the front, via a header). You also get ample storage options, including four M.2 sockets (one PCIe 4.0 x4) and four SATA ports. The onboard Realtek ALC4080 audio chip is a pleasant surprise for the budget-class board. Couple that with its rugged looks and DIY-Friendly features and you have a board that’s well rounded on the specification side.
On the performance front, we used the latest non-beta BIOS available, which updates to AGESA 1.2.0.3a, the latest and greatest from AMD. With this BIOS and factory settings (outside of enabling EXPO on the memory), the Tomahawk MAX performed well throughout our testing suite, often leading the pack. It did well in gaming and most productivity apps, but delivered middle-of-the-pack results across the Procyon/MS Office tests. All the results are close, and you wouldn’t notice a difference without a frame counter or timer on-screen.
Below, we’ll examine the board's details and determine whether it deserves a spot on our Best Motherboards list. But before we share the test results and discuss details, below are the specifications from MSI.
Specifications of the MSI MAG B850 Tomahawk Wifi
Inside the Box of the MSI B850 Tomahawk MAX Wifi
Inside the retail packaging are a few accessories to help you get started. While it isn’t much, they offer a single SATA cable, EZ M.2 Clips II and a tool for removal, EZ Front Panel, 1 to 3 EZ Conn-Cable, and the EZ Wi-Fi antenna. Last, there is the Quick Installation Guide and the cable stickers.
Design of the Tomahawk MAX Wifi

The Tomahawk MAX Wifi sits on a black 8-layer server-grade PCB with large heatsinks covering the VRM and plate-style heatsinks tasked to cool the M.2 sockets and chipset. Breaking up the all-black look are bright yellow-green highlights with the MAG symbol and the Tomahawk/Arsenal Gaming branding on the rest of the heatsinks. RGB lovers must add their own to the headers, as none are built-in. Overall, it’s a good-looking budget motherboard that should blend in with most build themes.
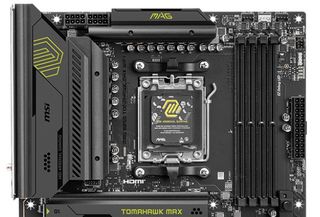
In the upper left corner, we see the two 8-pin EPS connectors (one required) that power the processor. Surrounding them are the Frozr Design VRM heatsinks, which sport a matte-black finish and some branding. There’s plenty of surface area and mass to keep the capable power delivery below running within spec, even with a flagship-class (higher-wattage) processor.
After passing the socket area, we encounter the four DRAM slots with locking mechanisms on both sides. MSI supports up to 256GB of RAM with speeds listed to DDR5-8400+, which is plenty fast for the platform. We could boot with our DDR5-8000 kit, but it was only stable (out of the box) using the DDR5-7200 kit.
Above the RAM slots are the first three (of seven) 4-pin fan headers. In this case, CPU_Fan1, PUMP_Sys1, and SYS_Fan1. Each header supports PWM and DC-controlled devices. Output varies depending on the header with the system fans headers at 1A/12W, the CPU fan at 2A/24W, and the pump with the most able to output 3A/36W. Fan Control is handled through MSI Center sofware and the User Scenario applet.
Looking at the right edge and moving down, we run into another 4-pin fan header and the first 3-pin ARGB header (the other ARGB/RGB headers are on the bottom edge) with control over the RGBs handled through the Mystic Light portion of MSI Center.
Below are the four EZ Debug LEDs that light up during the POST process. If there’s a problem in one of the areas (Boot, DRAM, VGA, CPU), the colored LED for the trouble spot remains lit, giving some insight into where the problem is. Next is the 24-pin ATX power connector for the board, and finally, the convenient EZ COnn-Header V2 that allows you to connect ARGB strips, fans, USB 2.0 devices, and even their MPG EZ120 ARGB fans.
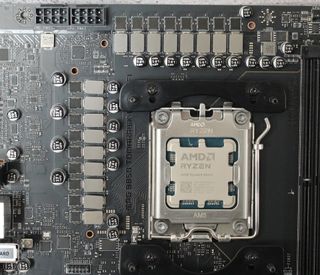
Power delivery on the Tomahawk MAX consists of 17 phases, 14 of which are dedicated to Vcore. Power comes from the 8-pin EPS connector(s) onto a Monolithic Power Systems(MPS) MPS2412 controller. From there, it moves to the 80A MPS MPS2433 SPS MOSFETs. The 1,120A is plenty for even the flagship Ryzen 9 7950X or 9950X. While they aren’t the most robust we’ve seen, they do not hold you back, even if you decide to overclock.
On the bottom side of the board, on the left, is a fully exposed audio solution with the Realtek ALC4080 chip for all to see. It also uses a few dedicated audio capacitors and isolates the audio signal from the rest of the board (the familiar line that runs vertically). It’s a good audio solution that users should be pleased with, especially on a less expensive chipset.
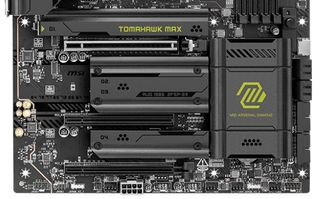
In the middle are three full-length PCIe slots and four M.2 sockets. Starting with the PCIe slots, the top slot, PCI_E1, uses MSI’s PCIe Armor and EZ PCIe Release, offering additional support and easy access for removal. It connects through the CPU and is your primary graphics slot at PCIe 5.0 x16. The bottom two full-length slots (PCI_E2/3) connect through the chipset. The middle slot is the slowest, running at PCIe 3.0 x1, while the bottom is PCIe 4.0 x4. Note that when a device is installed in M2_3, PCI_E3, it drops to x2. You can force that slot to x4, but it disables the same M2 socket.
Speaking of M.2 sockets, the first M. 2 socket, M2_1, is just above the top PCIe slot. It runs at PCIe 5.0 x4 (128 Gbps). The heatsink isn’t the biggest we’ve seen, so if you plan to run extended transfers with a hot running 5.0-based drive, keep an eye on temperatures. Surprisingly, M.2_2 also runs at PCIe 5.0 x4, so you have two ultra-fast M.2s. M.2_4 supports up to PCIe 4.0 x4, while the M.2_3, which borrows lanes from the bottom PCIe slot, runs up to PCIe 4.0 x2.
Shifting focus past the chipset to the right edge, there are a few connectors. Starting at the top are the front panel USB-C 3.2 Gen 2x2 (20 Gbps) connectors, four SATA ports, and two 19-pin front panel USB 3.2 Gen 1 (5 Gbps) connectors. If you need USB4/40 Gbps ports, you’ll have to buy an add-in card or an X870/E solution where it’s mandatory.
Across the bottom are several useful headers. From left to right:
- Front Panel audio
- 4-pin RGB, 3-pin ARGB
- 2-pin Chassis Intrusion
- 4-pin System Fan header
- 8-pin Supplemental PCIe power
- (2) USB 2.0 headers
- (2) 4-pin System Fan headers
- 3-pin ARGB header
- 2-pin Clear CMOS jumper
- 4-pin System Fan header
- Front Panel
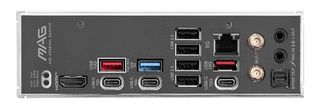
The rear IO has most of what you need. About the only thing missing is a 40 Gbps port. Starting on the left are two tiny buttons for Clearing the CMOS and the other for BIOS Flashback. Next to that is the HDMI port to use with integrated graphics. There are three USB Type-C ports, all of which run up to 10 Gbps, and two Type-A ports (red). The blue Type-A port in the middle runs up to 5 Gbps, while the black USB 2.0 ports reach 480 Mbps. You should have enough ports, but some may miss the speed of USB4. Next are the two Wi-Fi 7 connections and the audio stack with two 3.5mm (mic in/line out) and SPDIF—standard fare for the price point.
MORE: Best Motherboards
MORE: How To Choose A Motherboard
MORE: All Motherboard Content


 English (US) ·