
 7 months ago
123
7 months ago
123
The word “Warp” isn’t something that makes us think “AI enabled terminal emulator”. For me, I think of Captains Kirk, Picard, Sisko, Janeway, Archer, Burnham and Pike heading off on another adventure to the final frontier. But, Warp is an “intelligent terminal” app that offers the tantalizing proposition of “become a command line power user on day one”.
Warp is a terminal, but it is backed up by a cloud-based AI service which can be used to interact with the underlying operating system and create code in a plethora of languages. Warp offers a paid for service, but you can get by with the free plan.
In this how to, we will install and use Warp on Windows, then show how it can be used as a terminal / command prompt and then use its AI to create a Python application without writing a single line of code.
Before we get too far into the how to, let's set the record straight. AI is a great tool to try out new ideas, and to automate laborious processes. But, we would never replace a person at the keyboard. Be they a writer, coder, artist or musician. Clever coding takes more than AI, it needs a human to understand the problem / requirements and to solve them using code. AI does a fair job of this, but it is never 100% correct.
How to install and use Warp
Warp’s installation process is simple, no matter your choice of operating system.
1. Download and install Warp for your OS.
2. Open Warp via the Start Menu.
The Warp terminal is very similar to a Linux or Powershell terminal, but underneath the hood it has much more power thanks to a natural language model which can interpret our requests, write and run the code necessary to complete the task.
The Warp Terminal is easy to use, but lets go over the layout before we start any work.
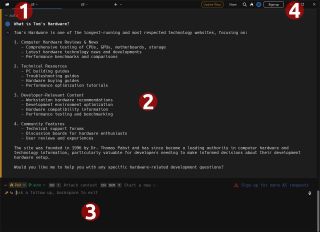
- Tabbed terminals: Warp can run multiple tabs, each with their own prompts / actions.
- Output window: Warp will output responses, code, requests to this window. Warp can also show code snippets and even diffs (the difference between files) here. It can also be used for basic input, such as giving permission for a task during an interactive step.
- Input window: This is where we enter prompts and issues commands using the host OS’s commands, natural language, or code.
- Sign up / in: Warp is free to use, and you don’t need to sign up to try it out. There is a free account which gives you plenty of access to the service.
Using OS level commands with Warp
We’ll start with an easy one, listing the contents of a directory. This demonstrates how the Warp terminal can be used as a general terminal / command prompt interface.
1. Use the dir command to list the contents of a directory, press ENTER to run the command. Here I list the contents of my user directory. Pressing the TAB key will autocomplete the current word or file path.
dir C:\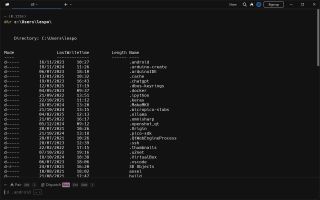
2. Press the up arrow to select the previous command.
3. Edit the command so that the output of the directory listing is output to a file called user-{name}.txt and to your Desktop. Change the {name} to match your username and press Enter or click Run in the Warp terminal.
4. Navigate to the file and you will find the output of the directory listing is now stored in the file.
Let's do something a little more involved. I have a folder full of images and I want Warp to rename all of the images so that they are sequentially numbered, but I want to use the file creation date to sort them.
Using natural language we give Warp the instruction and it interprets into a command / script.
1. Open the directory containing the images that are to be renamed. This is so we can see Warp rename the files in real-time
2. In the Warp terminal, enter the following instruction using natural language. Remember to change the file path to match your own.
rename all of the images in C:\Users\lespo\Pictures\Screenshots so that they are sequential, sorted by their creation date3. Warp will check the contents of the directory and get a list of the files. It will then suggest an action. Read the suggested action and press Enter (or click Run) to start.
4. Look to the directory, you will see Warp rename the files using a padded number format (001, 002). Warp is using a PowerShell script to rename the files, far faster than I could think or write a script.
Using Warp to create a Python application
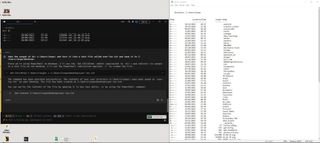
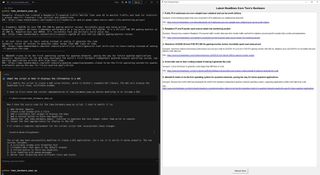
Now lets see how Warp copes with writing code on the fly. I want a Python script that will get the five latest headlines from Tom’s Hardware and then output them as headline, synopsis and URL.
1. Use the following prompt “create a python file that will get the latest five headlines from Tom's Hardware and display them in the following format. Headline, synopsis and URL”
2. Warp will check for the required Python library, in this case feedparser. I already have this installed, but if not, Warp should prompt to install it. Warp will ask to create a Python file, press Enter to do this.
3. Click on the “Run in Terminal” button to drop the command into the terminal. Then press Enter to run the script. You will see the output of the script in the Warp terminal.
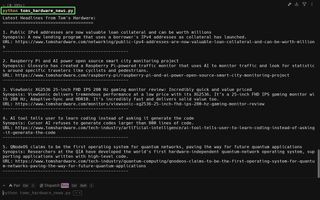
I took this a little further, asking Warp to amend the Python script so that it displayed the output in a dialog box.
1. In the Warp terminal, ask for the output of the Python code to be displayed in a GUI.
2. Press Enter to run the code in the terminal. Warp knew that it needed a library to generate GUI elements, so it chose Tkinter and then told me how it would approach the request. It created a scrollable text widget and then formatted the output for the widget.
The output of this prompt isn’t perfect, but it is more than sufficient as a quick prototype.
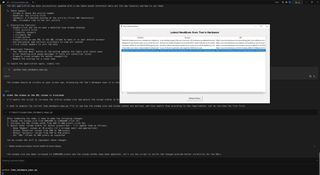
3. Ask Warp to use a table to output the code. This should make the data easier to read. Alas it didn’t but the table looked good!
I wanted to make an executable out of this project, so I asked Warp to do that for me. First it checked for PyInstaller, a Python library to create executable files by bundling the project code, along with a snapshot of the dependencies.

4. If not already installed, press Enter to install PyInstaller. I did not have this installed, so it asked to install it using pip. Pressing Enter to install, Warp did all the work.
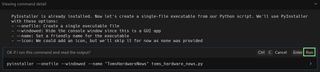
5. Press Enter to create a single executable file called “TomsHardwareNews.exe” using the code that it had just created.

6. Go to the directory containing the file and open it to see the GUI app. It's not perfect, but I just created an executable Python project in 10 minutes without writing a line of code!


 English (US) ·