
 8 months ago
120
8 months ago
120
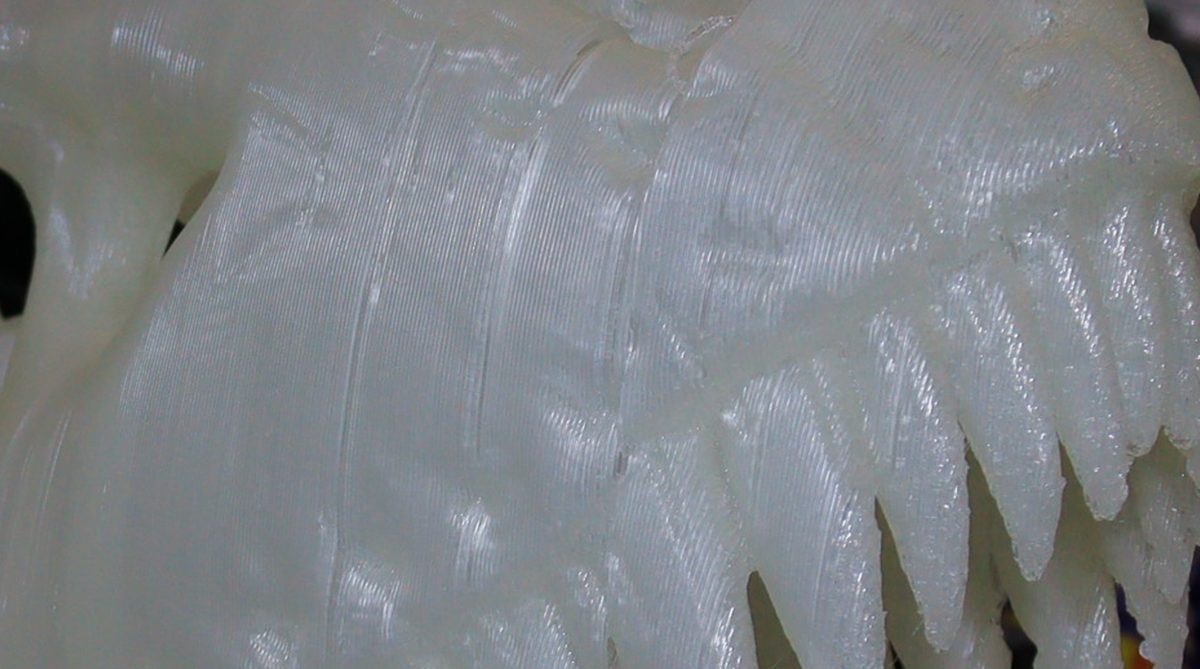
Salmon skin or Moire issue in 3D prints is where repeating patterns or wavy lines appear across the print, and they resemble the scales of a salmon. It affects the appearance of the design and makes it hard to achieve a perfect finish, and you will need extra post-processing, which takes a lot of time. The problem can also compromise the dimensional accuracy of the print, especially for functional parts where precision is important. Salmon skin problems are almost similar to ringing issues, but the difference is that ringing is not continuous. It appears on specific areas in your 3D print, and salmon skin, on the other hand, is consistent across the surface of the design.
This issue can still occur even with the best 3D printers, and it results from many issues, including problems with stepper motor drivers, 3D printer vibrations, high 3D printing speeds, and even worn-out or loose 3D printer belts. Like any other 3D printing issue, this problem can be fixed using the strategies described below.
Check 3D Printer Belts
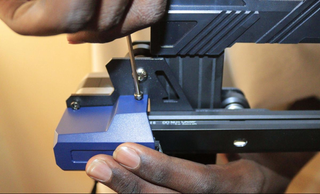
1. Properly tighten 3D printer belts and replace them if they are worn out
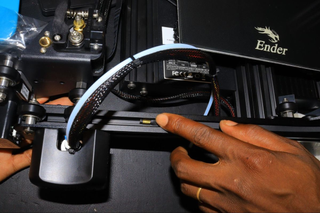
Loose 3D printer belts can make the print head wobble or skip some steps, which results in uneven filament deposition, which can result in salmon skin. As you tighten it, ensure it’s not too tight as it can introduce unnecessary strain on the motors that can introduce vibrations. You should also ensure the belts are not worn out, as it can result in inconsistent tension during 3D printing. You can buy one from Amazon and replace it if you see signs of being worn out.
In addition to that, you can also tighten the screws on your 3D printer to ensure no component is loose, but be careful not to overtighten.
Also, inspect the rods and rails to ensure they are securely mounted and not misaligned or bent.
Check 3D Printer Motor
2. Install TL smoothers
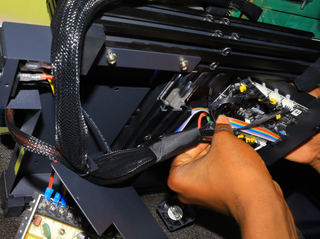
3D printer motors not running smoothly is another leading cause of salmon skin issues in 3D prints. This can be caused by voltage spikes and electrical noise in the motor signals and it is common in older stepper drivers. When the motors are not running well, it results in inconsistent movements of the print head. To address this issue, you need to use TL Smoothers, which are simple add-ons that you install between the stepper drivers and the stepper motors to filter out voltage spikes and ensure smoother motor operation.
They solve the problem by acting as a filter, which reduces the irregularities of the electricity that cause the motors to move in uneven steps. They also tune the drivers to provide only the required amount of power. You can buy them from Amazon, and they come in a 6-pack. It is easy to install as you only plug them in using each of its two connectors: One is for the signal input which you connect to the pins of the stepper driver and the other is the output side, which you connect to the motor’s wiring. You don’t need to solder anything as the smoothers are designed to fit well in the electronic enclosure of the 3D printer. A Reddit user has reported improvement in the quality of the 3D print after using TL smoothers.
Latest firmware and better stepper motor
3. Update the Firmware and Upgrade the Stepper Motors
Outdated firmware may lack the advanced motion control features that optimize stepper motor performance and might not allow fine-tuning settings like jerk and acceleration. Updating it improves how your 3D printer handles motor control and allows for customization of the stepper driver settings, which might be challenging to achieve in outdated firmware.
In addition to updating the firmware, you can also consider upgrading to higher-quality stepper motors, as the regular ones could have inaccuracies that result in uneven motion mainly due to heavy usage, or they could have a lower micro stepping rating. Microstepping rating is the division of a single step of a stepper motor into small controlled steps in order to achieve a smoother and precise movement. High quality stepper motors like TMC2209, which you can find on Amazon have been designed to handle small, precise steps more accurately. They can also follow the signals from stepper drivers more smoothly, reducing vibrations.
Lower 3D printer speed
4. Reduce the 3D Printing Speed
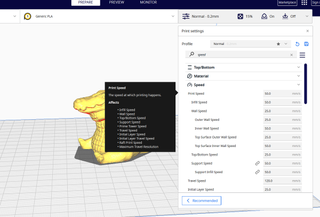
High 3D printing speed causes the stepper motors to struggle to keep up with rapid changes in direction and hence reducing it allows them to move more smoothly and consistently. Also, when 3D printing at a low speed, each layer of the filament has more time to adhere properly to the previous one, allowing the nozzle to maintain a consistent extrusion.
Moreover, sometimes 3D printing at high speeds results in vibrations and mechanical stress on the components of the 3D printer, like the belts, which can also result in defects. Printing at a lower speed prevents this from happening. You can adjust the speed on the 3D slicer. Keep in mind that while slower speeds help improve the surface quality of your print, they also increase the print time, and in some cases, they can result in other issues. As you reduce the speed, ensure you don’t reduce it too much that it results in other 3D printing defects. The default and ideal 3D printing speed in most 3D slicers is usually 50 mm/s. If yours is above that, you should reduce it.


 English (US) ·