Whether you want to capture epic battle moments in Final Fantasy XIV, or you’re really feeling your Glamour and want to immortalize it in photo format, you’re going to be taking a lot of screenshots in the MMO. But where do they end up? And do you get a choice in the matter?
In the six years I’ve been playing FFXIV, I’ve amassed thousands of screenshots. I have more photos of my Miqote than I have of myself in real life, and I’ve even ended up with an external hard drive dedicated to storing online memories. Even the beginning of my relationship with my now-fiancé, who I met while playing, is chronicled through screenshots—a surprisingly common occurrence.
Here’s how to find your screenshots, how to change the save destination to make things easier in the future, and other tips to help you unleash your in-game photography genius.
Where to find your FFXIV screenshots on PC
 Screenshot by Destructoid
When you’ve pressed the Print Screen button and heard the satisfying shutter sound that FFXIV supplies by default, you’ll then need to locate your screenshots folder. To do this, open up File Explorer and follow these steps:
- Select “Documents”
- Select “My Games”
- Select “FINAL FANTASY XIV – A Realm Reborn”
- Select “Screenshots”
It doesn’t matter what expansions you own or were playing through when the screenshot was taken. All are sent directly to this folder. As you obtain more and more screenshots, this folder might be slow to load and organize itself, so it’s a good idea to transfer photos you want to keep to an external location every so often.
Tip:
If you take a lot of screenshots and want easy access to this folder, remember to pin it to quick access in File Explorer. To do this, click on the three dots at the top of the window and select ”Pin to Quick Access.” It will now show up alongside folders like “Pictures” and “Documents” on the right side of the window whenever you open File Explorer.
How to change the screenshot destination folder in FFXIV
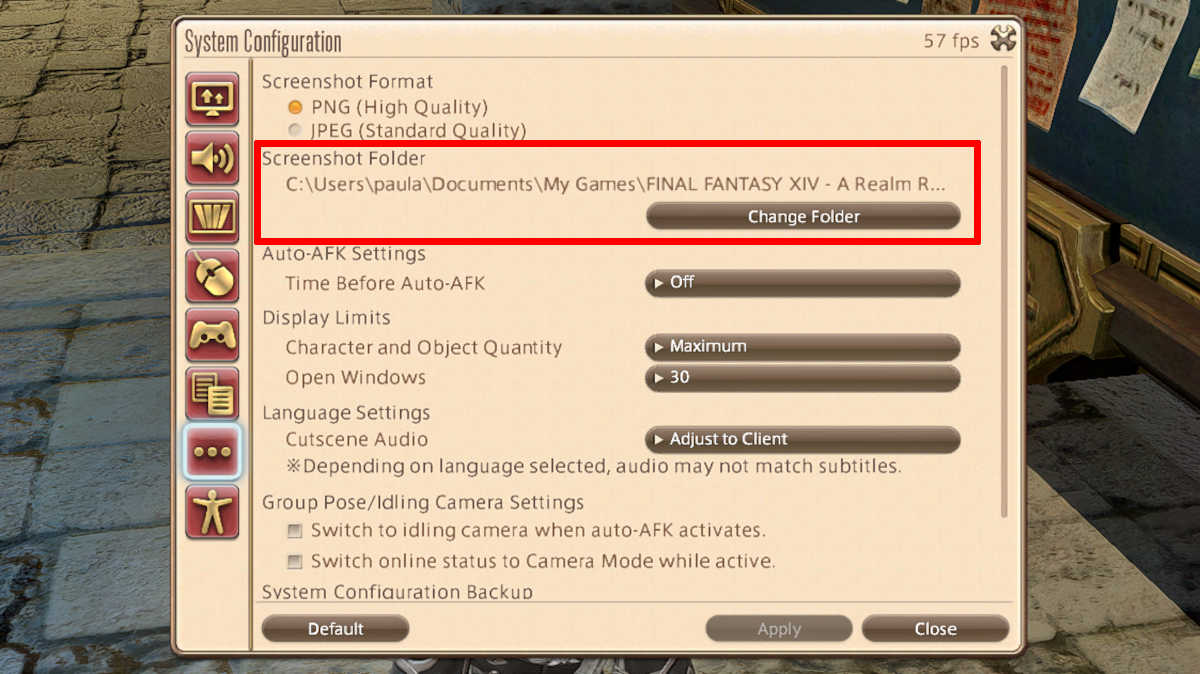 Screenshot by Destructoid
If you want to change where your screenshots go by default, there’s a way to do that through the settings in FFXIV. To do this, make sure you’re logged in and then follow these steps:
- Open up the menu and select “System Configuration”
- Navigate to the “Other Settings” tap (second from the bottom, the icon with three dots)
- Under the “Screenshot Folder” subheading, click on “Change Folder.”
Tip:
If you want to save precious storage on your computer’s main drive, it’s a good idea to save your screenshots directly to an external hard drive. While this means that you’ll basically always need the hard drive plugged in, it will prevent you from filling up your main drive with screenshots, which will happen quickly without you even realizing it.
Destructoid is supported by our audience. When you purchase through links on our site, we may earn a small affiliate commission. Learn more about our Affiliate Policy

 1 week ago
6


 English (US) ·