
 3 weeks ago
29
3 weeks ago
29
Do we need another Bambu Lab A1 clone, especially now that Core XY printers are more accessible than ever? The Anycubic Kobra X brings compelling proof that the bedslingers aren’t dead, not yet.
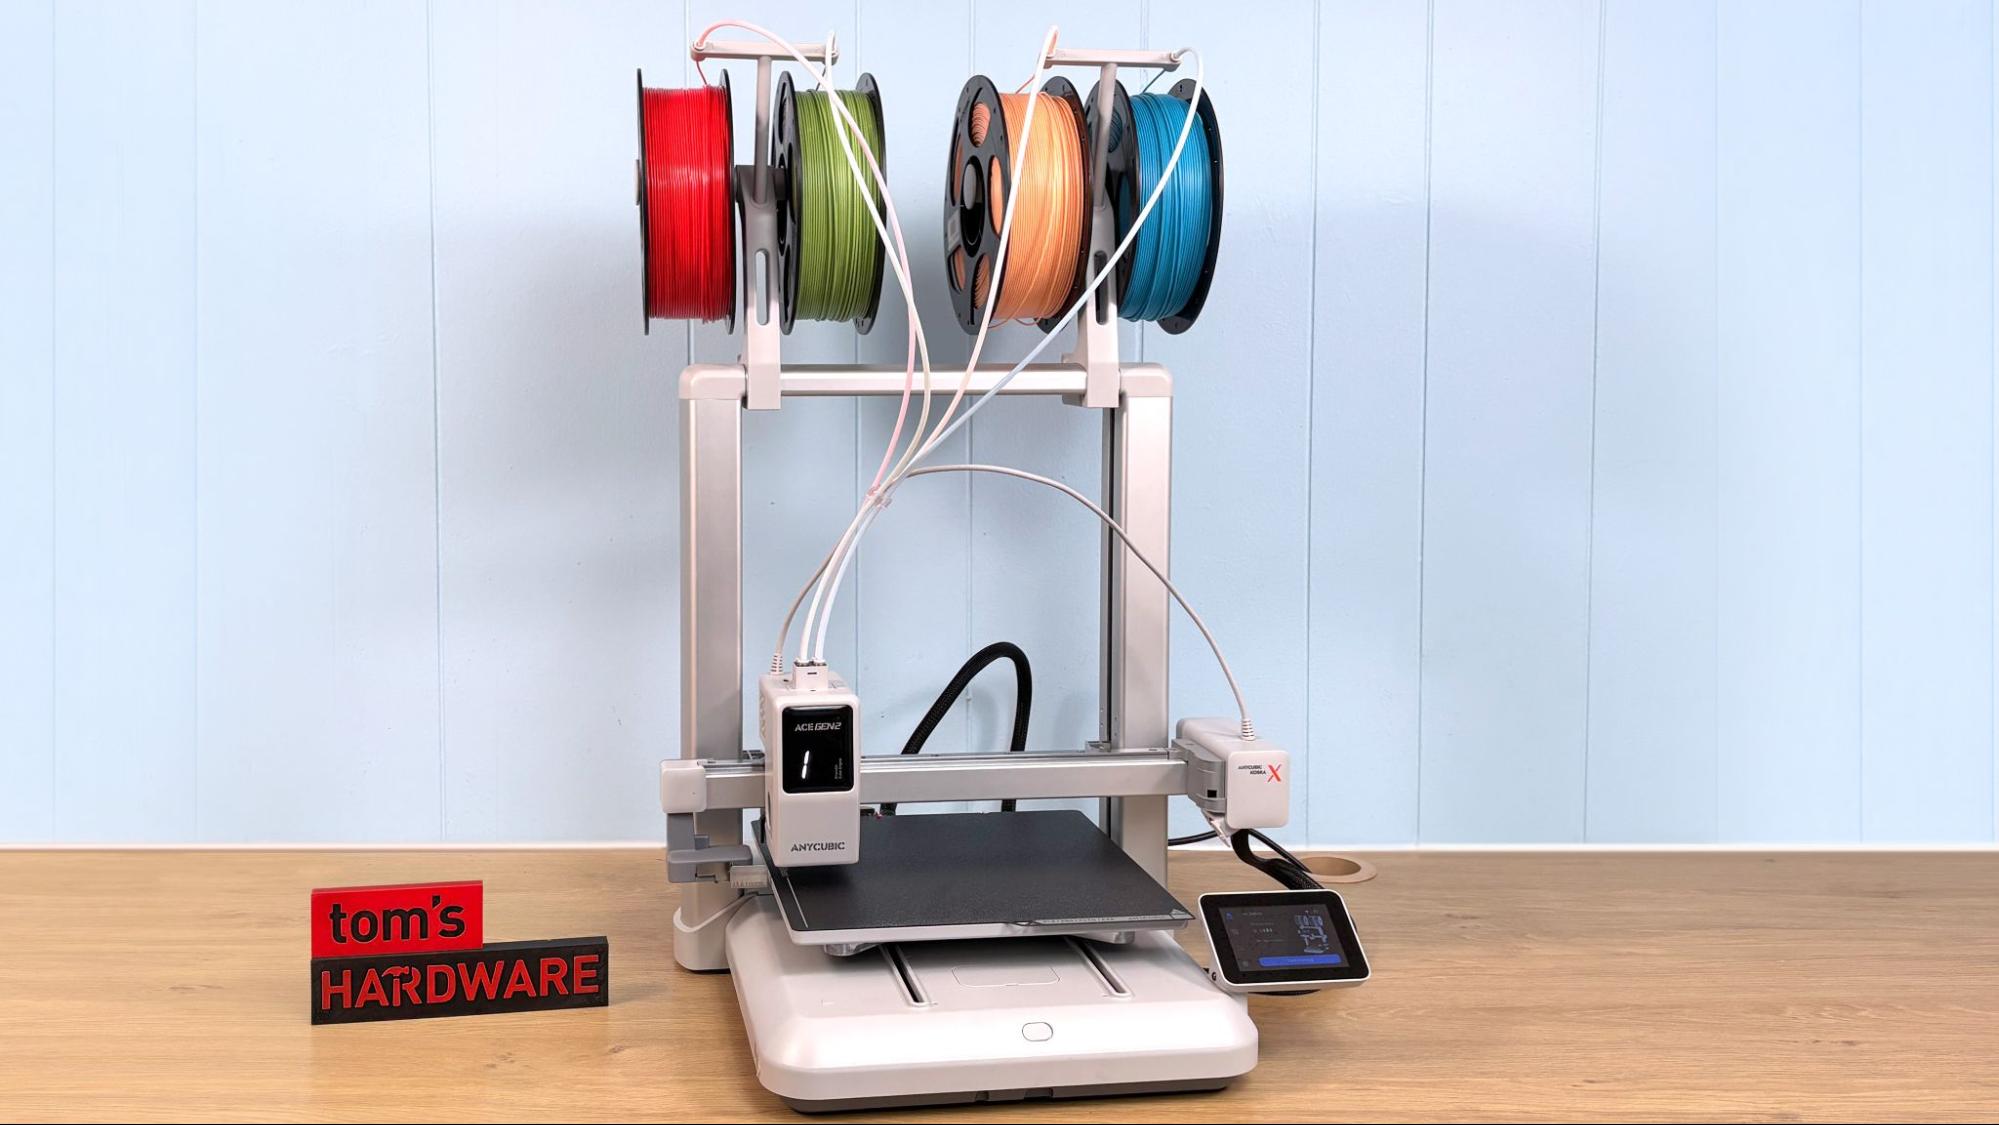
At first glance, the Anycubic Kobra X looks a lot like the Bambu Lab A1, with the same brushed aluminum gantry with both the Z-axis screws and Y-axis linear rods tucked out of sight. It has a similar build volume with a 260 x 260 bed plate, and a nozzle that can be swapped without tools.
But the big difference is the multimaterial system, the ACE Gen 2, which is built directly into the toolhead. There’s no external box. Filament feeds straight in from stationary top-mounted spools. Add an optional hub, and you can connect up to four ACE 2 Pro units for as many as 19 colors.
Specifications: Anycubic Kobra X
Swipe to scroll horizontally
Build Volume | 260 x 260 x 260 mm (10.23 x 10.23 x 10.23 in) | Row 0 - Cell 2 |
Material | PLA/PETG/TPU/PVA/PLA-CF/PETG-CF/ASA (up to 300 °C degrees) | Row 1 - Cell 2 |
Extruder Type | Direct Drive | Row 2 - Cell 2 |
Nozzle | .4 hardened steel | Row 3 - Cell 2 |
Build Platform | Two-sided PEI coated flexible build plate | Row 4 - Cell 2 |
Bed Leveling | Automatic + Z | Row 5 - Cell 2 |
Filament Runout Sensor | Yes | Row 6 - Cell 2 |
Connectivity | USB, LAN, Cloud, App | Row 7 - Cell 2 |
Interface | Color Touch Screen | Row 8 - Cell 2 |
Machine Footprint | 455 × 445.3 × 461.3 mm (17.91 x 17.53 x 18,16 in) | Row 9 - Cell 2 |
Machine Weight | 9.5 KG (20.94 lbs) | Row 10 - Cell 2 |
MSRP | $399 ($279 Early Bird Pre-sale, Jan 15 to Feb 28) | Row 11 - Cell 2 |
Initial Ship Date | March 25 to April 5, 2026 | Row 12 - Cell 2 |
Anycubic Kobra X: Included in the Box
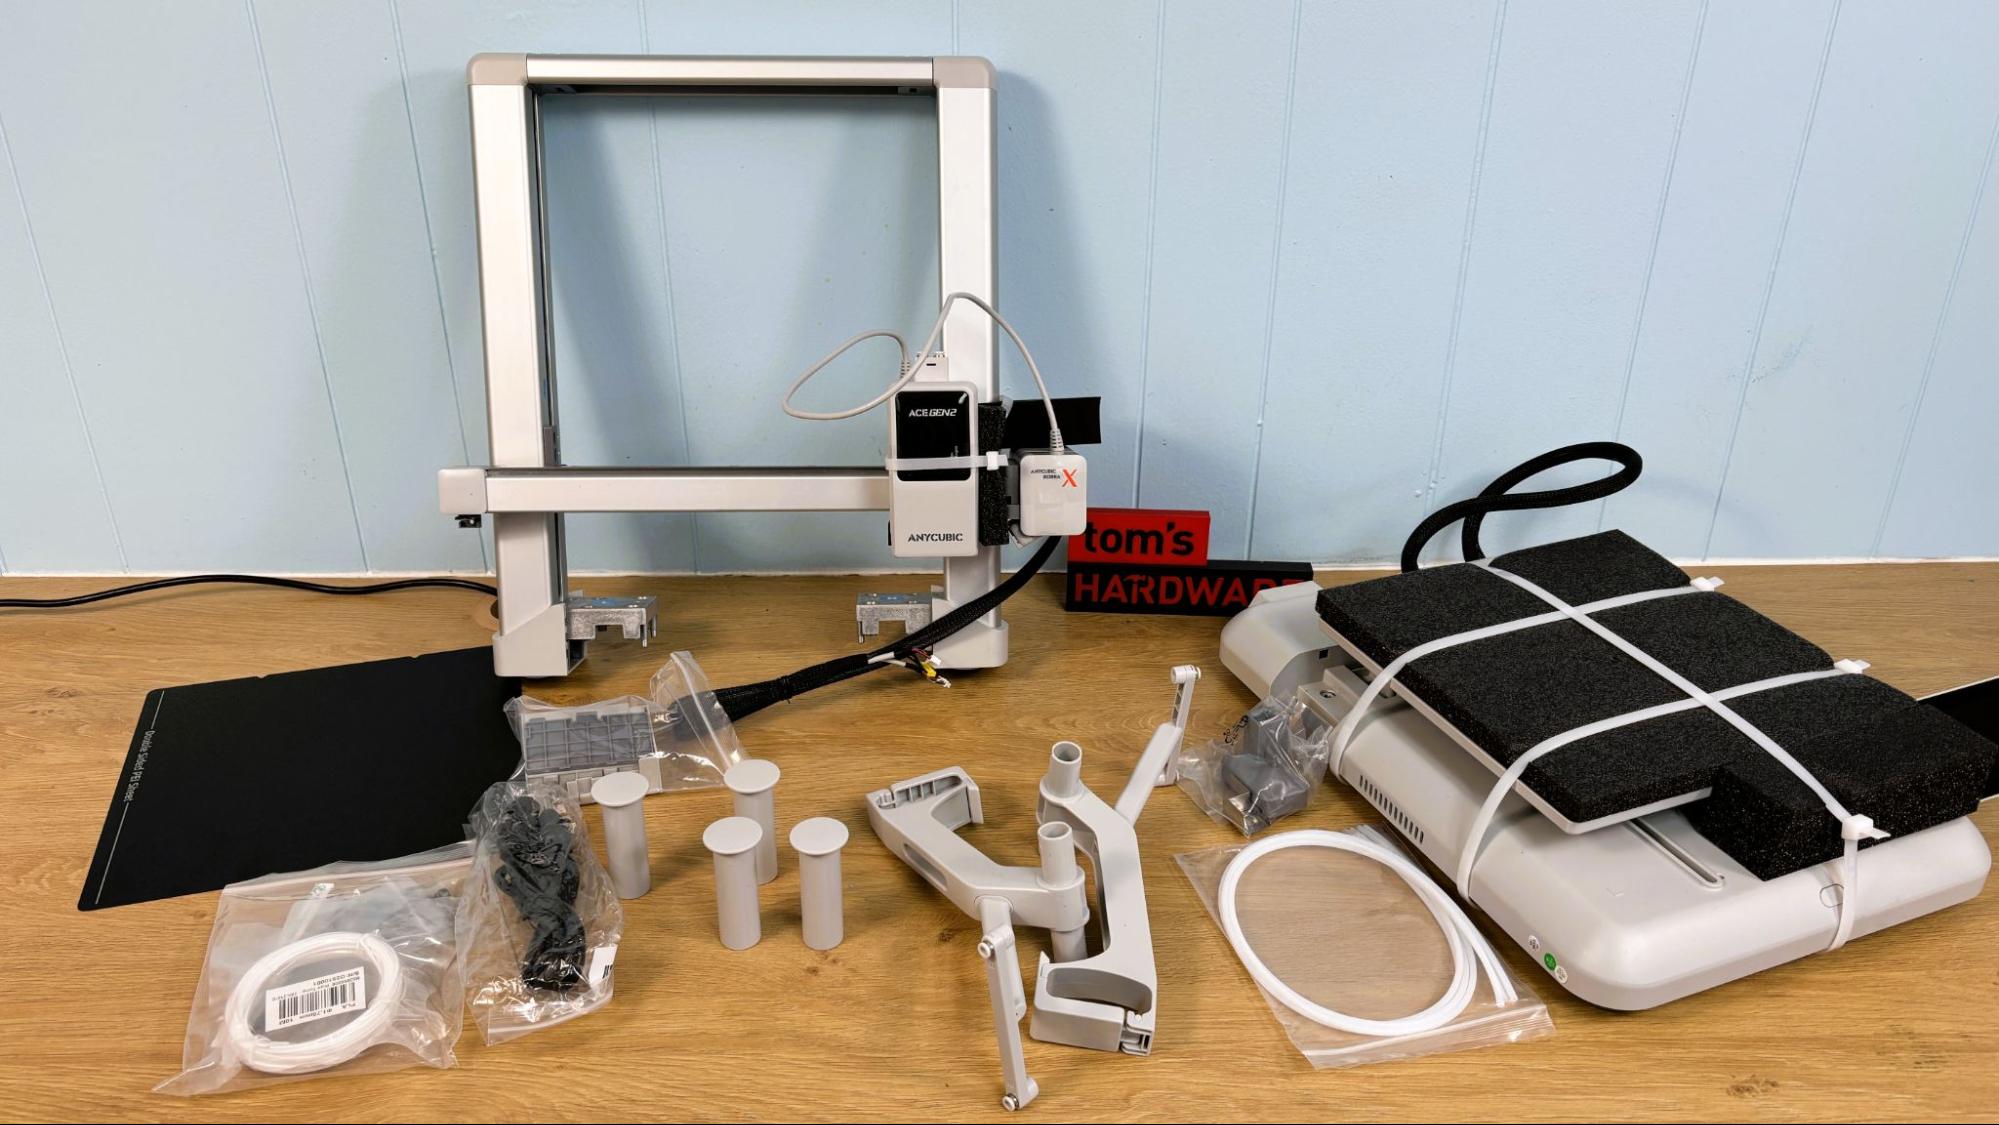
The Anycubic Kobra X ships in two main assemblies, the base and the gantry. Also included are the spool holders with guides, purge wiper, toolkit, assembly screws, decorative covers, a paper copy of the manual, and the ubiquitous coil of white PLA.
We also received four spools of Anycubic PLA for the review.
Design of the Anycubic Kobra X
The Anycubic Kobra X looks suspiciously like a Bambu Lab A1, with a brushed aluminum gantry, left side X-axis purge wiper, and a fully enclosed motion system.
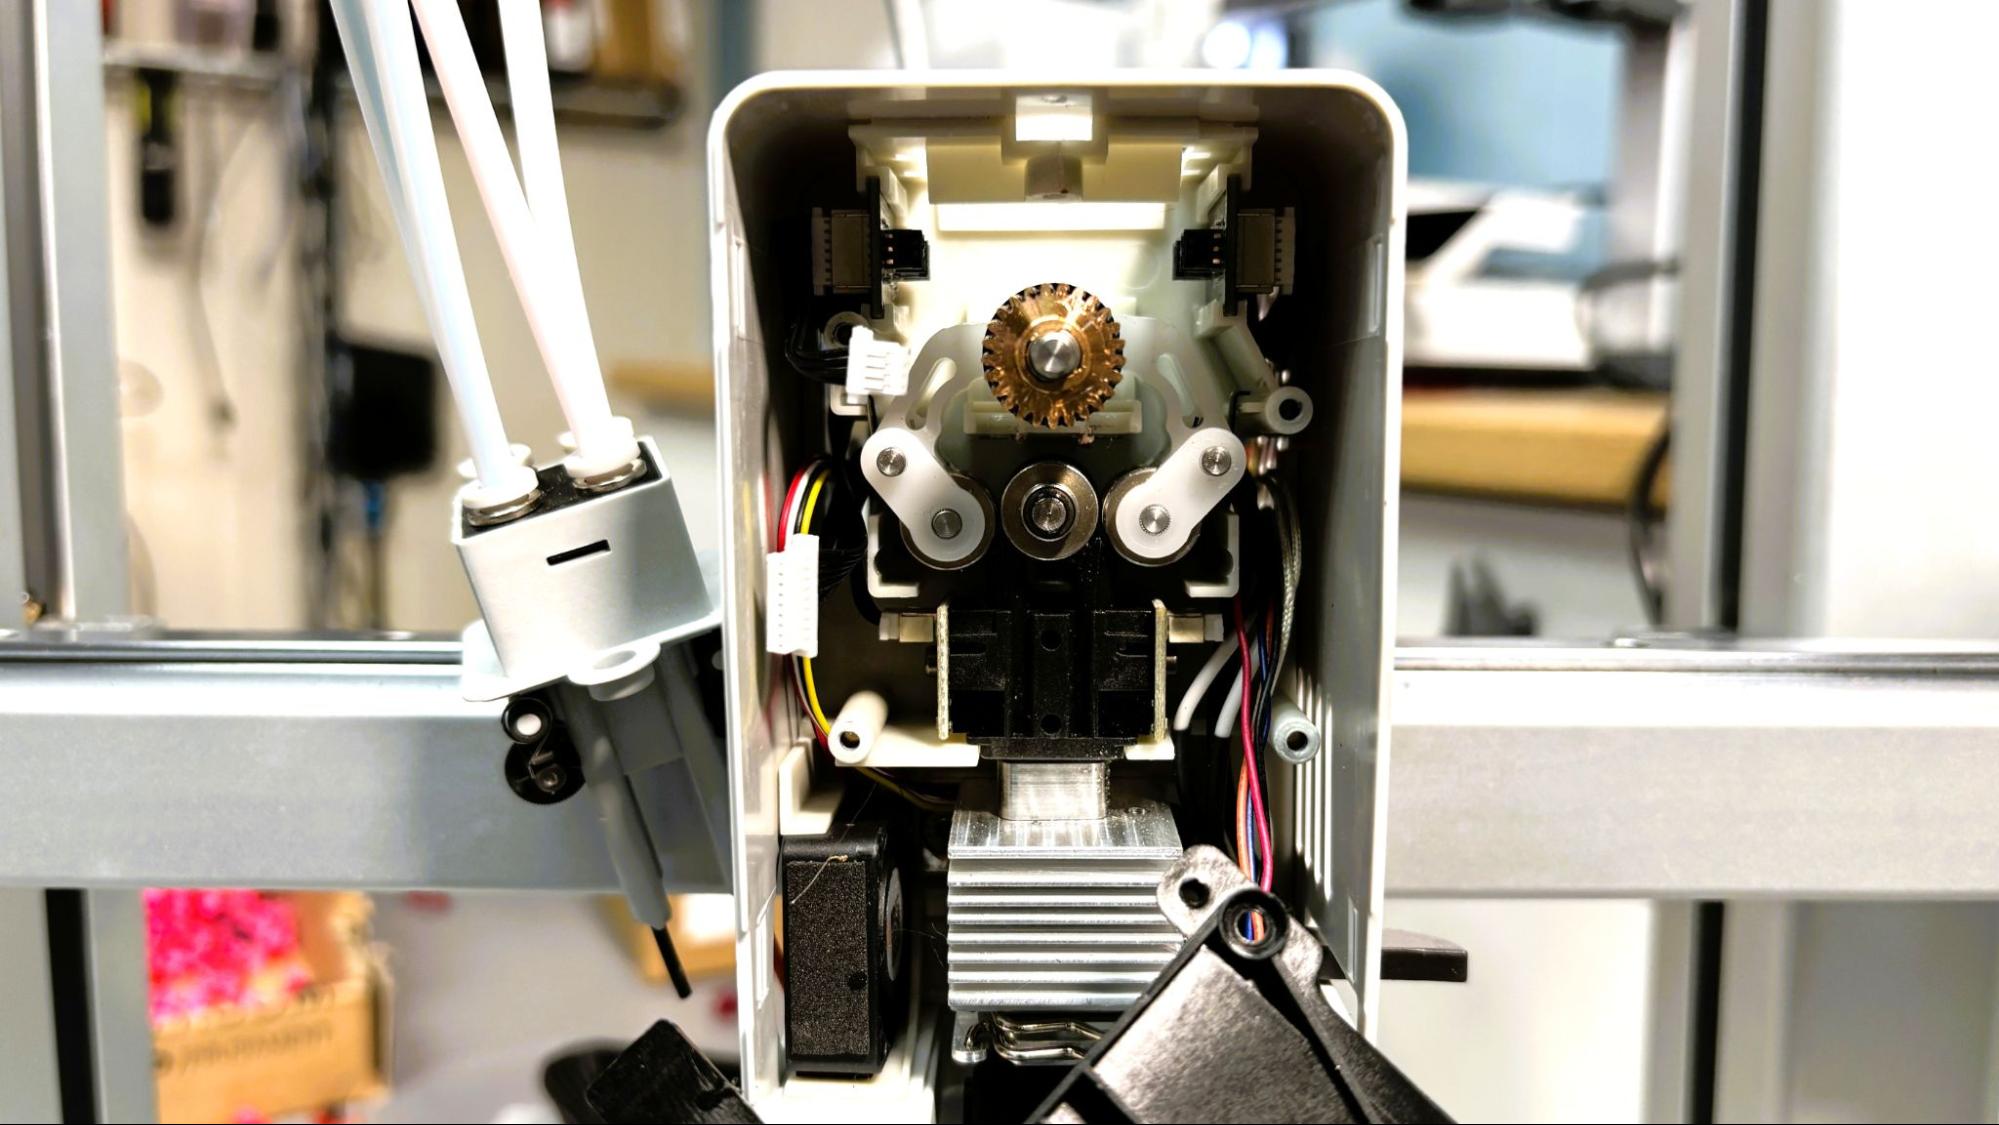
Under the hood, it’s a very different beast. The ACE (Anycubic Color Engine) Gen 2 has been miniaturized and stuffed right into the toolhead. The active filament is chosen by a motor driven camshaft, which will allow the feed gears to only grip the correct filament. A large display on the front of the tool head shows which filament is active.
If four colors isn’t enough for you, the system can be expanded up to 19 colors by adding up to four of Anycubic’s ACE 2 Pro boxes. This would involve 16 tubes being connected to the printer via hubs, a spectacle Anycubic has yet to show off in the marketing materials.
During testing, the Kobra X’s ACE Gen 2 worked flawlessly. I tried everything from PLA to PETG to 95A and 85A TPU. The only jam I had was running an old spool of extremely brittle Light Weight PLA. Removing the hub on top of the toolhead was all that was required to clear it. I do not fancy disassembling the extruder, as it is a fairly complicated process.
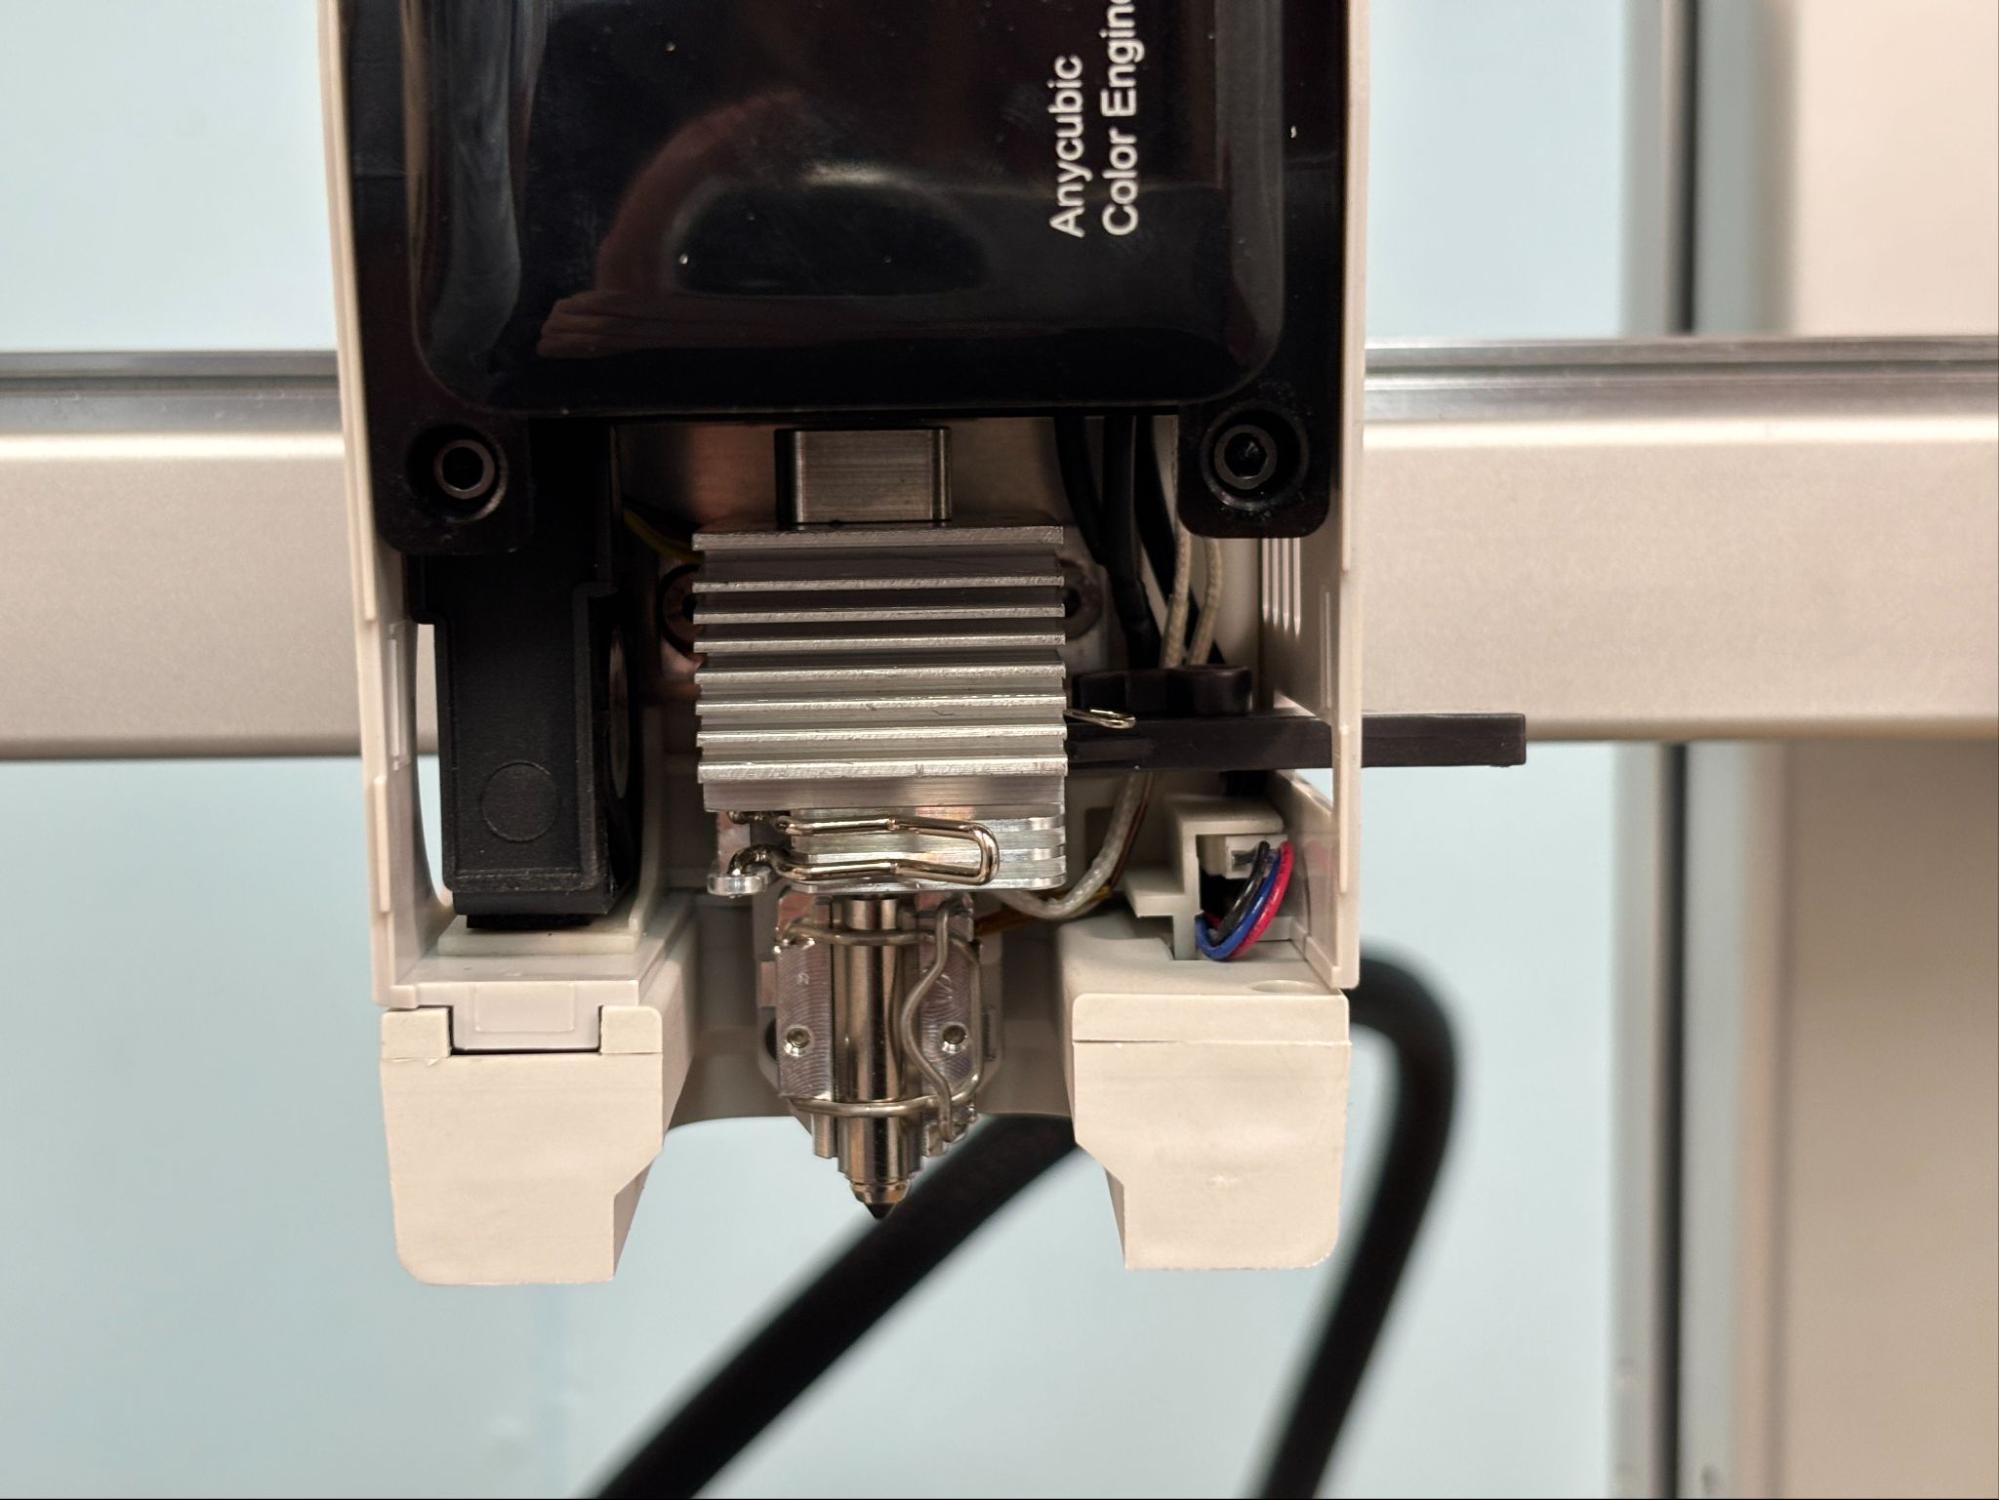
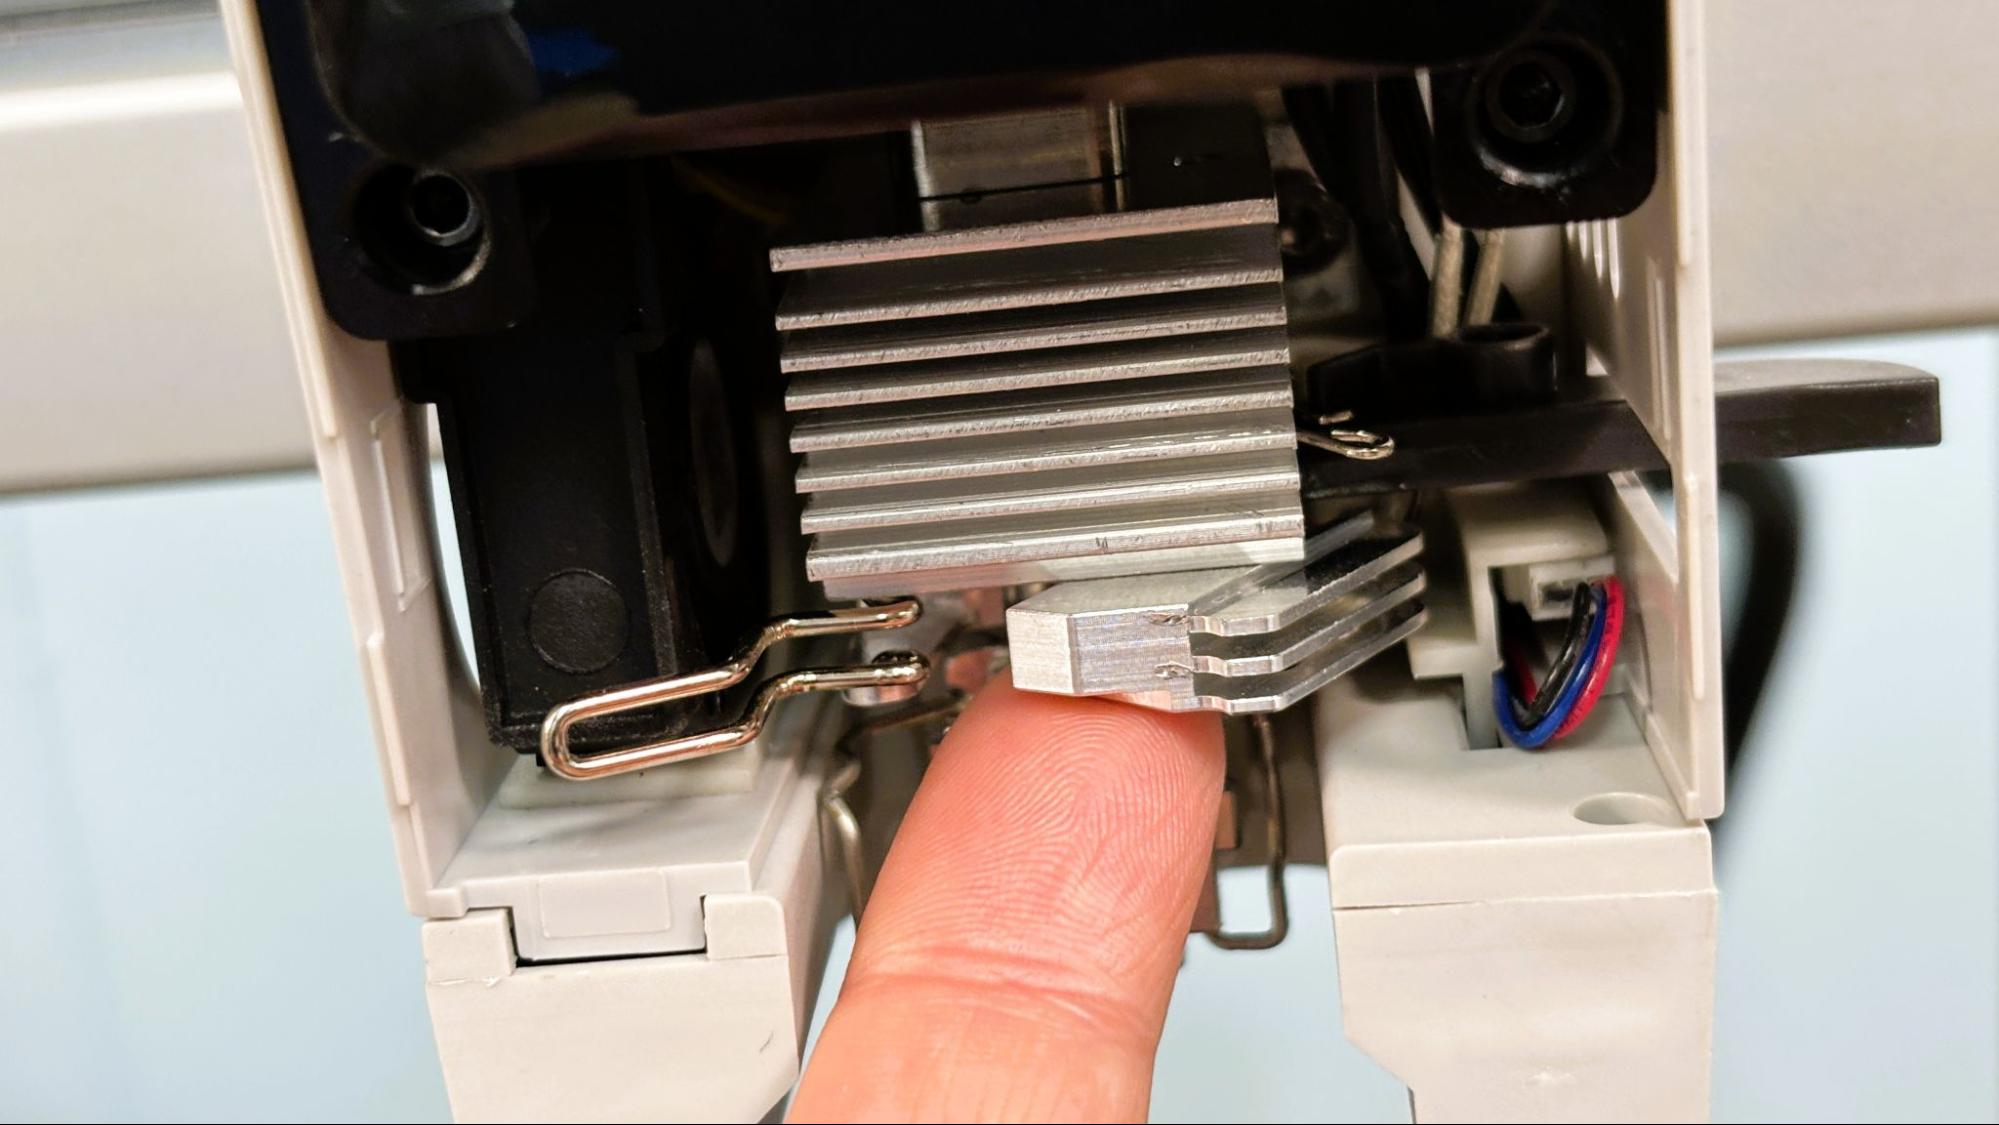
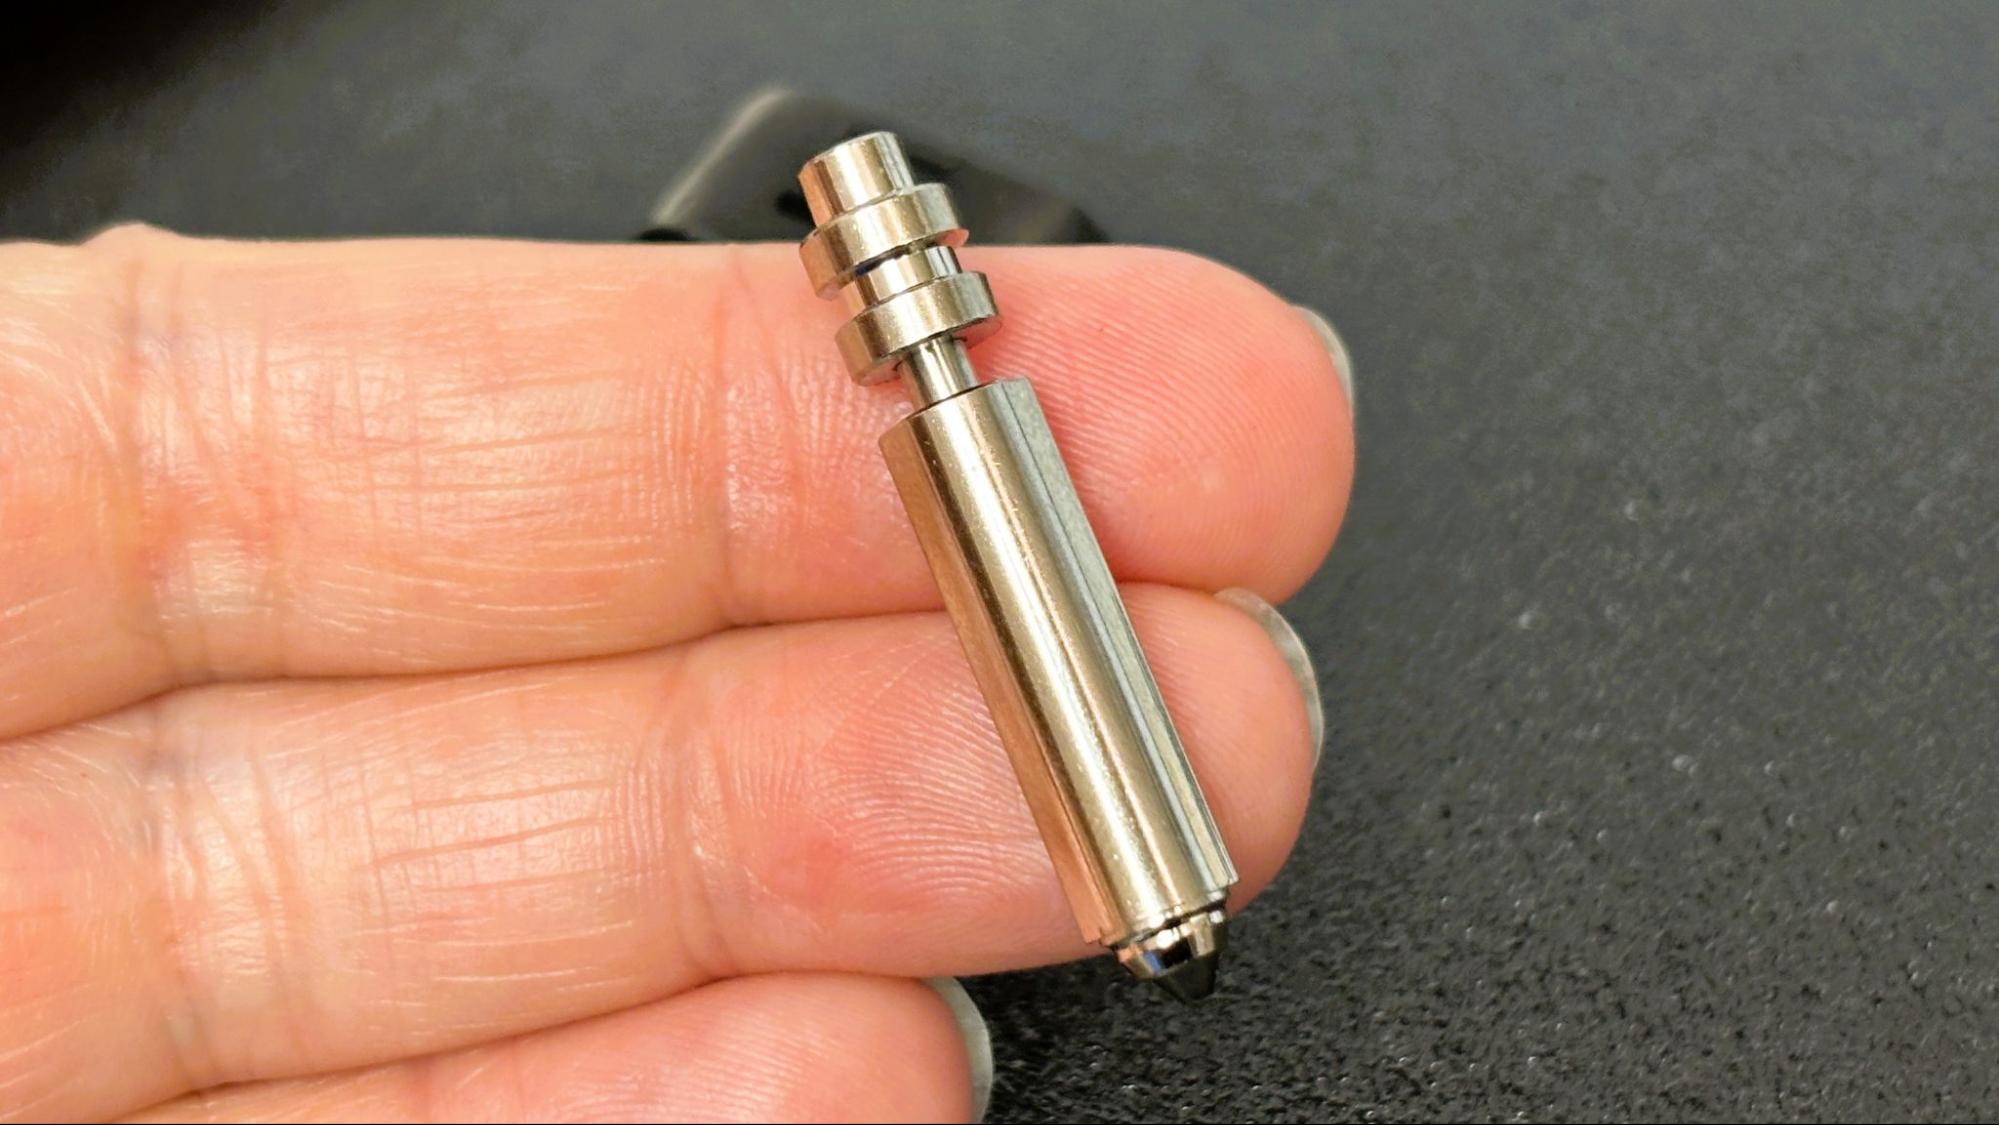
The hotend and nozzle of the Kobra X look a lot like a Bambu knockoff until you start to disassemble it. This was designed to cut the filament as close to the melt zone as possible. As a result, most of the finned heat sink is now a permanent part of the hotend, including a part that swings out of the way, to access the nozzle. The nozzle included with the printer is made of durable hardened steel.
The motion system of the Kobra X is mostly enclosed, with the top mounted X-axis linear rail being the only part visible. Dual Z-axis rods are enclosed inside the gantry and driven by a single stepper motor and belted at the top. The bed runs on metal rails with metal guide wheels and is enclosed in the base, with access ports to verify belt tightness.
Running in standard mode, the printer is fairly quiet, especially with very little filament retraction needed. The main noise is from the cooling fans, and our review unit did have a somewhat annoying squeak coming from the motion system.
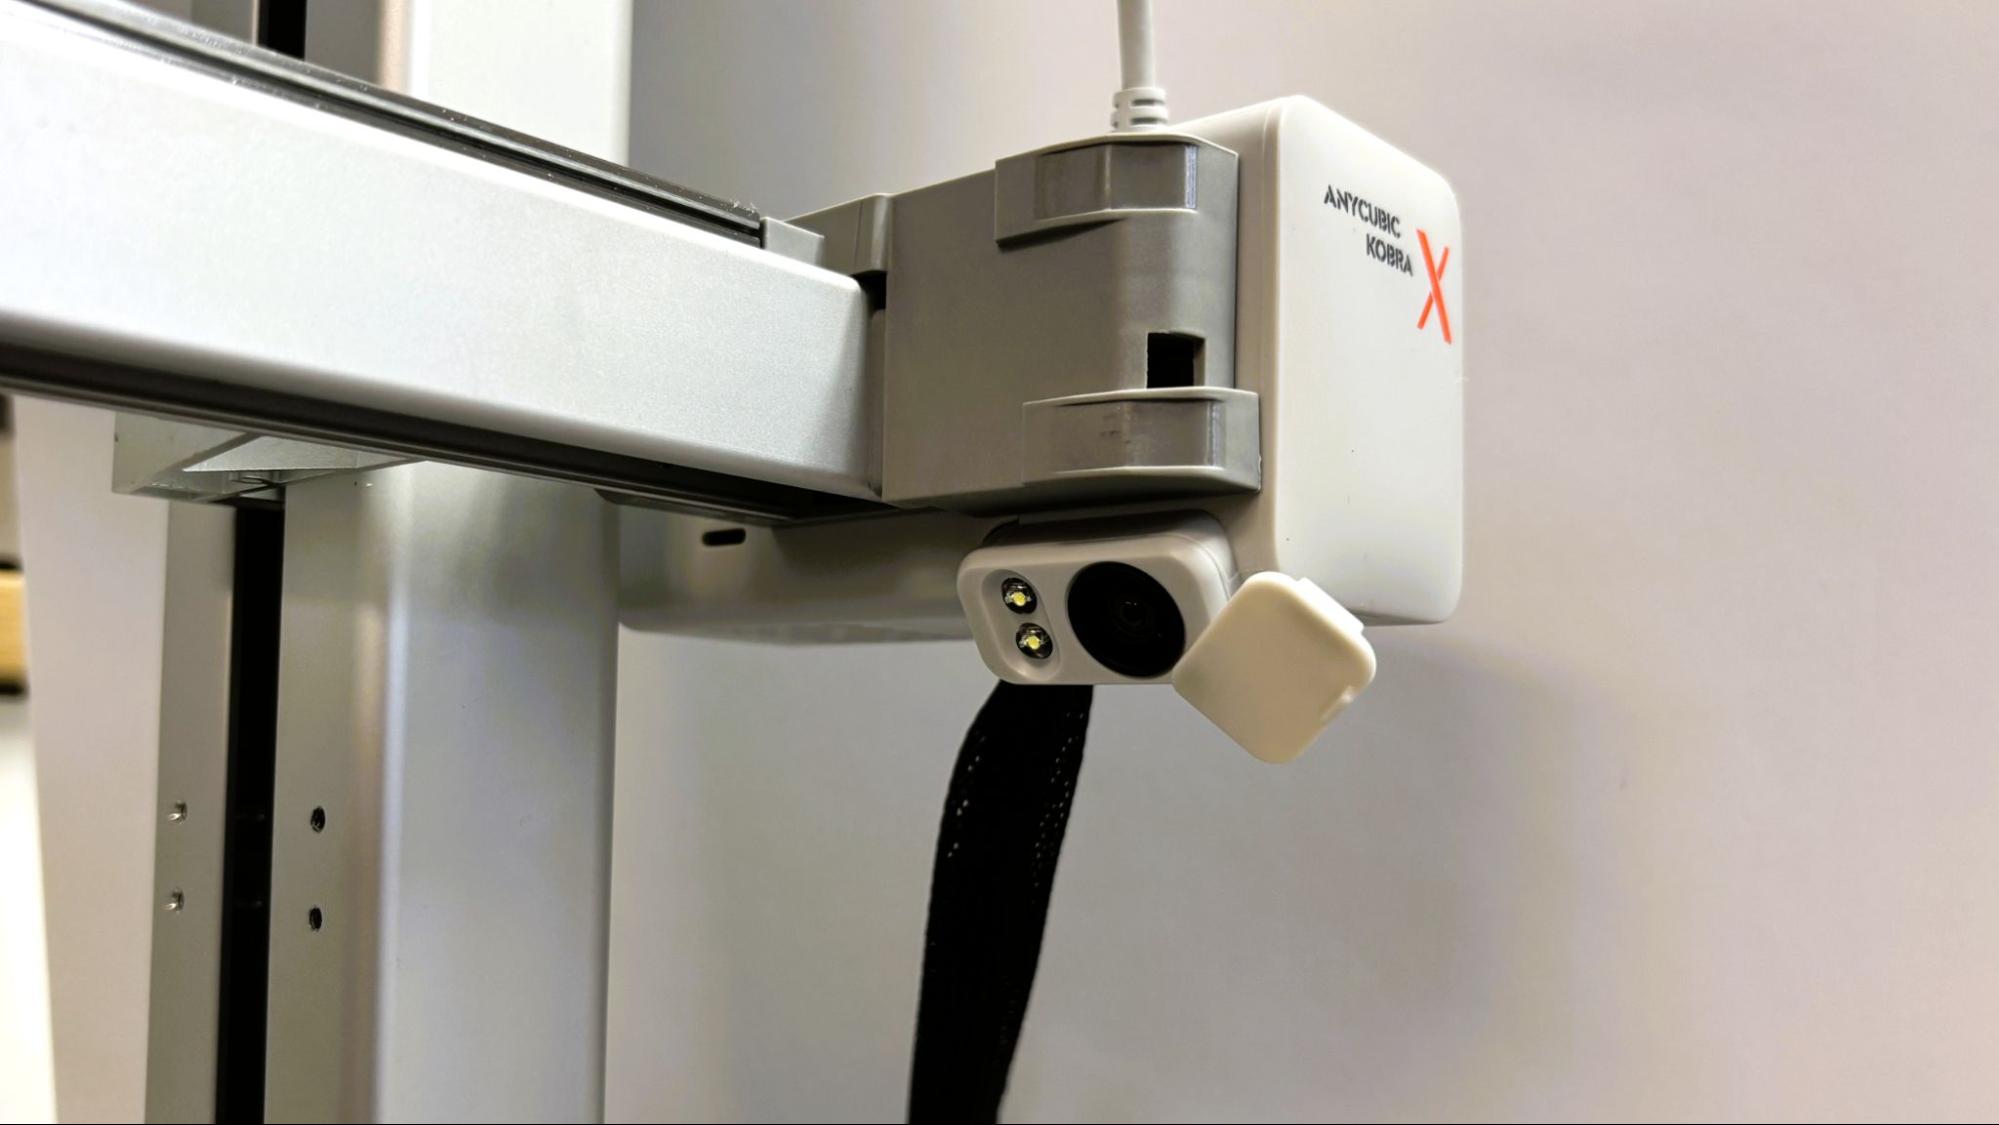
The Kobra X has a decent 720p camera with a privacy cover and LED lighting. The camera can take time-lapse video of your prints, but the camera’s viewing angle is not very good for that. The camera is best for print monitoring from the device tab of the slicer and the Anycubic app. It is also used for spaghetti detection, which must be turned on from the printer or from the print options on the workbench tab of the slicer. Since the bed adhesion was good, I never bothered to turn it on.
Assembling the Anycubic Kobra X

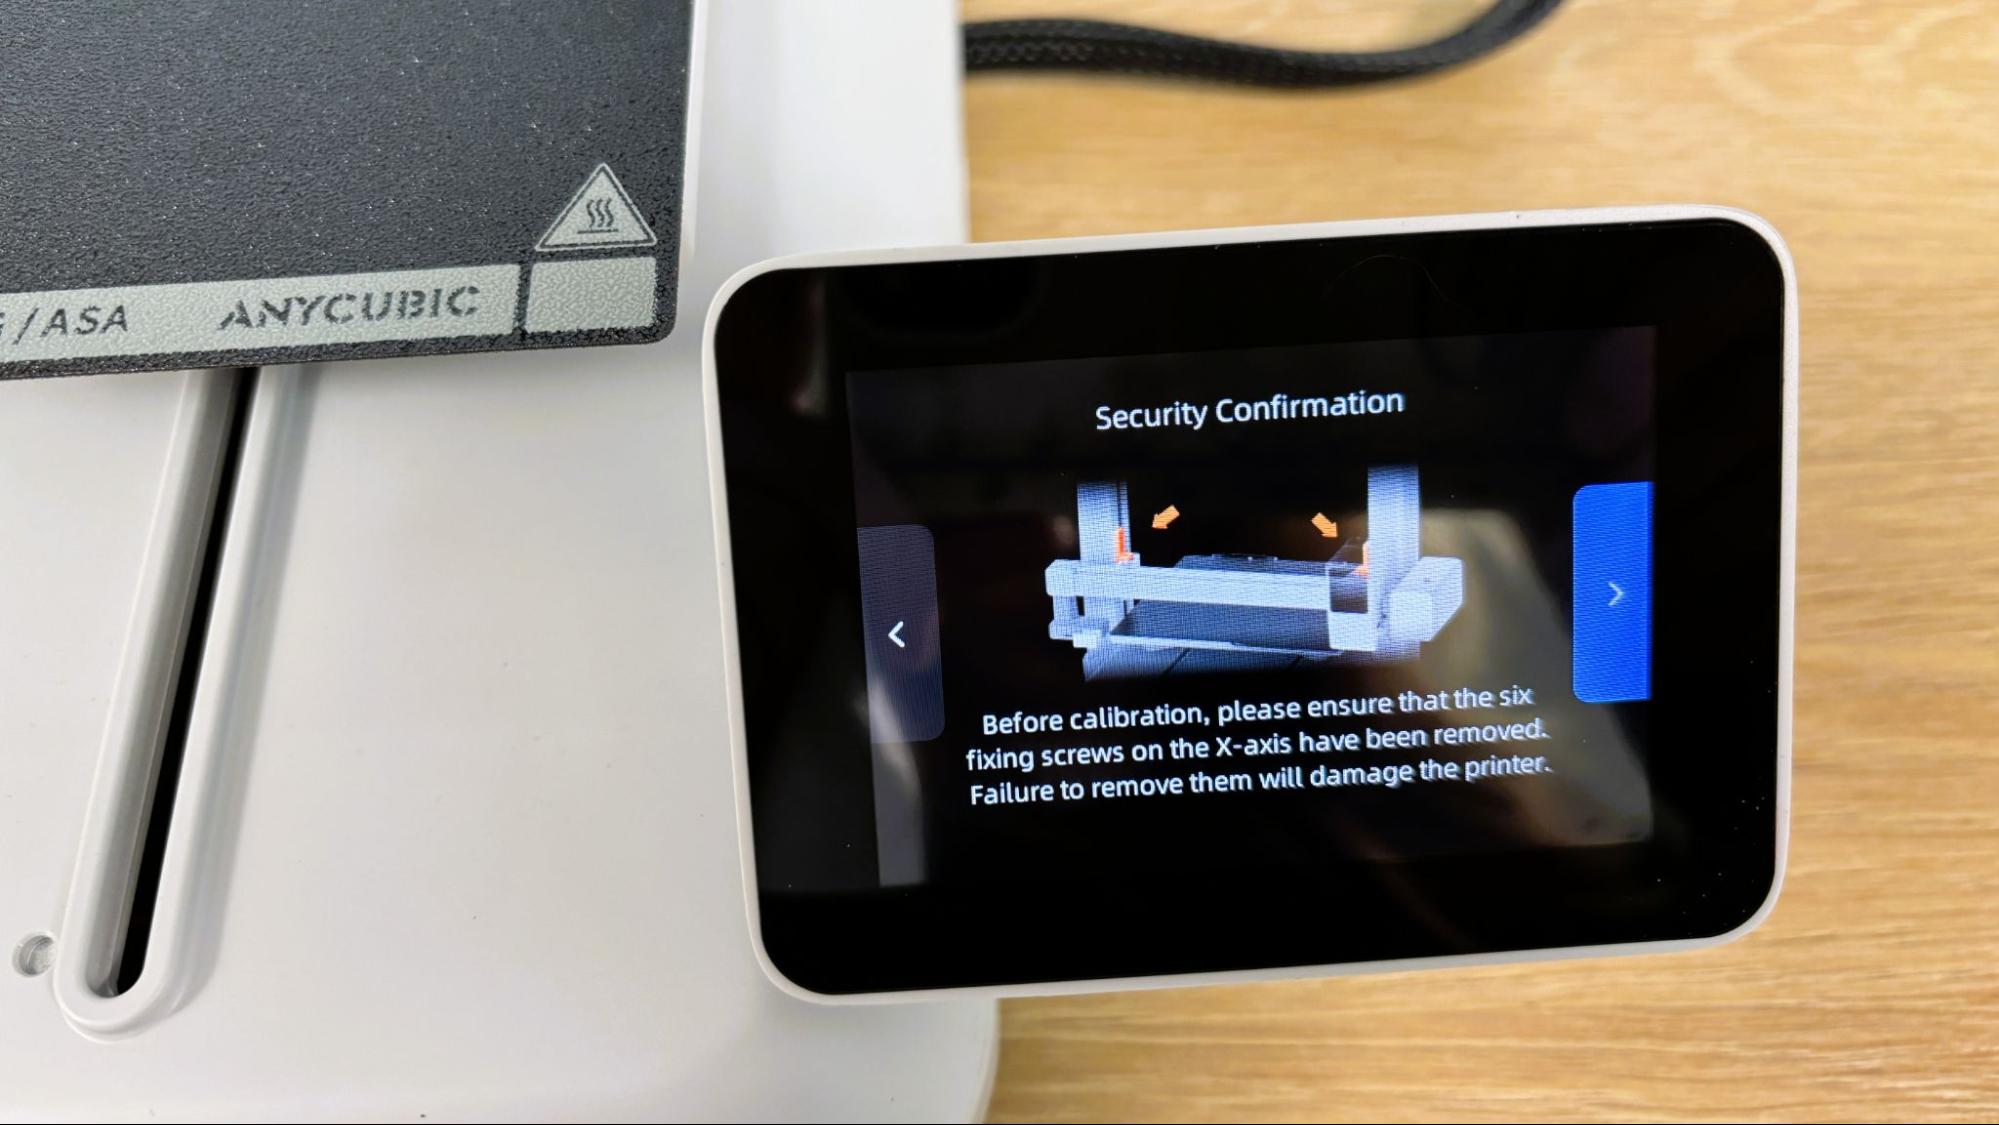
After cutting a few zip ties and removing some foam, the Anycubic Kobra X is easy to assemble with the parts nicely labeled and the hardware separated into bags. The gantry is held on with eight M5 screws into the base, four into either side. Once you switch on the machine, the interface will ask you to double check that all shipping brackets have been removed, which is a nice reminder, especially for beginners.
The cables are well labeled and plugged into the base once the gantry is secured.

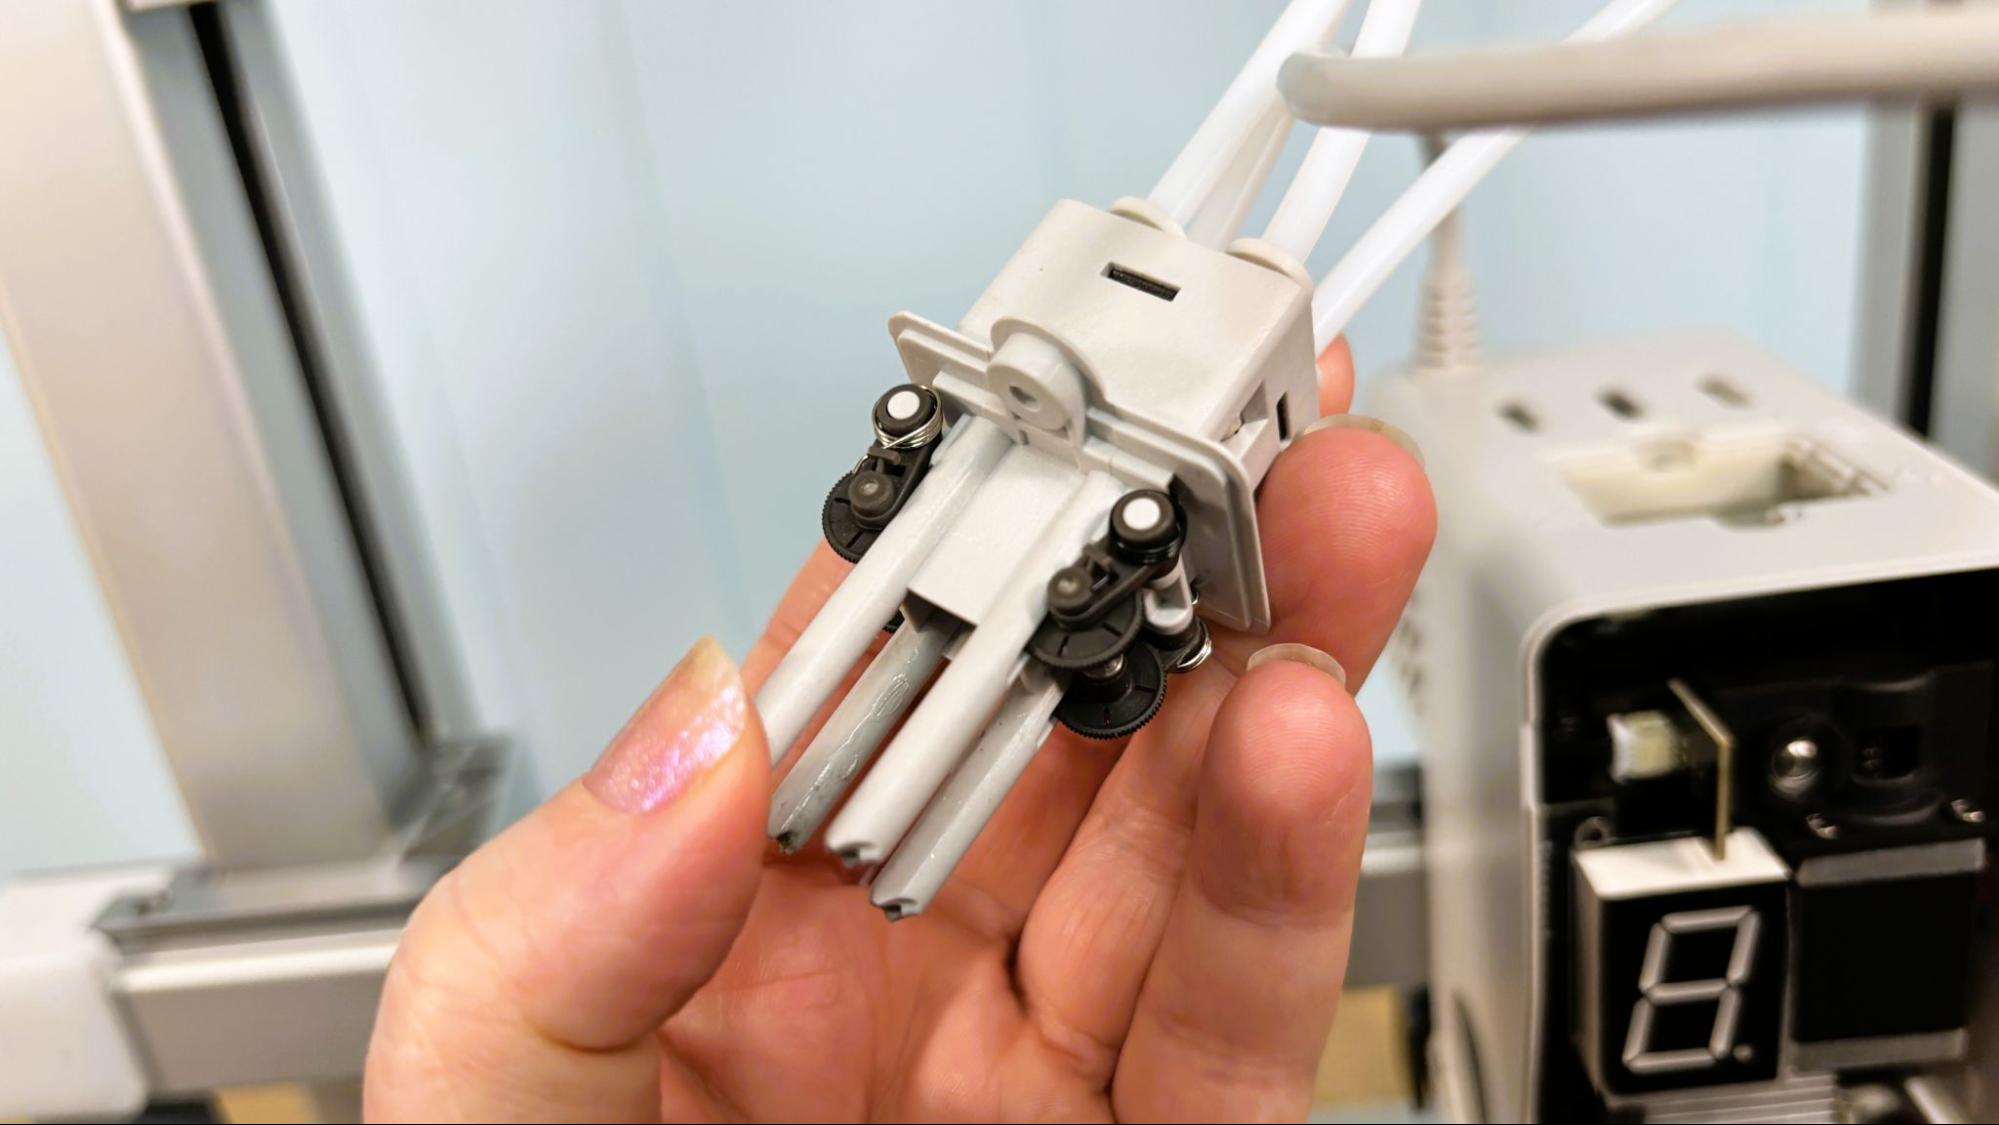
The spool holders clamp into place on the top of the gantry without tools. These should be spaced as far apart as possible, as getting full sized spools of filament into the inner two holders is a tight fit. Four guide tubes from the spool holders must be attached in the correct order to know which spool is feeding each slot.
The purge wiper attaches to the left side of the X-axis with one screw and there are covers for the exposed hardware on top and for the wiring on the bottom giving the printer a very polished appearance once assembly is complete.
Leveling the Anycubic Kobra X
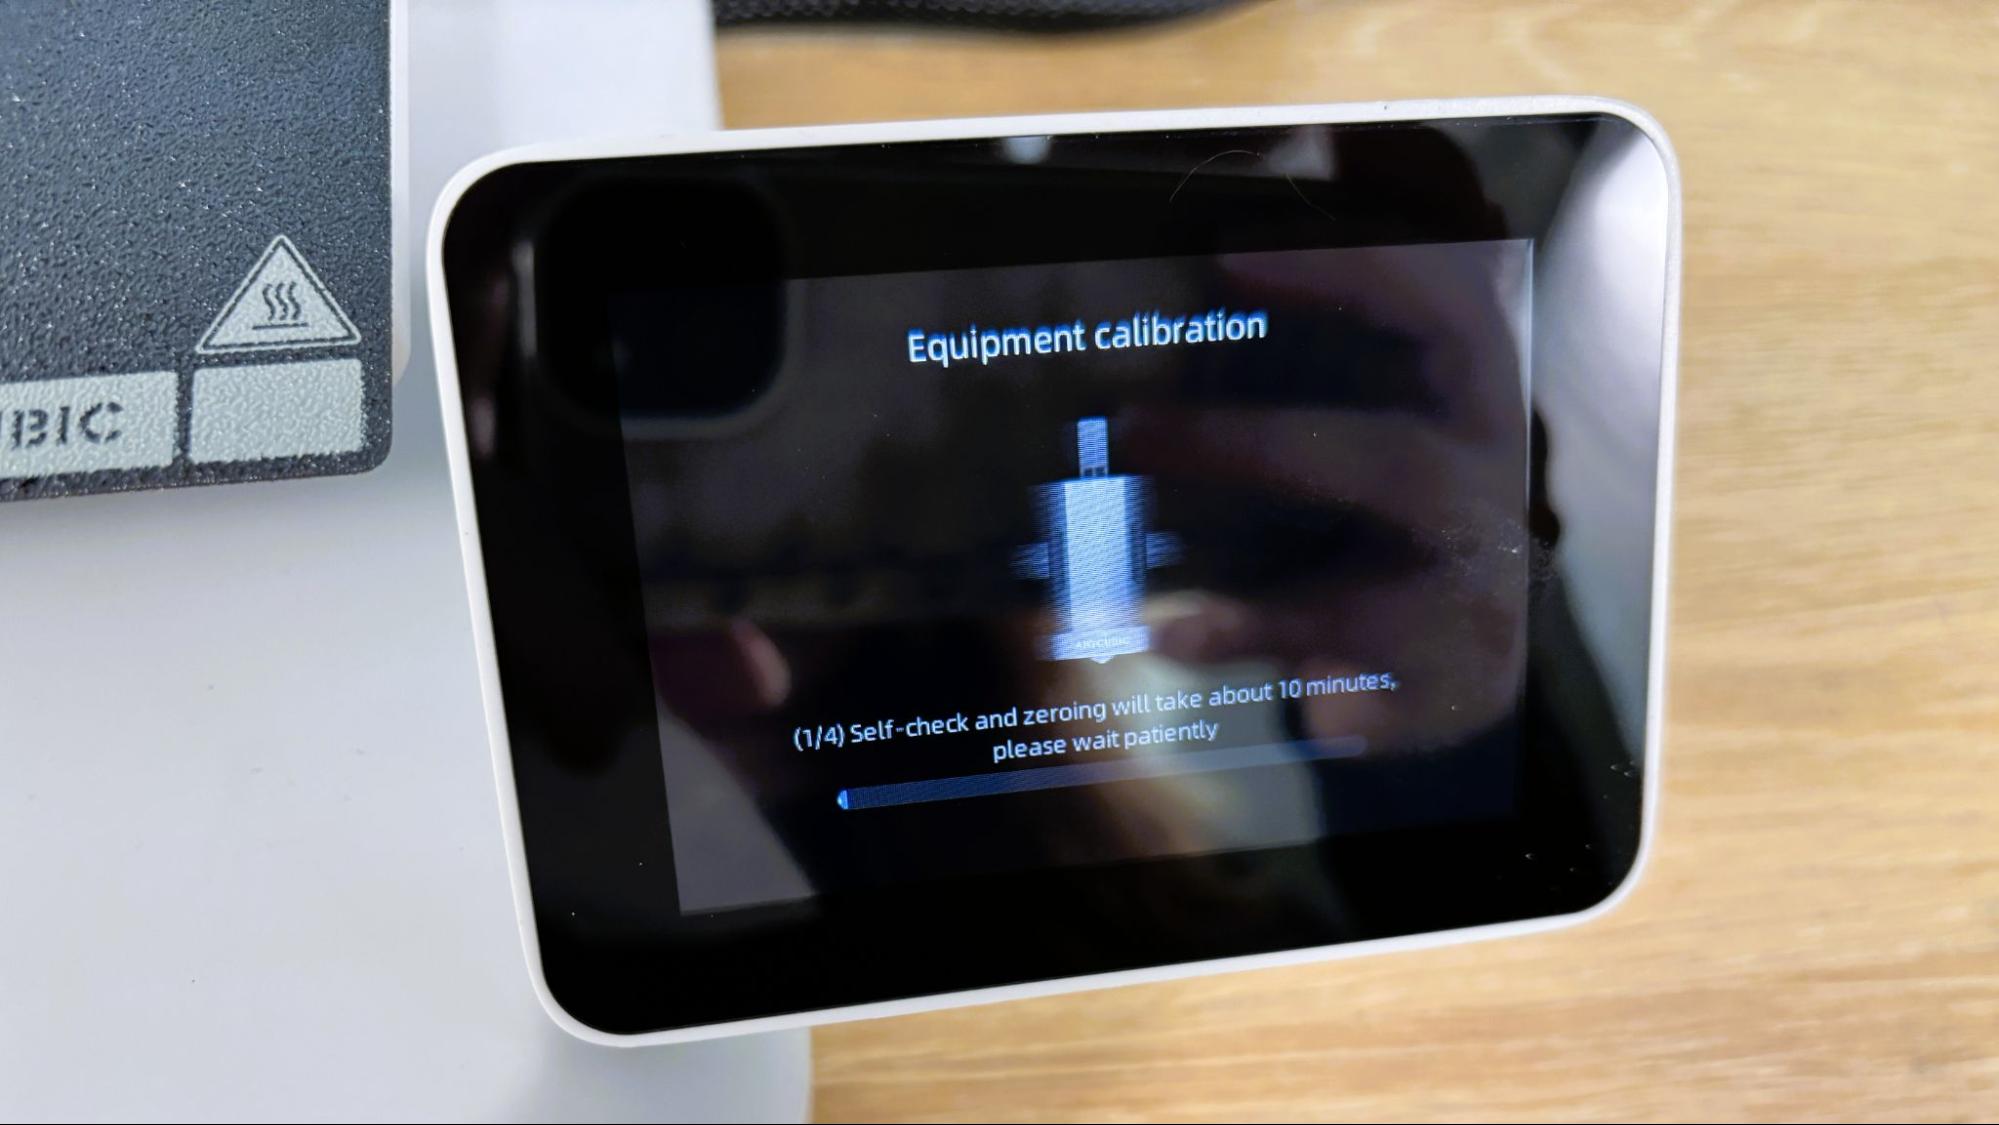
The Anycubic Kobra X levels the bed and automatically sets Z offset as part of its initial calibration and then rechecks it at the start of every print. Anycubic’s LeviQ 3.0 system works flawlessly.
Loading Filament on the Anycubic Kobra X
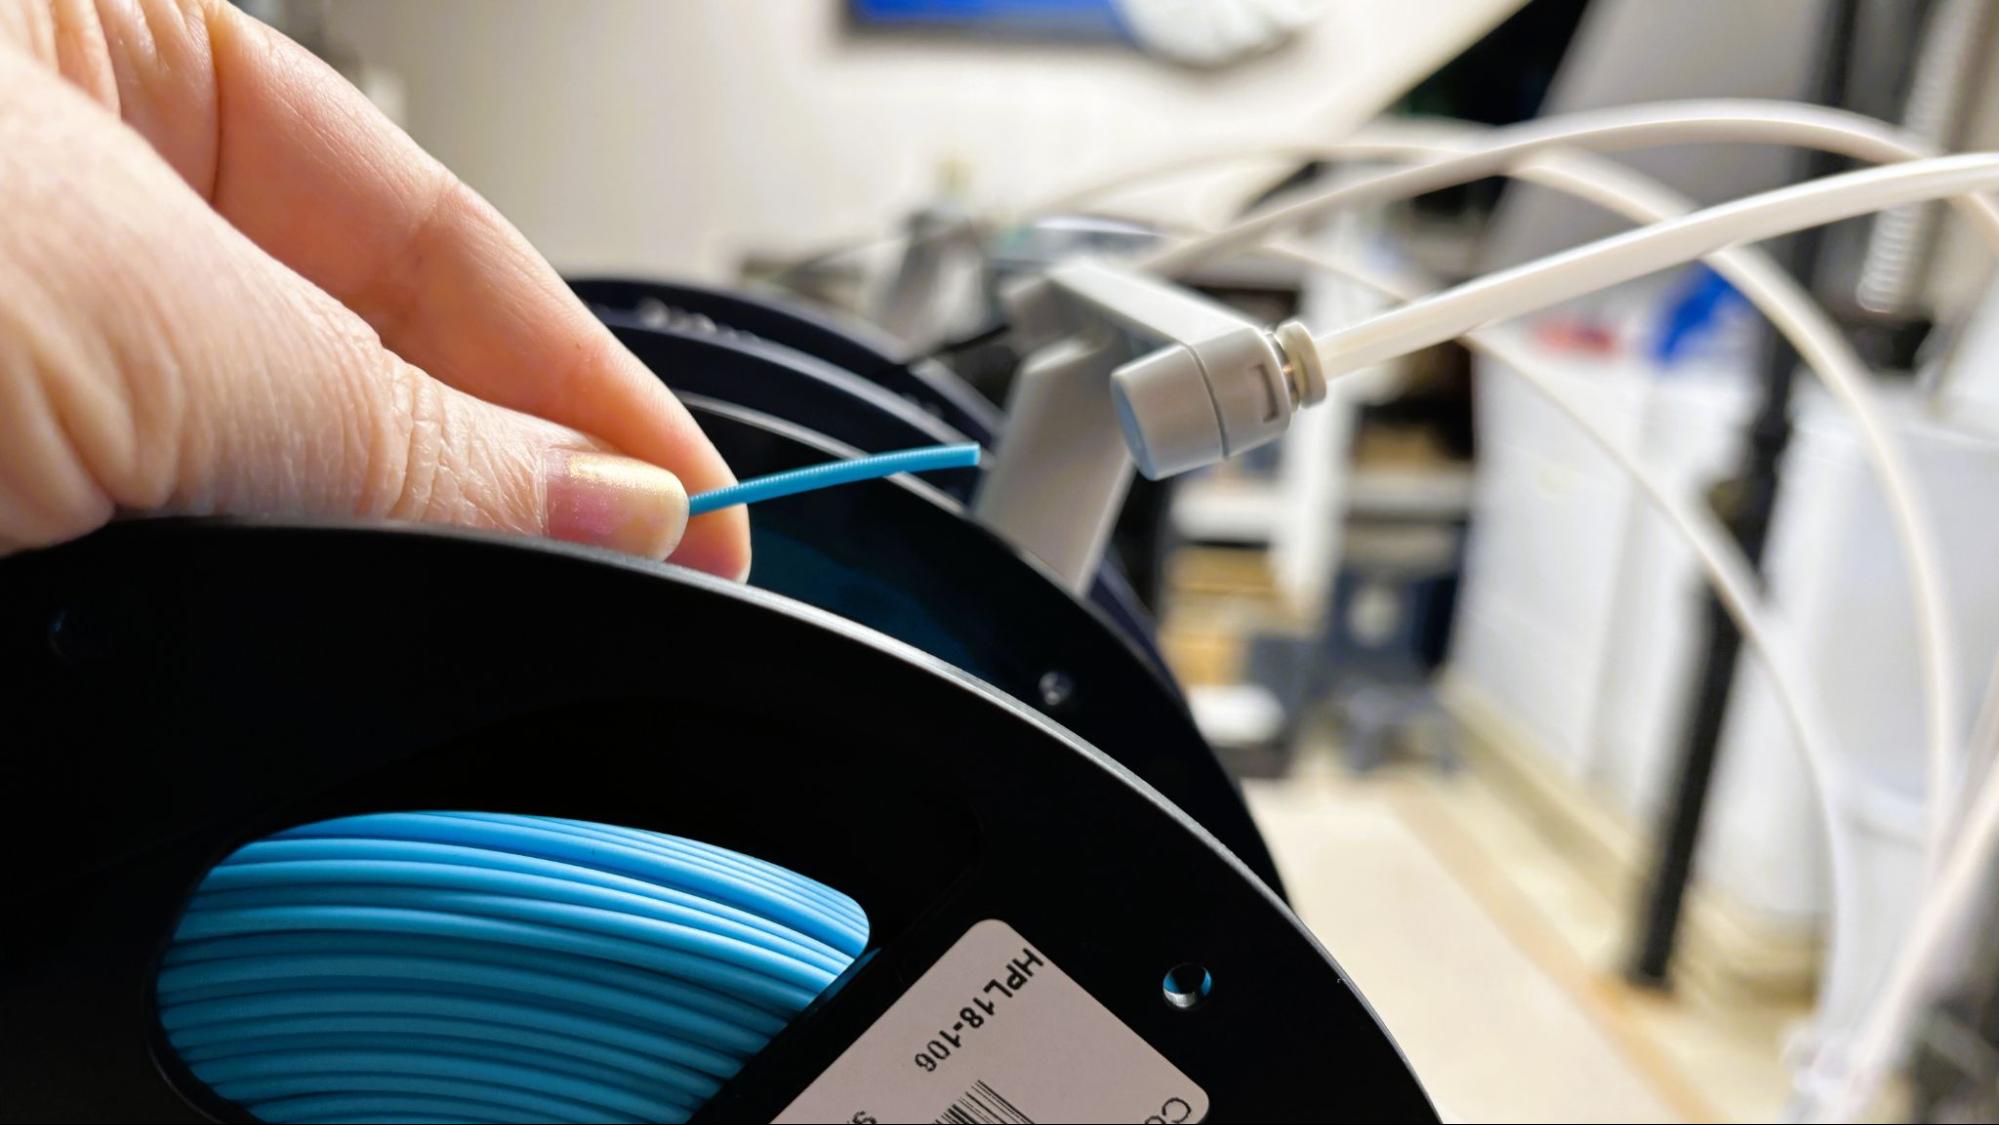
Loading filament into the Anycubic Kobra X is simple but is a little awkward if the spool is full. The short distance between the guide tube and the edge of the spool makes it tough to push more than an inch or two of filament at a time. The spool holders do not have any mechanical retraction, so the spools can get a little messy when the filament unloads between swaps and when machine vibration causes the spool to unwind.
The simple spool holder design allows you to use any brand of filament, no matter what the spool is made of or how big the diameter of the hole. You can also easily use quarter sized spools and sample coils without problem.
The Kobra X has an RFID tag reader, which currently only works with Anycubic filament. The reader is located on the base of the machine and getting it into the system isn’t really worth the effort. You have to tell the machine you’re going to use the reader from inside the filament menu, wave the spool over the reader until it recognizes it, then load the filament on the spool holder.
Preparing Files / Software Anycubic Kobra X
The Anycubic Kobra X uses Anycubic’s slicer, Anycubic SlicerNext. This is built on the foundation of OrcaSlicer and BambuStudio. If you are familiar with either of these, you will feel right at home with Anycubic SlicerNext.
From the home page of the slicer you can access Maker Online, Anycubic’s online ecosystem. If online access is not your cup of tea, you can slice files and move them manually via USB stick.
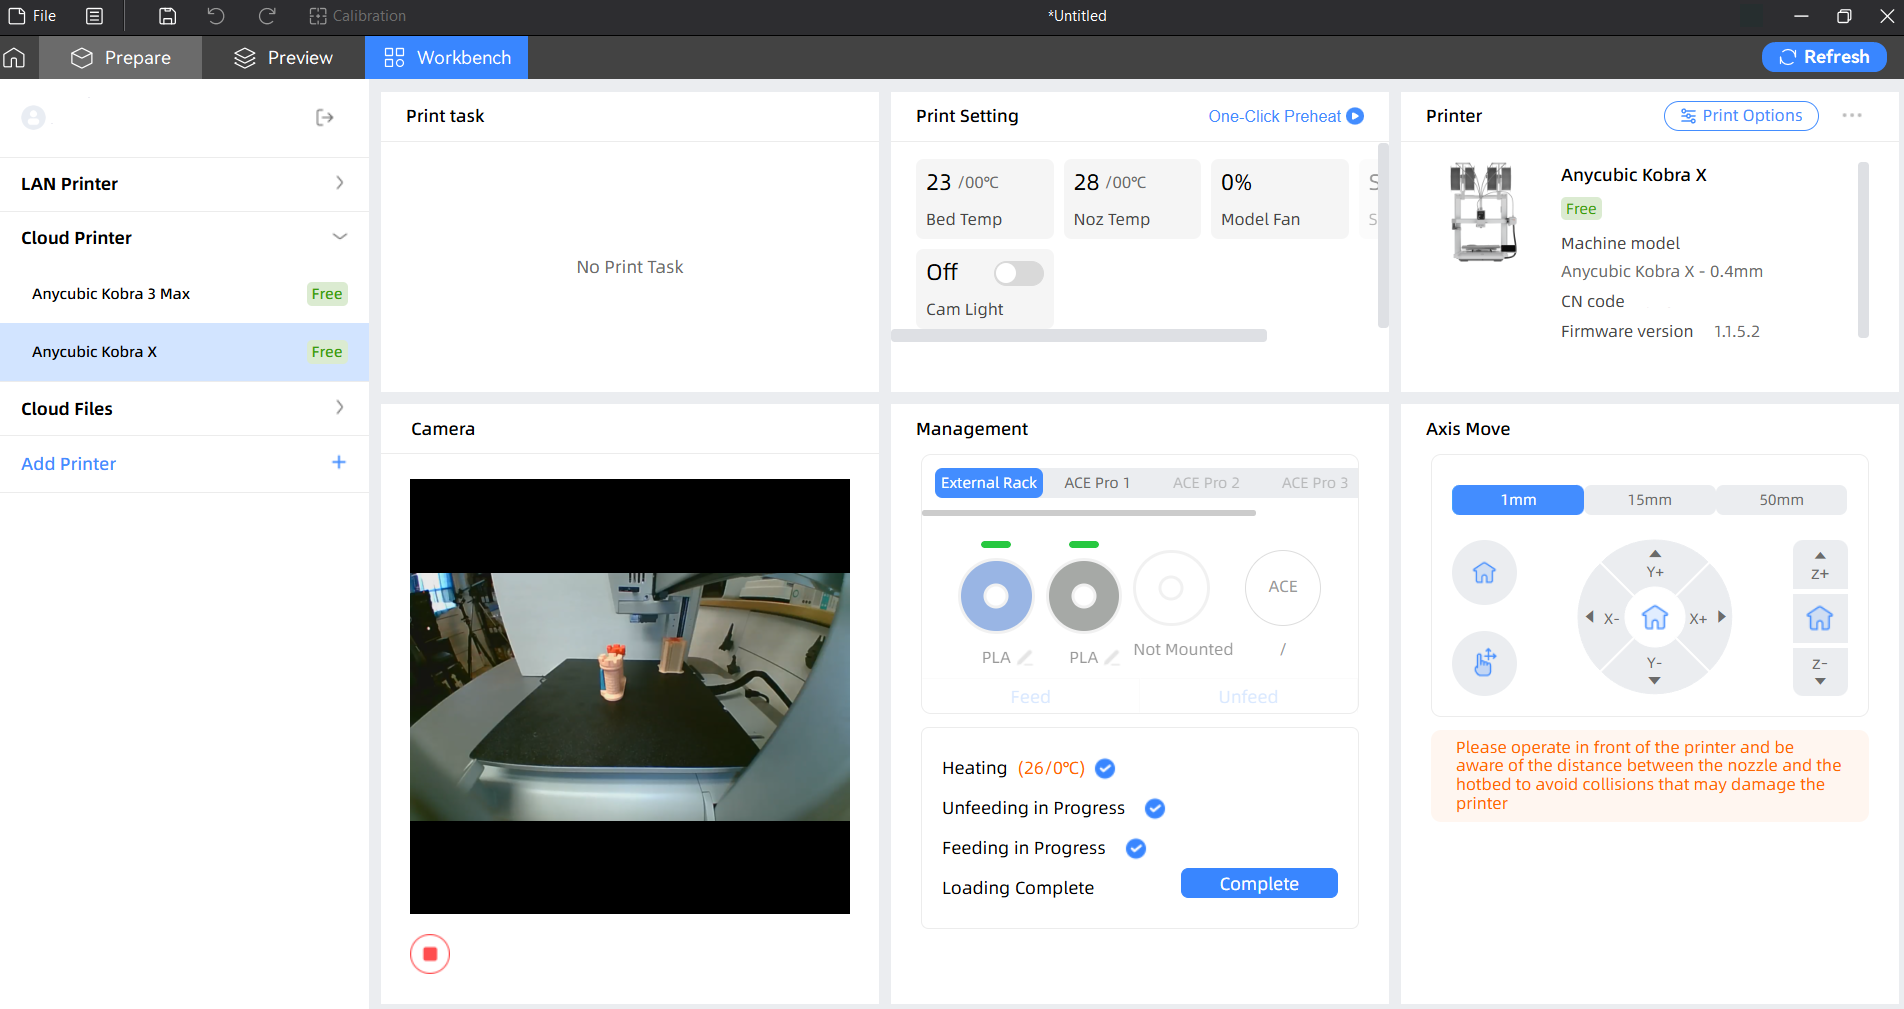
The workbench tab of Anycubic SlicerNext offers a number of control options for the printer, although fine tuning beyond temperature, parts cooling fan speed, and three broad speed modes is not available. The camera view is visible but unfortunately it cannot be expanded to full screen. The workbench tab is also where you can easily update the printer’s firmware over the air and find statistics on total print time and filament used.
Printing on the Anycubic Kobra X
The Anycubic Kobra X printed perfectly out of the box with the Anycubic PLA they supplied for the review. You’ll definitely want to check out our list of the best filaments for 3D printing to load up the spool holders for the ACE Gen 2.
Any 3D printer that uses one nozzle for multicolor is going to have a problem with filament waste. Once filament is melted inside the hot end it can only be pushed out, resulting in printer “poop”.
Anycubic was able to decrease this waste on the Kobra X by reducing the distance between the cutter and the nozzle to 10 mm, which greatly reduces how much filament needs to be retracted or flushed when you change colors or materials. Reducing the purge amount also reduces the time required to change colors. During our testing, the Kobra X was nearly twice as fast as its rival, the Bambu Lab A1, and wasted much less filament when using equal settings.
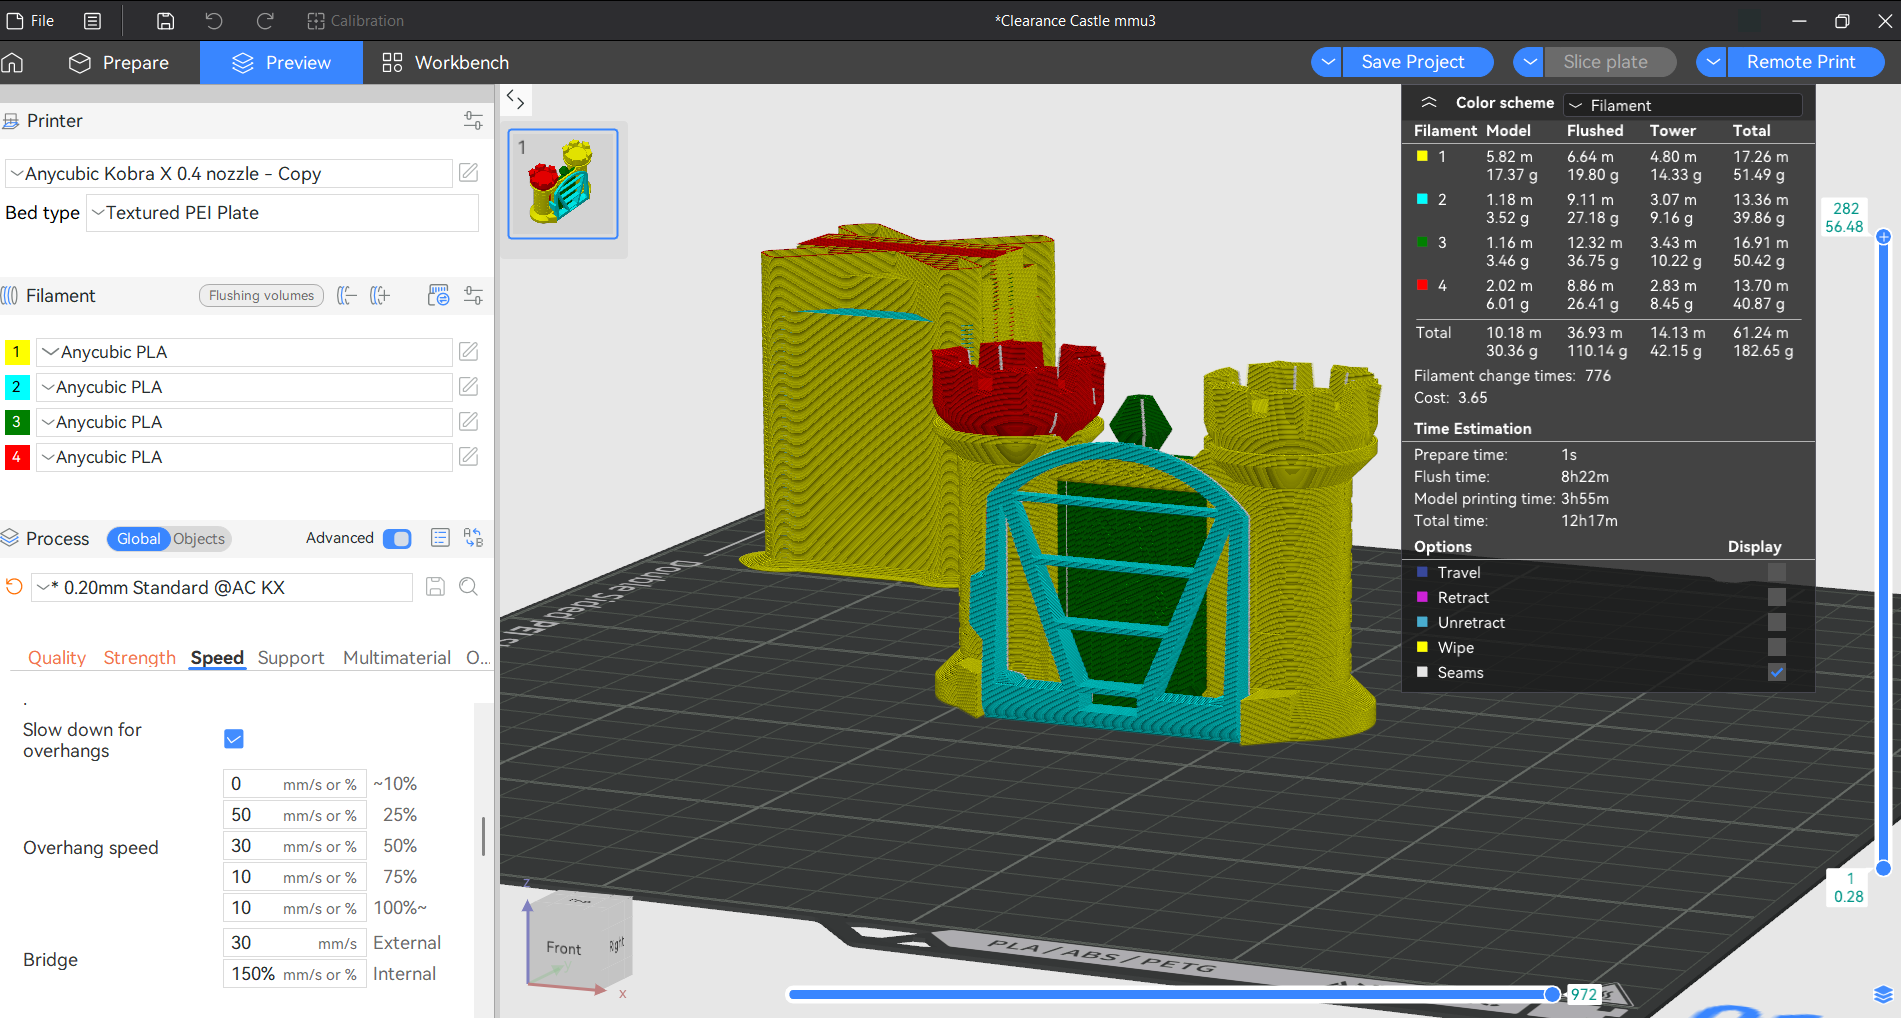
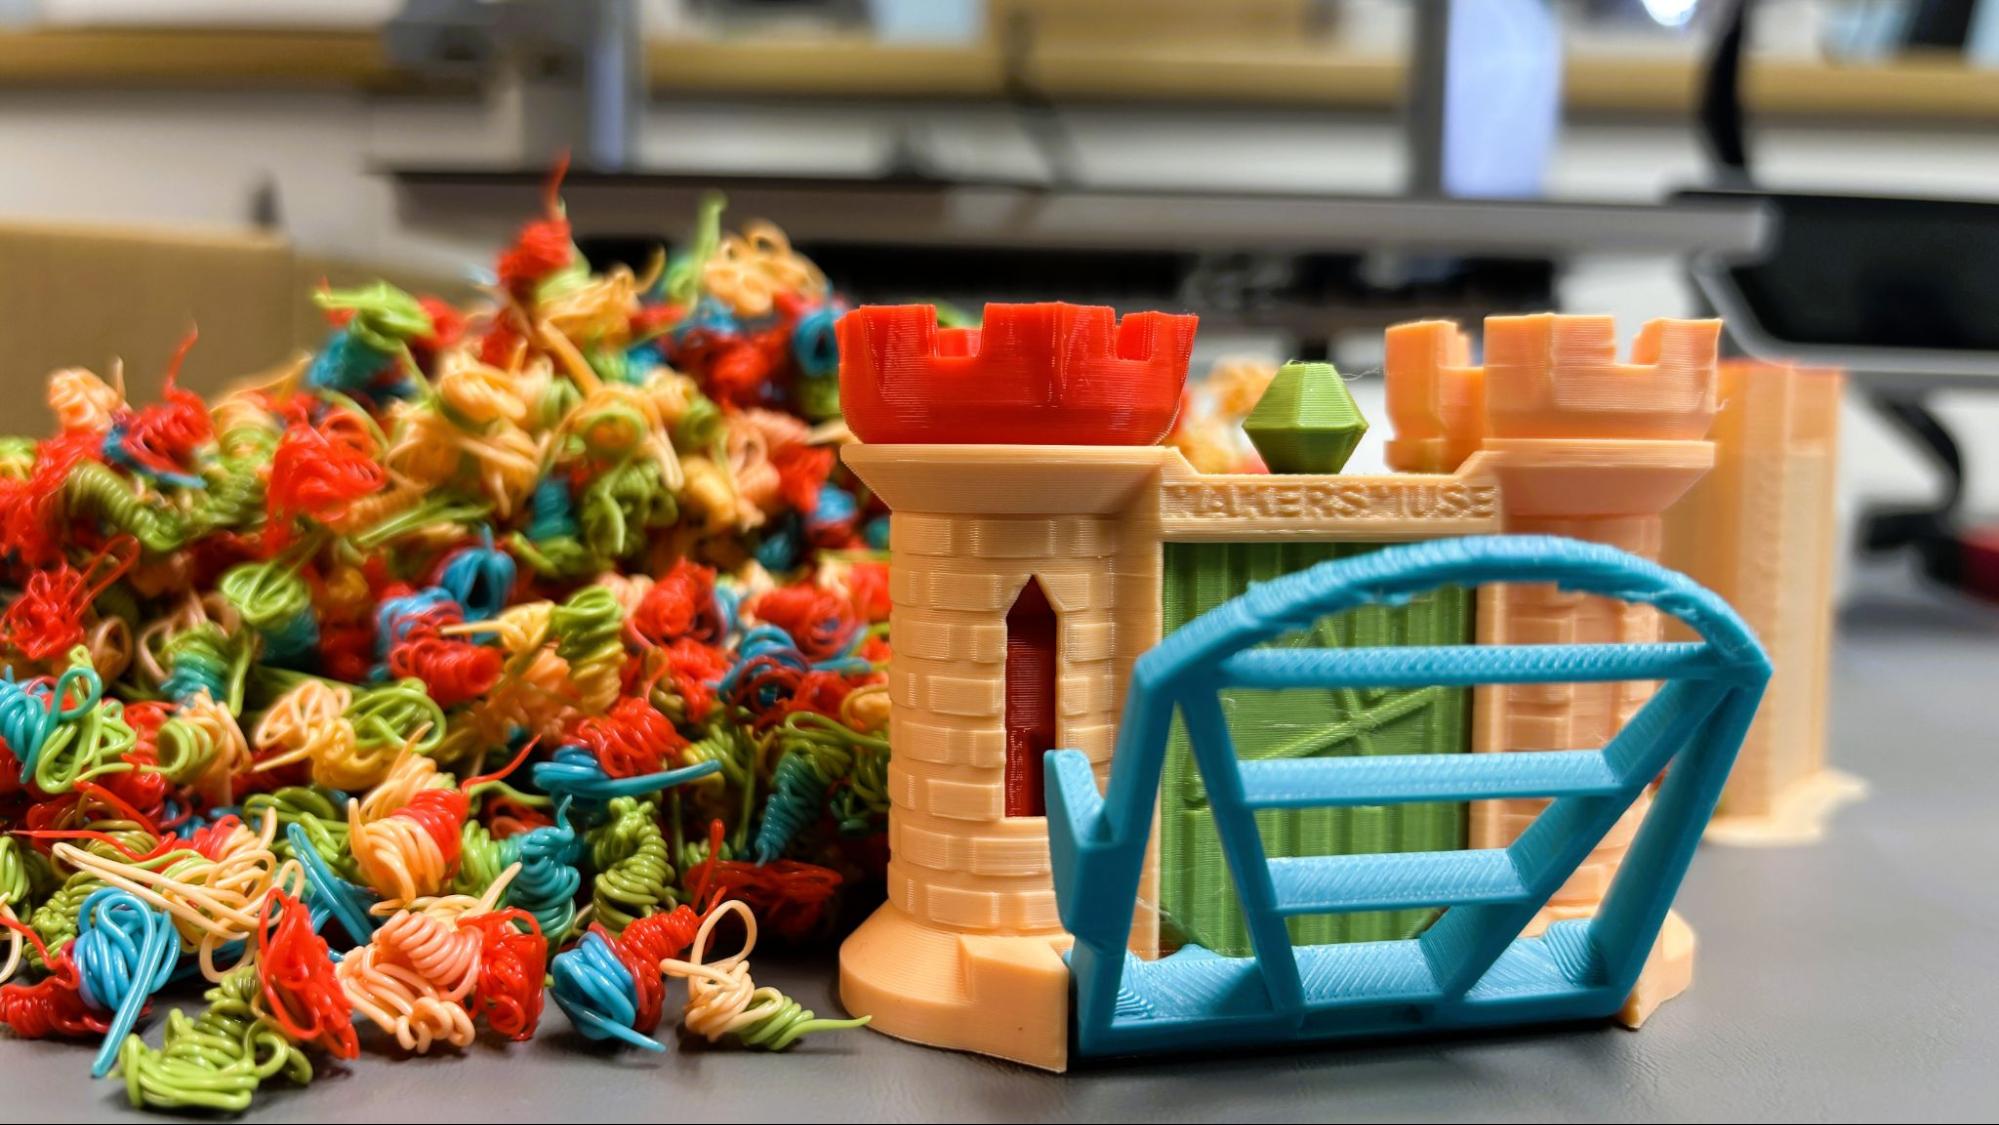
For the first print I ran the Clearance Castle from Makers Muse in the Anycubic Basic PLA. This four color print took 13 hours and 10 minutes, using a .2 mm layer height and default settings. It purged 150grams of filament and created a 42gram purge tower. This number could definitely be reduced by fine tuning the purge amounts in the slicer.
By comparison, the Bambu Lab A1 ran the same print, using the same default settings, and took 23 hours and 8 minutes to print, and created 229 grams of purge poop with a 34 gram purge tower. That’s 10 hours longer and with 71 grams more waste. In each case, the model itself only weighs 31.74 grams.
The Kobra X printed the castle with very good quality, though the bridging (on the draw bridge) was a little rough. All the colors were exceptionally clean.
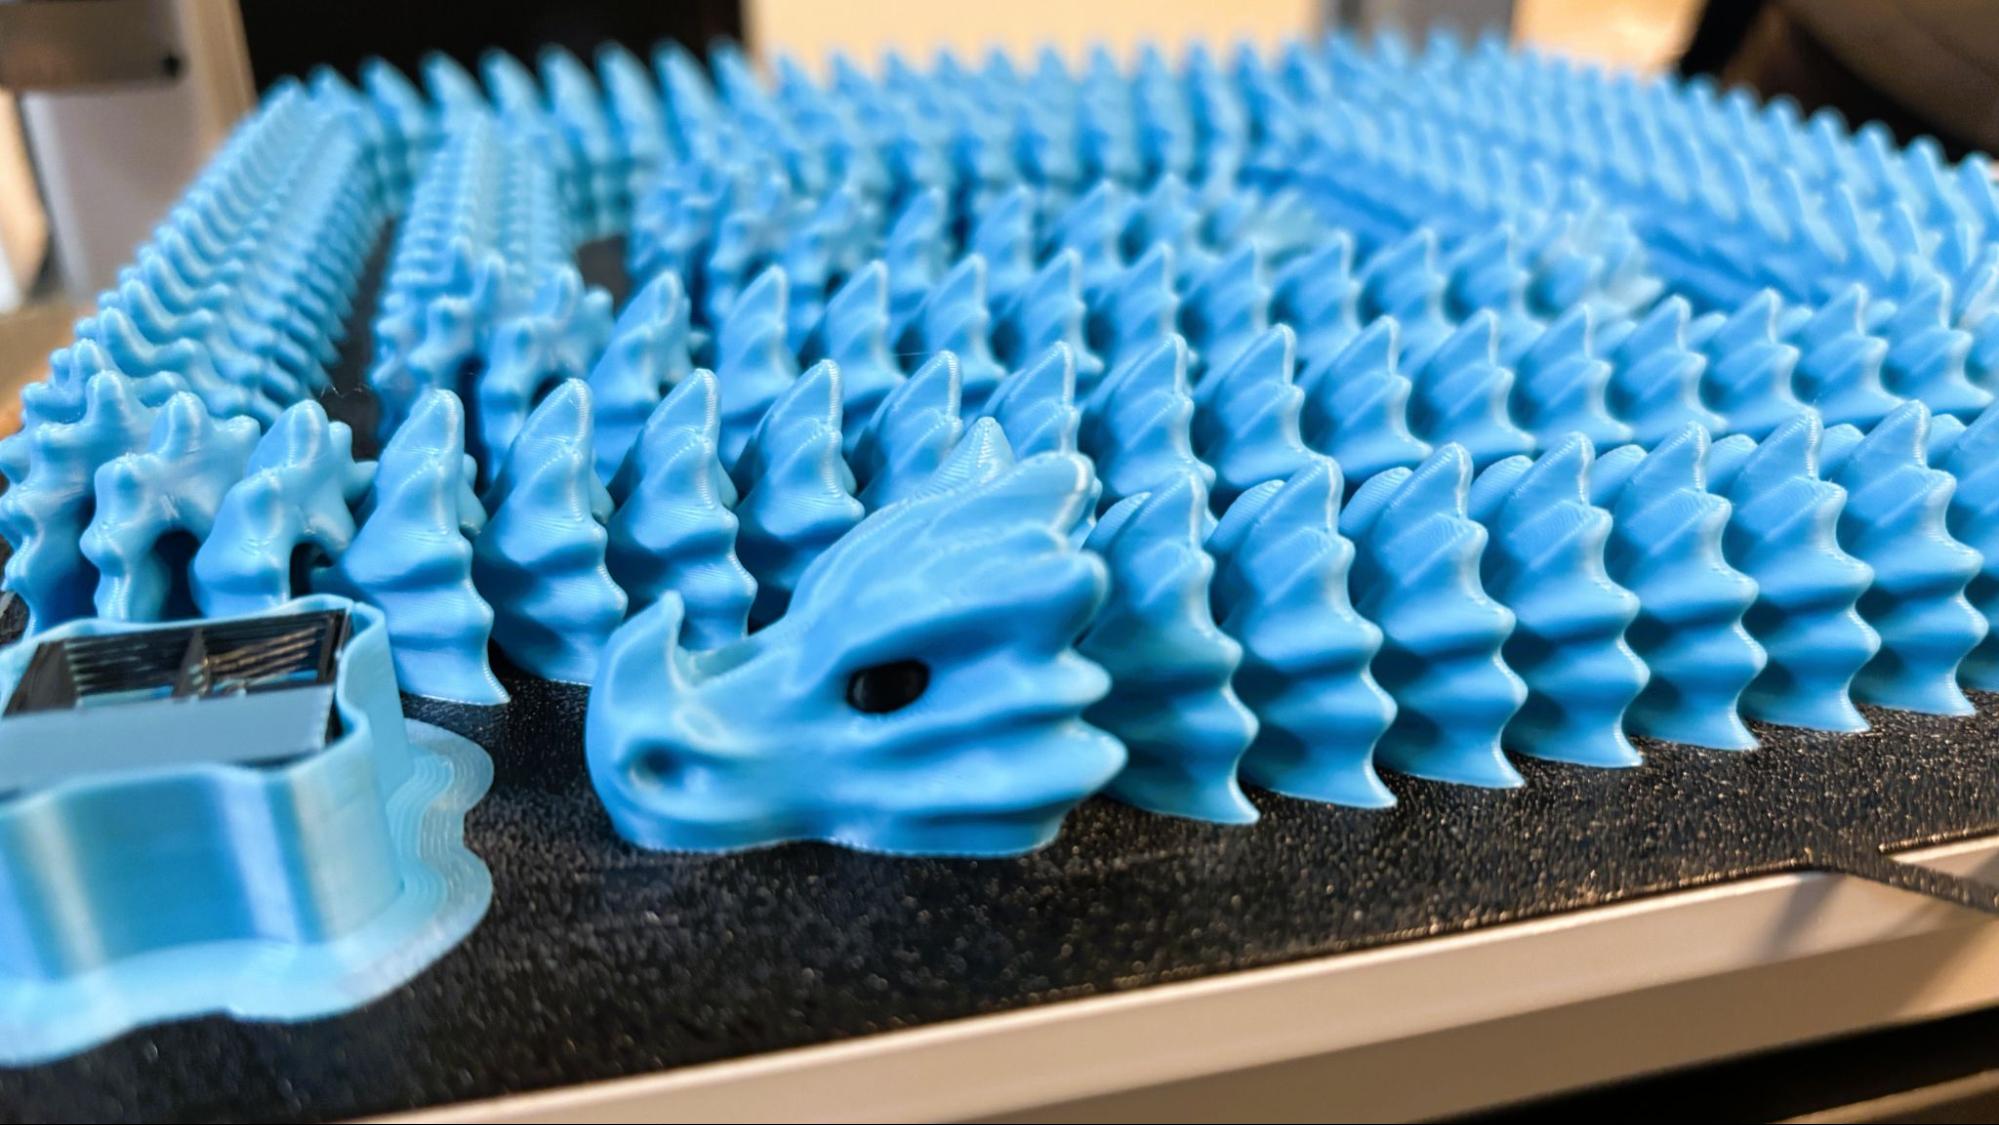
A good test for bed adhesion and levelling is the Articulated bone dragon from kh4rj0 on Printables. The 150 link dragon is over 5 feet long and fits the build plate to the edge. It printed just beautifully in the blue and black PLA Anycubic provided. The print took 17 hours and 22 minutes with a .2 mm layer height and running at an average speed of 140 mm/s.
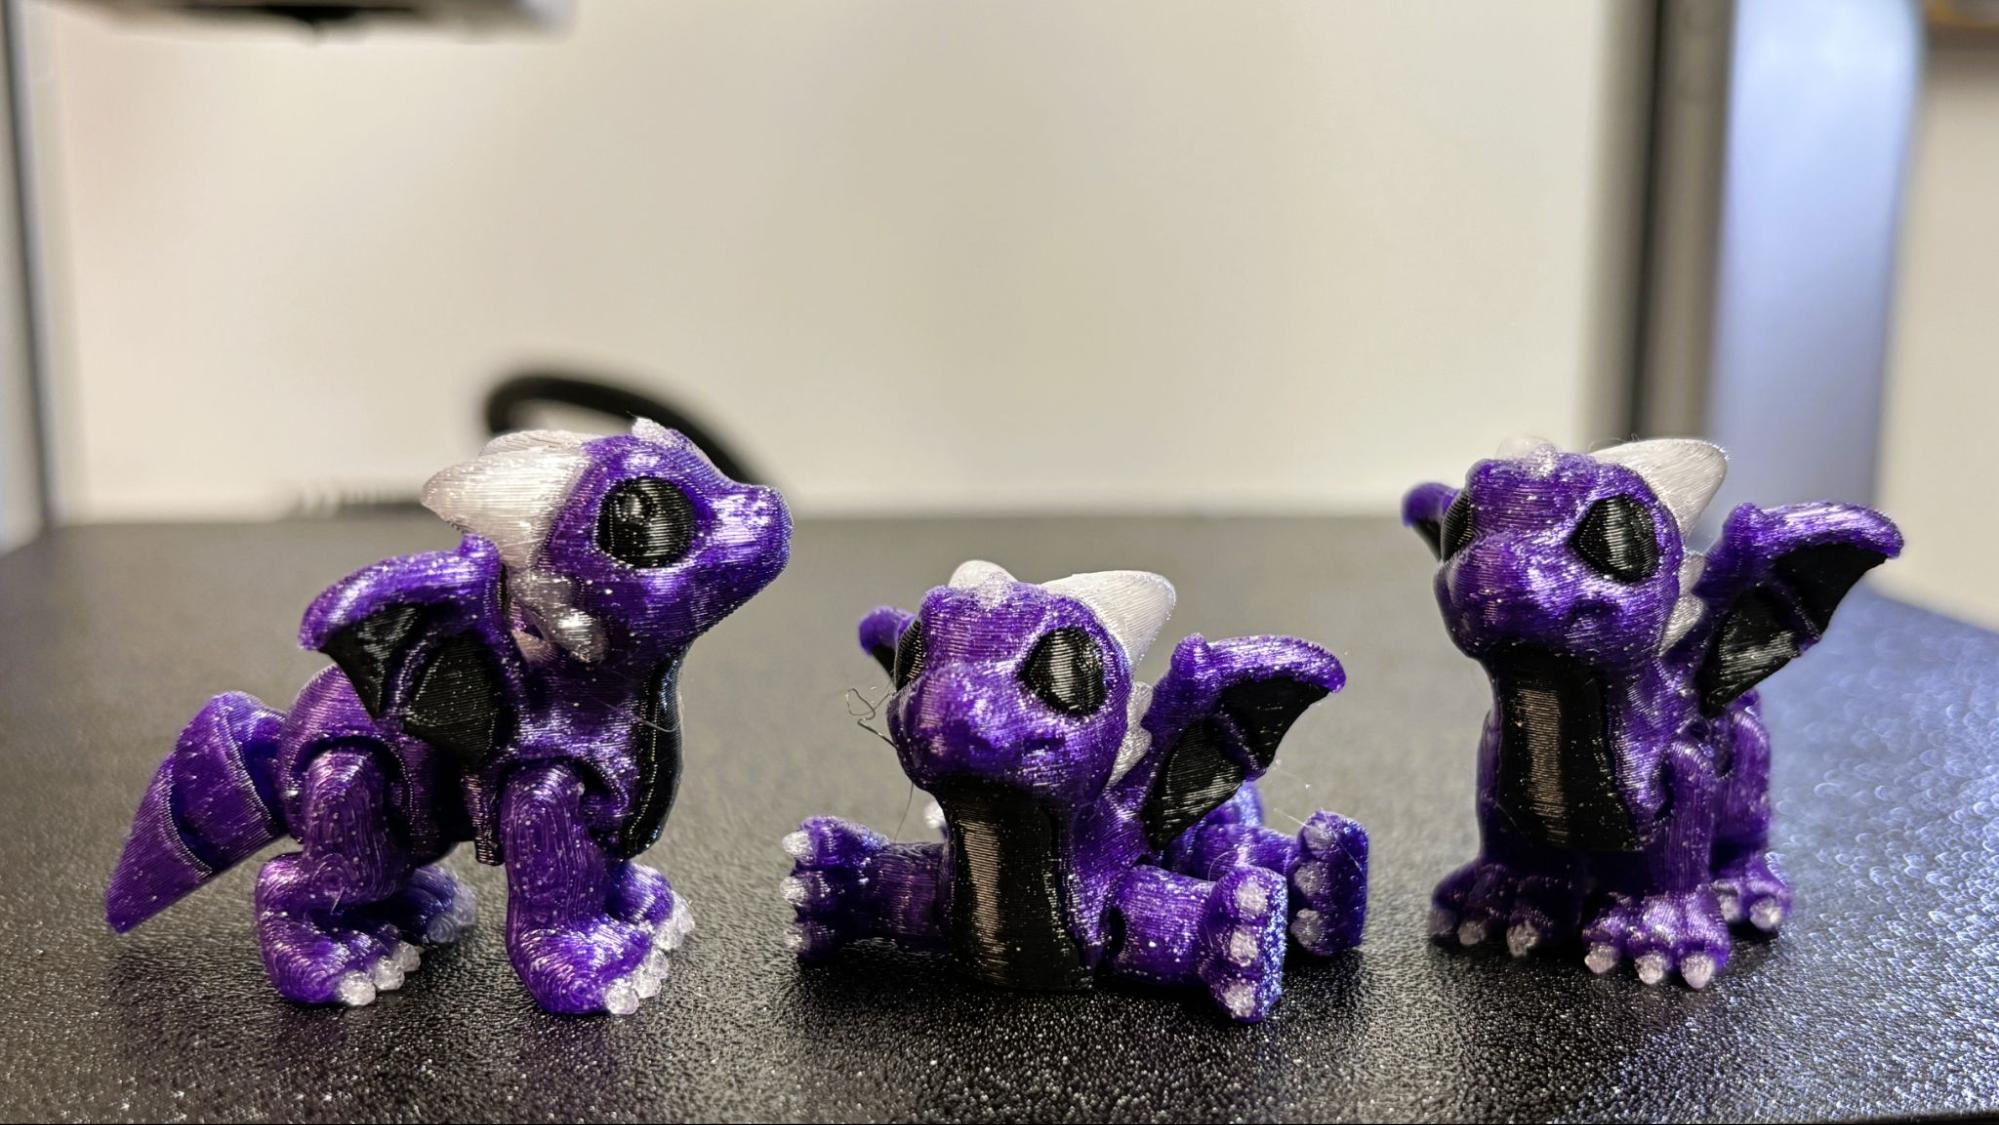
For PETG I used some old oddball partial spools that fit great on the Kobra X’s spoolholders but never work in a box style AMS. Using clear filament in a multicolor print can be challenging but the result was free of color bleeding using the default settings in the slicer. A plate of six Cinderwing3D Classic Dragon Hatchlings took 5 hours and 44 minutes to print using a .2 mm layer height at an average speed of 140 mm/s. The prints had a few wisps of stringing but are otherwise very nice.
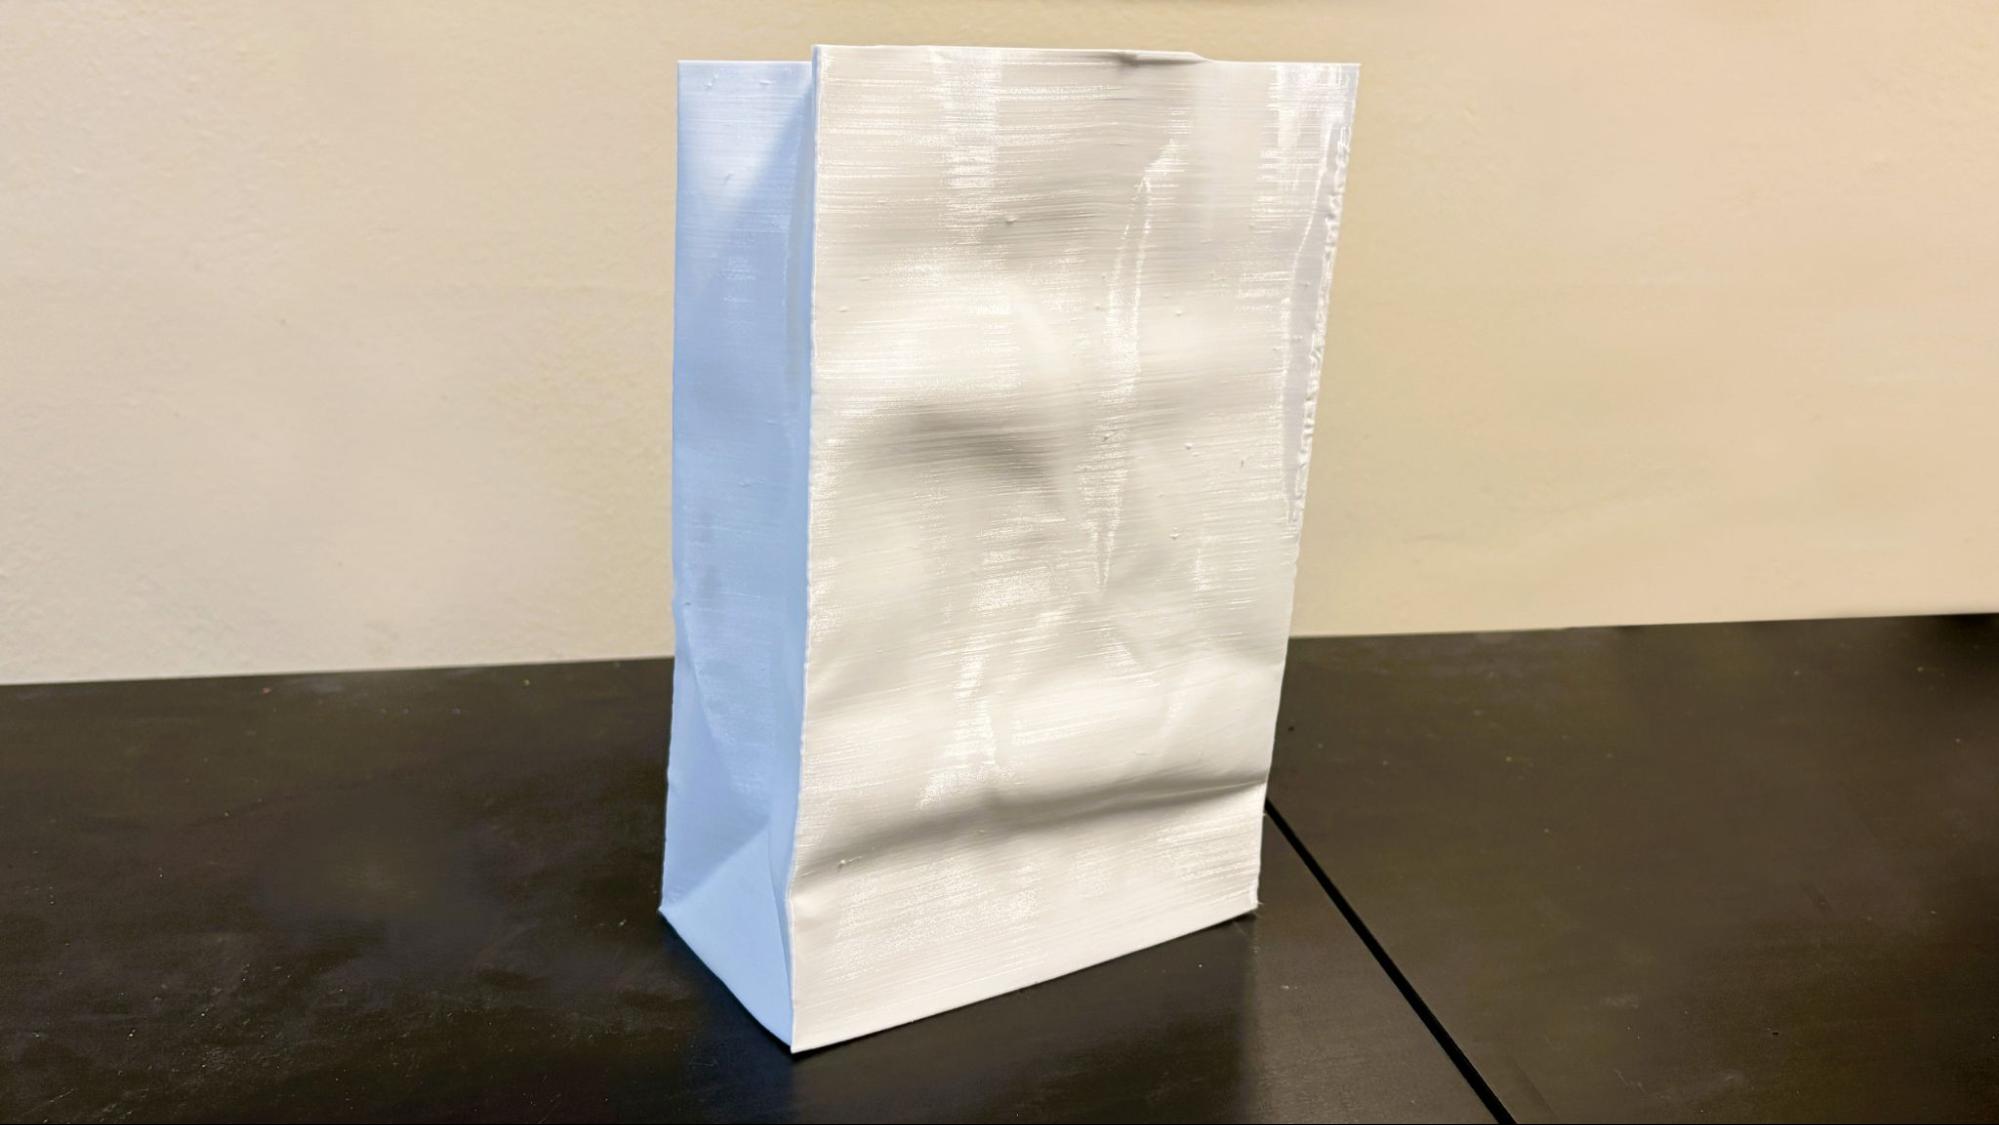
Many multicolor systems struggle to push 95A and softer TPU. The ACE Gen 2 did both 95A and 85A TPU just fine. The most impressive print I did was an old file from Thingiverse of a scanned paper lunch bag in white Inland TPU. Using a .2 mm layer height in vase mode with a full 1 mm layer width, the print took 10 hours 48 minutes at an average speed of 35 mm/s. The print came out really good considering the height and the flexibility of the filament.
Bottom Line
Anycubic’s Kobra X is an excellent addition to the company’s bedslinger lineup. Although it skips the spool-drying feature of the ACE Pro, the integrated ACE Gen 2 more than makes up for it with faster swaps and excellent filament compatibility, feeding everything from odd-sized spools to soft TPU without fuss.
More importantly, the Kobra X proves that multicolor printing doesn’t have to be expensive or complicated. By building the entire system into the toolhead, Anycubic avoided the bulky external AMS boxes and long filament paths that slow down swaps and create waste. The result is a printer that feels faster, simpler, and less fussy than its rivals. If you want affordable, reliable multicolor printing without jumping to a pricier CoreXY machine, the Kobra X is an easy recommendation.
If you want fast, affordable multicolor printing without a complicated external AMS or premium price tag, the Kobra X is an easy pick. If you prefer a more mature ecosystem, you may still lean toward Bambu Lab’s A1, which is currently on sale for $399. If you need more build space, but still want affordable color, the Anycubic Kobra 3 Max has a 420 x 420 mm build plate and is currently on sale for $599.


 English (US) ·