
 1 month ago
8
1 month ago
8
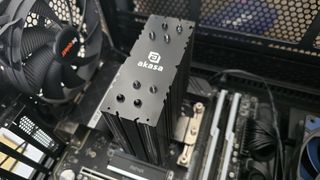
The latest entry-level cooler to land on our test bench is from Akasa. The H4 Plus features a single tower heatsink with four direct touch heatpipes and a black and dark blue aesthetic. Some of you may know of Akasa for its SFF and Mini-PC products – like the Gem Pro Raspberry Pi Case. We’ve recently tested the company’s unusually shaped M.2 heatsink, the Akasa Gecko, and found it one of the best on the market for cooling high-power PCI-e 5 SSDs.
The Alucia H4 Plus won’t make our list of the best CPU coolers, but we’ll put it through testing to see how it performs. But first, here are the specifications from Akasa.
Cooler specifications
Swipe to scroll horizontally
| Cooler | Akasa Alucia H4 Plus |
| MSRP | $38.95 USD |
| Heatsink Material | Aluminum |
| Rated Lifespan | MTTF of 40,000 hours for the included fan |
| Socket Compatibility | Intel Socket LGA 1851/1700/1200/115x/20xx AMD AM5 / AM4 |
| Base | Direct Touch Copper Heatpipes |
| Max TDP (Our Testing) | ~214W with Intel’s i7-13700K |
| Installed Size (with fans) | 148(L) x 92 mm (W) x 120mm (D) |
| Warranty | 2 years |
Packing and included contents
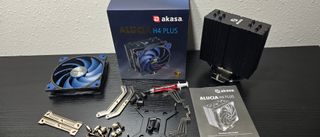
The cooler is shipped with cardboard, molded foam, and plastic to protect the contents during shipping. Included with the cooler are the following:
- Single tower heatsink
- 1x 120mm fan
- Akasa T5 Pro Grade Plus thermal paste
- Extra fan clips
- User Manual
- Mounting for AMD & Intel CPU platforms
Features of Akasa’s Alucia H4 Plus
*️⃣ Slim single-tower design
The included heatsink is a slim, all-black single-tower design.
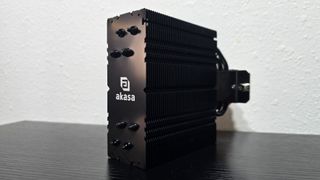
*️⃣ Full RAM compatibility
The heatsink is slightly recessed, ensuring that the included fan does not interfere with any DIMM slots – all sizes of RAM, no matter how tall, are supported.
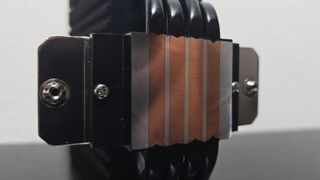
*️⃣ Direct touch heatpipes
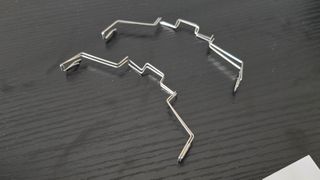
The Alucia H4 Plus incorporates four direct-touch heatpipes to transfer heat from the CPU into the aluminum fins.
*️⃣ Akasa T5 Pro Grade Plus thermal paste
Akasa includes a tube of its thermal paste with the Alucia H4 Plus, enough for multiple installations.

*️⃣ Extra fan clips
While most users should find the default cooling performance of Akasa’s Alucia H4 Plus satisfactory, extra clips are included if you desire to add an (optional, not included) second fan.
*️⃣Simple installation
As you’ll see later in this review, the installation of the cooler is simple and easy to perform.
*️⃣ 1x Black and blue fan
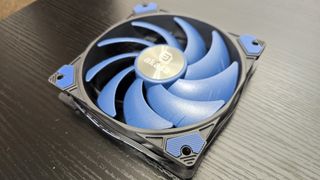
There’s more to a cooler than just the heatsink or radiator. The bundled fans have a significant impact on cooling and noise levels, as well as how the cooler looks in your case.
Included here is one 120mm fan with a black frame paired with nine ribbed blue fan blades and anti-vibration pads in the corners. In the middle of the fan, above the bearings, Akasa’s logo is displayed on an etched metal circle.
Swipe to scroll horizontally
| Model | Unlisted |
| Dimensions | 120 x 120 x 25mm |
| Fan Speed | 500-2000 RPM |
| Air Flow | Up to 56.3 CFM |
| Air Pressure | Up to 1.94 mmH2O |
| Bearing Type | HD Bearing |
| Lighting | None |
What I don’t like about Akasa’s Alucia H4 Plus
❎ High Price
The price of the Alucia H4 Plus is $38.95 USD. Most entry-level single-tower coolers are $30 or less, with Thermalright and ID-Cooling featuring models for as little as $15 here in the U.S.
❎ Louder than many competitors
As you’ll see in the benchmarks below, the Alucia H4 Plus runs louder than many of its competitors on the market.
Testing Methodology, and how my testing differs vs the competition
My cooler testing is specifically designed to emulate the conditions a user would actually experience when using a computer. Some reviewers test coolers using an open bench. I do not like this method, it reduces cooling difficulty. When you use a case, the internal temperature of that case will become higher than that of the room’s ambient temperature, increasing the saturation of the cooler and overall cooling difficulty. Testing outside of a case will give an advantage to weaker coolers, especially those with fans that aren’t very strong.
Others test using a thermal heatplate. This method suffers from all the drawbacks of an open bench, but also doesn’t accurately represent cooling a CPU. A thermal plate evenly distributes a thermal load across the copper heat conduction square. The problem with this type of testing is that modern AMD Ryzen and Intel Core CPUs have most of their heat concentrated in a few hotspots – and cooling a concentrated source of heat is more difficult than cooling a source that’s spread evenly.
The last thing I do differently from some cooler testers is that I insist on using relatively new CPUs for cooler testing because people building new PCs should be using recent CPUs. Also, thermal density is just different with newer CPUs. Products like Ryzen 3000 “Zen 2” and older 14nm Intel CPUs have lower heat density compared to modern counterparts, due to a combination of using older manufacturing processes and running at lower clock speeds. Using a weaker cooler with an older CPU can make the cooler look better performing than it actually is with current-gen silicon.
Today's highest-end CPUs, whether Intel or AMD, are difficult to cool in intensive workloads. In the past. reaching 95 degrees Celsius or more on a desktop CPU might have been a cause for concern. But with today’s top-end CPUs, this is considered normal operation. Similar behavior has been present in laptops for years due to cooling limitations in tight spaces.
All testing is performed with a 23C ambient room temperature. Multiple thermal tests are run on each CPU to test the cooler in a variety of conditions, and acoustic measurements are taken with each result. These tests include:
1. Noise-normalized testing at low noise levels
2. “Out-of-the-box”/Default configuration thermal and acoustic testing
a. No power limits enforced
b. Because CPUs hit TJ Max in this scenario, the best way to compare cooling strength is by recording the total CPU package power consumption.
3. Thermal and acoustic testing in power-limited scenarios
a. Power limited to 175W to emulate a medium-intensity workload
b. Power limited to 125W to emulate a low-intensity workload
The thermal results included are for 10-minute testing runs. To be sure that was sufficiently long to tax the cooler, we tested both Thermalright’s Assassin X 120 R SE and DeepCool’s LT720 with a 30-minute Cinebench test with Intel’s i9-13900K for both 10 minutes and 30 minutes. The results didn’t change much at all with the longer test: The average clock speeds maintained dropped by 29 MHz on DeepCool’s LT720 and 31 MHz on Thermalright’s Assassin X 120 R SE. That’s a tiny 0.6% difference in clock speeds maintained, a margin of error difference that tells us that the 10-minute tests are indeed long enough to properly test the coolers.
Testing configuration – Intel LGA1700 platform
Swipe to scroll horizontally
Many factors other than the CPU cooler can influence your cooling performance, including the case you use and the fans installed in it. A system's motherboard can also influence this, especially if it suffers from bending, which results in poor cooler contact with the CPU.
To prevent bending from impacting our cooling results, we’ve installed Thermalright’s LGA 1700 contact frame into our testing rig. If your motherboard is affected by bending, your thermal results will be worse than those shown below. Not all motherboards are affected equally by this issue. I tested Raptor Lake CPUs in two motherboards. And while one of them showed significant thermal improvements after installing Thermalright’s LGA1700 contact frame, the other motherboard showed no difference in temperatures whatsoever! Check out our review of the contact frame for more information.
Installation
1. First, place the CPU bracket against the rear of the motherboard, and then place the spaces on top of the included standoffs.
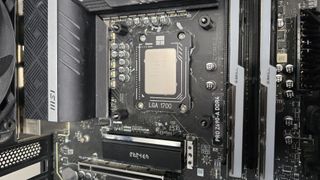
2. Place the mounting bars on top of the standoffs, and secure them using the included thumbscrews.
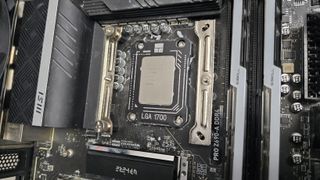
3. Next, apply the included thermal paste to the top of your CPU. If you’re not sure how to do this, we have a thermal paste installation guide you can read for more details.
4. Press the heatsink against the mounting bars, and secure it with a screwdriver.
5. Use the included fan clips to secure the fan to the heatsink. Attach the fan’s PWM cable to your computer, and installation is complete.


:quality(85):upscale()/2024/10/17/848/n/1922729/9dece426671163b35dcb11.60305022_.jpg)


 English (US) ·