
 3 weeks ago
28
3 weeks ago
28
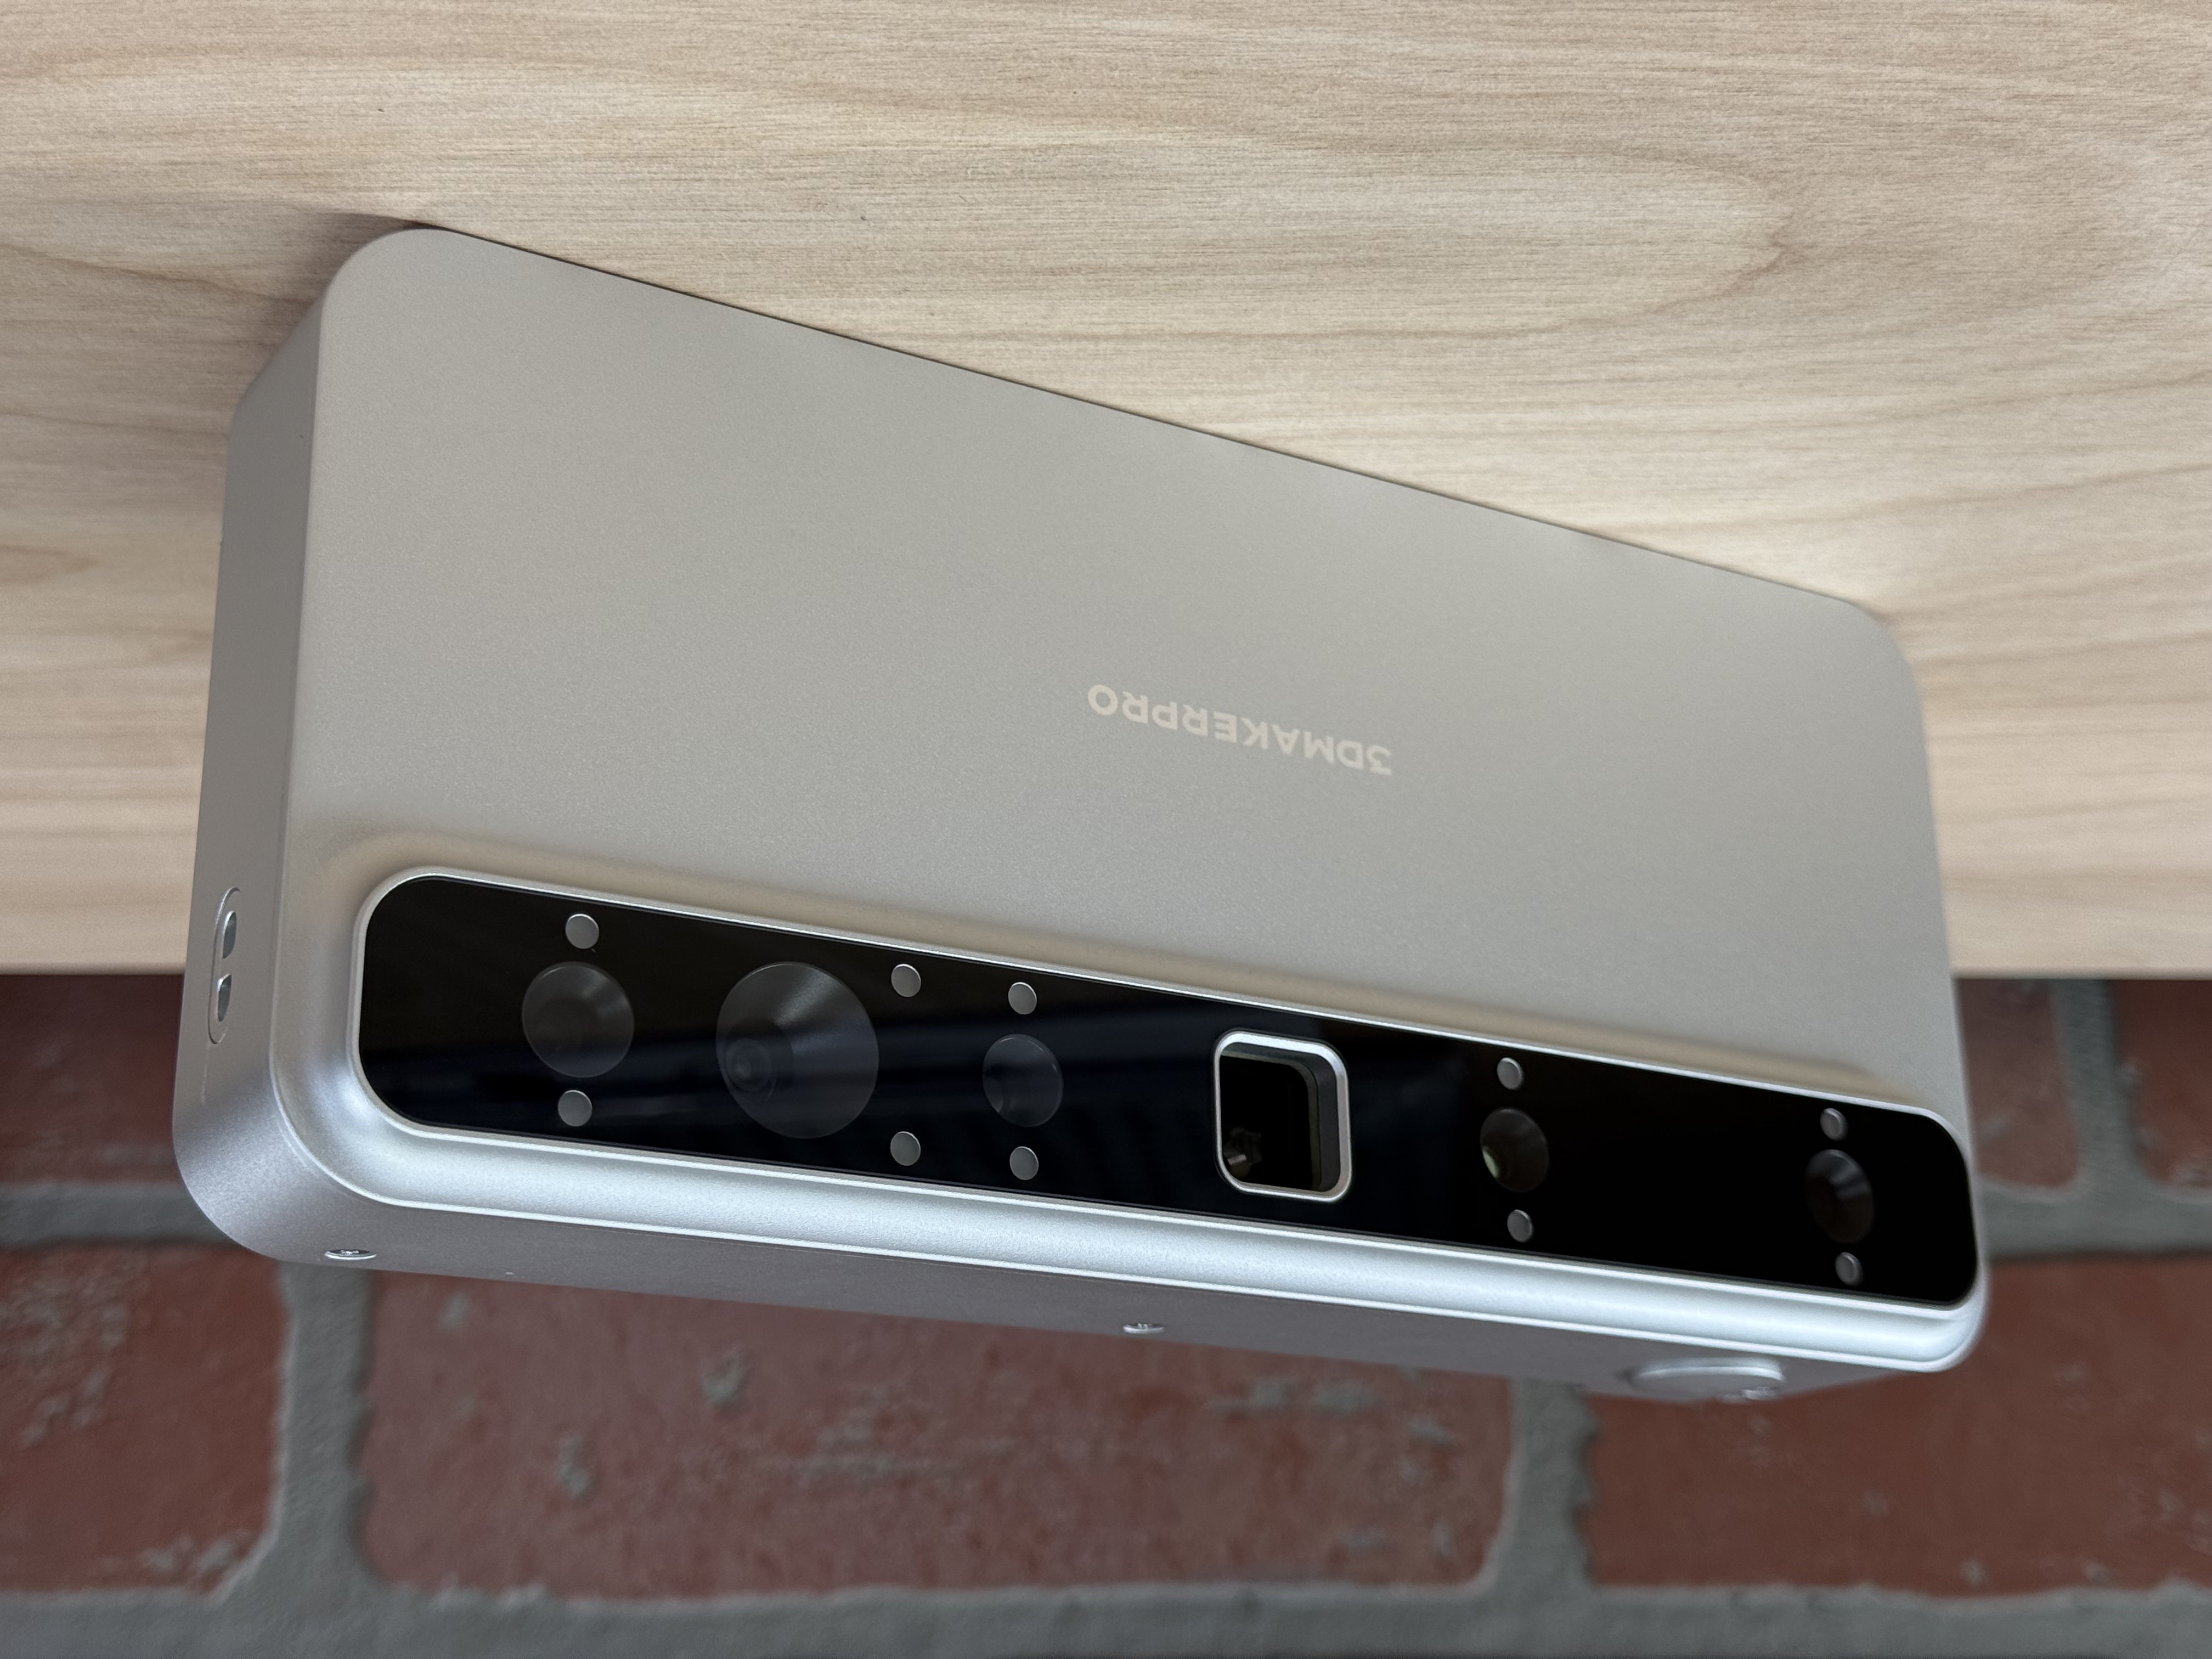
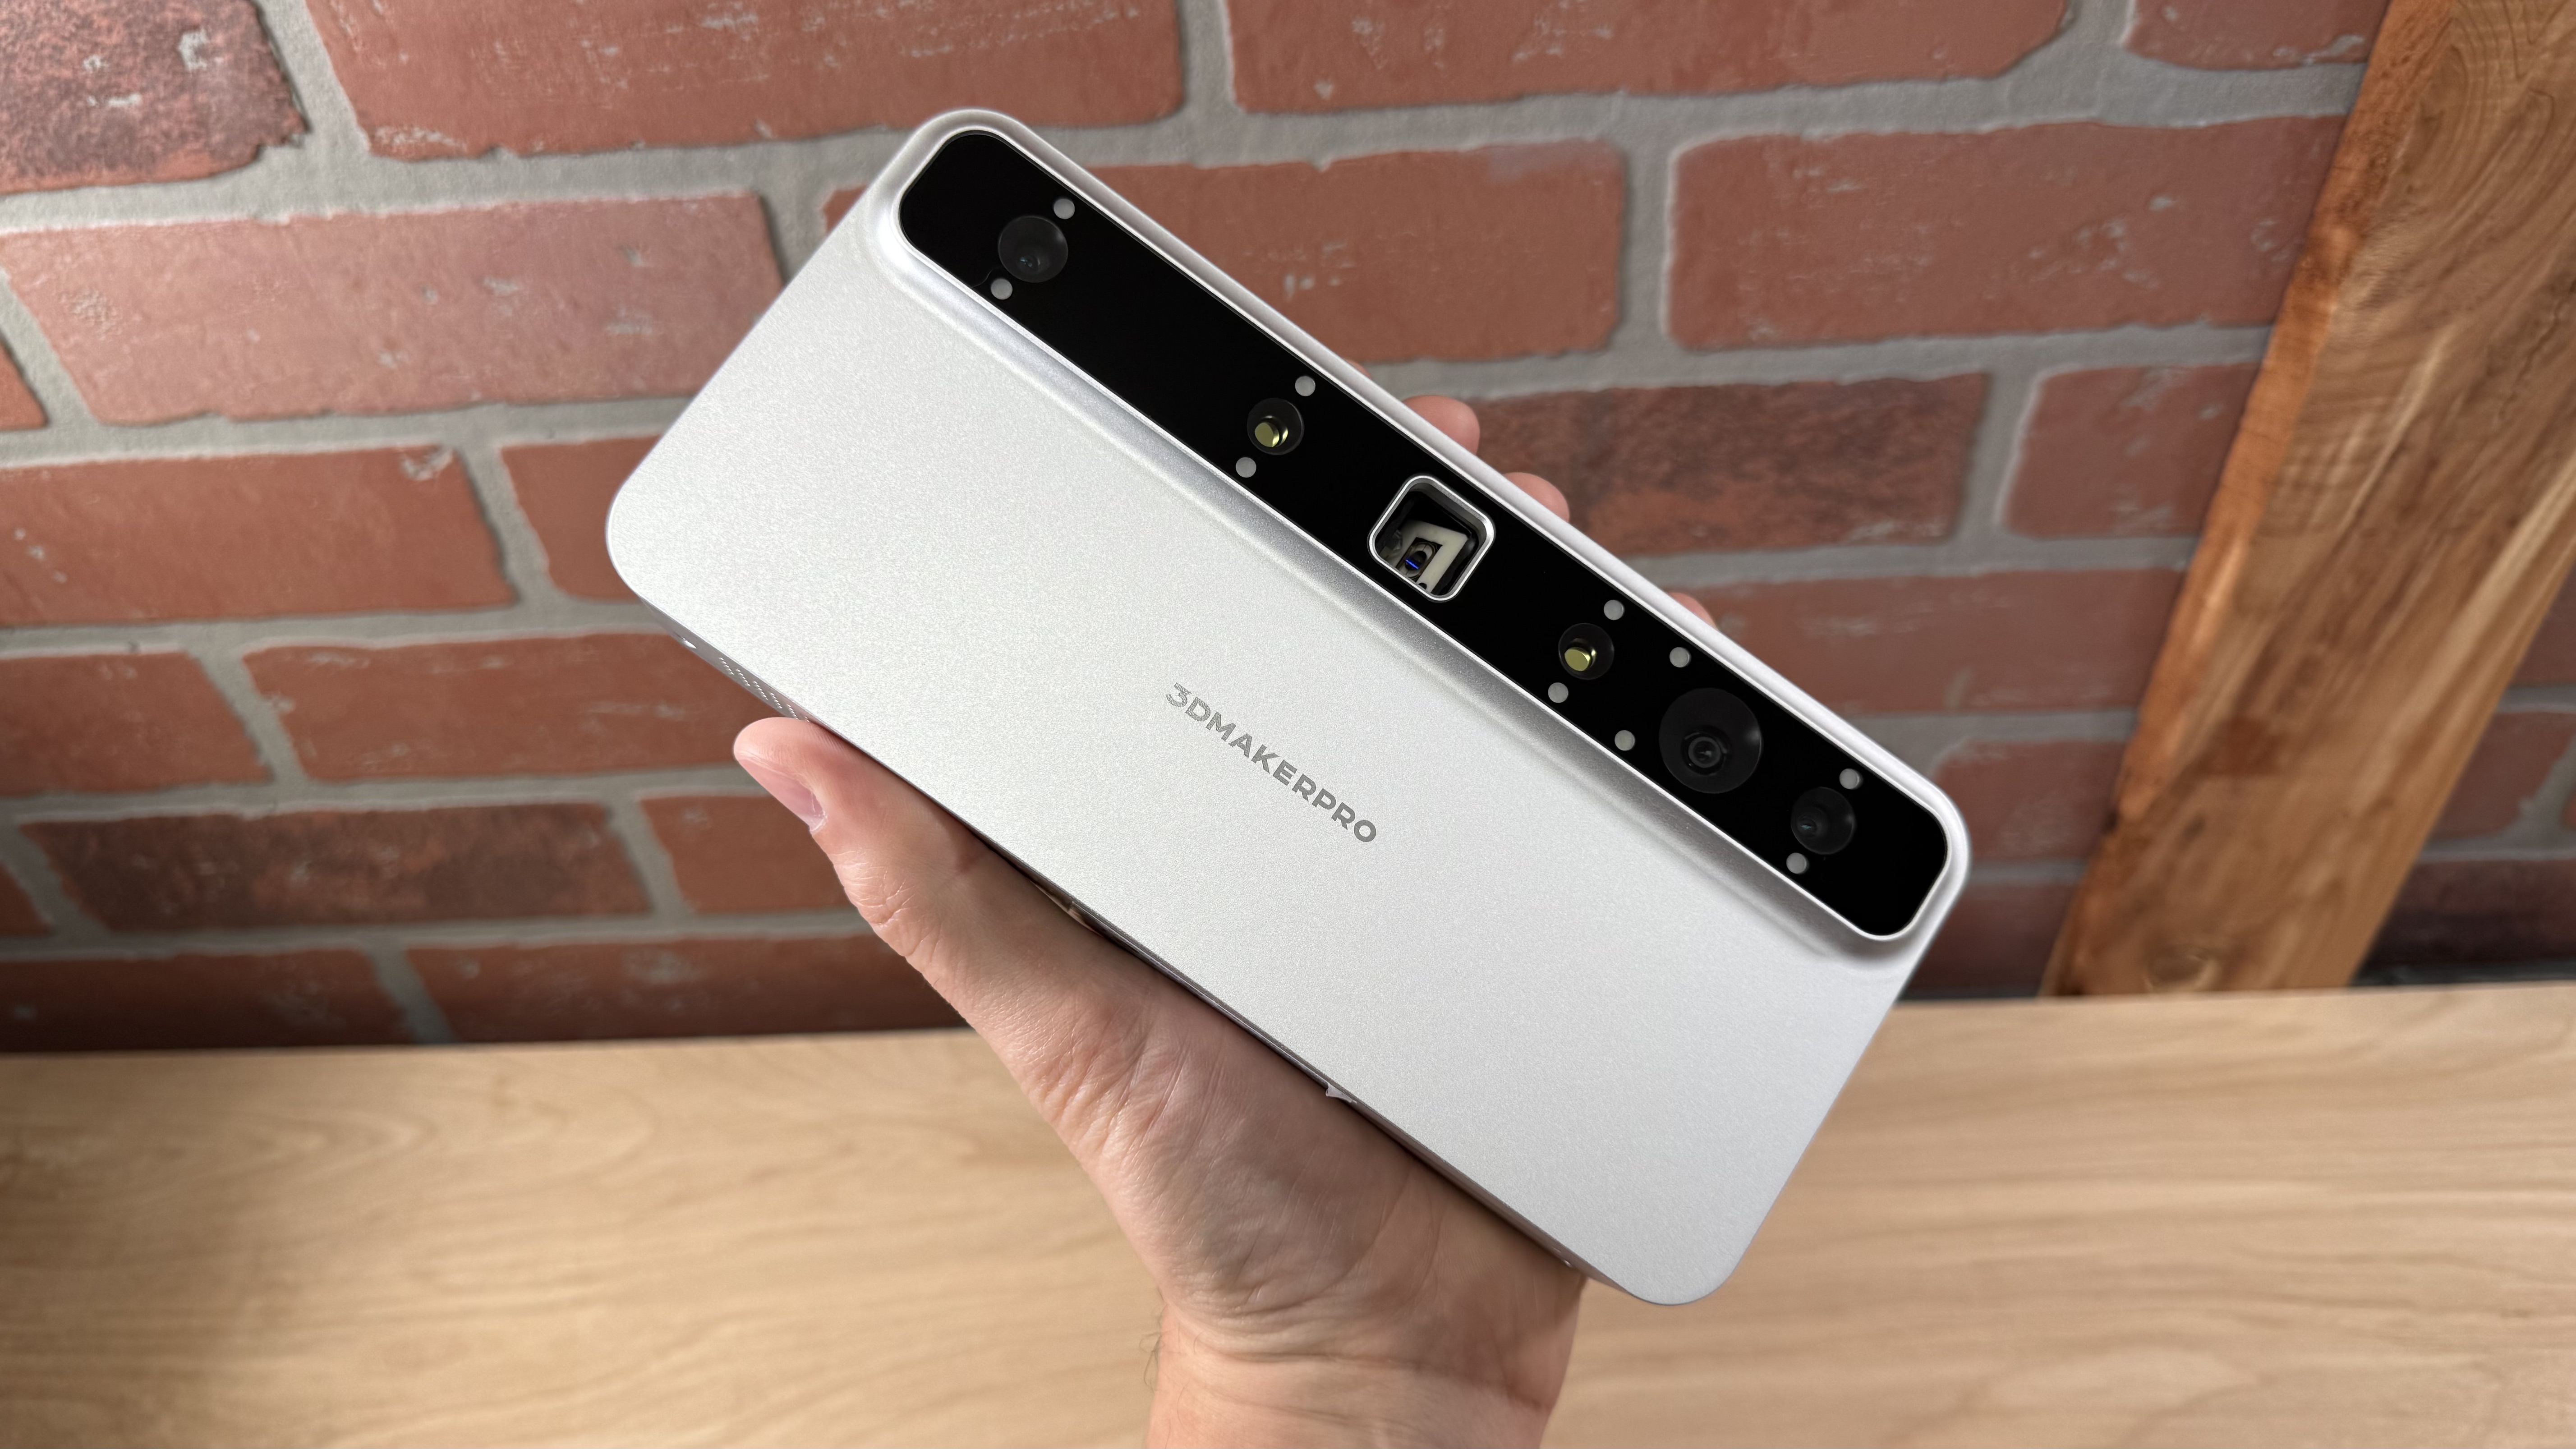
The 3DMakerPro Toucan looks and feels more like a digital camera than a 3D scanner, and it even has a thumbwheel to adjust exposure. Designed for convenient on-the-go 3D scanning, the Toucan uses a blue laser structured light system with both a Class 1 and Class 3R laser to capture point clouds. These can be edited, fused into a 3D model, and exported all on-device, no computer required. The $1,699 Premium bundle reviewed in this article includes a manual turntable and carrying case and has everything you need to make a 3D model in well under an hour after unboxing.
While the name Toucan evokes the colorful bird, the Toucan 3D scanner ironically struggled most with creating color textures. Geometry is crisp and sharp using the Class 3R laser and “Ultra Mode” to create dense point clouds, but the applied color textures look unfocused and blurry. If you are more comfortable with a keyboard and mouse and want to do your editing on a computer, you can also use the JMStudio software for more granular editing on a PC or Mac.
Specifications: 3DMakerPro Toucan
Swipe to scroll horizontally
Scanning Mode | Continuous, Turntable, Photo Mode |
Light Type | Blue Laser Structured Light (Class 1 / Class 3R) |
Single Frame Accuracy | ≤ 0.03mm Near, ≤ 0.1mm Far |
3D Resolution | ≤ 0.05mm Near, ≤ 0.1mm Far |
Working Distance | Between 200 mm and 1000 mm |
Min Scan Volume | 10 x 10 x 10 mm |
Scan Speed | Up to 15 FPS |
Alignment | Geometry, Texture, Markers |
Connectivity | Standalone, Wi-Fi |
Color Texture | Supported |
Output Format | OBJ, STL, PLY, ASC |
Operating System | Windows, macOS |
Included in the Box: 3DMakerPro Toucan
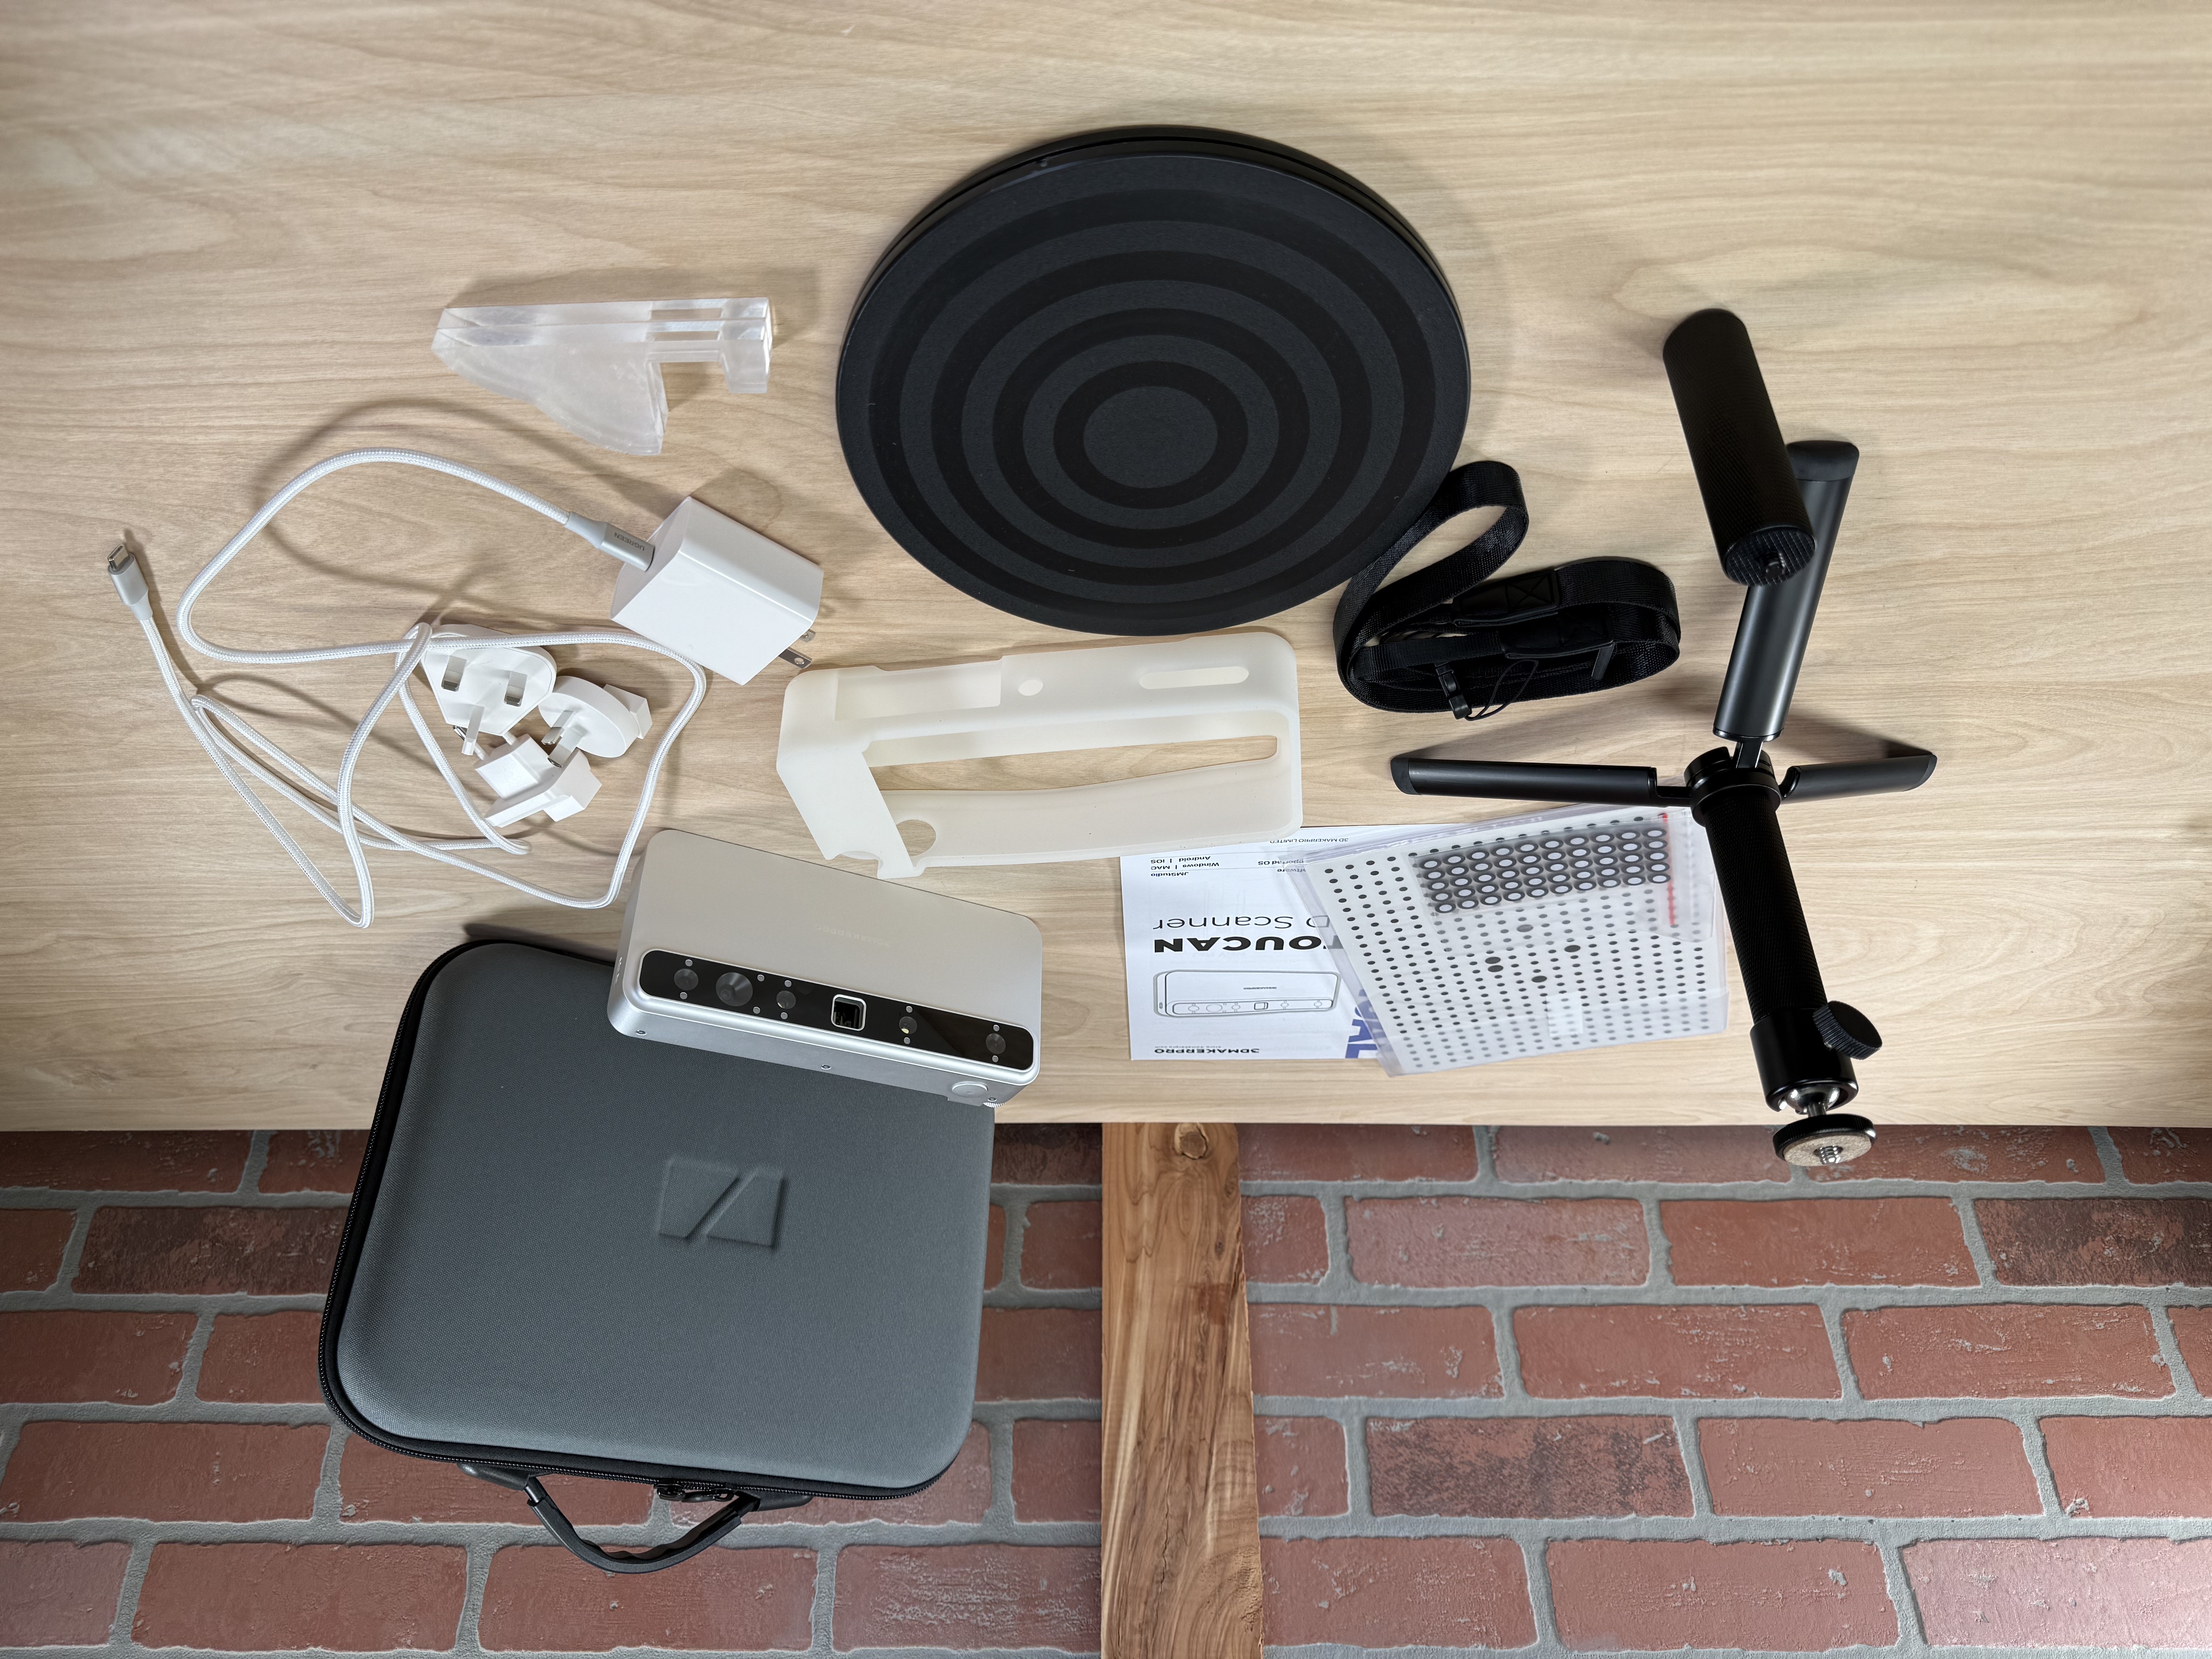
The 3DMakerPro Toucan is available in two packages: Standard and Premium. The Standard package includes the Toucan scanner, a power adapter, a calibration board and stand, a manual turntable, and a set of reflective markers. The Premium package (covered in this review) includes all of this as well as a tripod and a carrying case. 3DMakerPro also includes a silicone case and a wrist strap in both packages.
Latest Videos From
Design of the 3DMakerPro Toucan
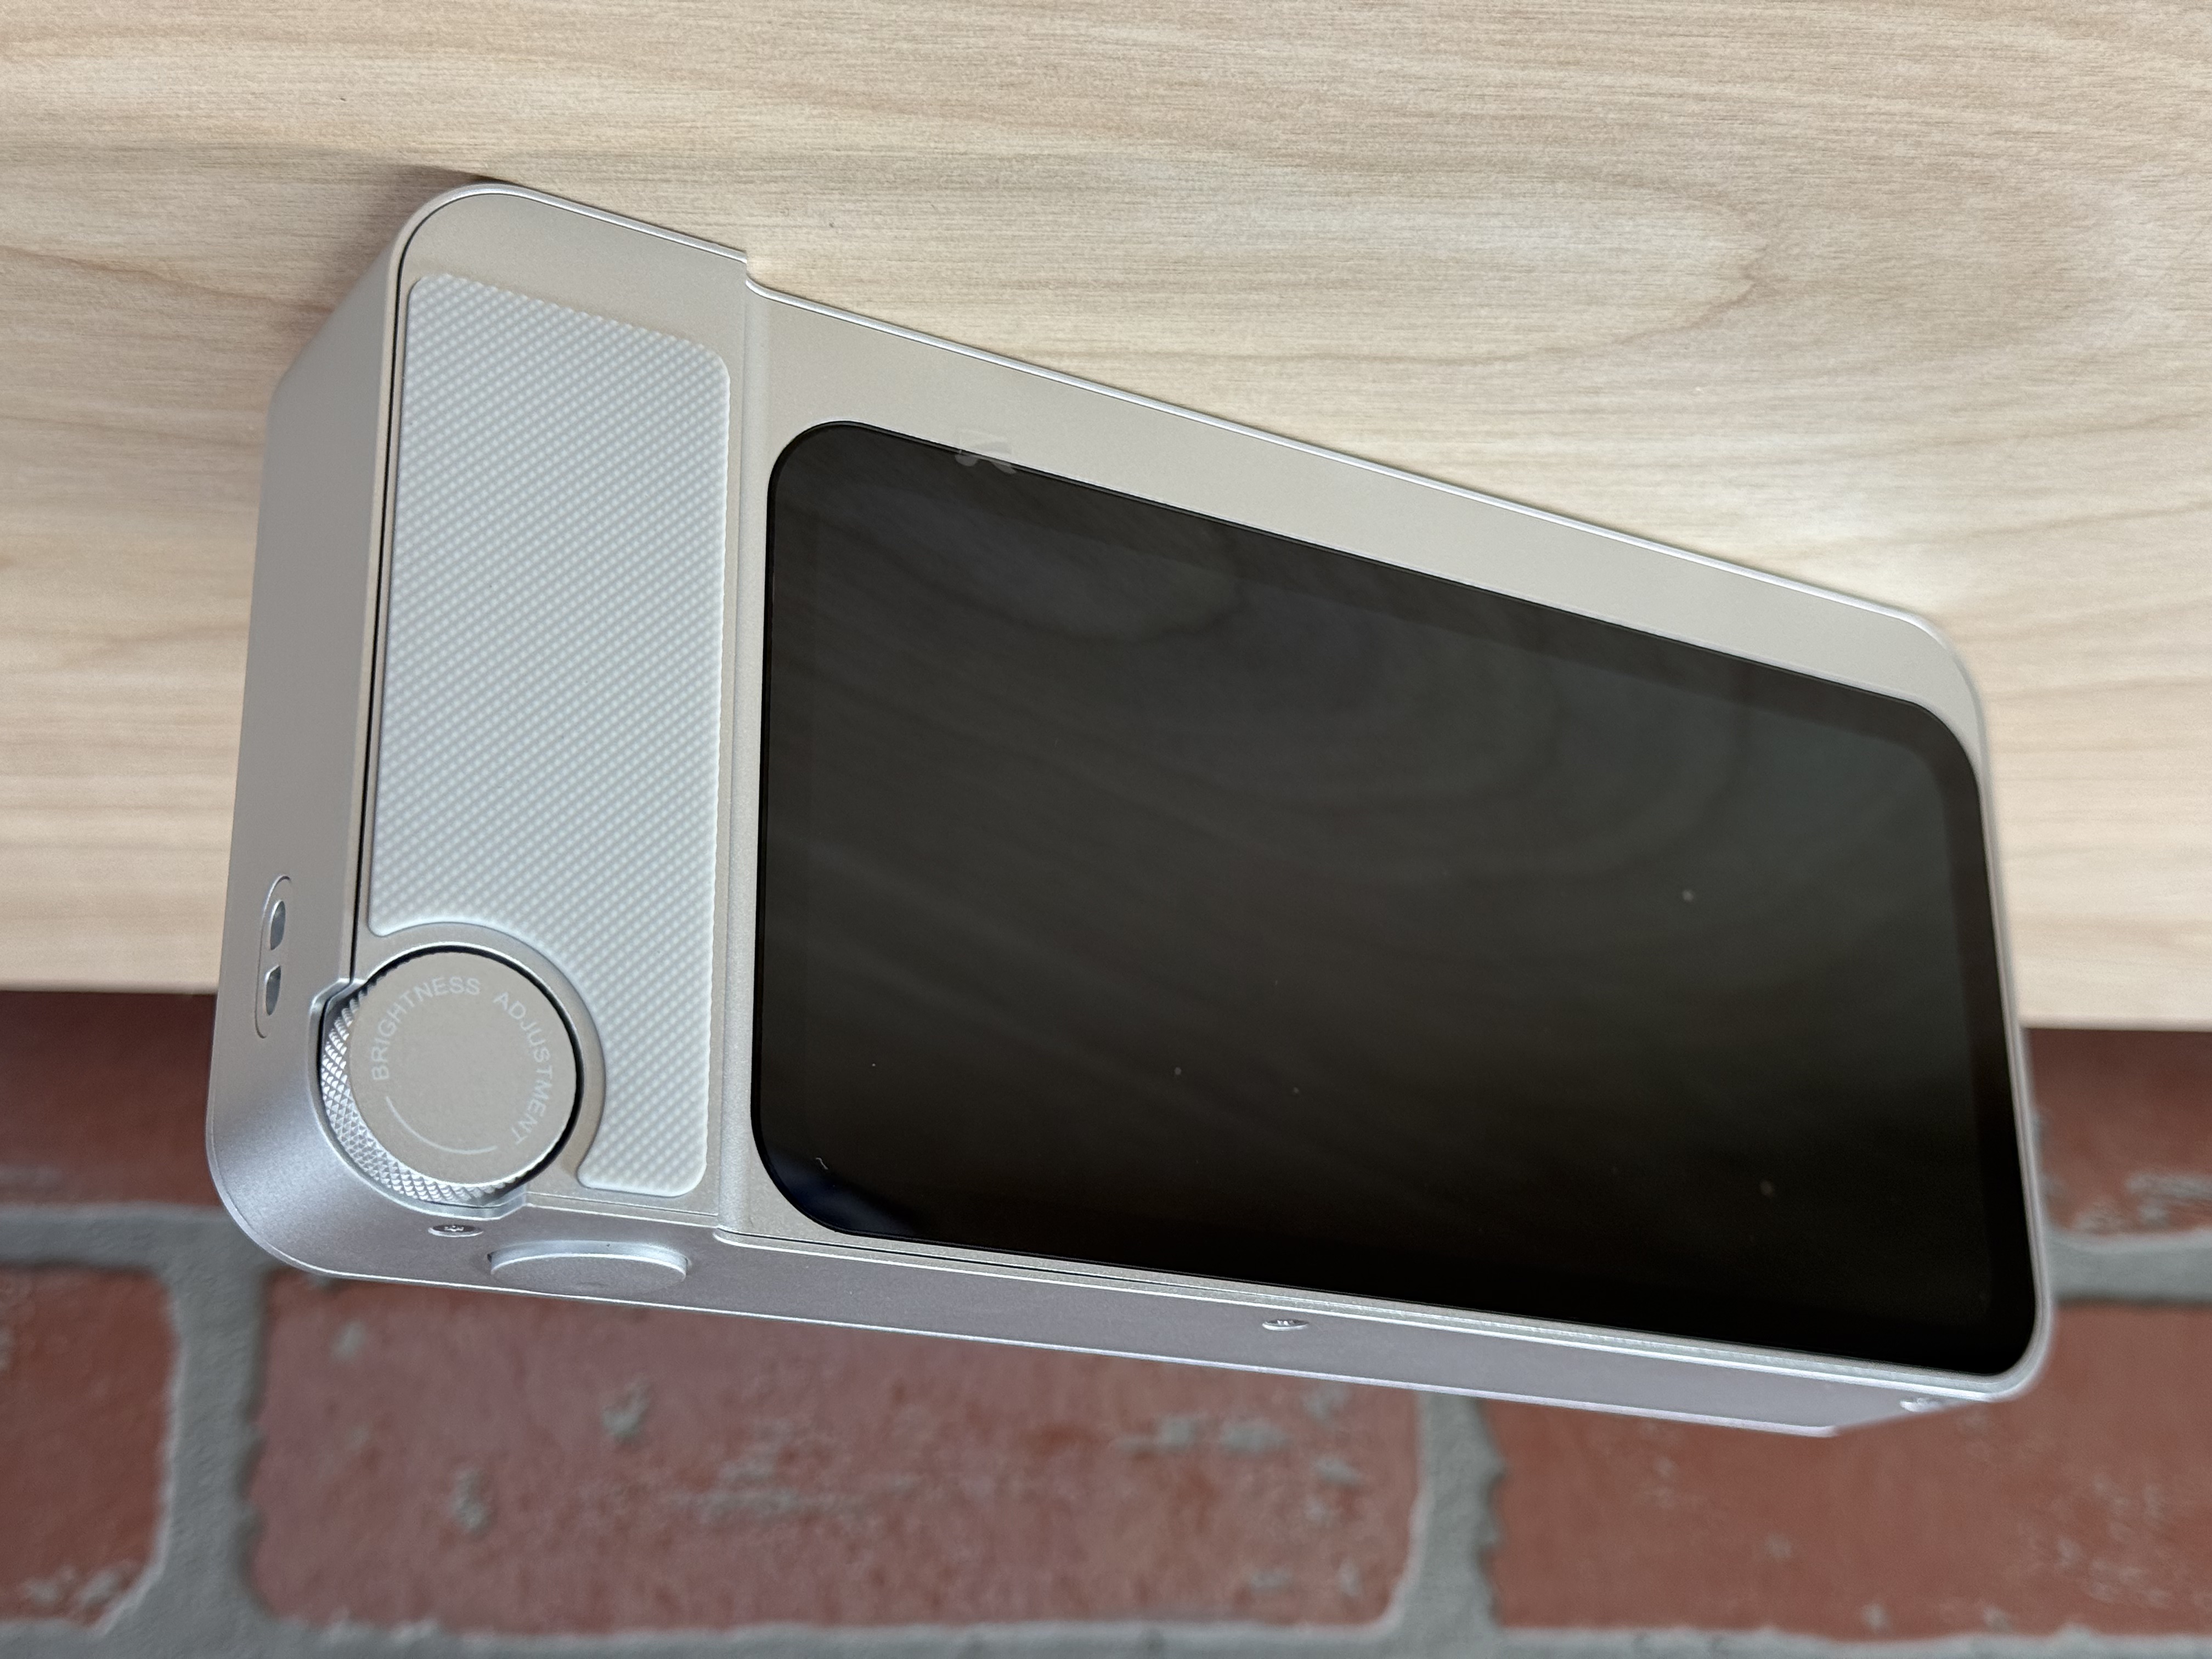
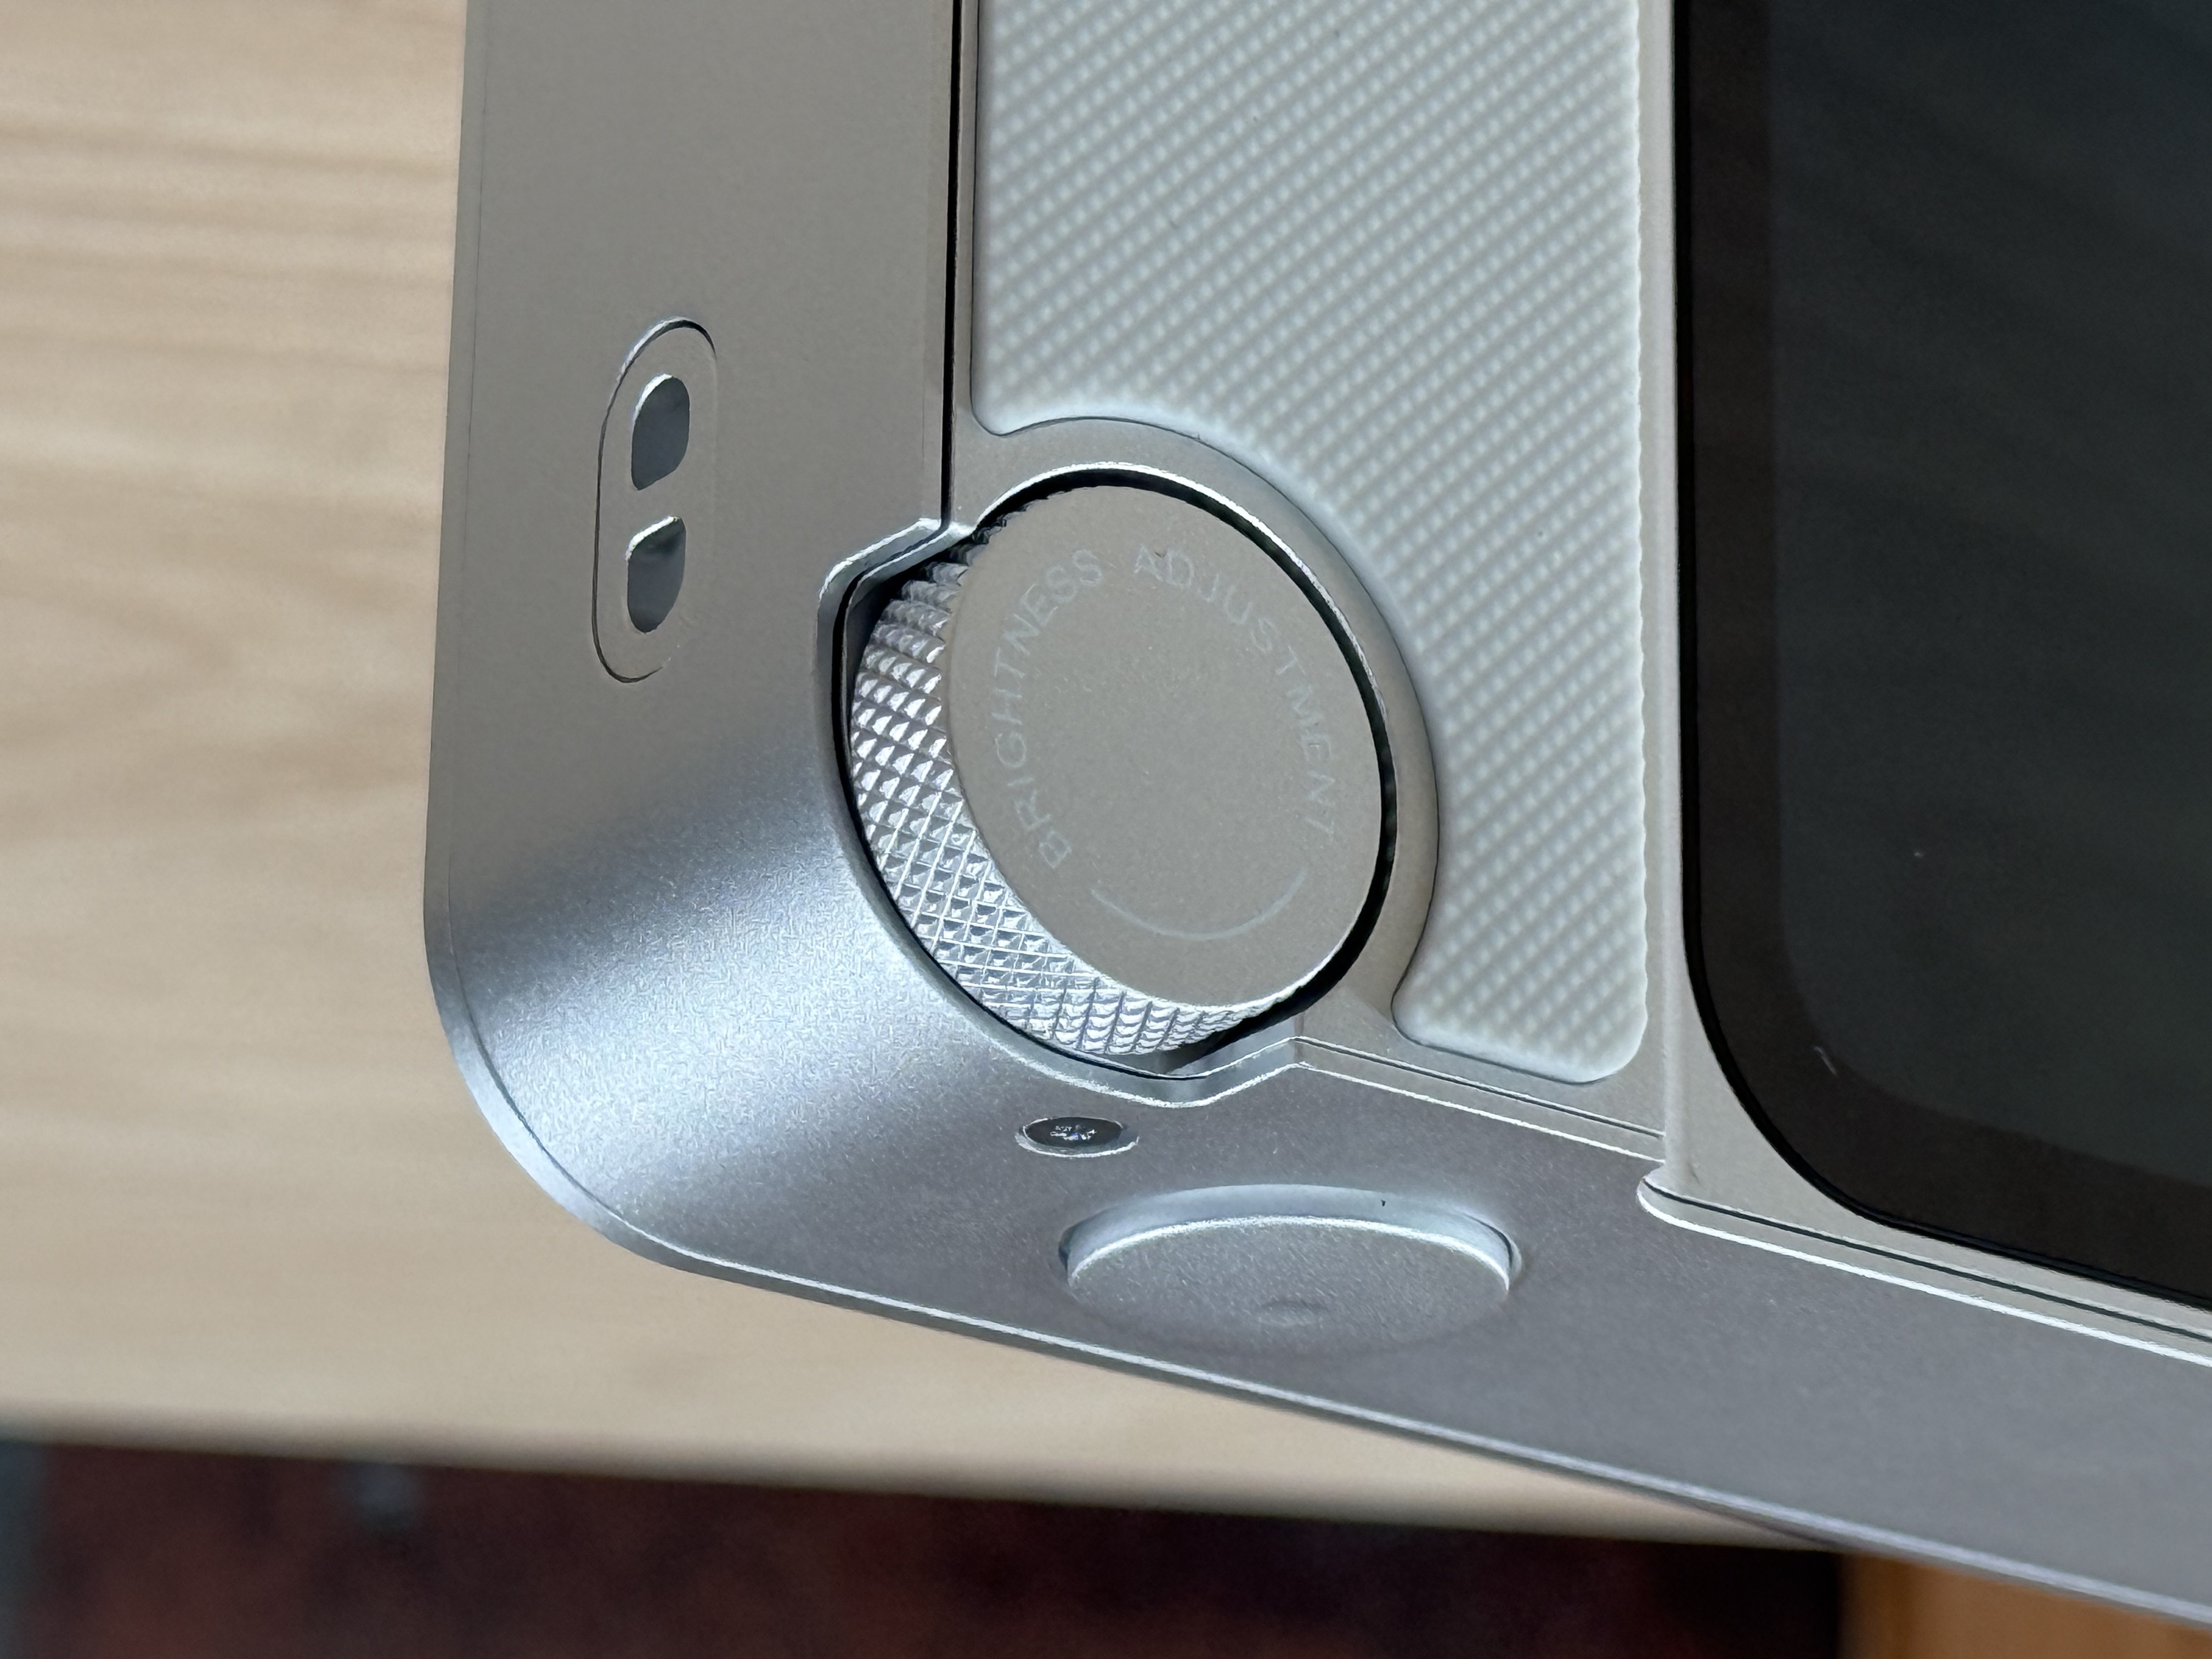
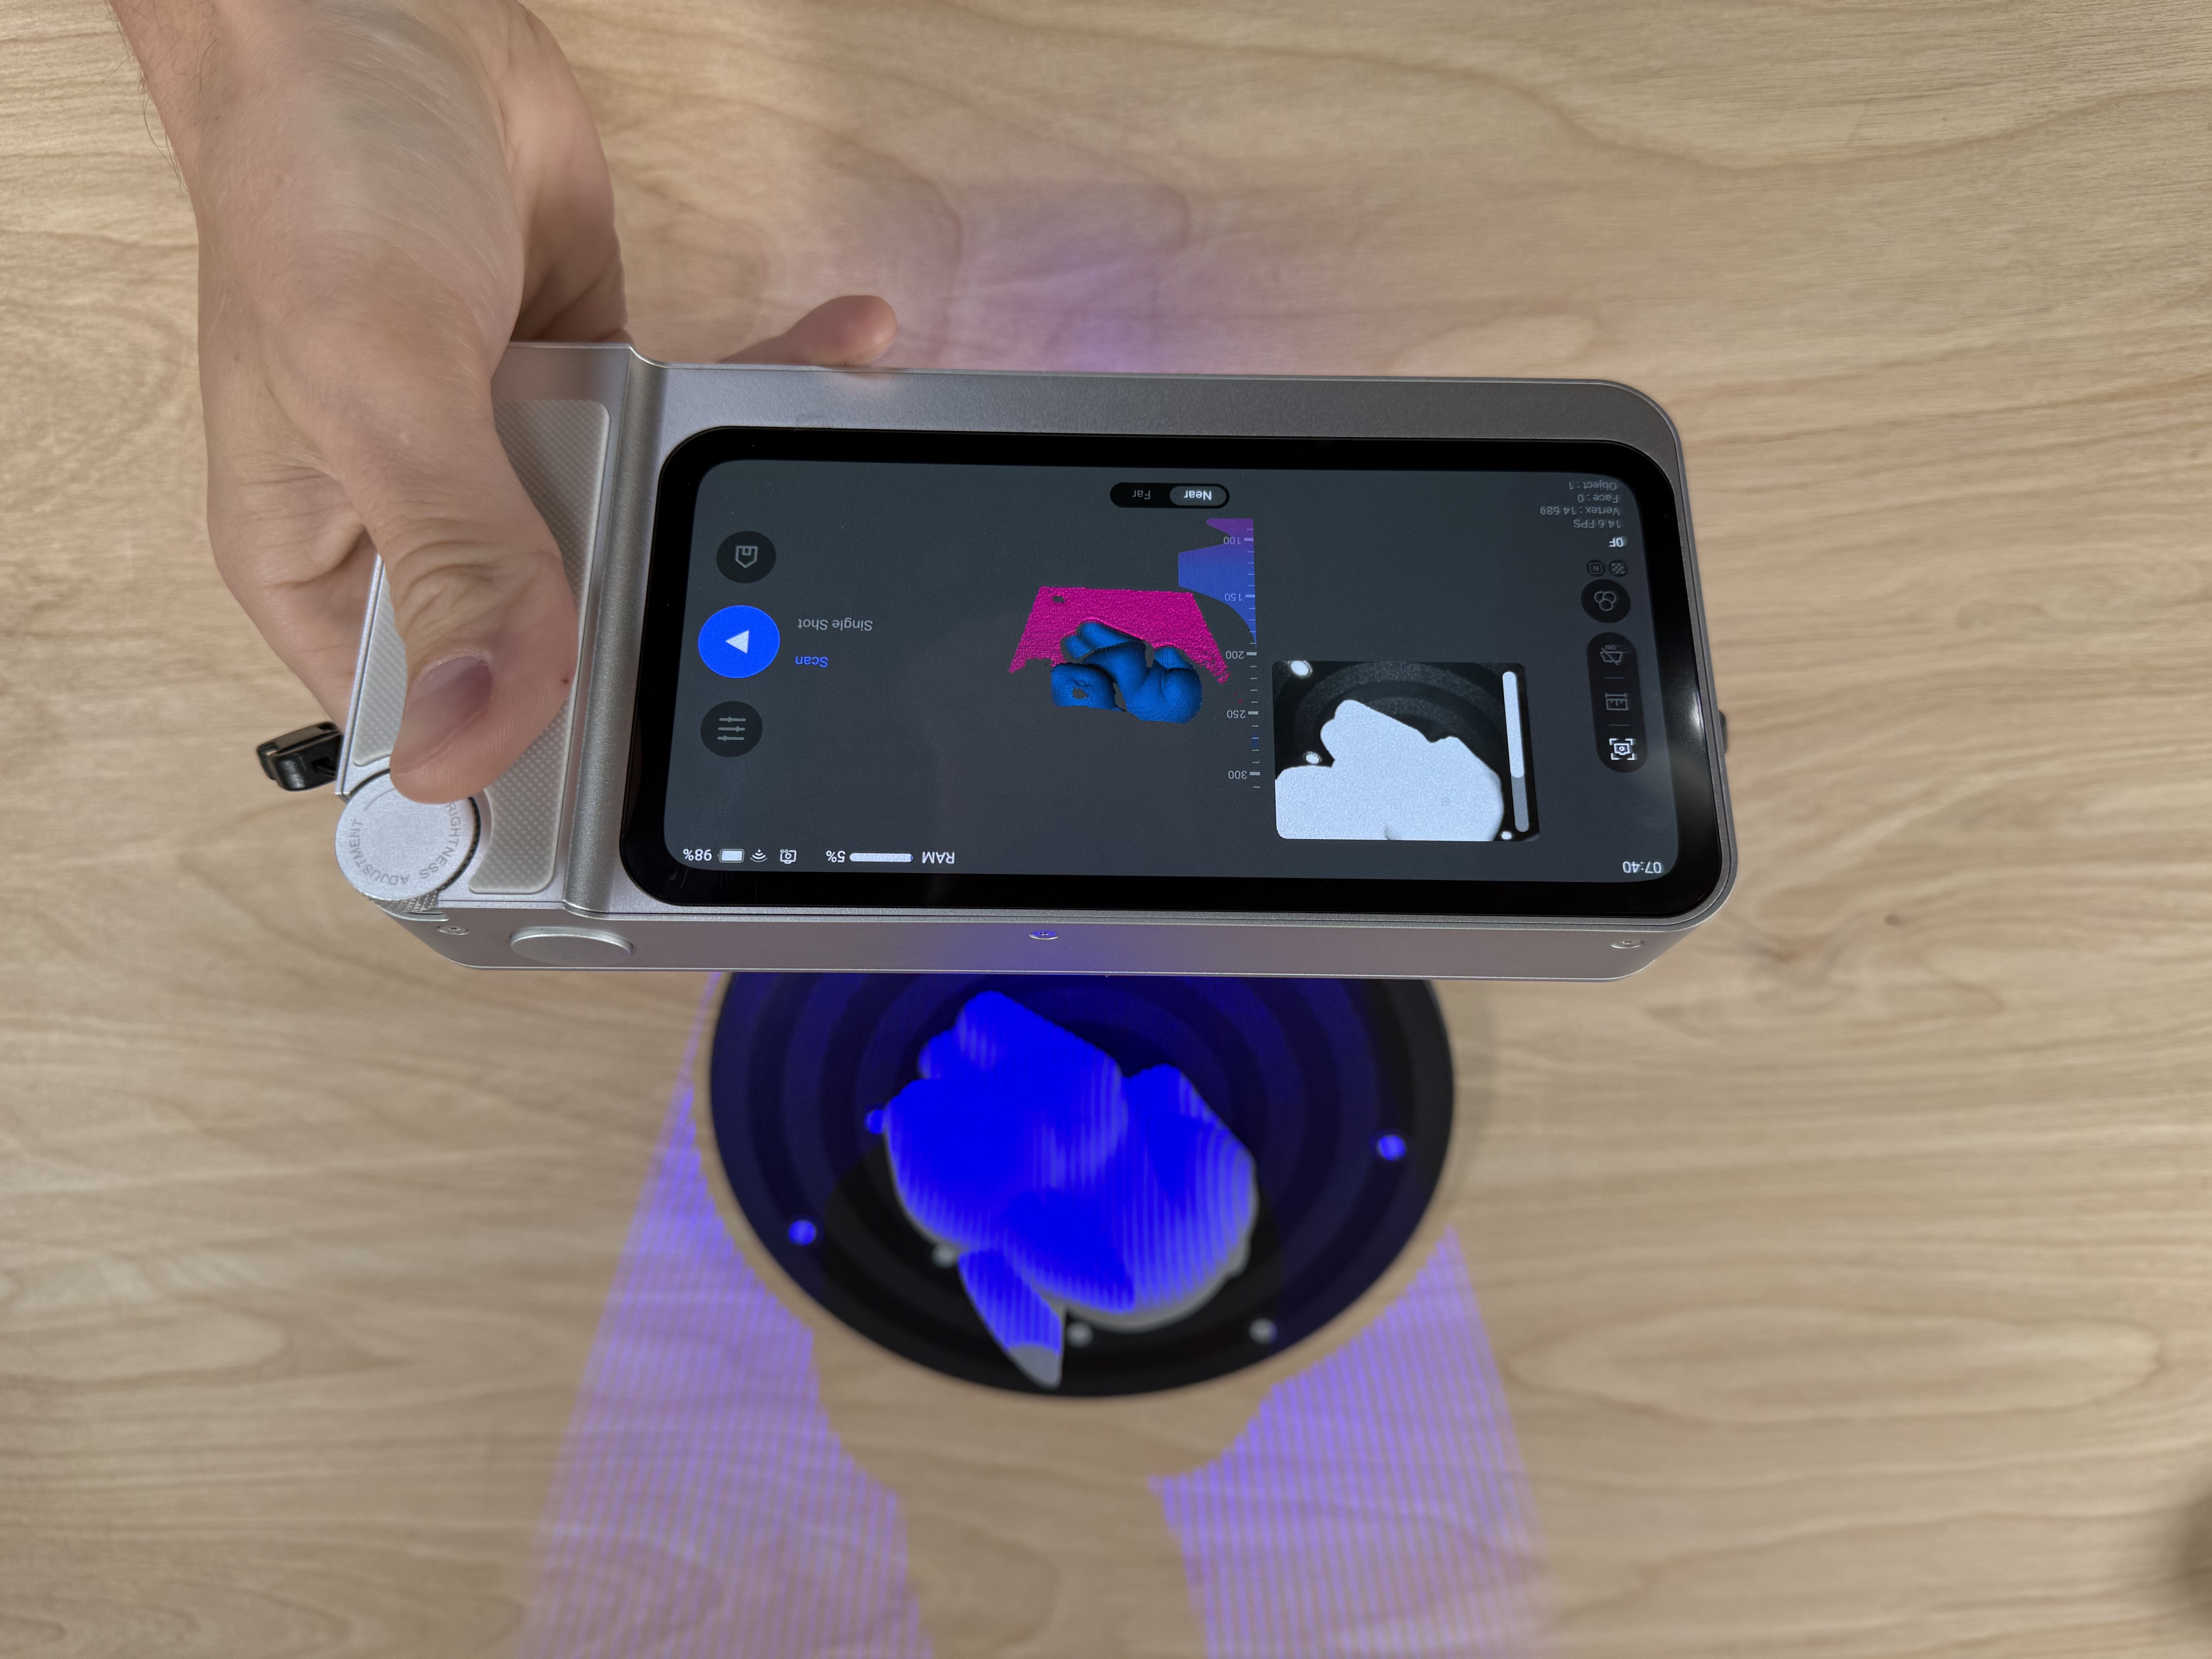
The 3DMakerPro Toucan looks like an elongated point-and-shoot camera from the early 2000s: silver body, LCD screen on the back, and a wheel selector and shutter button on the right shoulder of the unit. The metal body of the Toucan features a metal construction with a satin finish, recessed screws, and a small exhaust vent on the bottom of the unit, all giving a high-end feel. The rubber grip on the back is a comfortable resting place for your palm during scanning, and the diamond texture provides enough grip to keep it from slipping during use.
The wheel and button combo seems like a winner, but I was caught off-guard when I went to start my first scan: I clicked the button and nothing happened. As it turns out, the button only works in the “Single Shot” mode by acting like a typical camera shutter. This makes sense for that mode, but it was a little frustrating to keep clicking it before every scan only to have to go back and click the button on the back of the LCD.
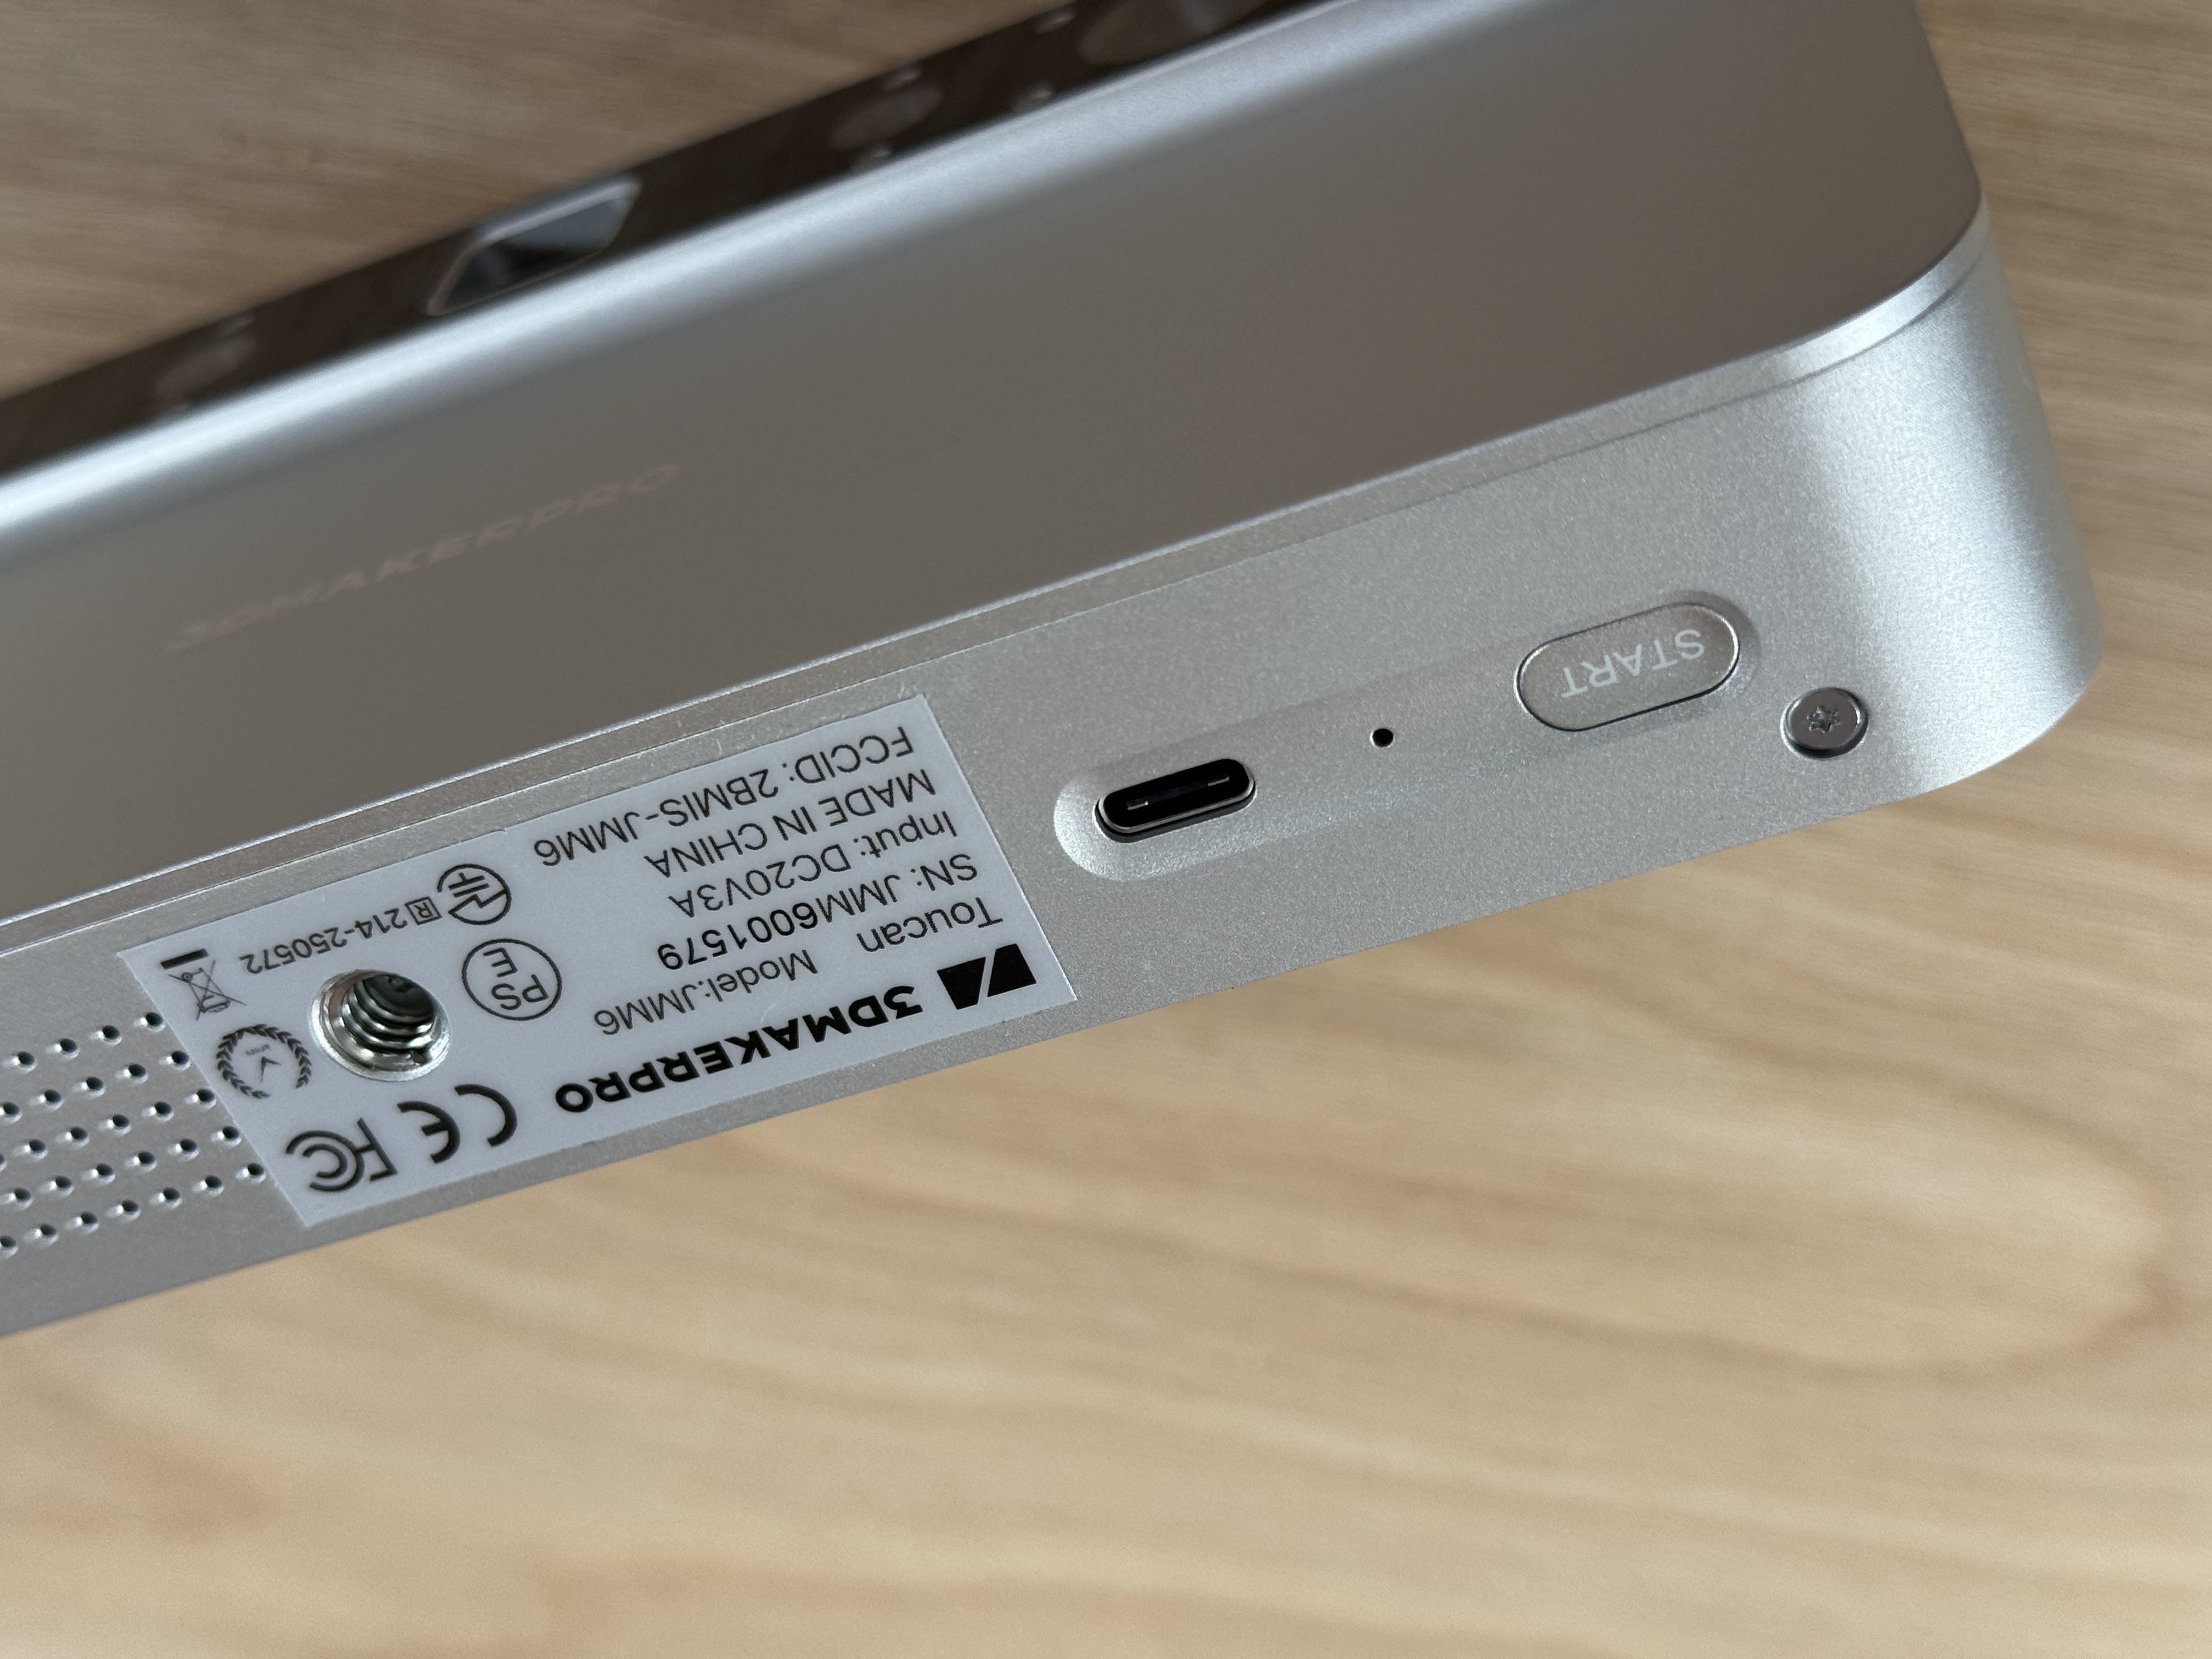
3DMakerPro was serious about skipping the computer with this scanner: the Toucan features an 8-core 2.5 GHz CPU, 256 GB of storage, and 32 GB of DDR4 RAM. There is a USB-C port on the bottom of the Toucan for charging with the included power supply as well as a recessed power button and a thread for a tripod or other stand. Add in a 6600 mAh battery and you can see why the weight of the unit is around 735 grams, just slightly too heavy to hold comfortably with a single hand for any extended period of time.

Unlike the highly ergonomic and easy-to-hold Mole, 3DMakerPro has gone in a more aesthetically-driven direction with the Toucan. While the scanner looks very premium, the sharp edges and flat surfaces make it awkward to hold comfortably for extended periods of time. The included silicone case is a welcome addition and makes the scanner significantly more comfortable to hold, but the Toucan doesn’t fit into the included carrying case while it’s wrapped in the case. Unfortunately, the silicone case is naturally sticky and tends to attract dust and dirt which has to be wiped clean regularly.
Software for 3DMakerPro Toucan
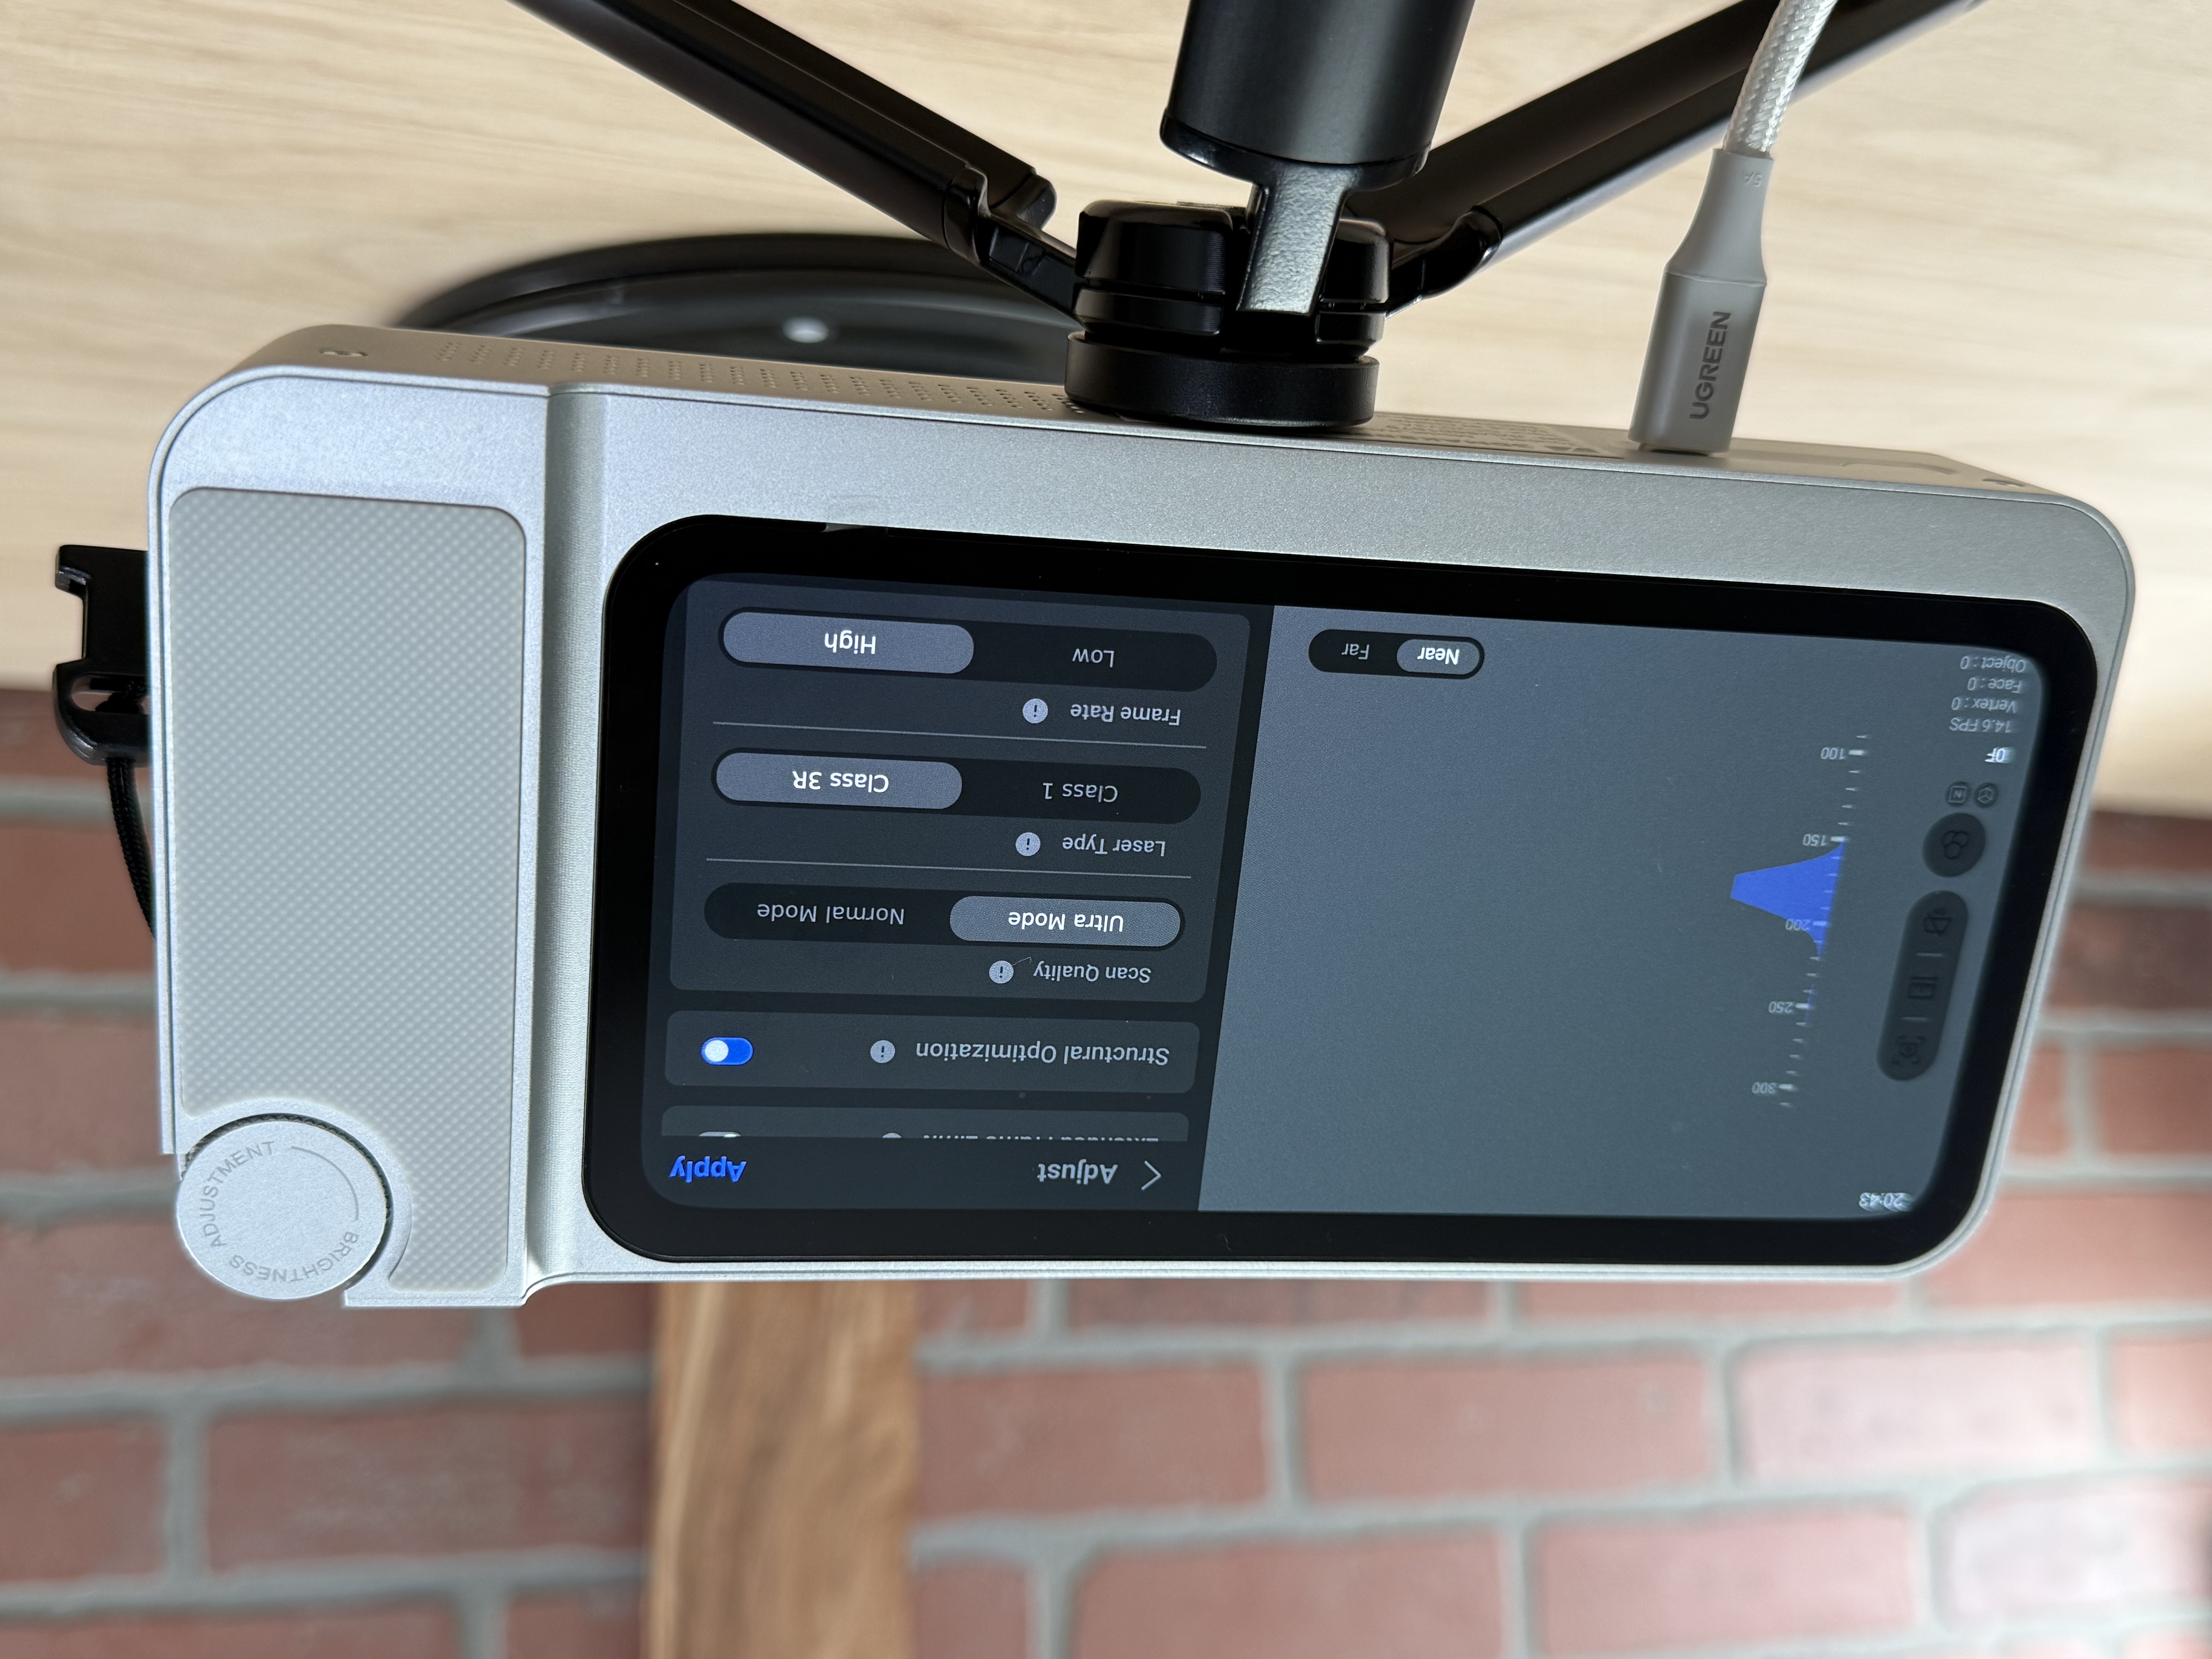
The 3DMakerPro Toucan uses the onboard computer to capture, process, and even export scan data and doesn’t require any other software (or even a computer) to generate a 3D model. Scan settings like laser type, frame rate, color capture, etc. can all be adjusted right on the Toucan using the large integrated LCD screen on the back of the unit. Once complete, the model can be exported as a mesh 3D file straight to a thumb drive. This onboard workflow is the primary differentiator of the Toucan, which is advertised as a portable, handheld 3D scanner.
The Toucan can also be used with the 3DMakerPro JMStudio 3D application, but it doesn’t have quite the first-party experience you might expect. The Toucan can’t directly connect to a computer with a USB connection, and instead has to transfer scan data via Wi-Fi. Once the scan data has been transferred, the project can be opened and processed like a normal scan. I wasn’t able to connect the Toucan to my computer with a USB cable, and instead had to transfer files over Wi-Fi or a USB-C thumb drive, which was not included.
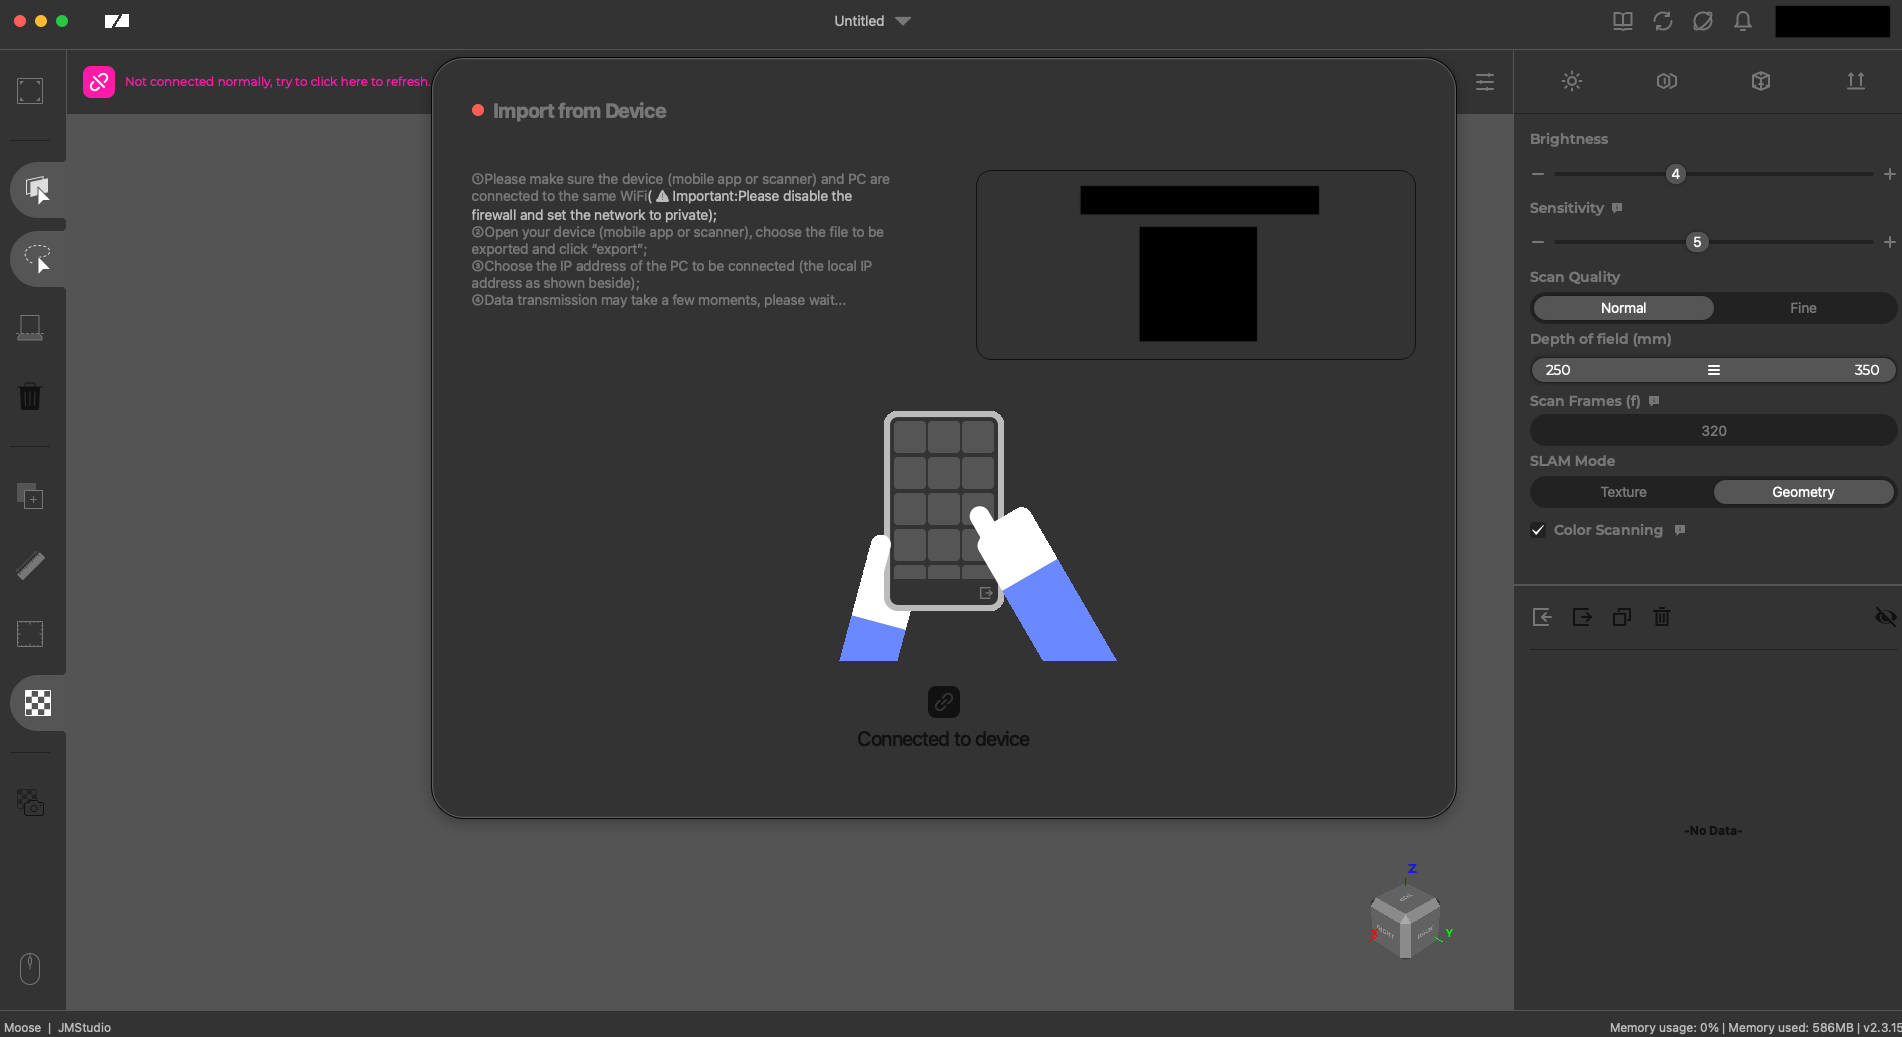
Transferring scans from the Toucan to my computer proved to be a challenging experience. The Toucan doesn’t support transfer of scan data over the integrated USB-C port, which is only used for charging. Instead, the Toucan connects via Wi-Fi and the “Import from Device” operation is used to transfer scan data. I had issues with this connection dropping multiple times mid-transfer, and the Wi-Fi connection was inconsistent despite stable network conditions.
Transferring a 1.2 GB scan took about seven minutes, and another three minutes to decompress the file once transferred to my computer. At these speeds, it’s much easier to just export the file to a USB-C thumb drive and then upload to a computer from there.
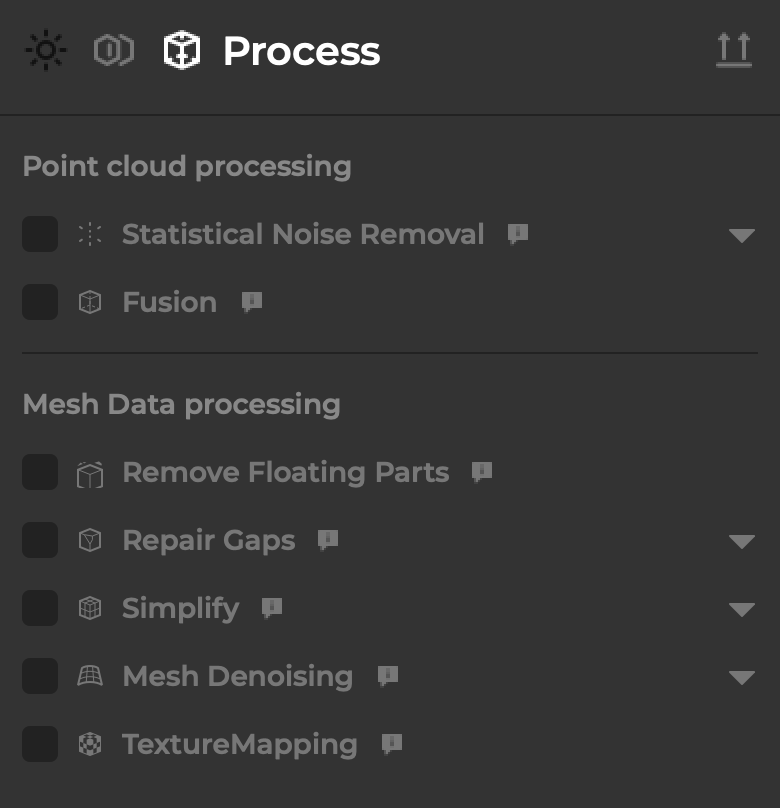
The processing in JMStudio (and the onboard Toucan software) involves cleaning the point cloud, converting it to a mesh, repairing and simplifying, and then adding an optional color texture. The process is similar between the app and the onboard software, and the Toucan is capable of processing scans entirely onboard without needing to export anything to the JMStudio software.
3D Scanning and Alignment with the 3DMakerPro Toucan
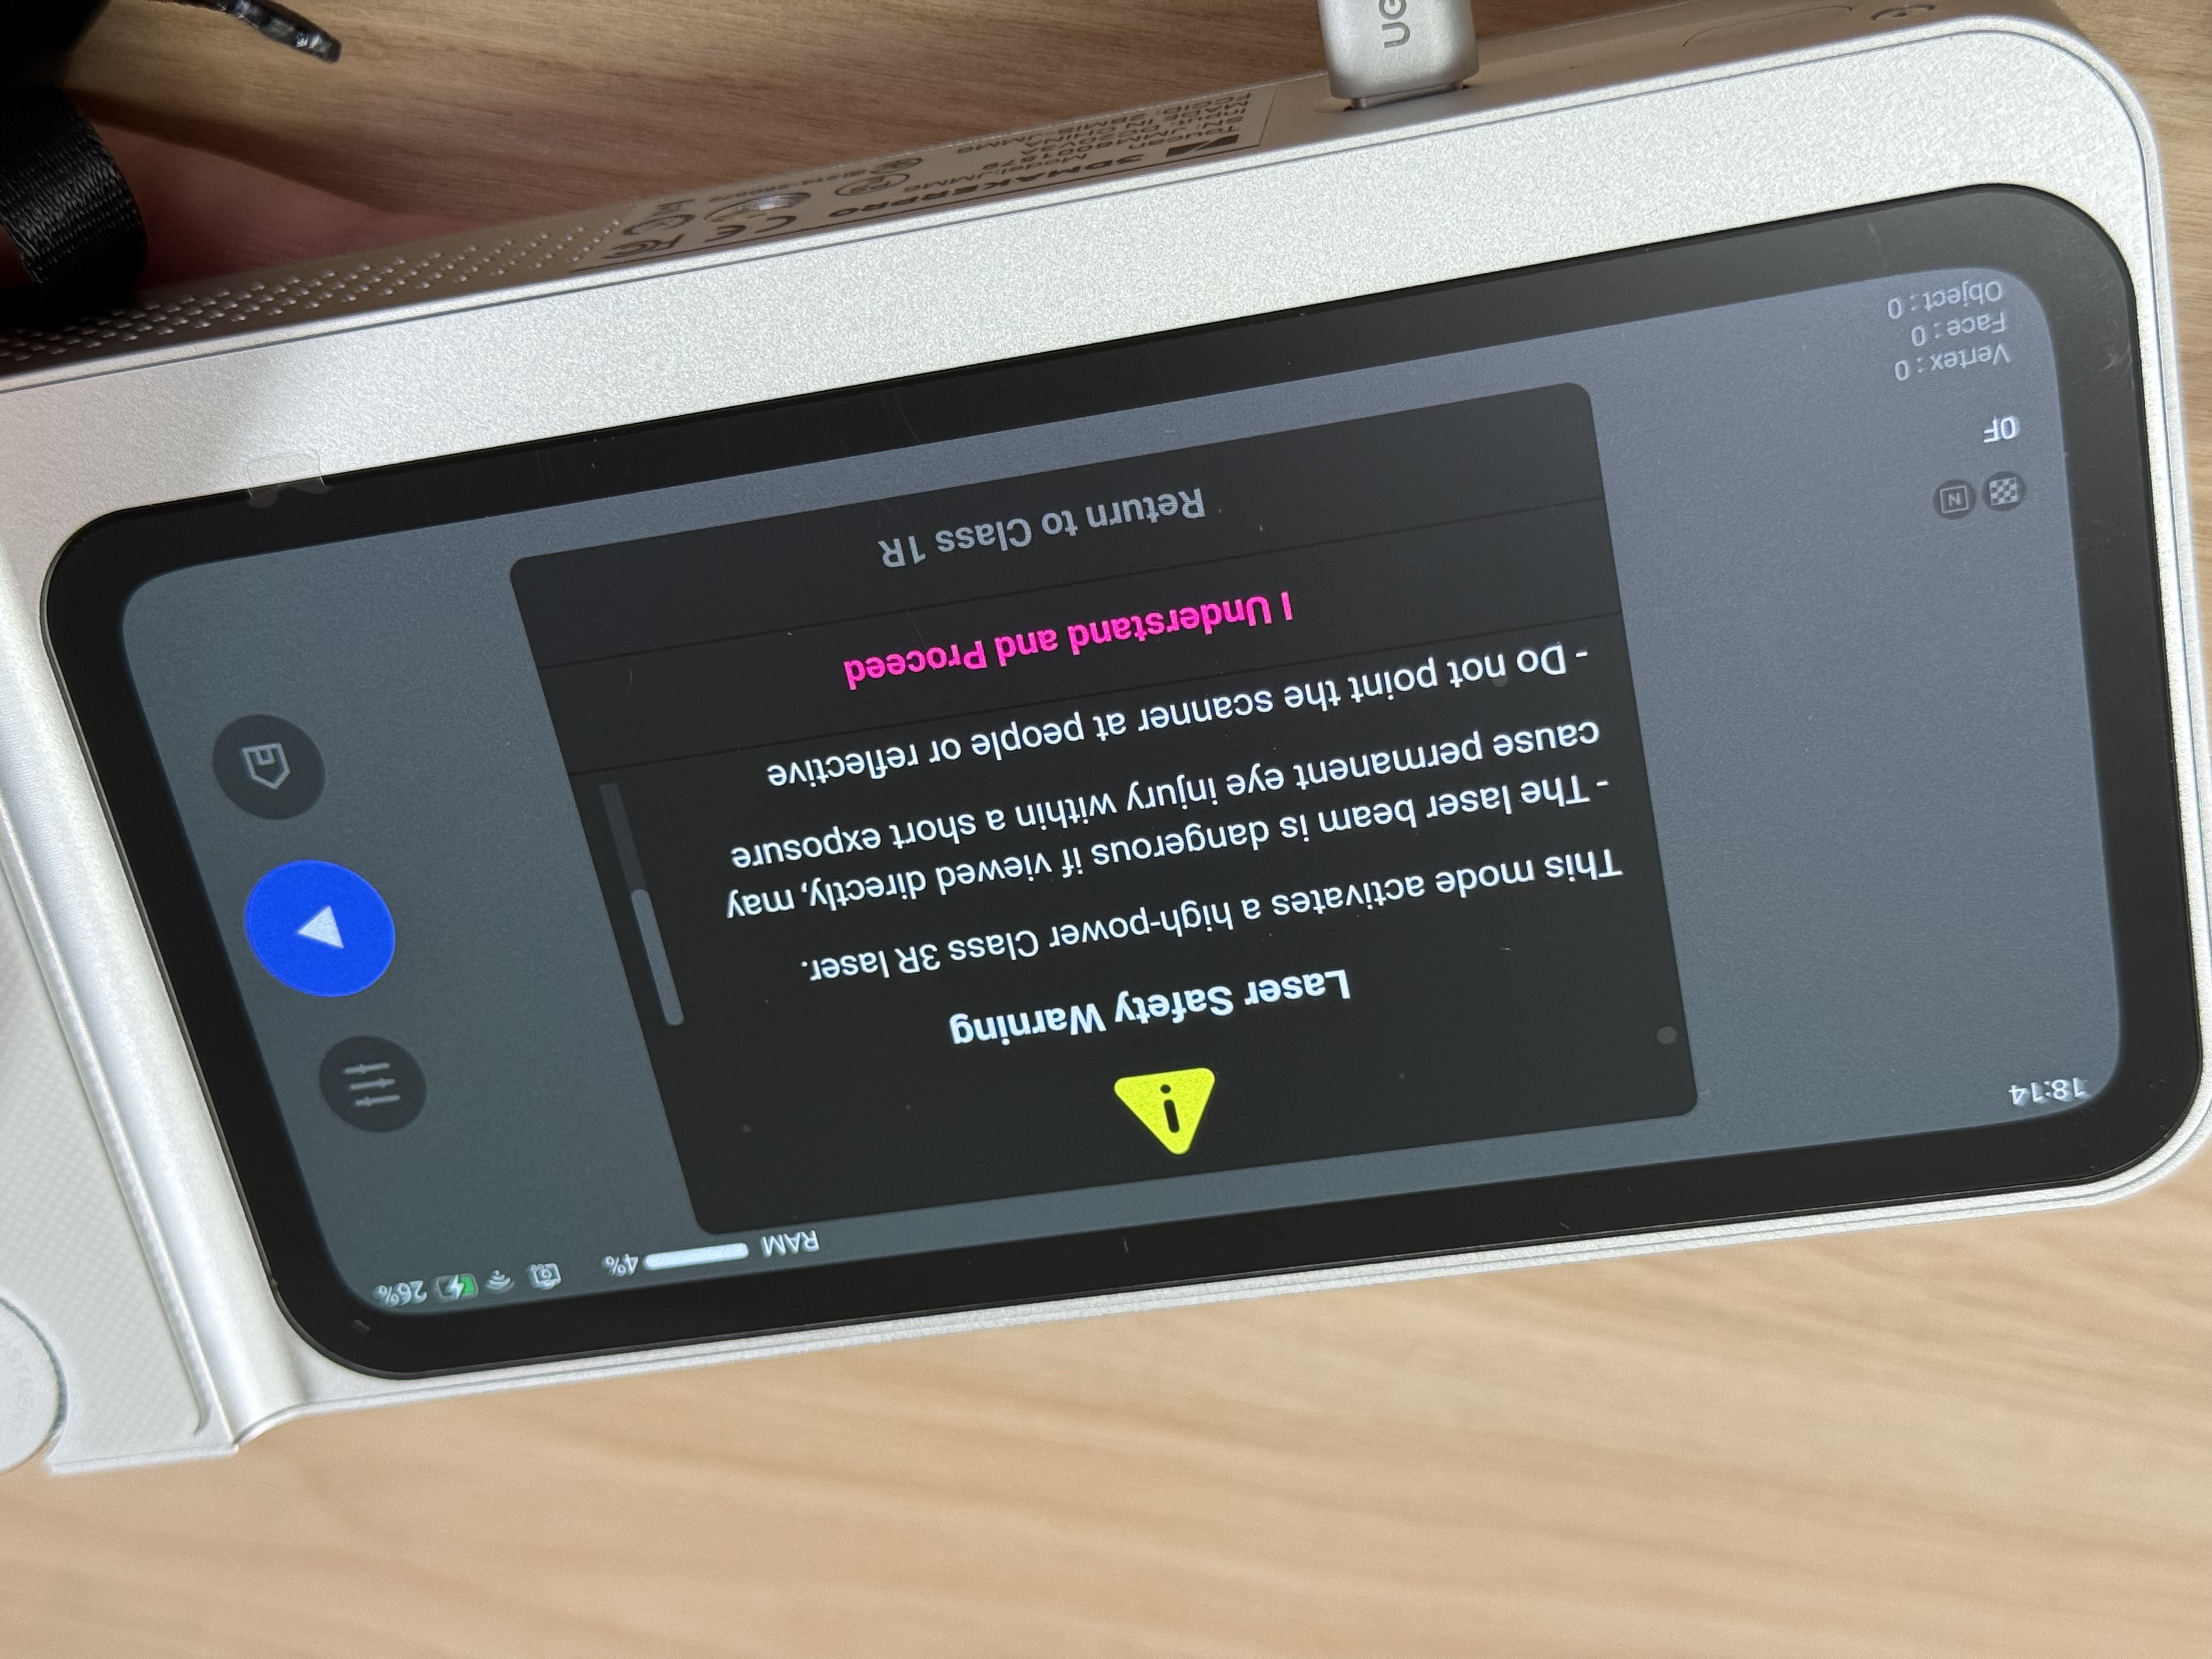
The 3DMakerPro Toucan has two laser modes: Class 3R and Class 1. Class 1 products are generally classified as safe for general use, while Class 3R laser products require additional safety considerations. The Toucan will show a warning before switching to the Class 3R laser mode every single time, something that I appreciated while using. The Class 3R laser is used for high-precision scanning and complex surfaces, while the Class 1 laser is used for more general use.
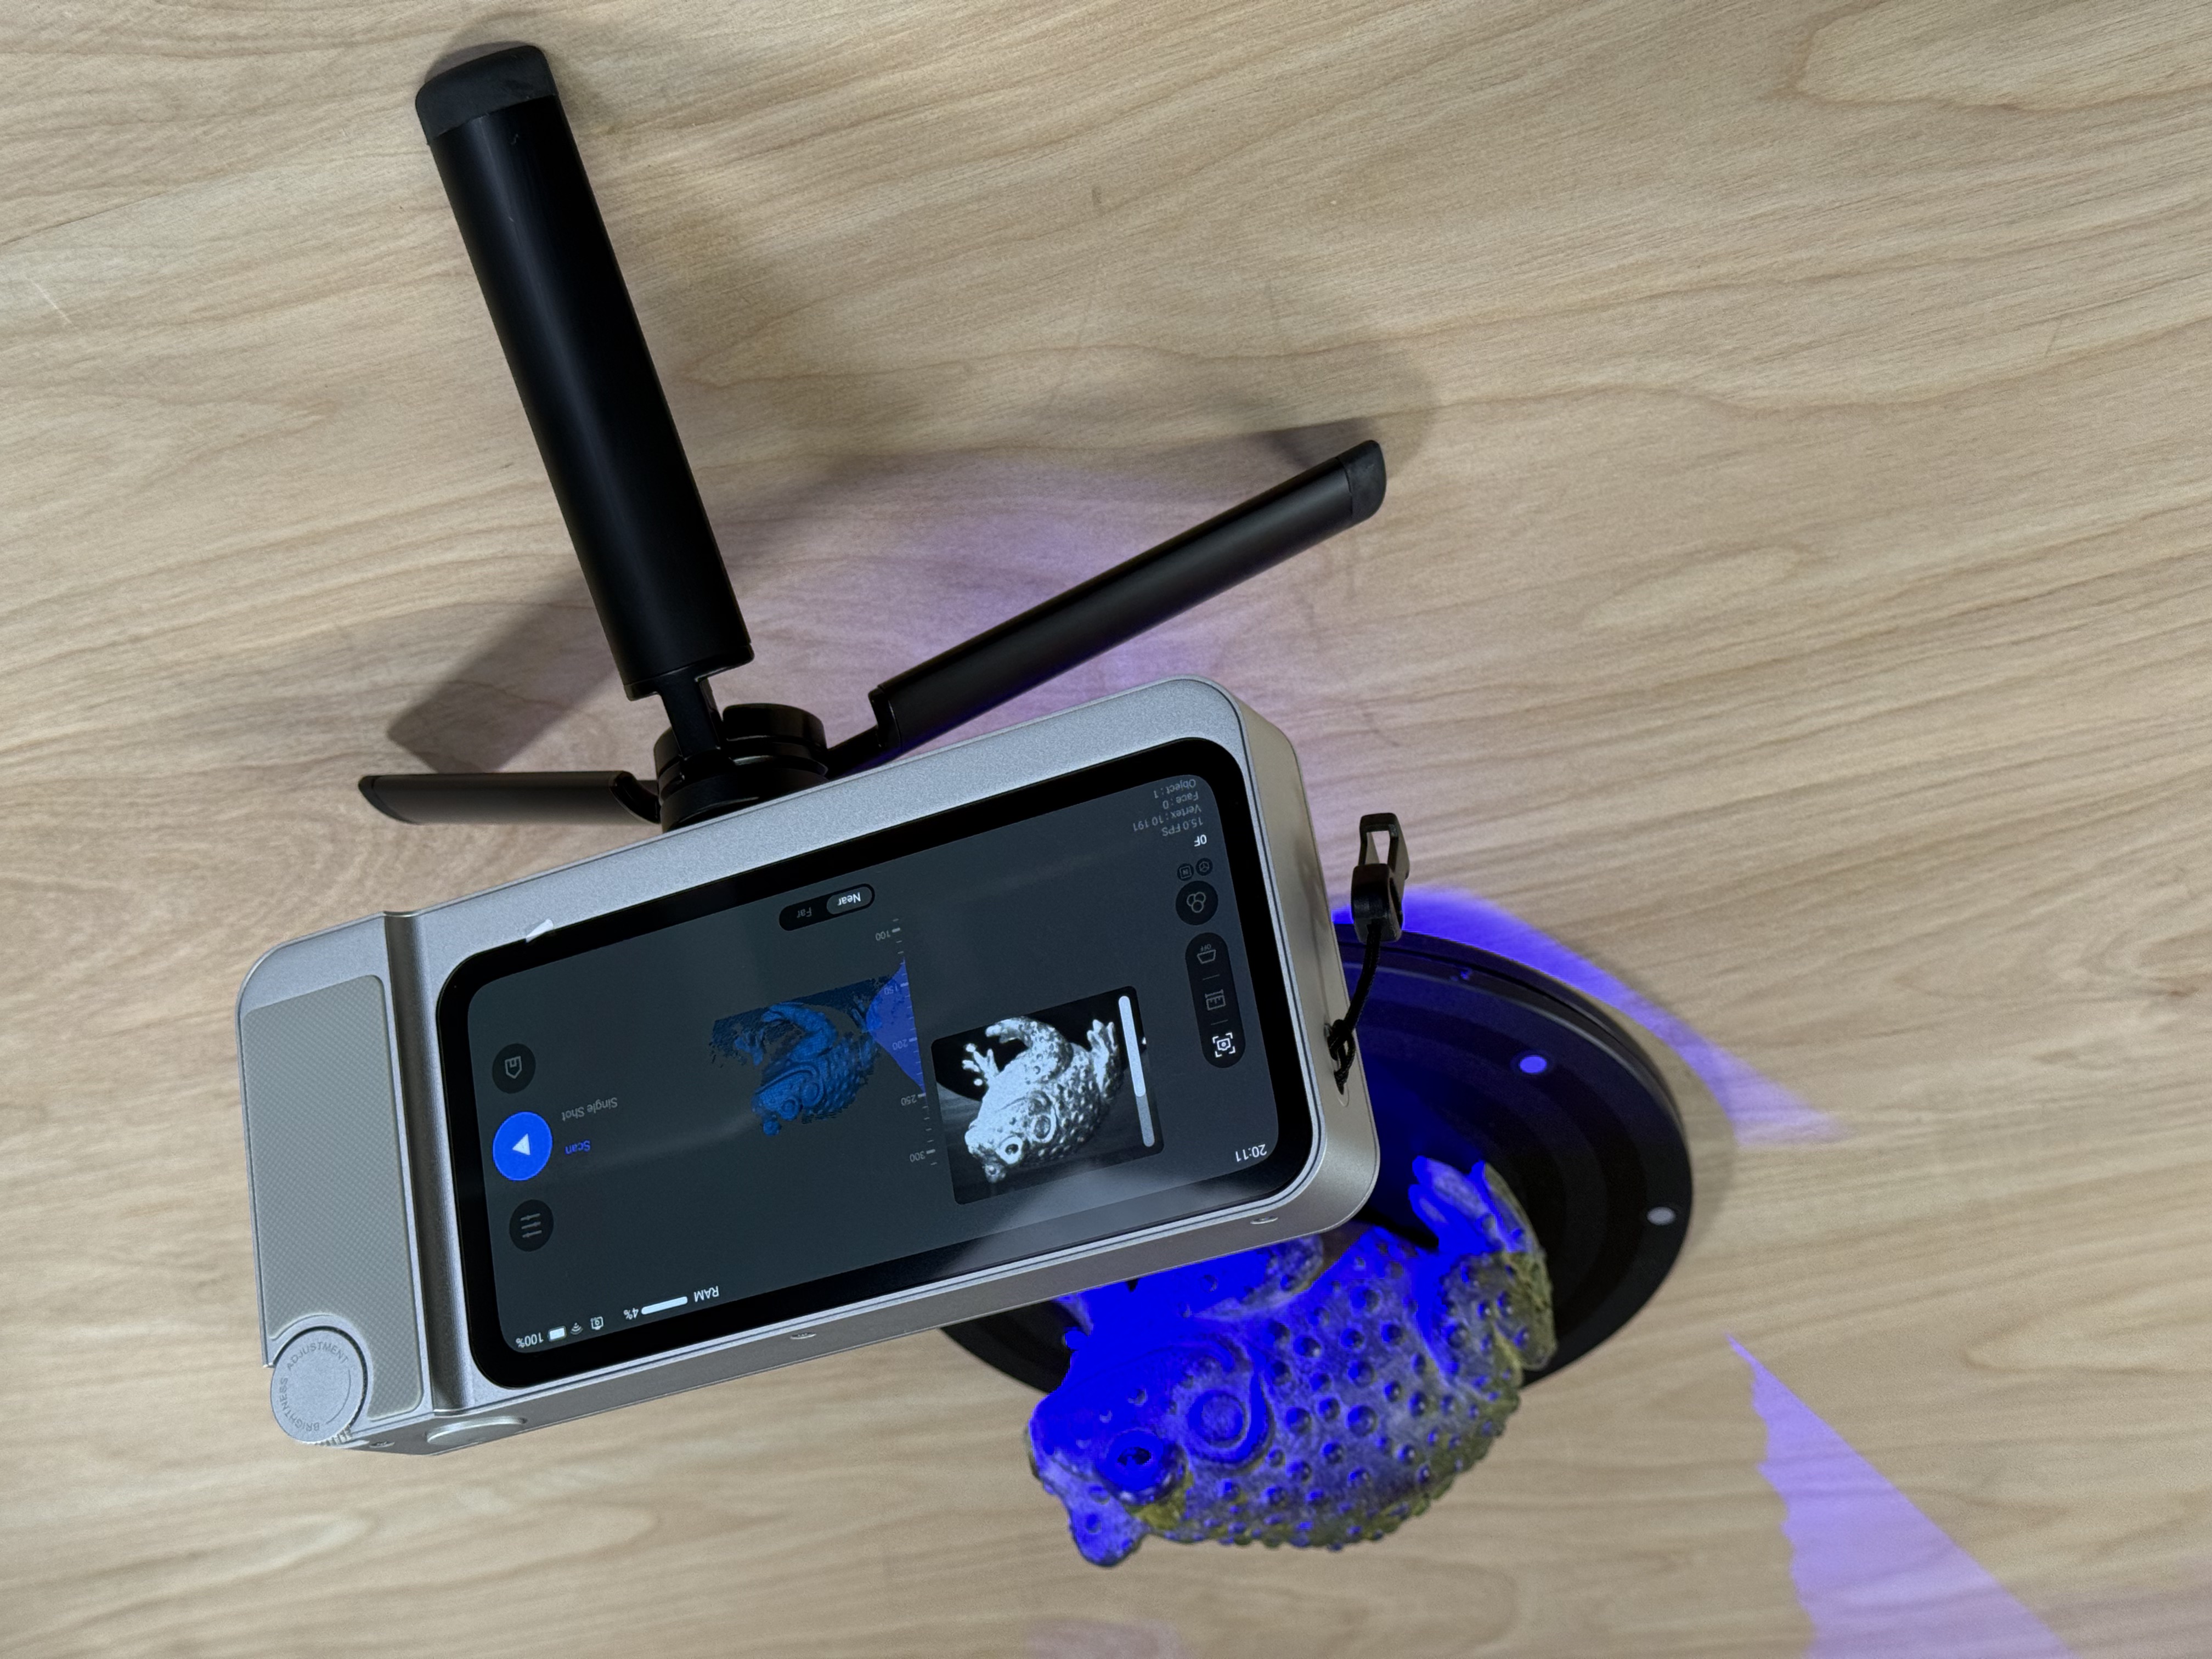
My favorite model to test a 3D scanner is a small toad sculpture because it has a high amount of surface geometry detail as well as complex paint. Using the manual turntable and the included tripod, I used the Class 3R laser in Near Mode, and enabled Color Scanning. The Toucan has a guide to indicate ideal scanning distance and will throw a warning if you are too close or too far from the model, and the brightness can be adjusted using the wheel on the top of the unit.
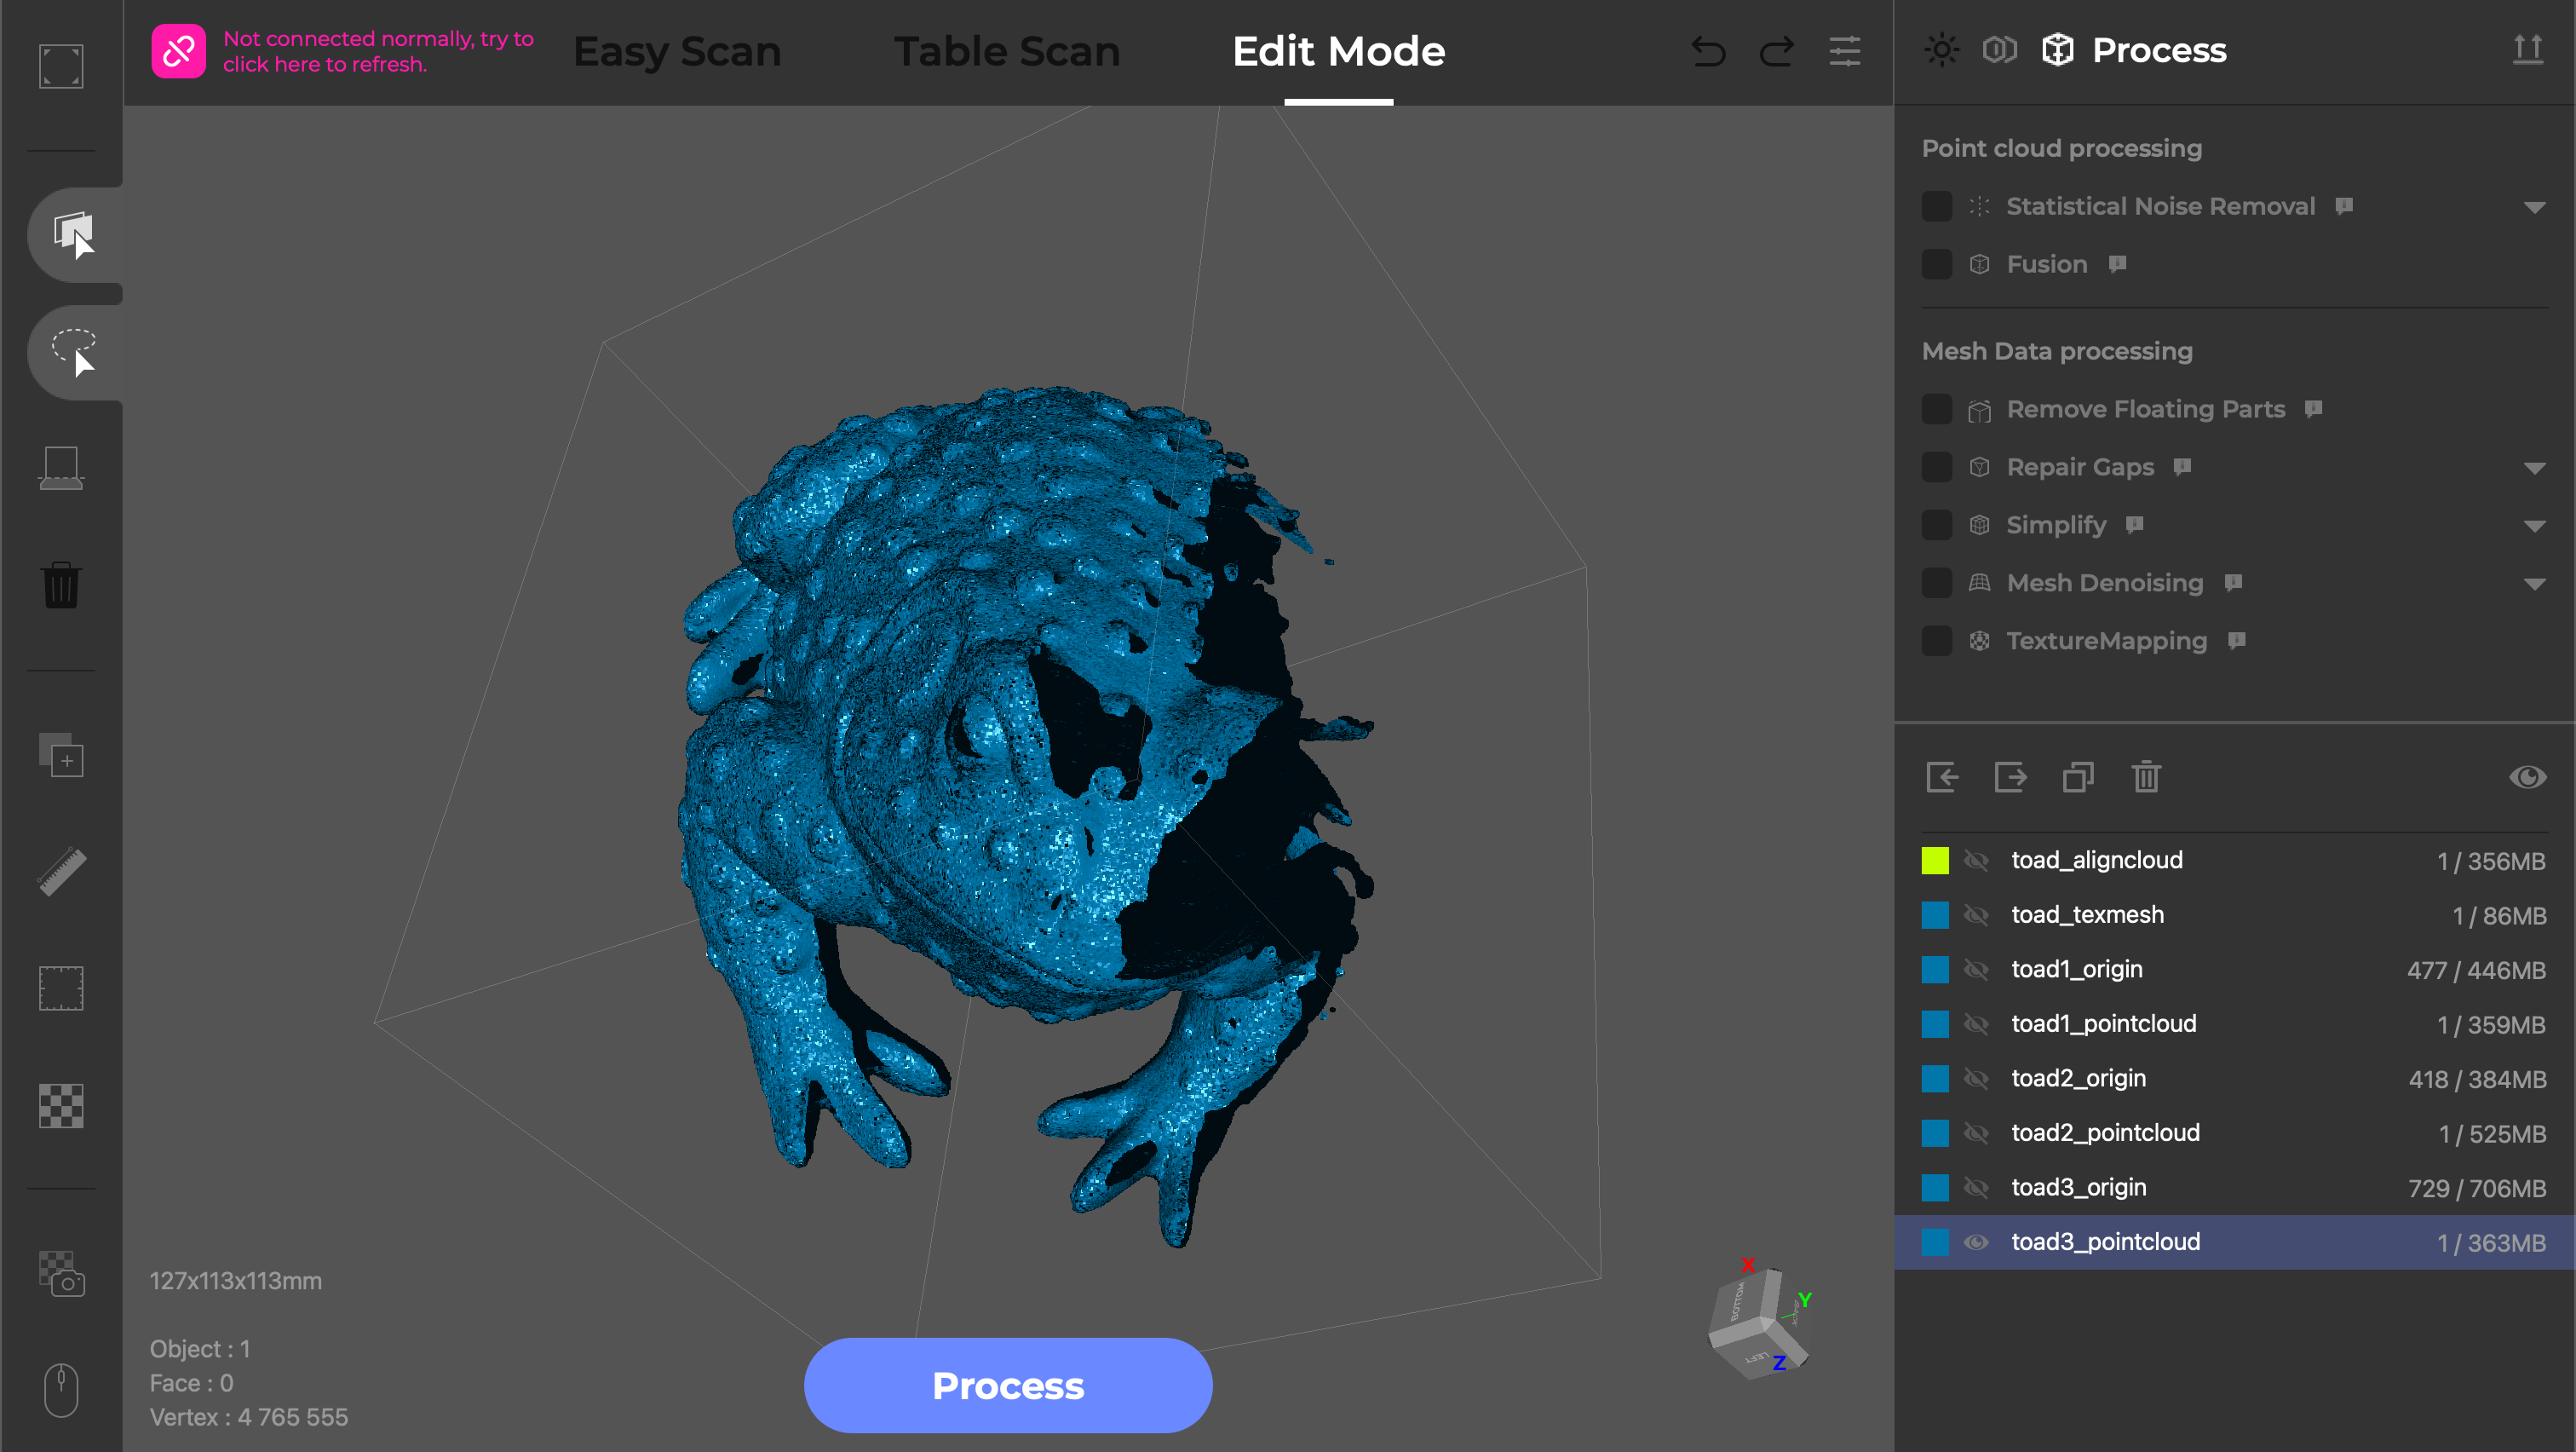
The Toucan kept a consistent 15 FPS during scanning, which made for an impressively fast first capture that took only about a minute. After running the Structural Optimization and Statistical Noise Removal processes, the result was a point cloud with 6.8 million points that was about 619 MB in size. This is an impressively dense point cloud, and the captured detail was crisp and clear even before converting to a triangulated mesh. The processing was done entirely on the Toucan, and these operations took under 5 minutes total to complete.
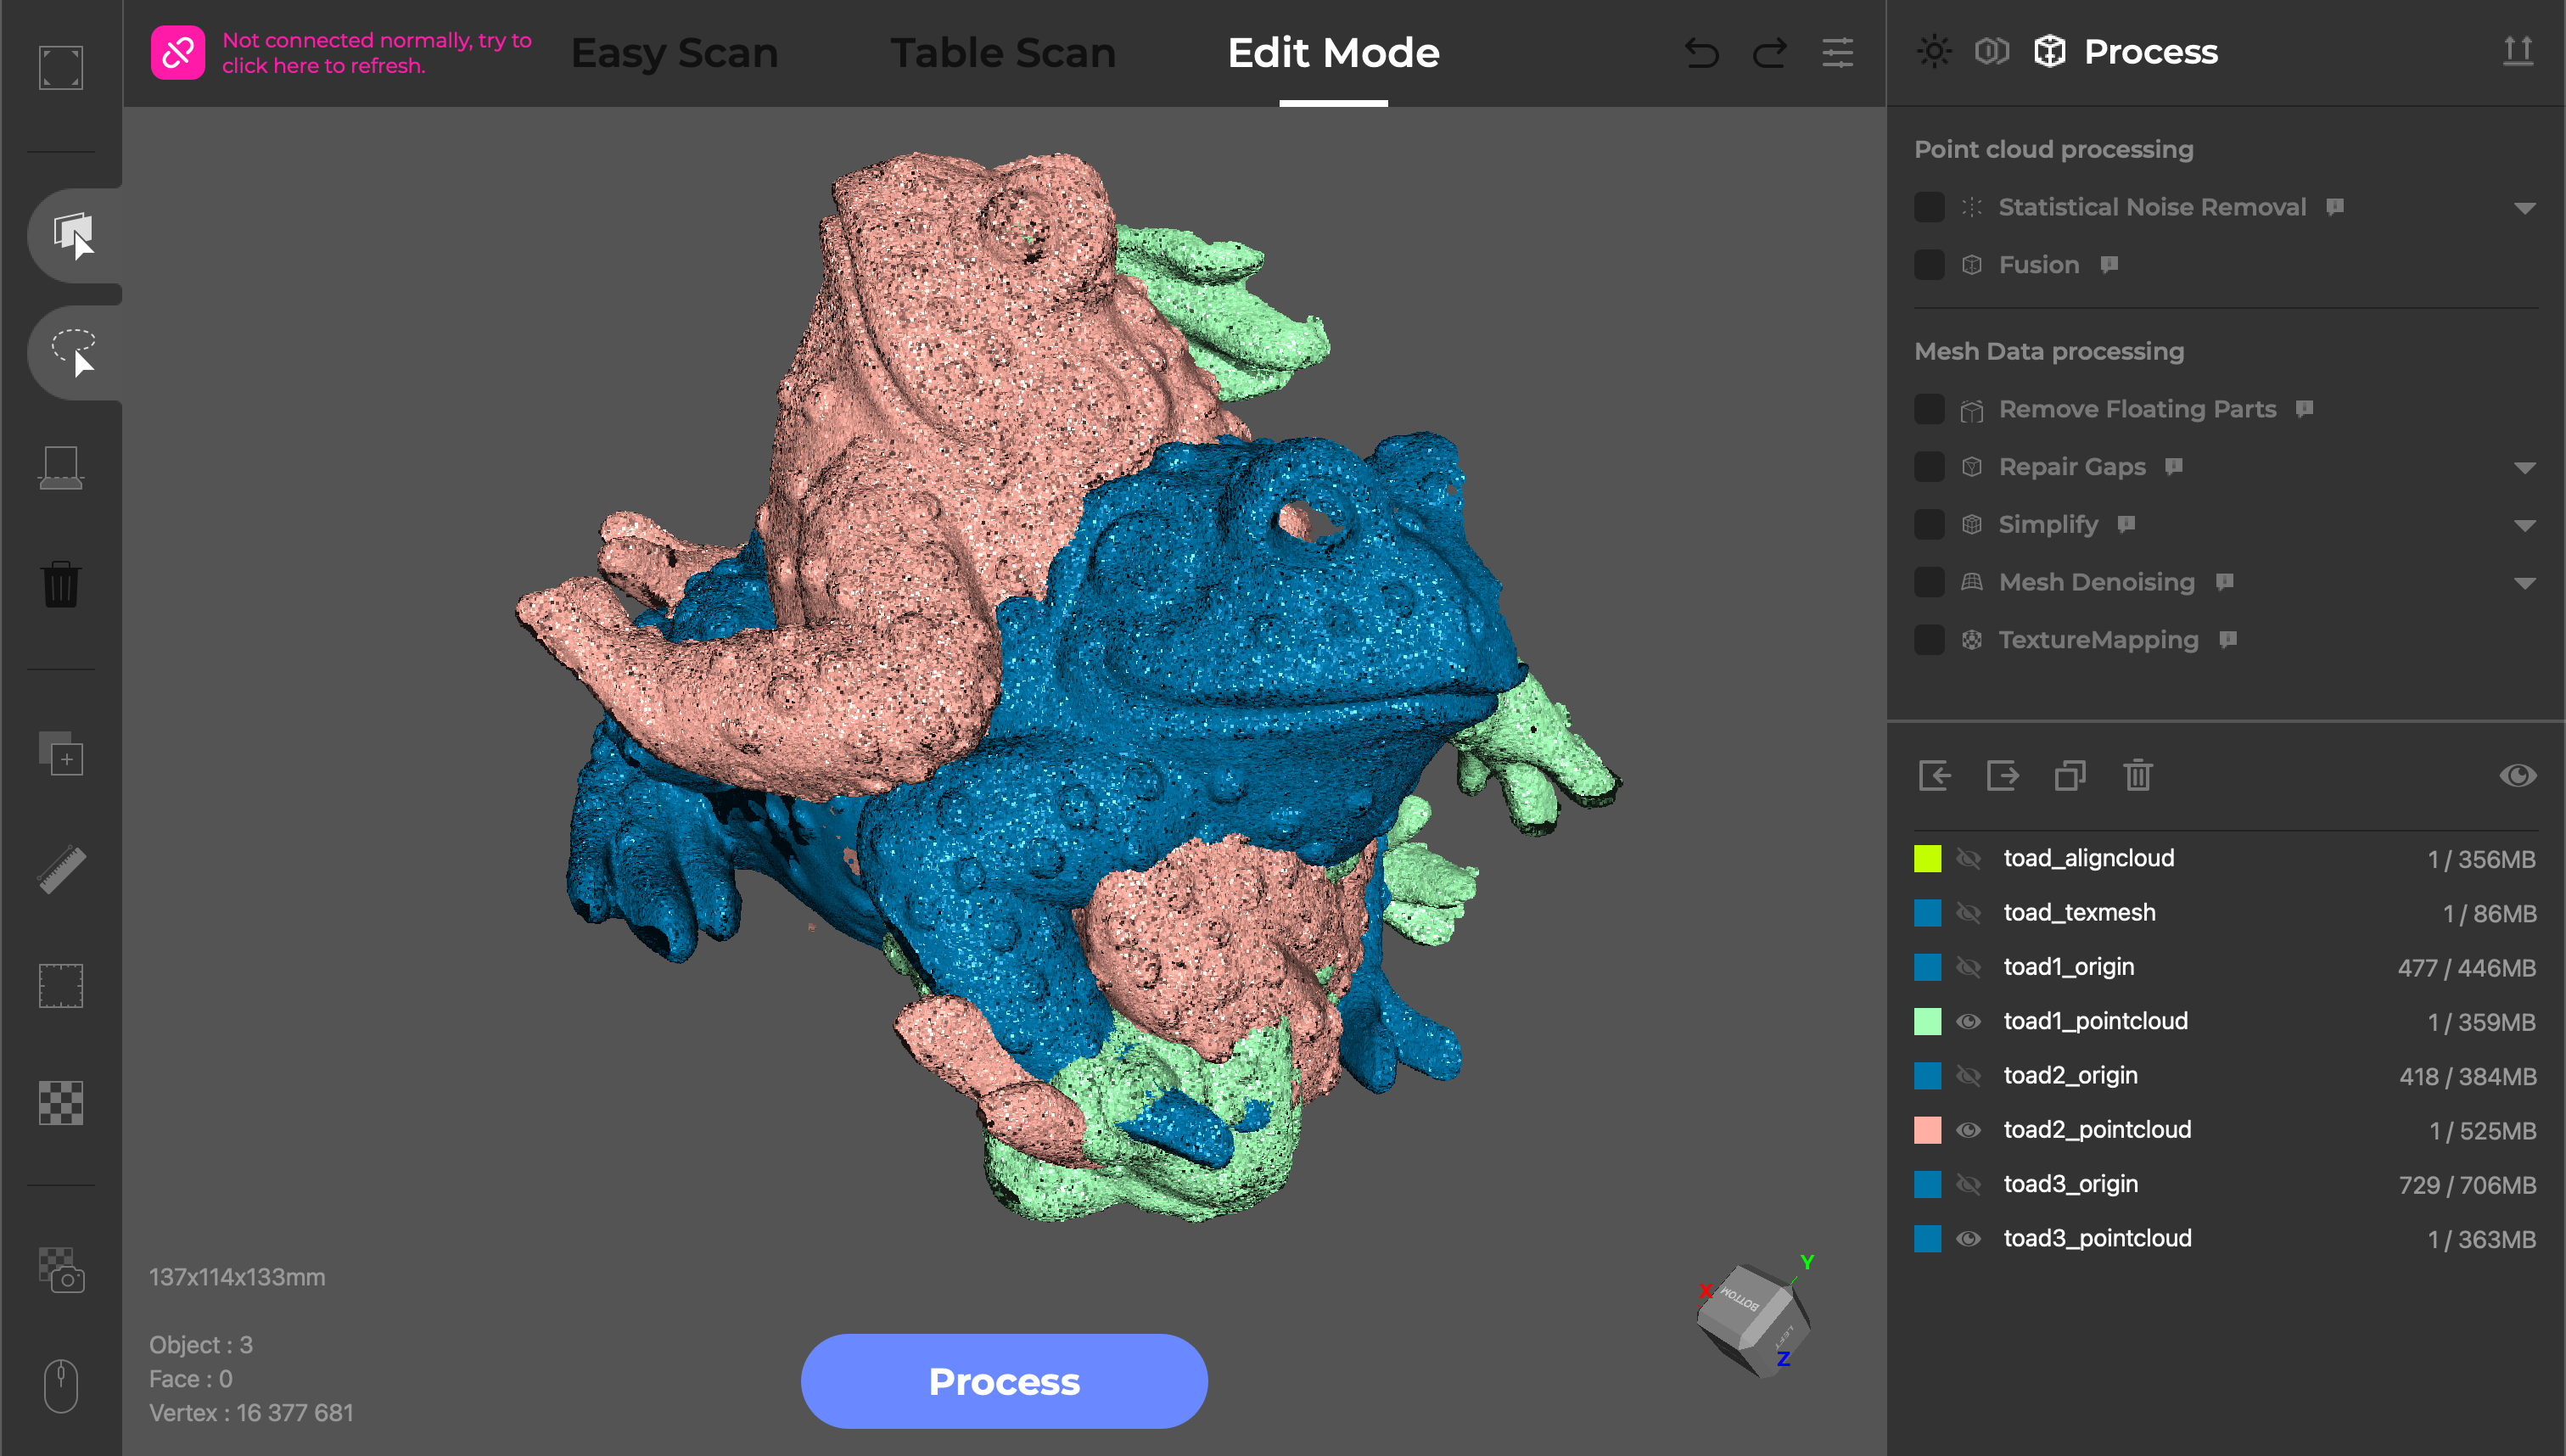
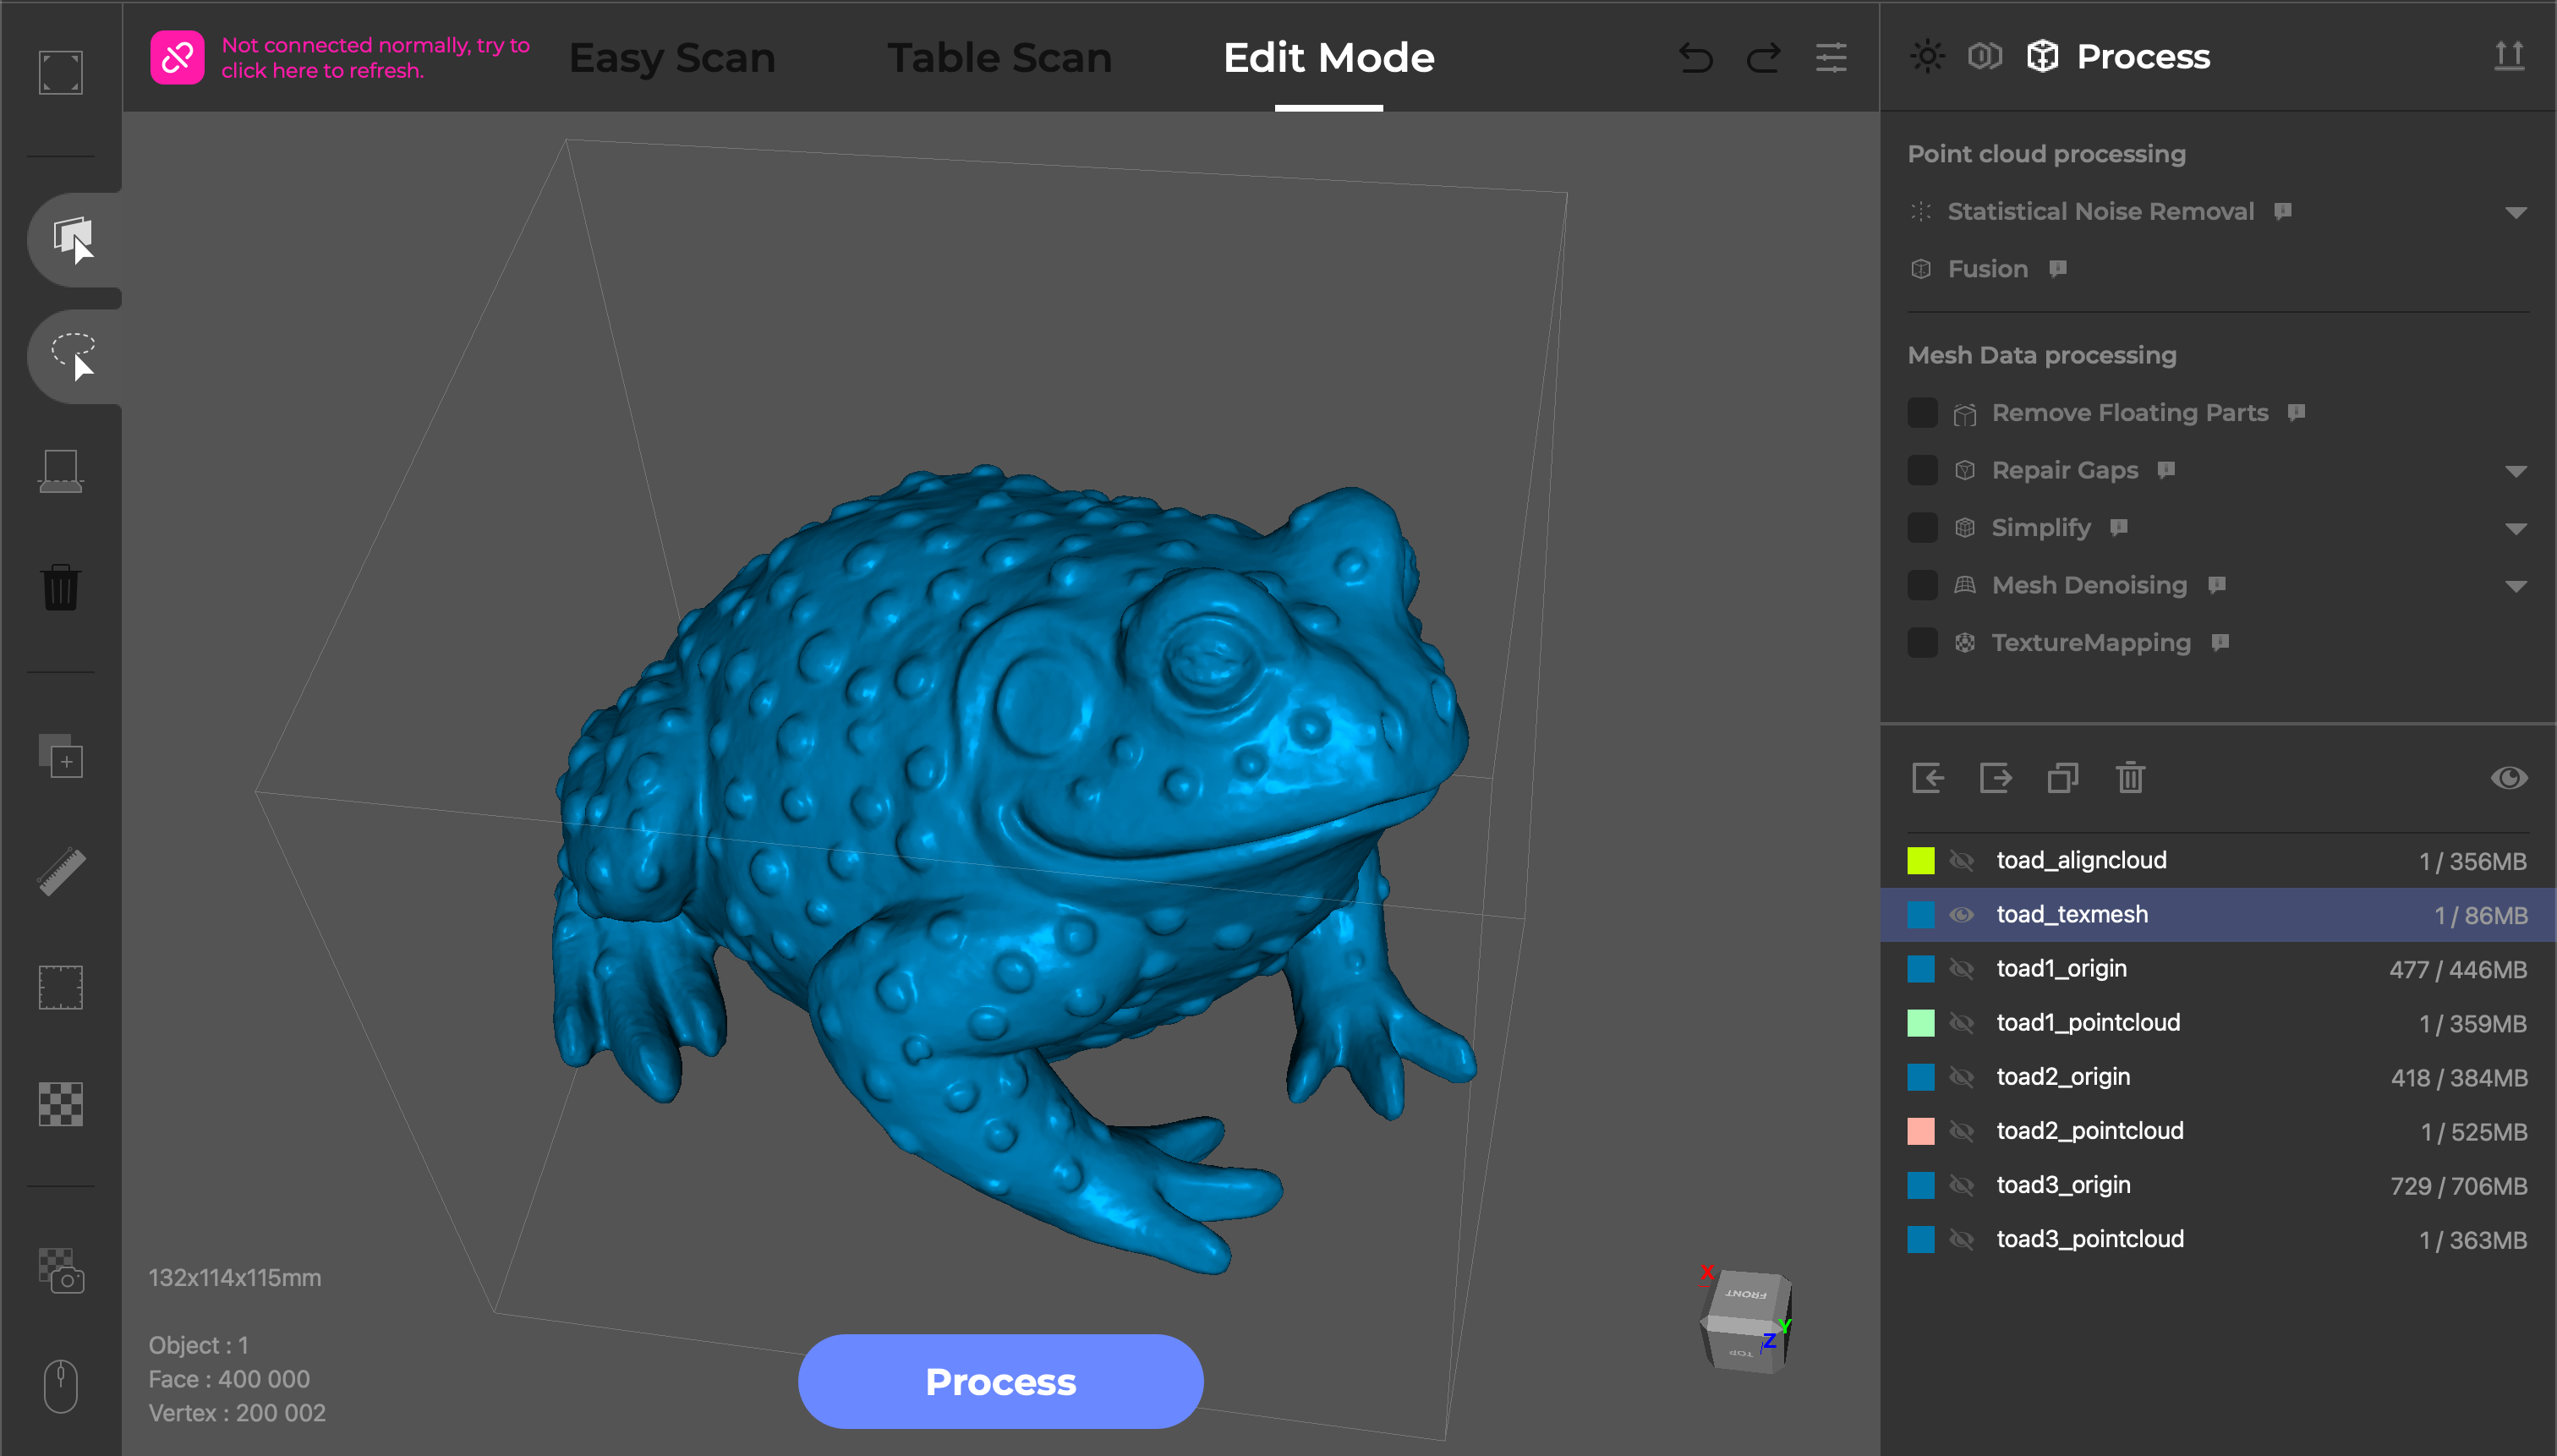
In order to create the complete model, I ran two more scans and then used the automatic Align feature to create a single point cloud with all the points aligned correctly. The automatic alignment worked well, but I had to adjust the overlap from 90% to 100% to get the best results. Once everything was aligned, the last step was converting the model into a watertight mesh and reducing the triangle count. The final model has 400,000 triangles and is only 26.5 MB in size, an impressive reduction from the nearly 1.5 GB of point cloud data used to make the mesh.
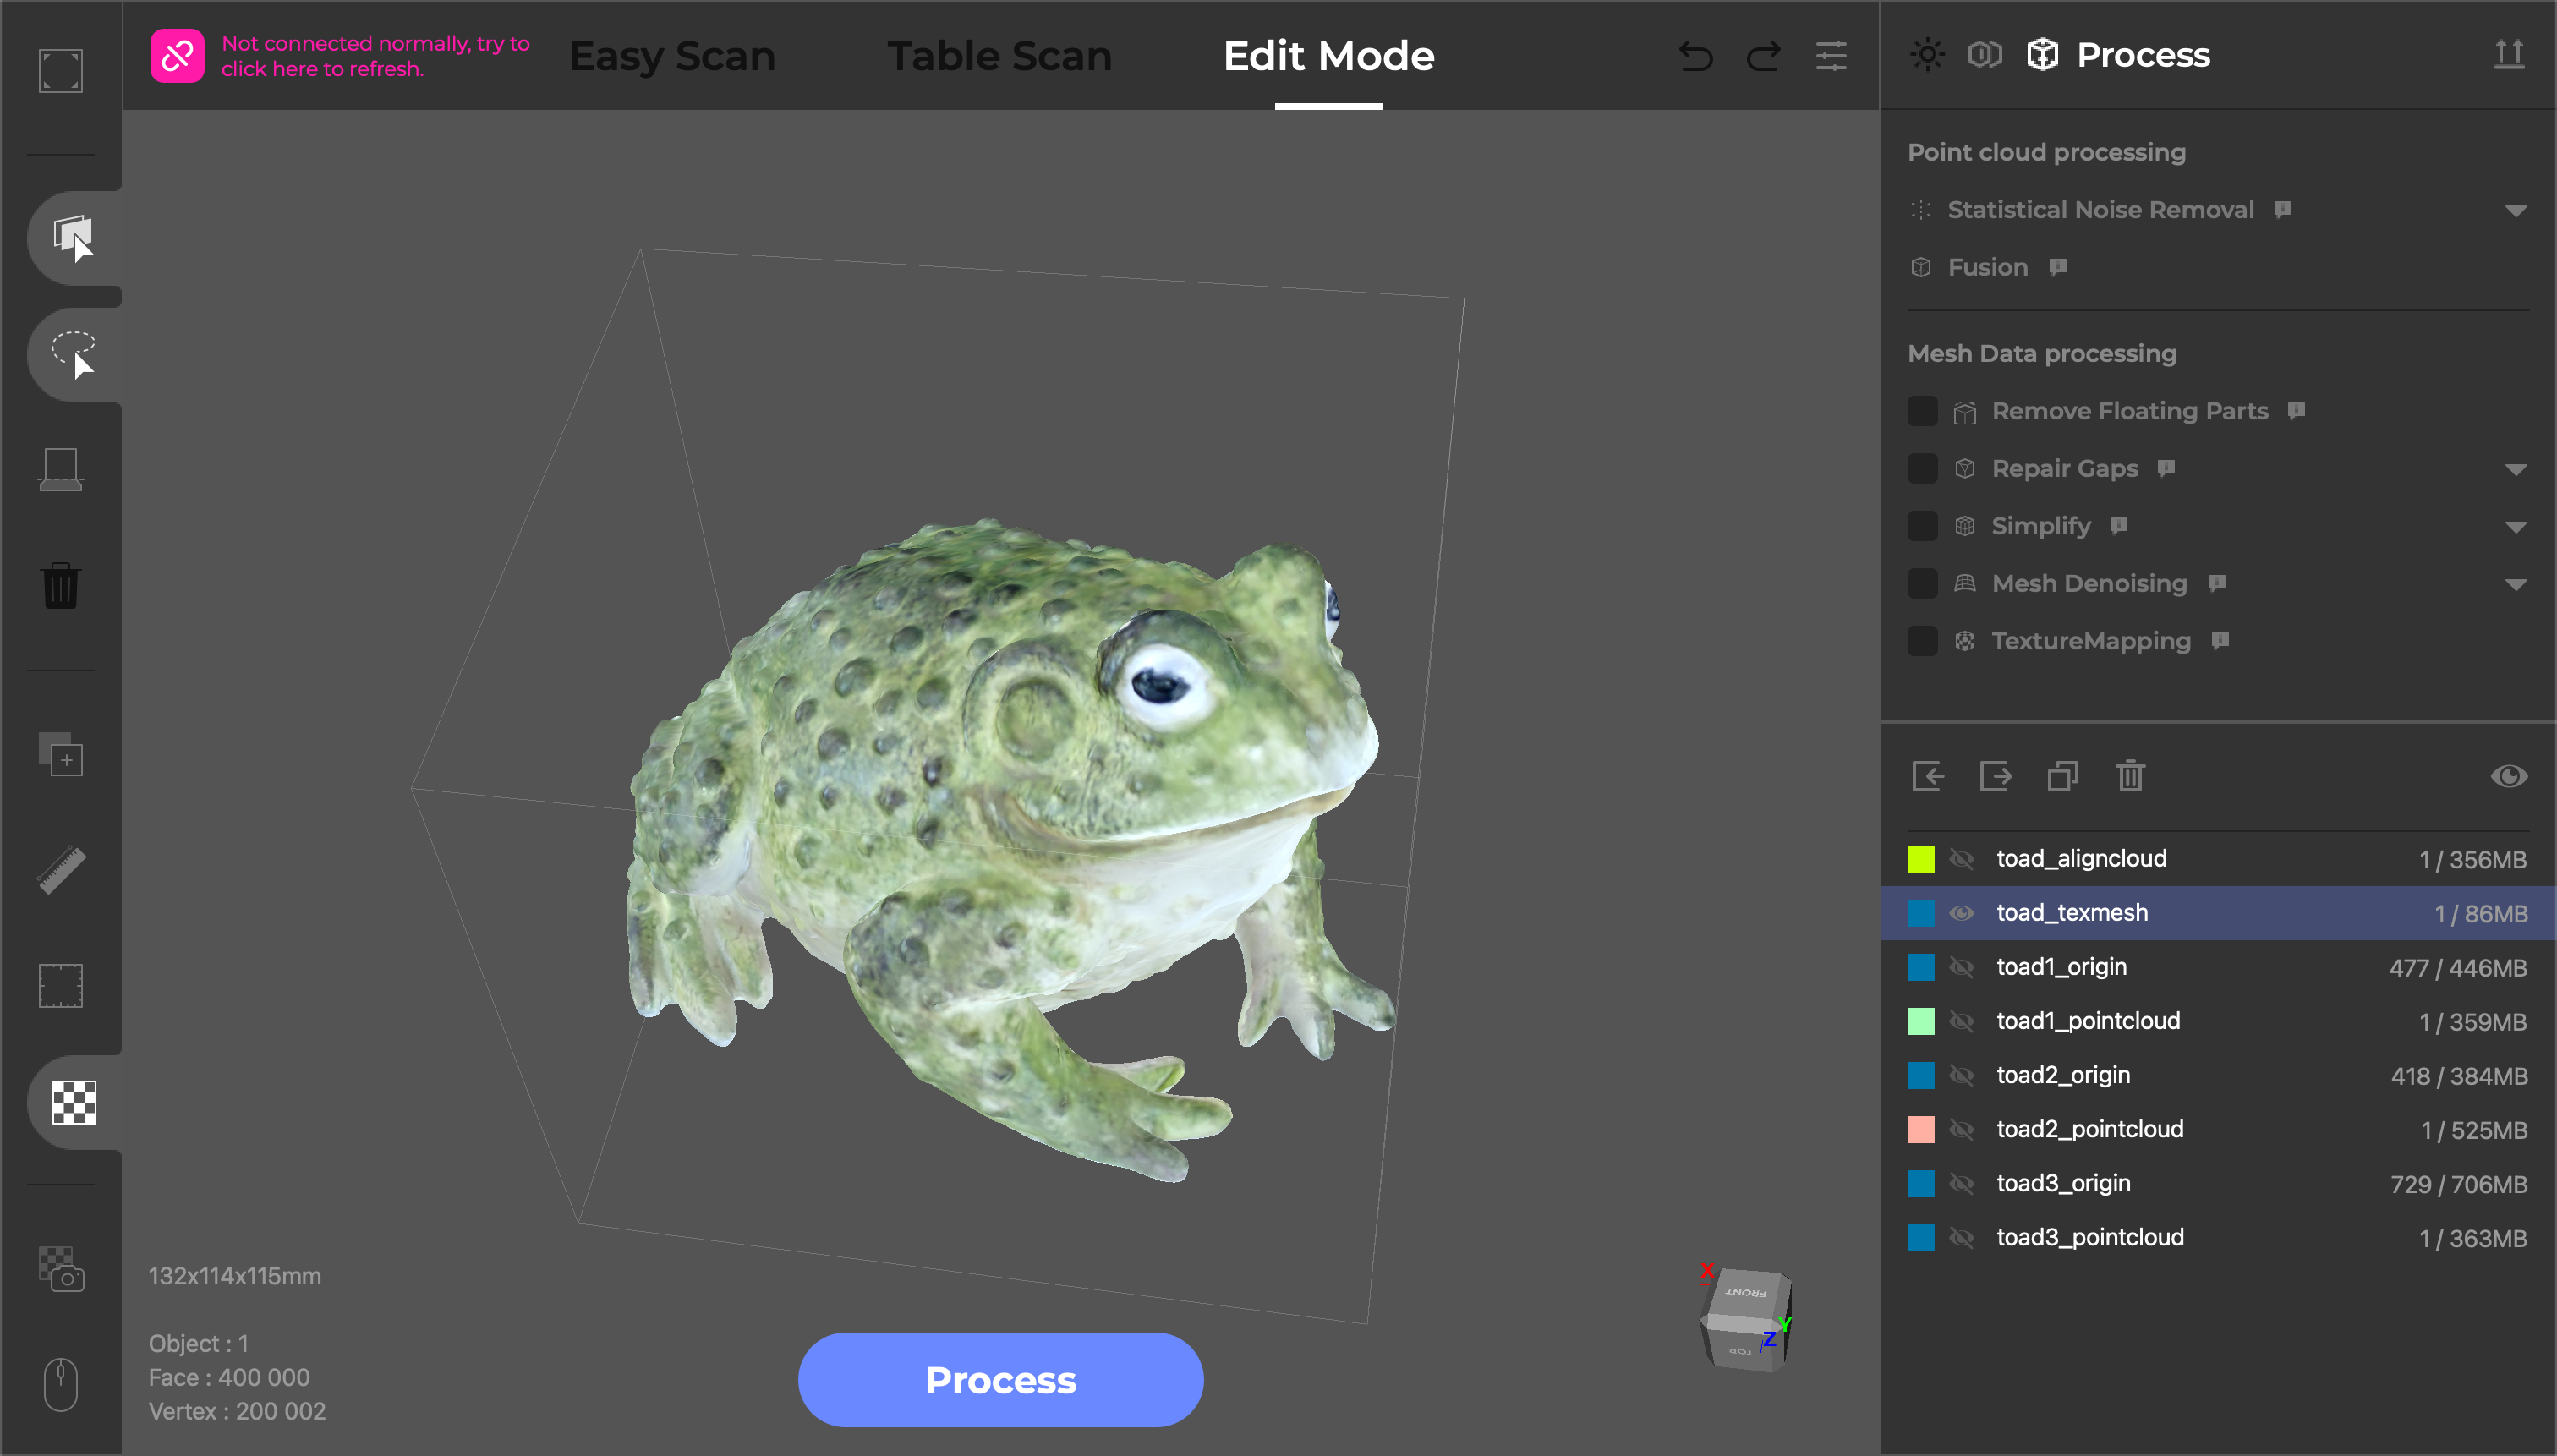
Unfortunately, the color texture was washed out and I was surprised to see blurriness on some of the surfaces and a general lack of clarity. I ran the Texture Mapping process a few times just in case I had missed something, but I wasn’t able to improve the overall quality of the color texture. A simple brightness or contrast slider would have been ideal for color textures like this, but neither the Toucan nor the JMStudio app offer this functionality.
The Toucan has a “Base Removal” tool which will automatically detect a flat surface under a model and trim the points from the point cloud. This is a very useful tool in handheld mode and also worked well when using the included manual turntable. It works well for models that are organic or curved, but it would sometimes identify flat faces on models I scanned and fail to capture those surfaces.
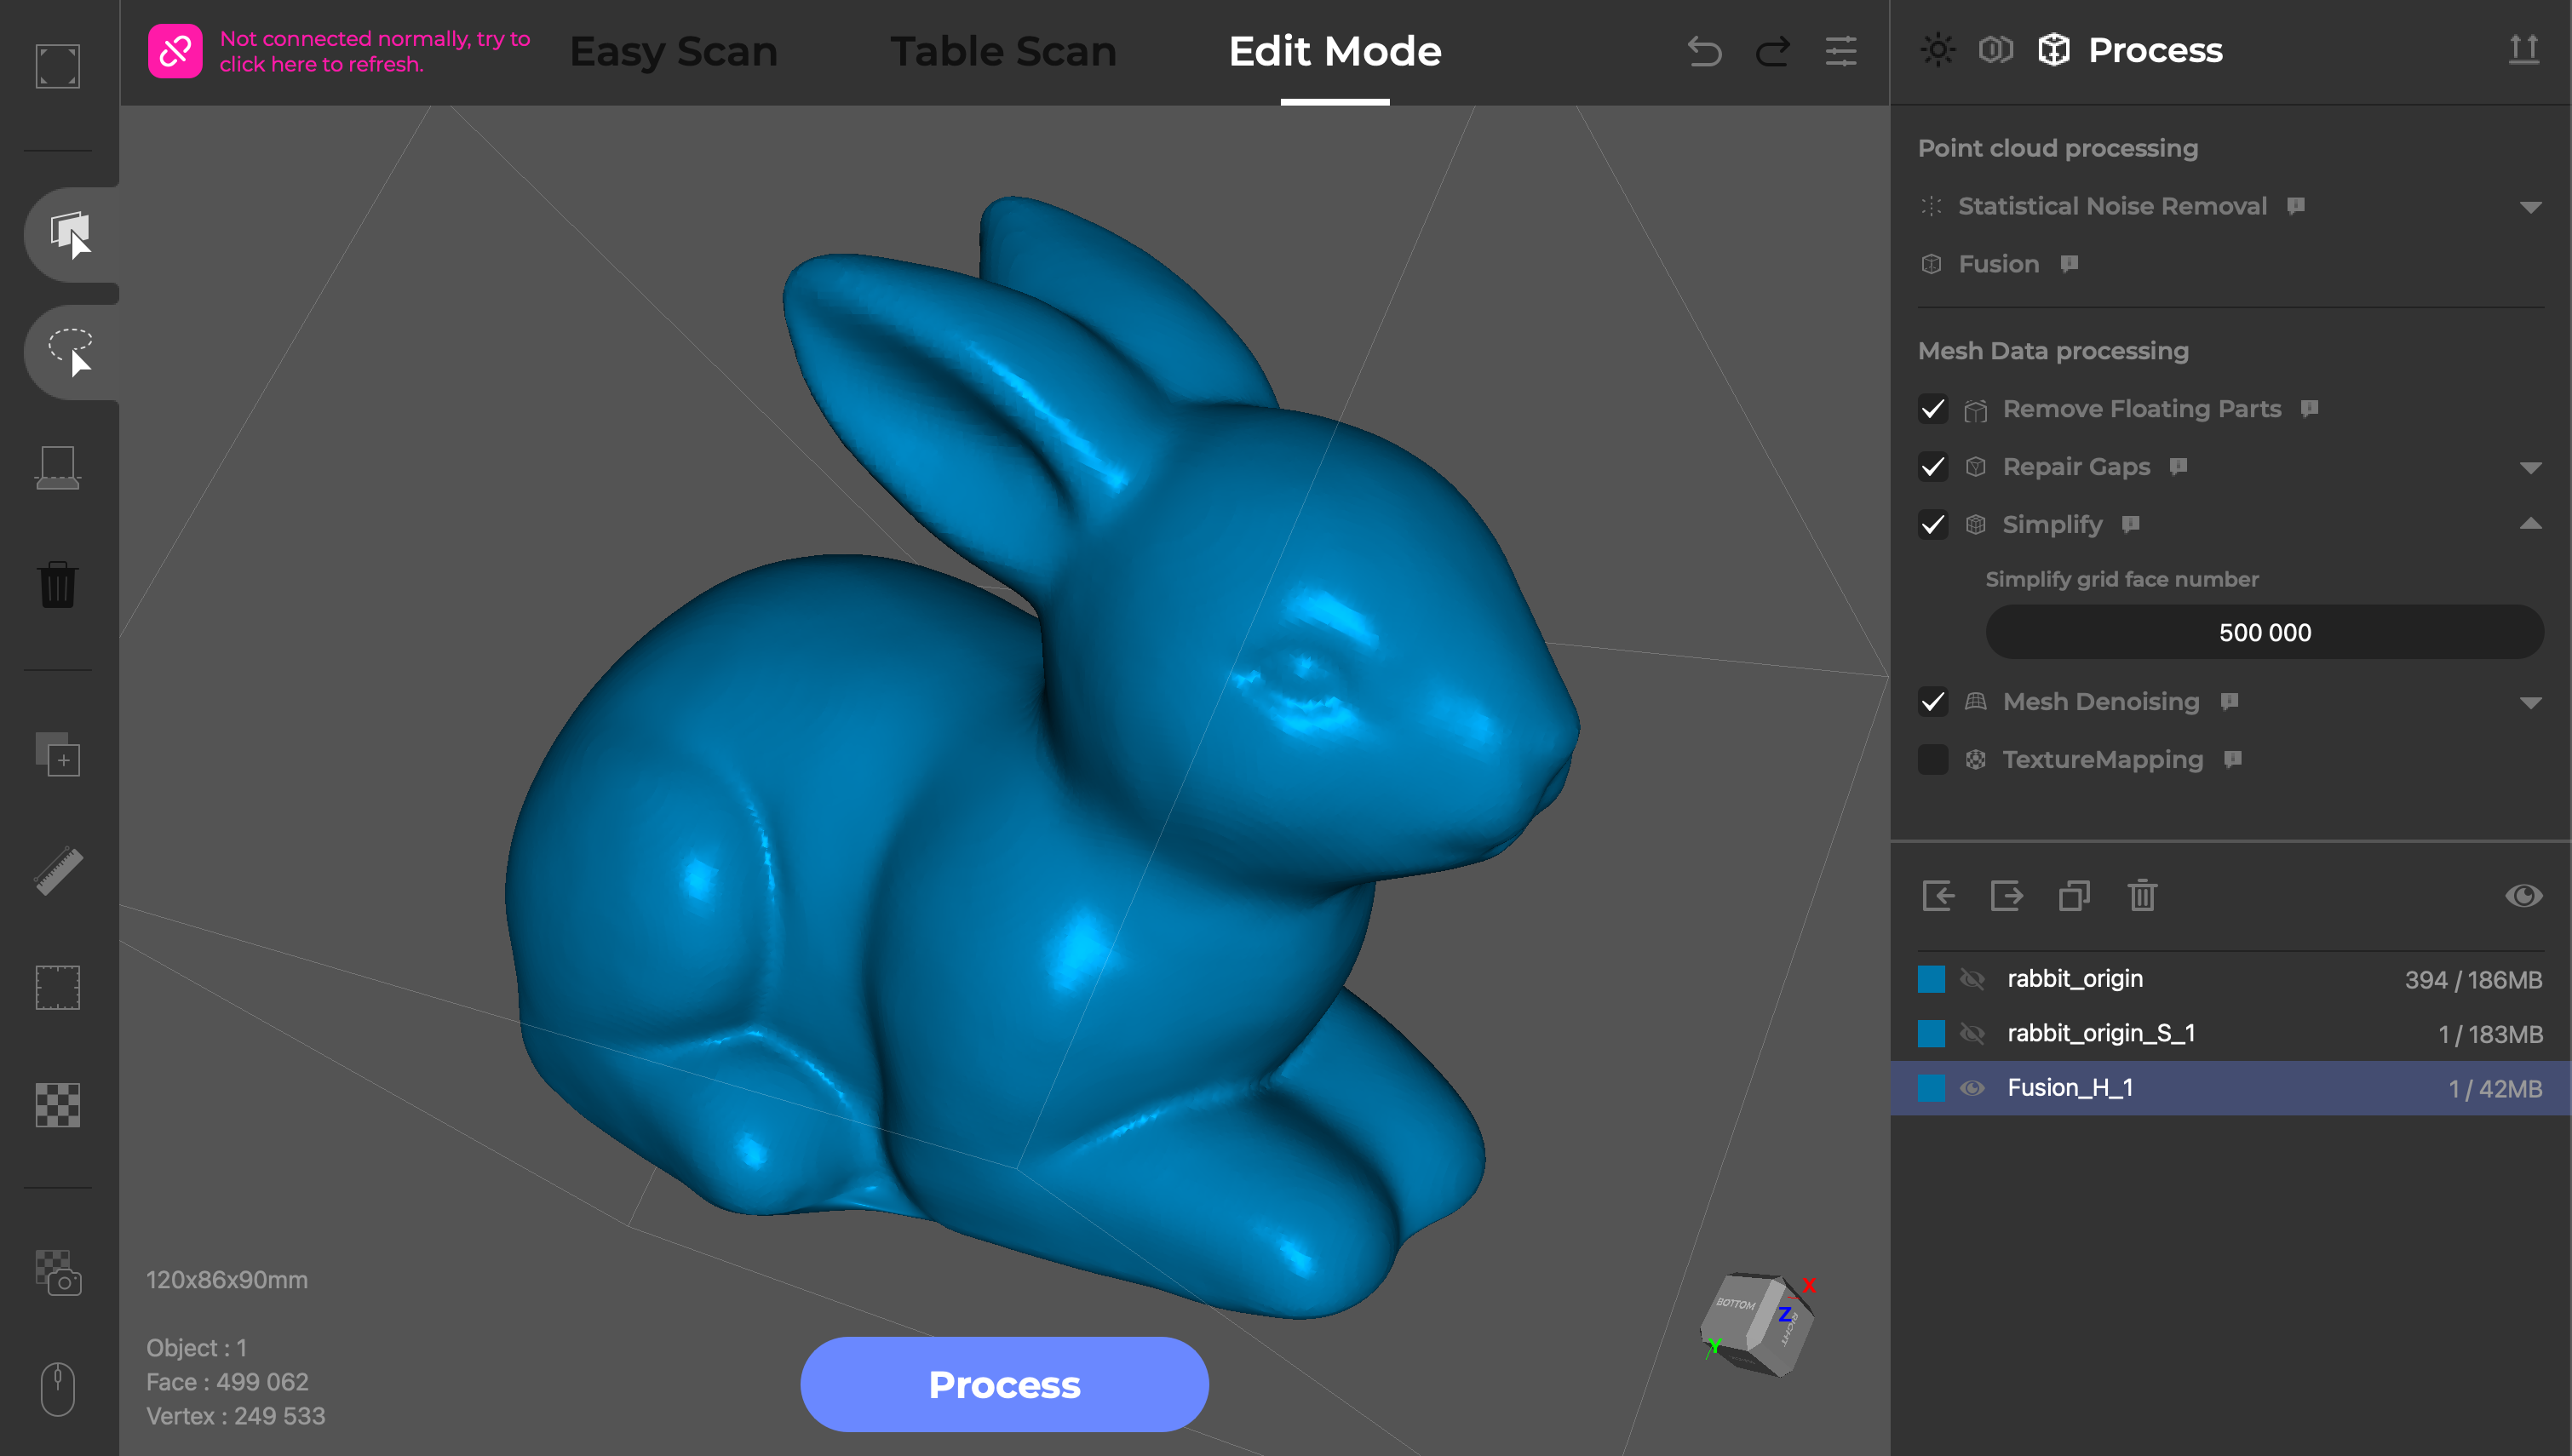
I only used a single rotation of the turntable to capture this scan of a concrete bunny, but the dense point cloud still had 2.4 million points and was more than enough to create a smooth mesh in the fusion step. There were a few small holes under the chin and in some of the areas that the scanner didn’t capture, but the Repair Gaps tool handled them easily. The final triangulated mesh had 499,062 faces and was 38.2 MB in size after the simplification step.
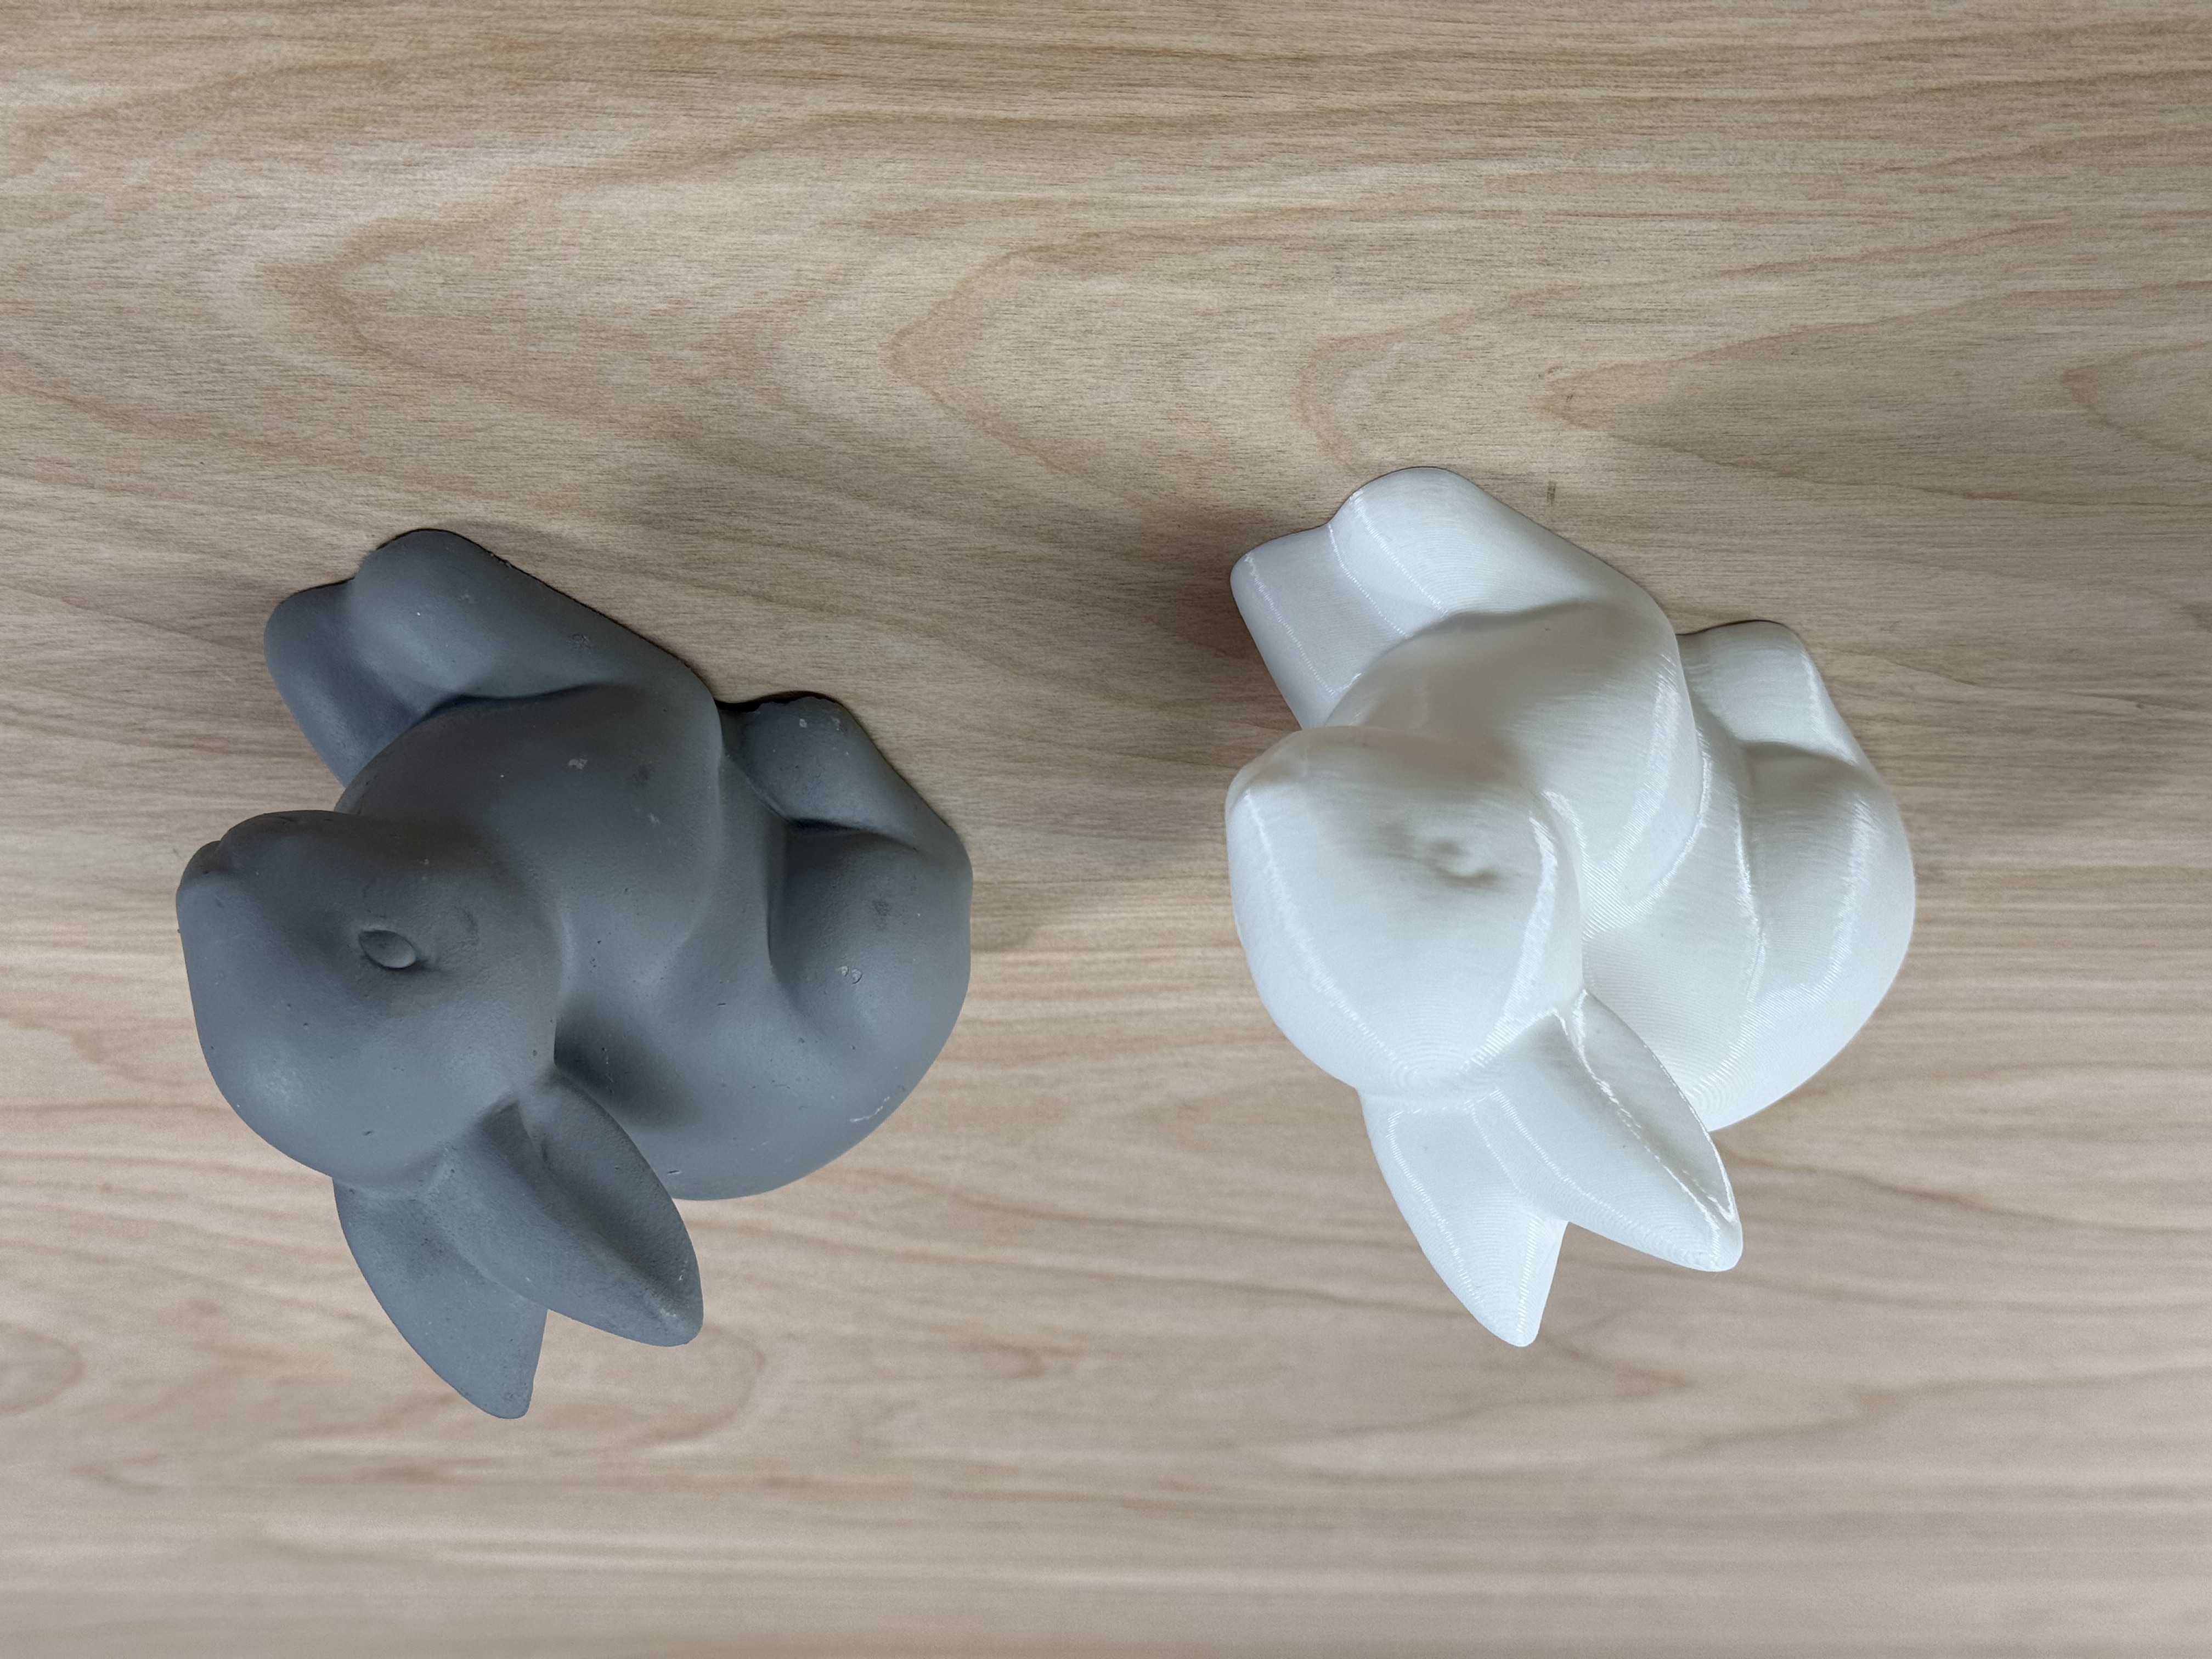

The generated triangle mesh was exported as an .stl and printed on a Bambu Lab X1-Carbon using PLA filament. The curves of the model were accurately captured, and the scale appeared perfect without any adjustment. Because I used the geometry tracking mode, the surfaces were all captured accurately and the model looked just like the original.
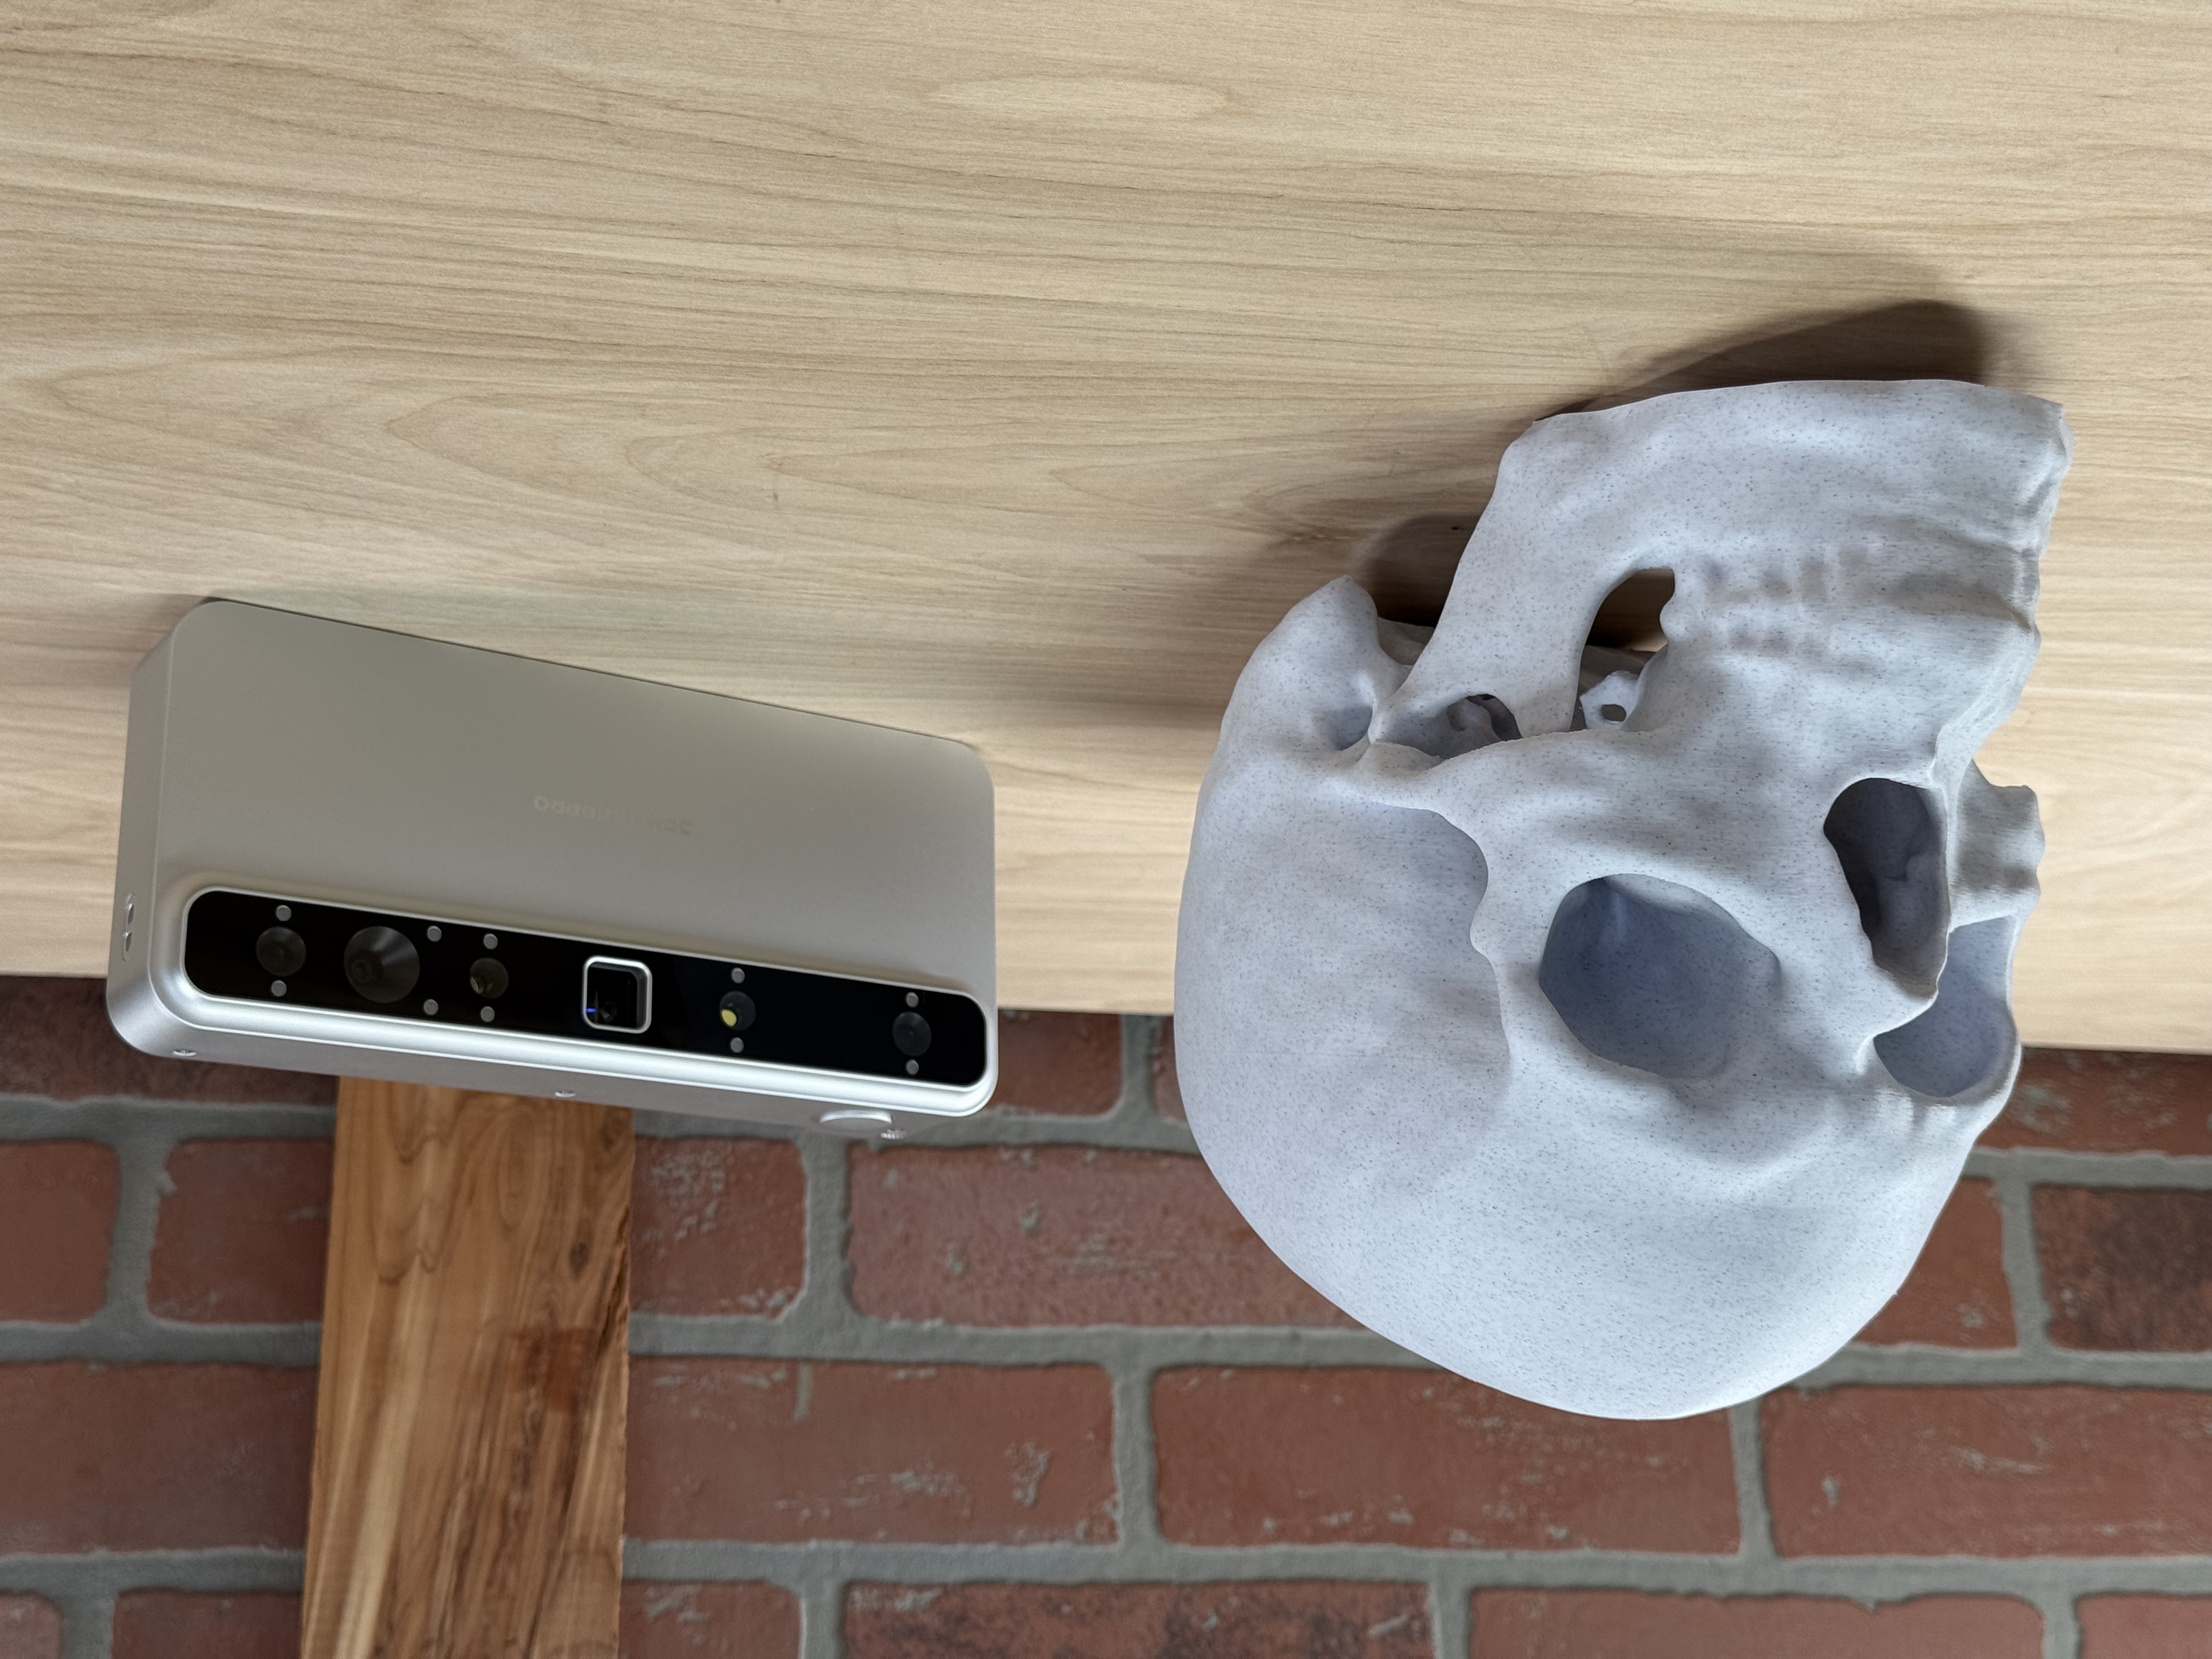
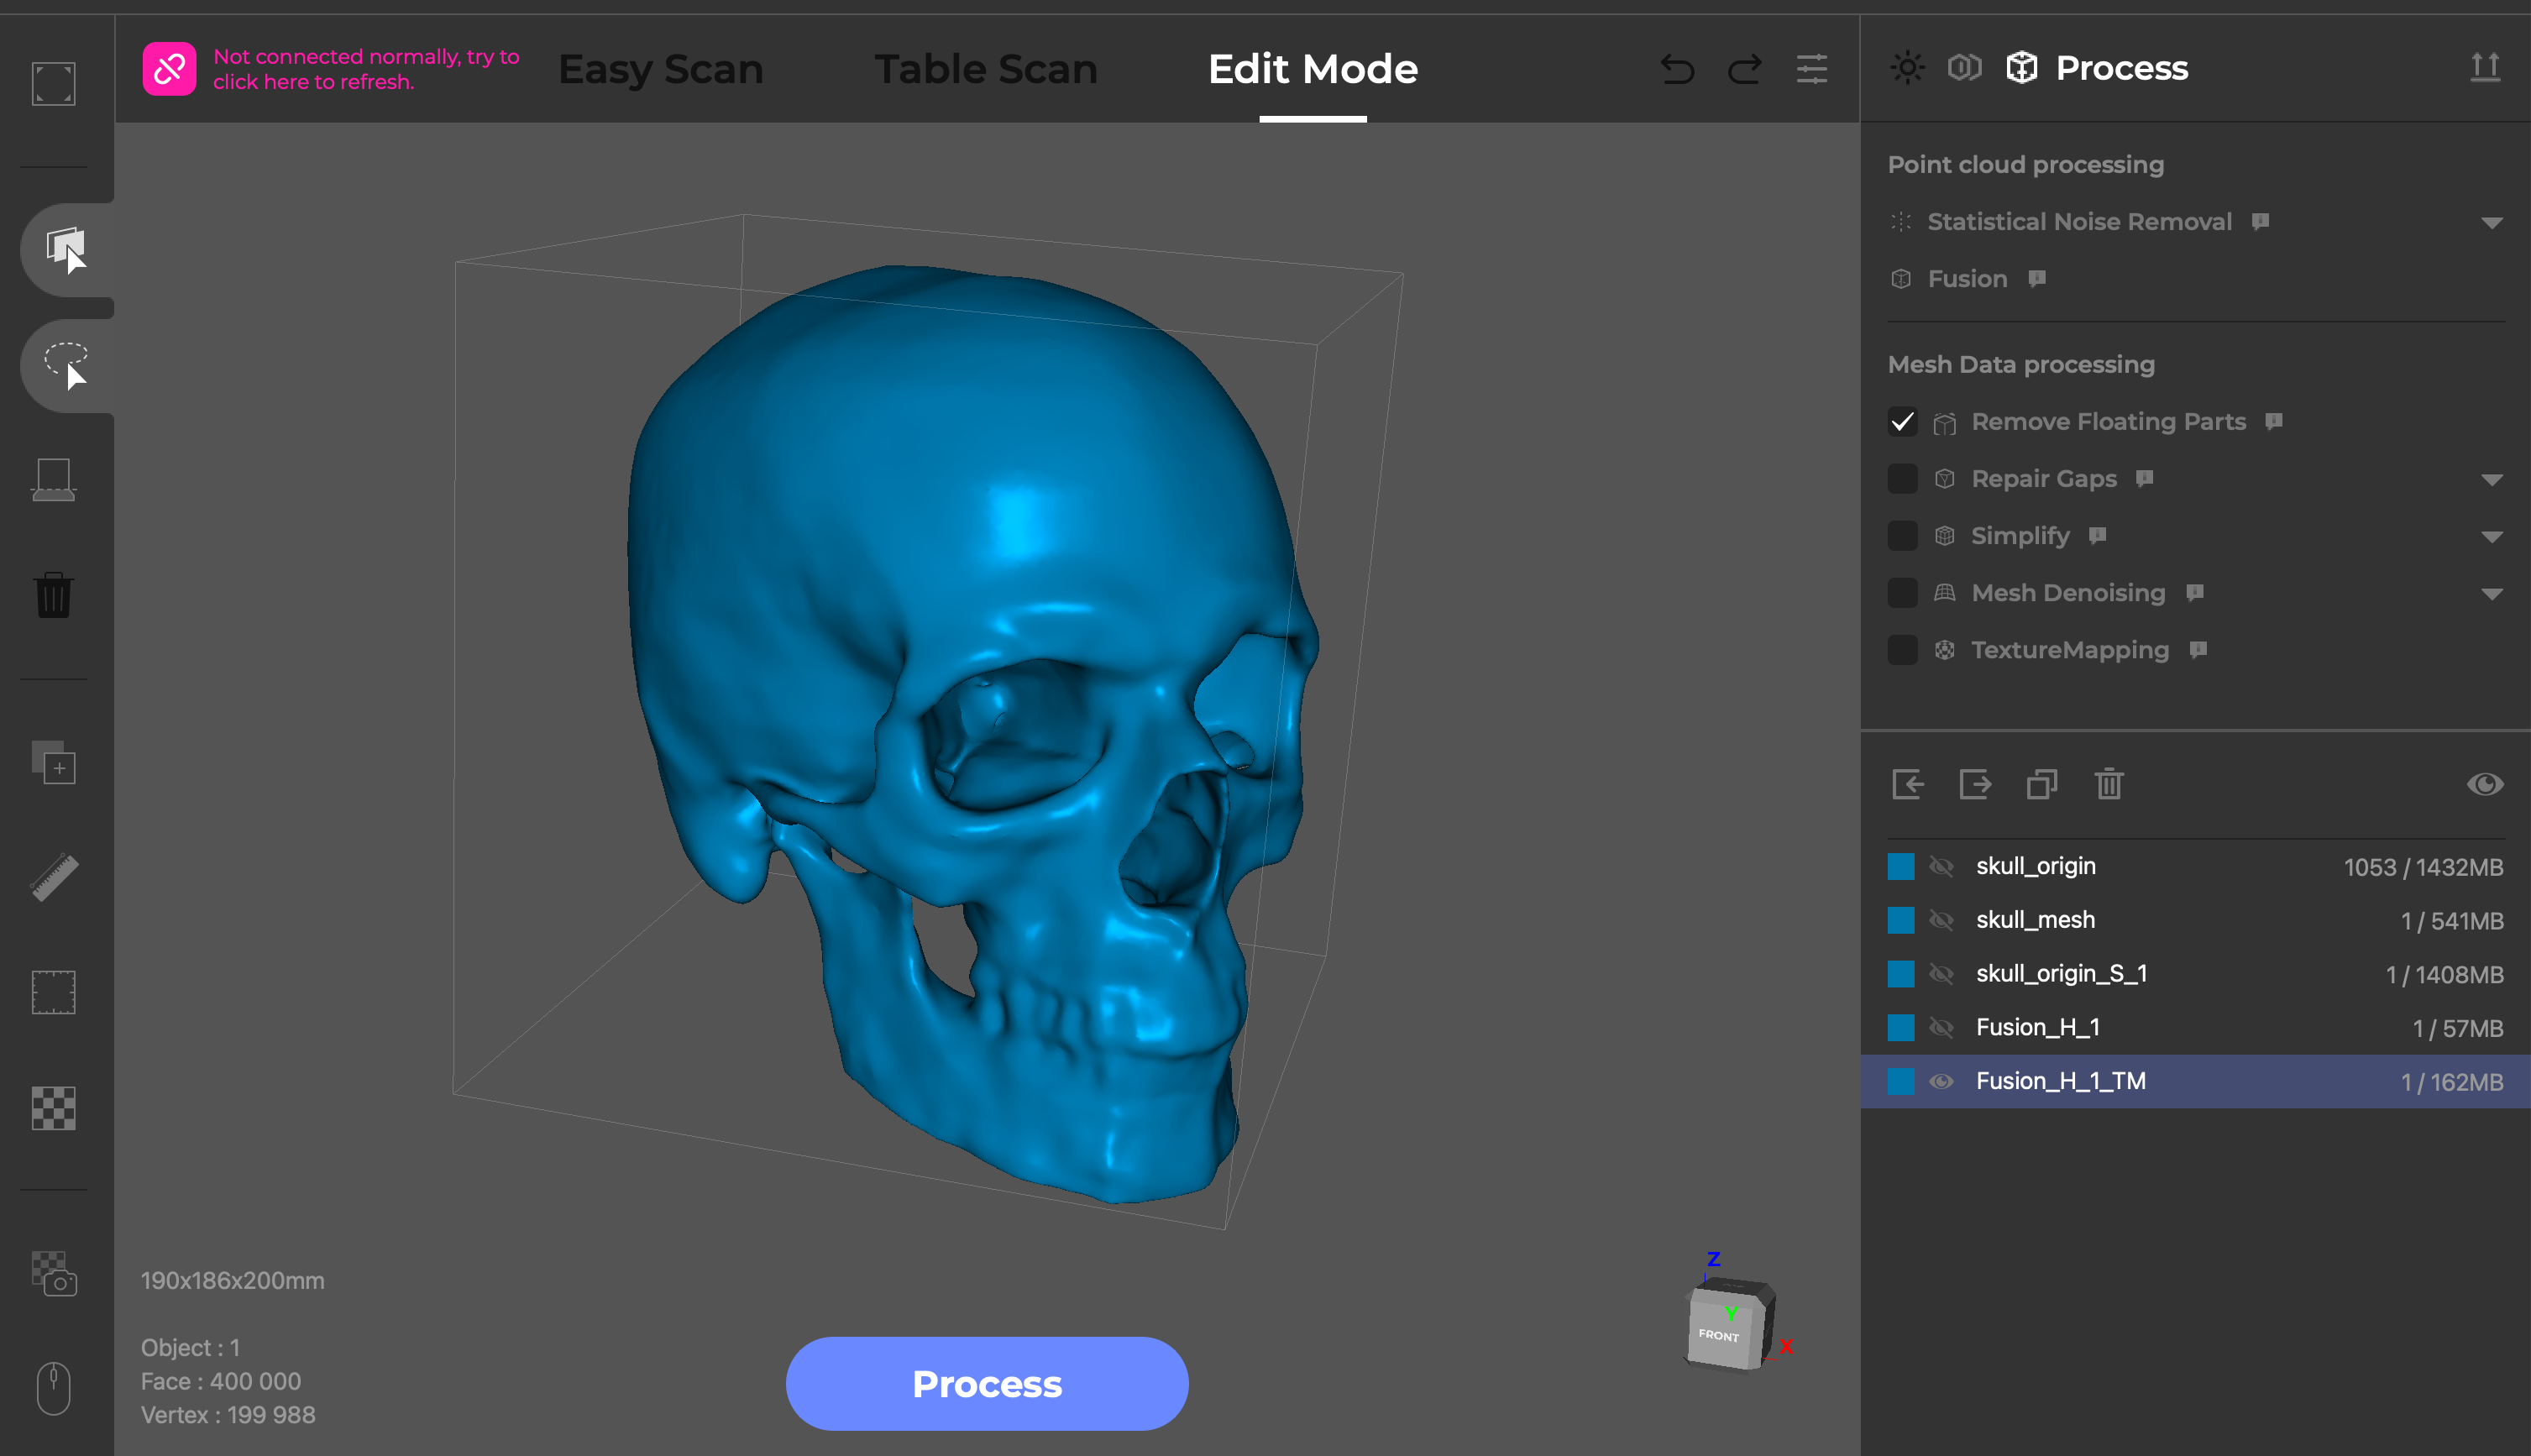
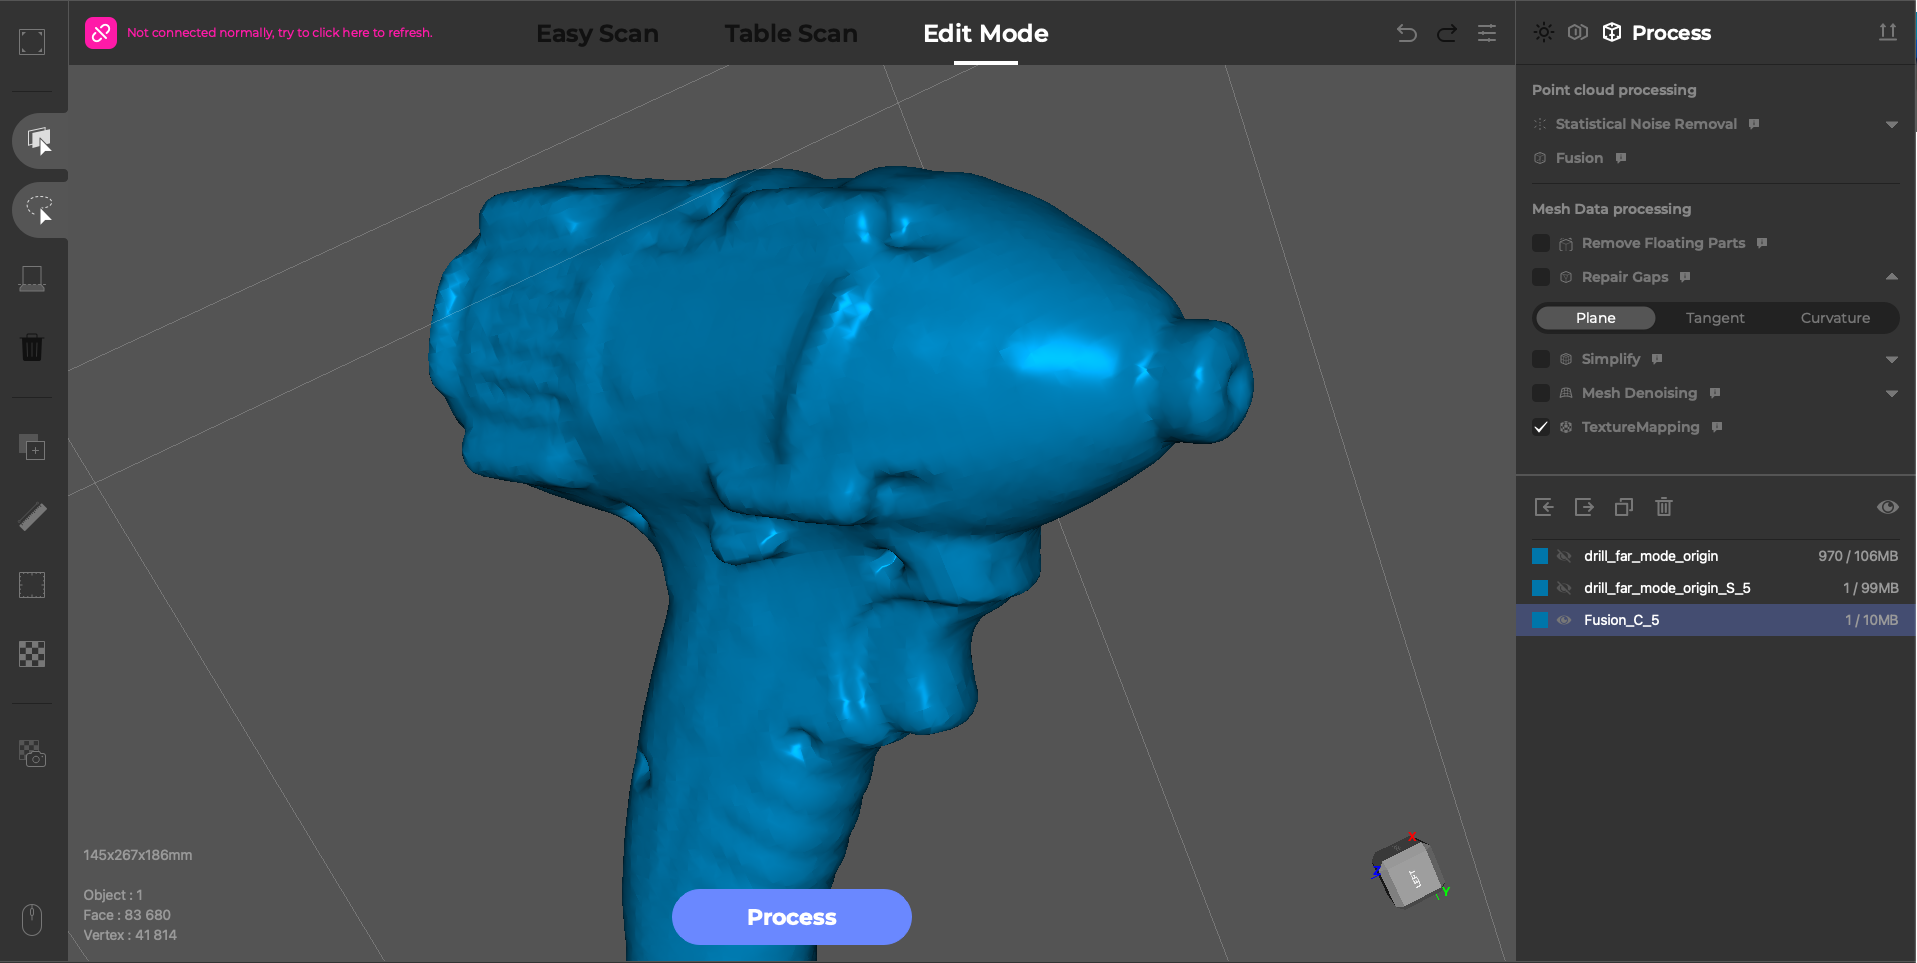
I wanted to try a model with a more complex surface, so I used this life-size 3D print of my skull that was made from a CT scan. This model has several deep recesses and lots of surface detail, so it’s a great test for a scanner like the Toucan which has an advertised capability of scanning into deep holes.
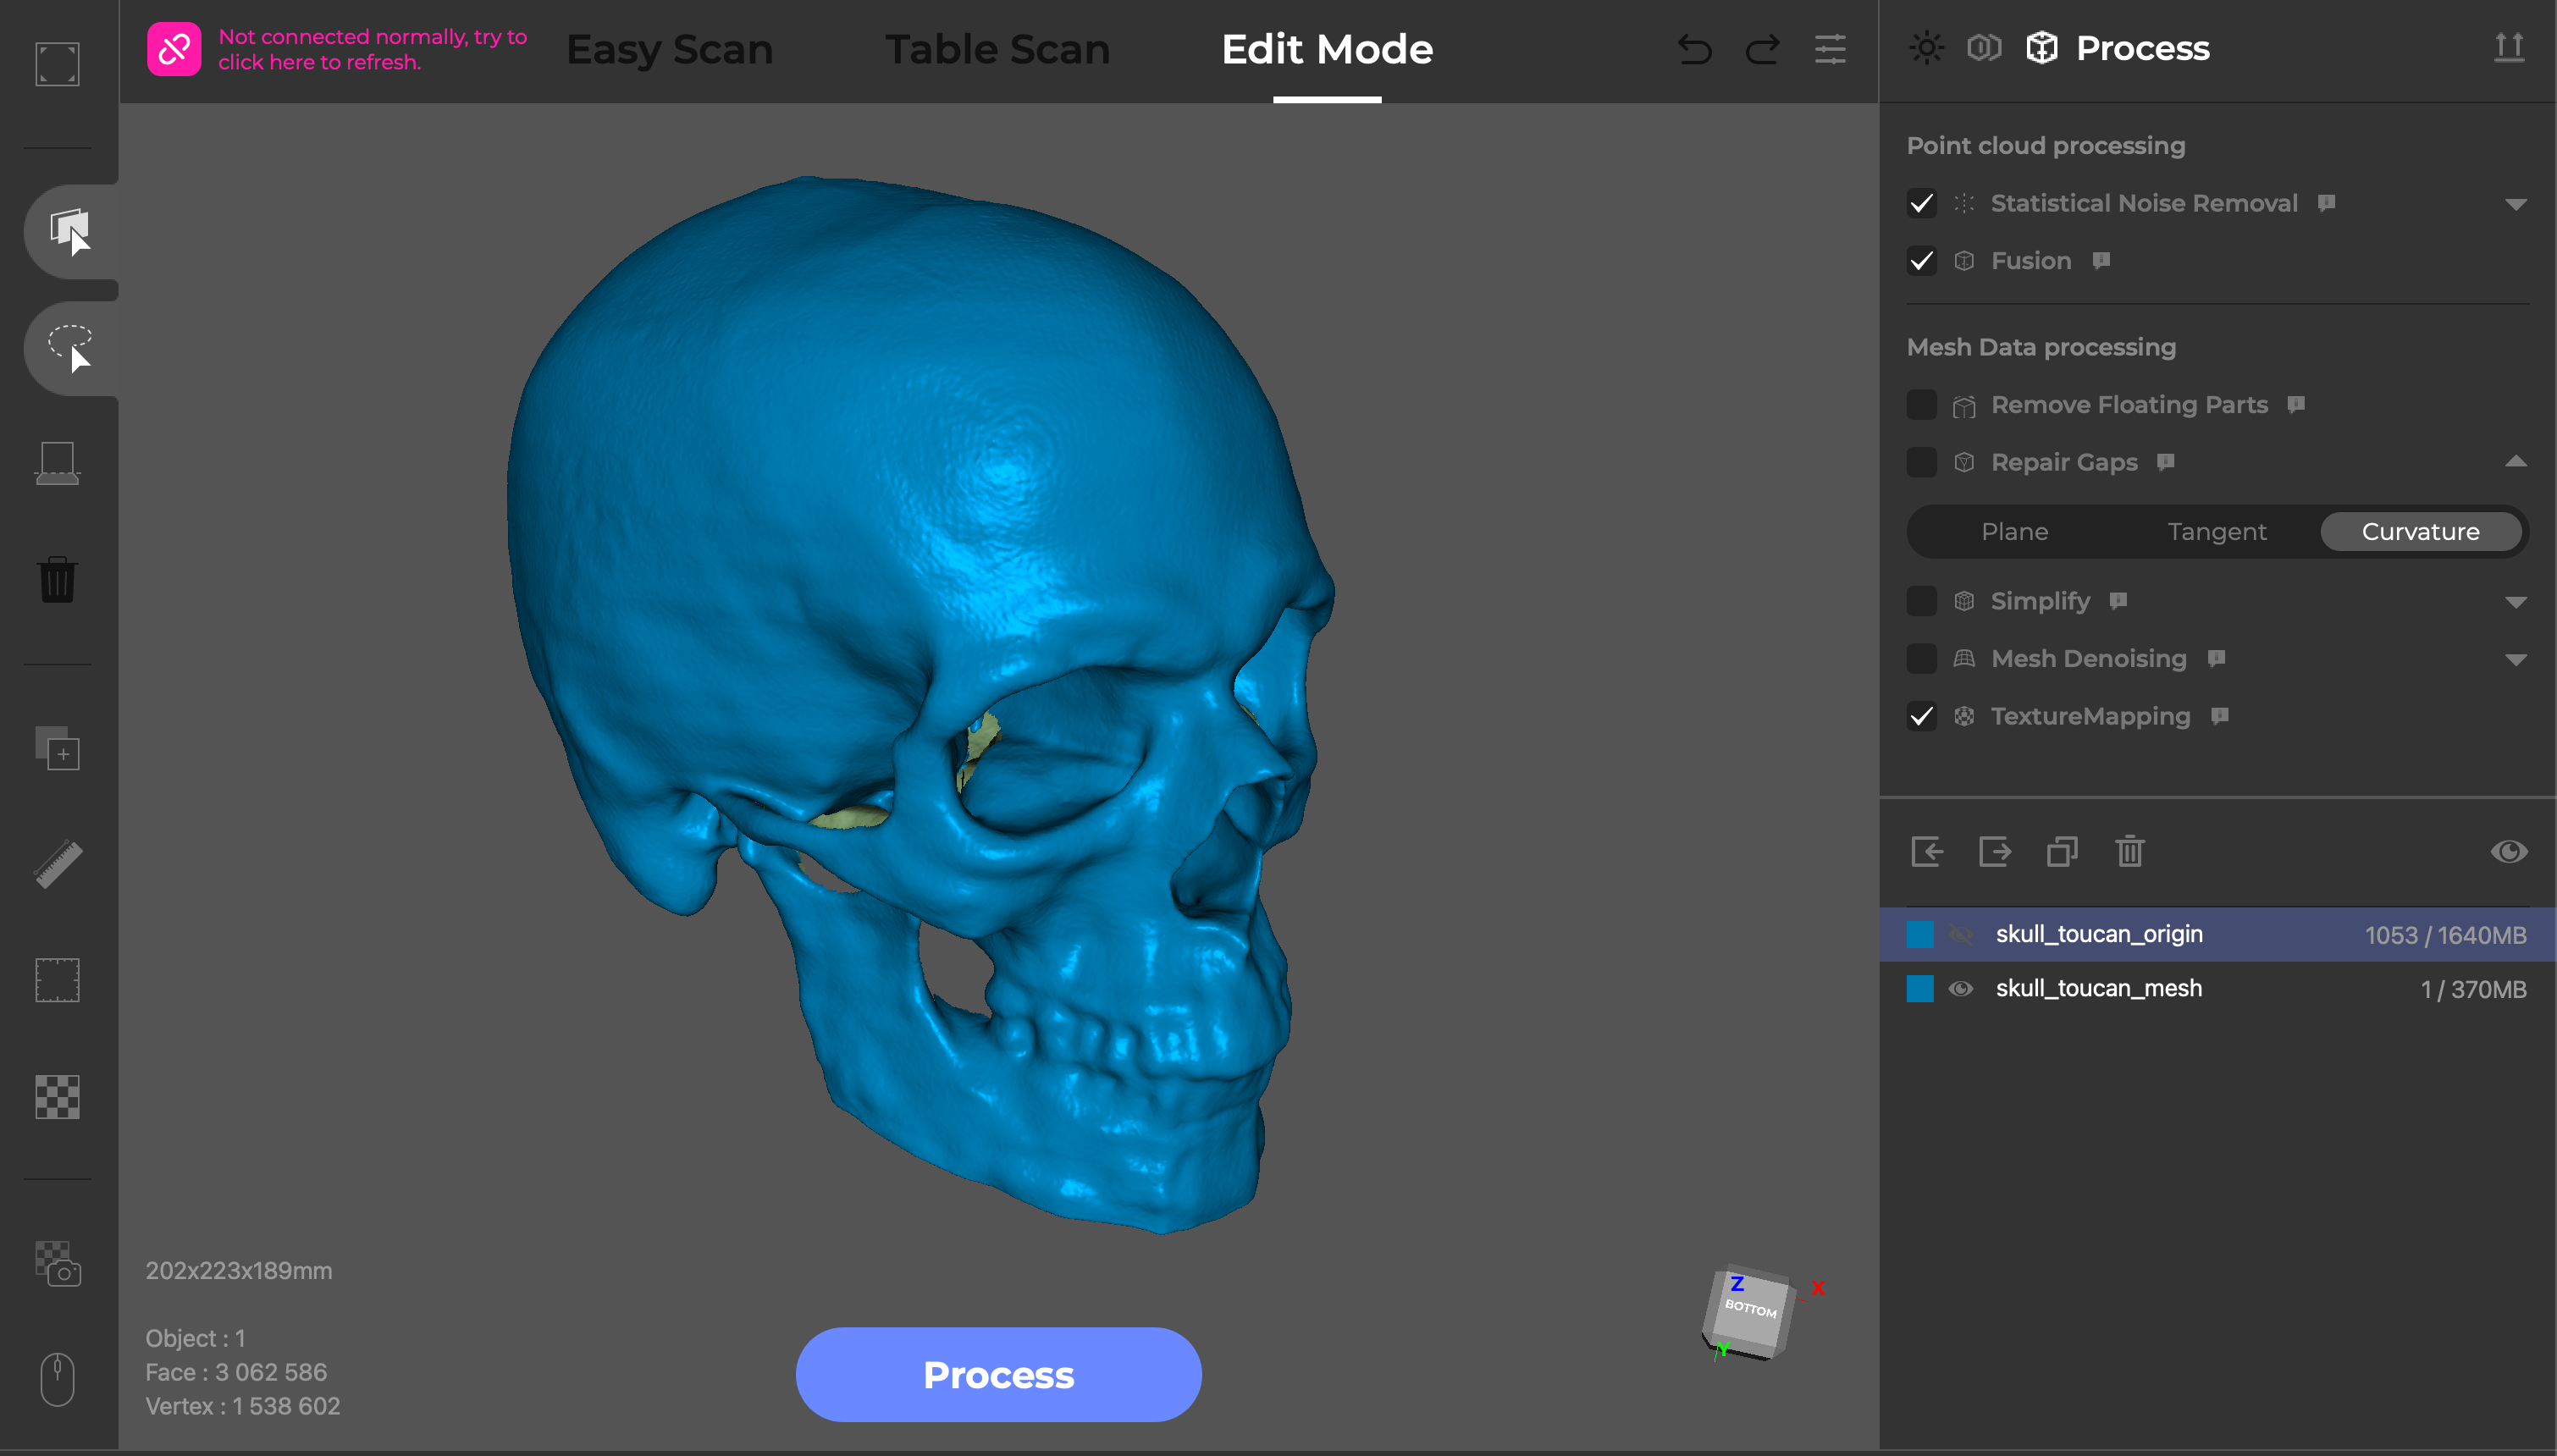
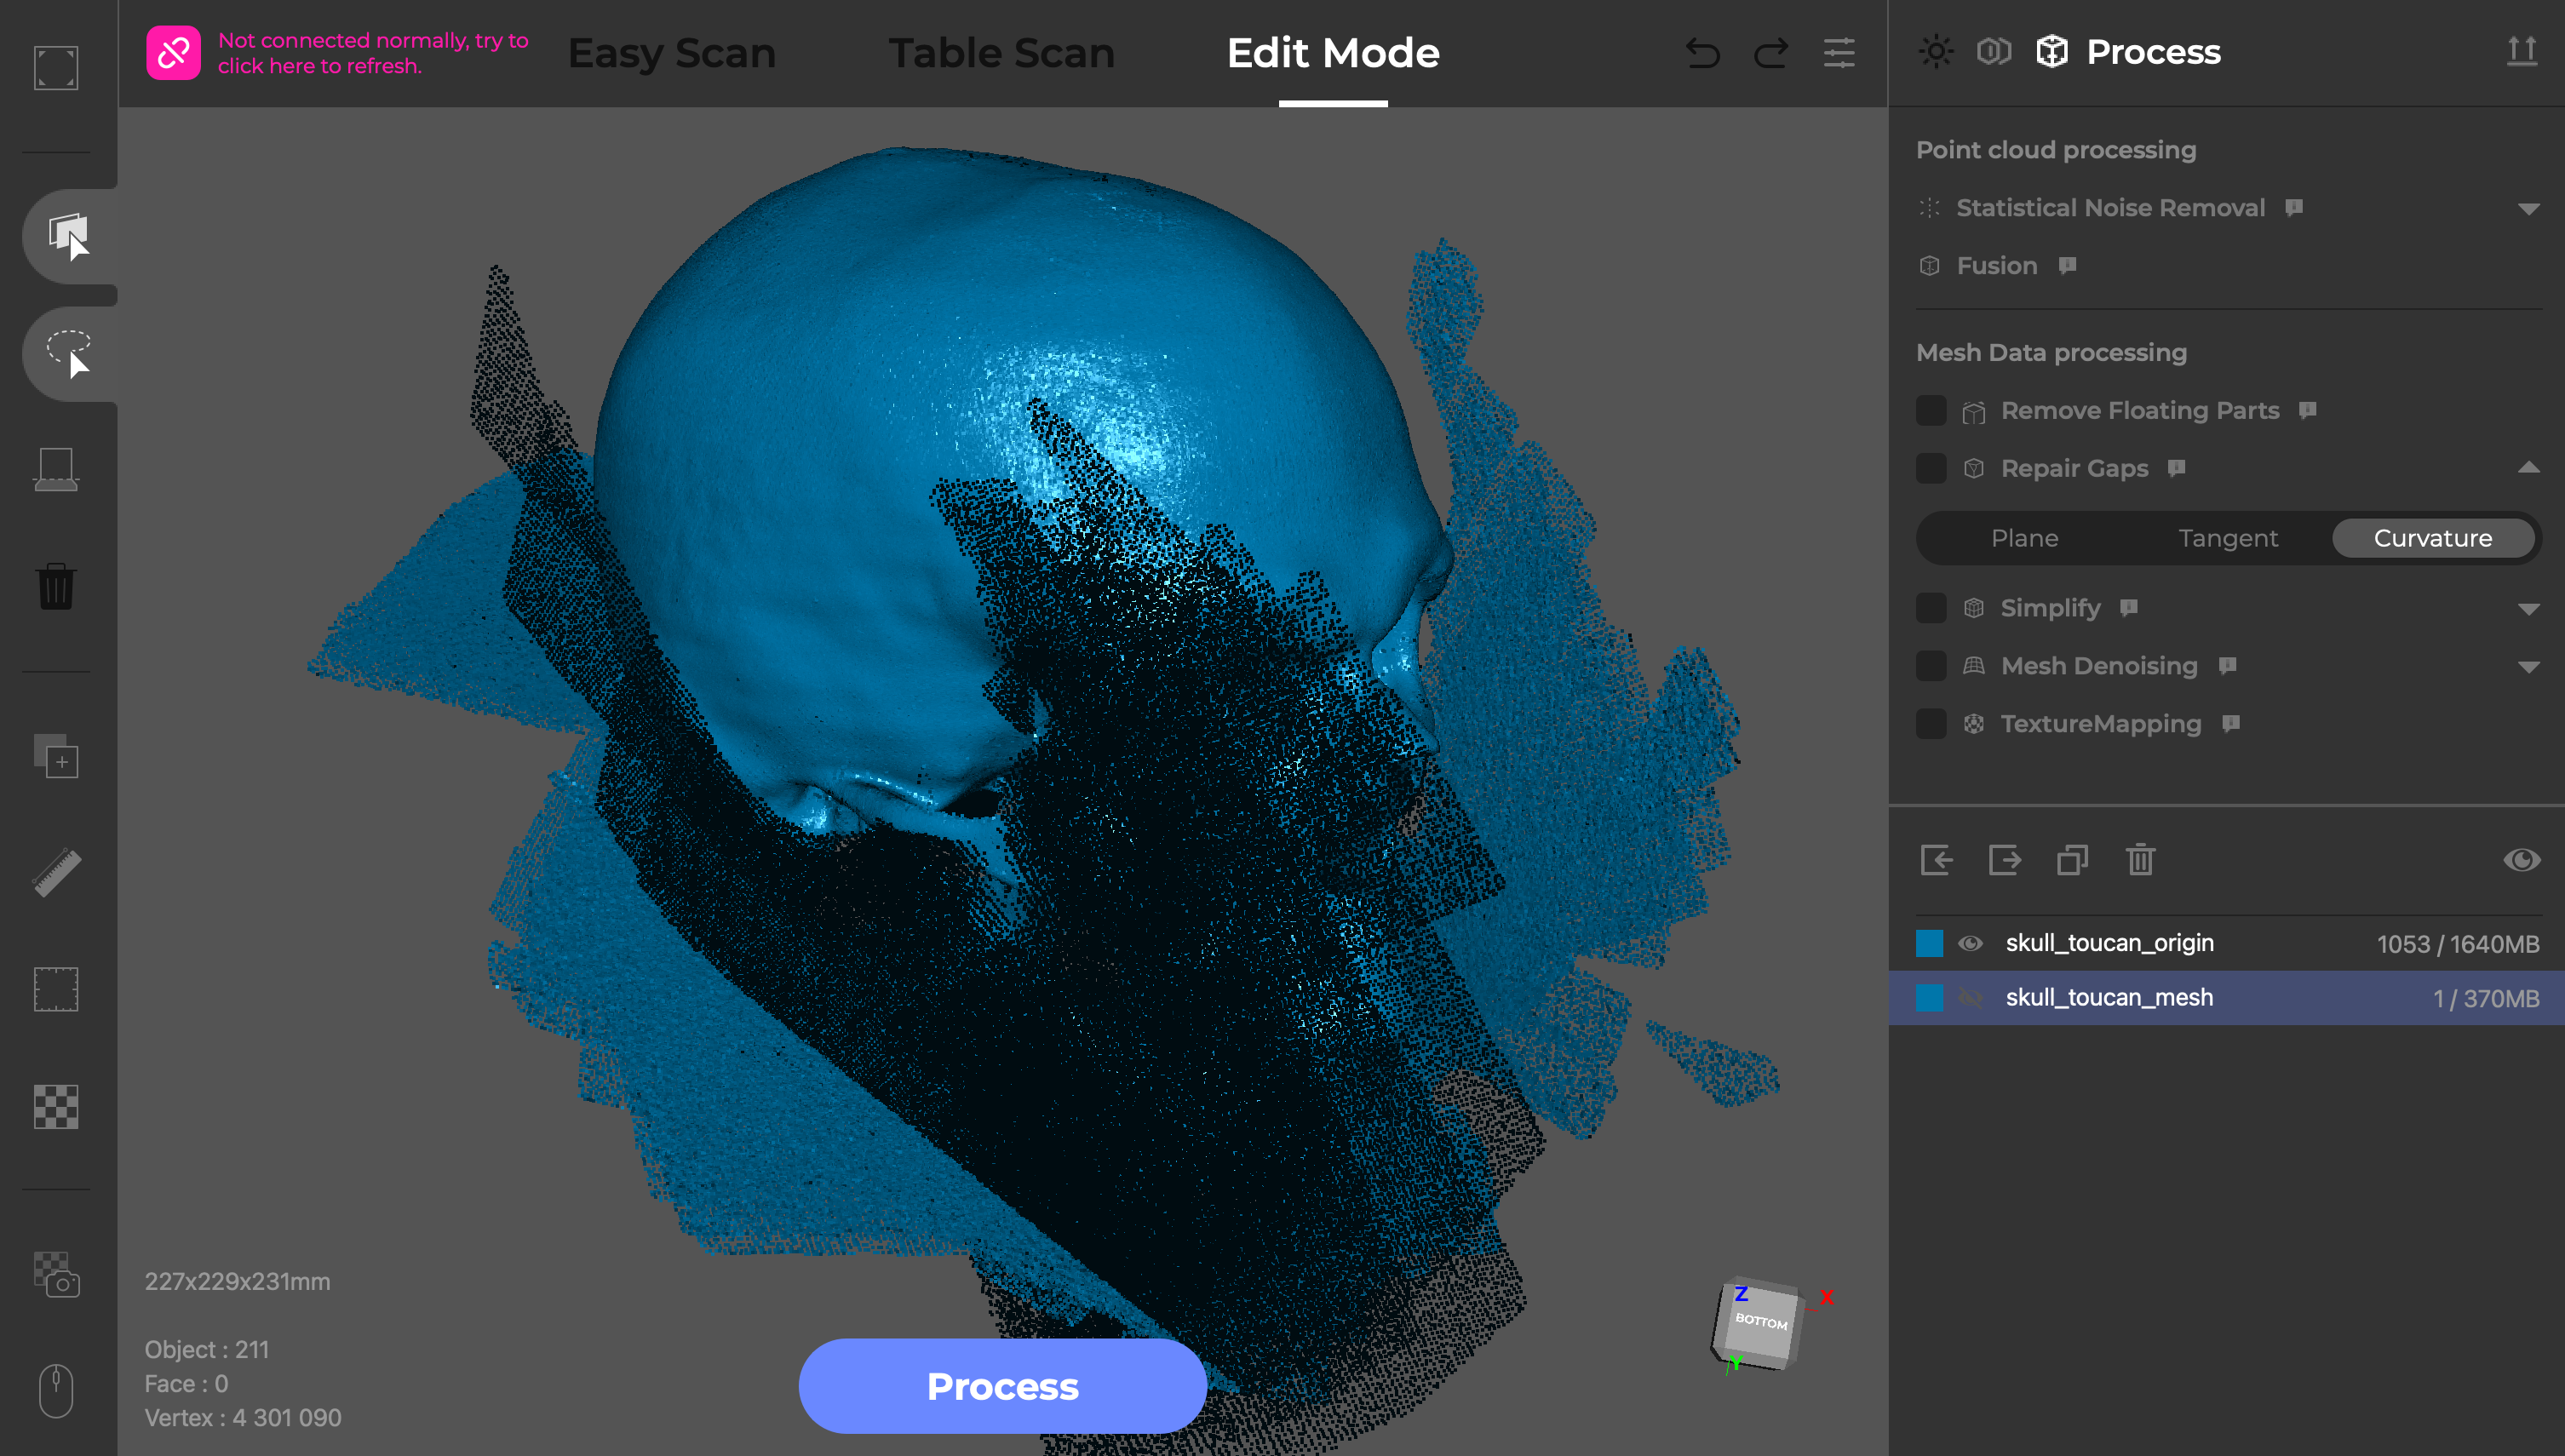
I used the Ultra Mode for quality and rotated the model three times to capture as many of the surfaces as I could. After removing the surfaces manually, I processed the point cloud using the One Click Process set to “High Quality”. The final triangulated mesh had over 3 million faces, and the visible banding from the CT scan is clearly picked up by the Toucan.
3D Scanning using Marker Mode with the 3DMakerPro Toucan
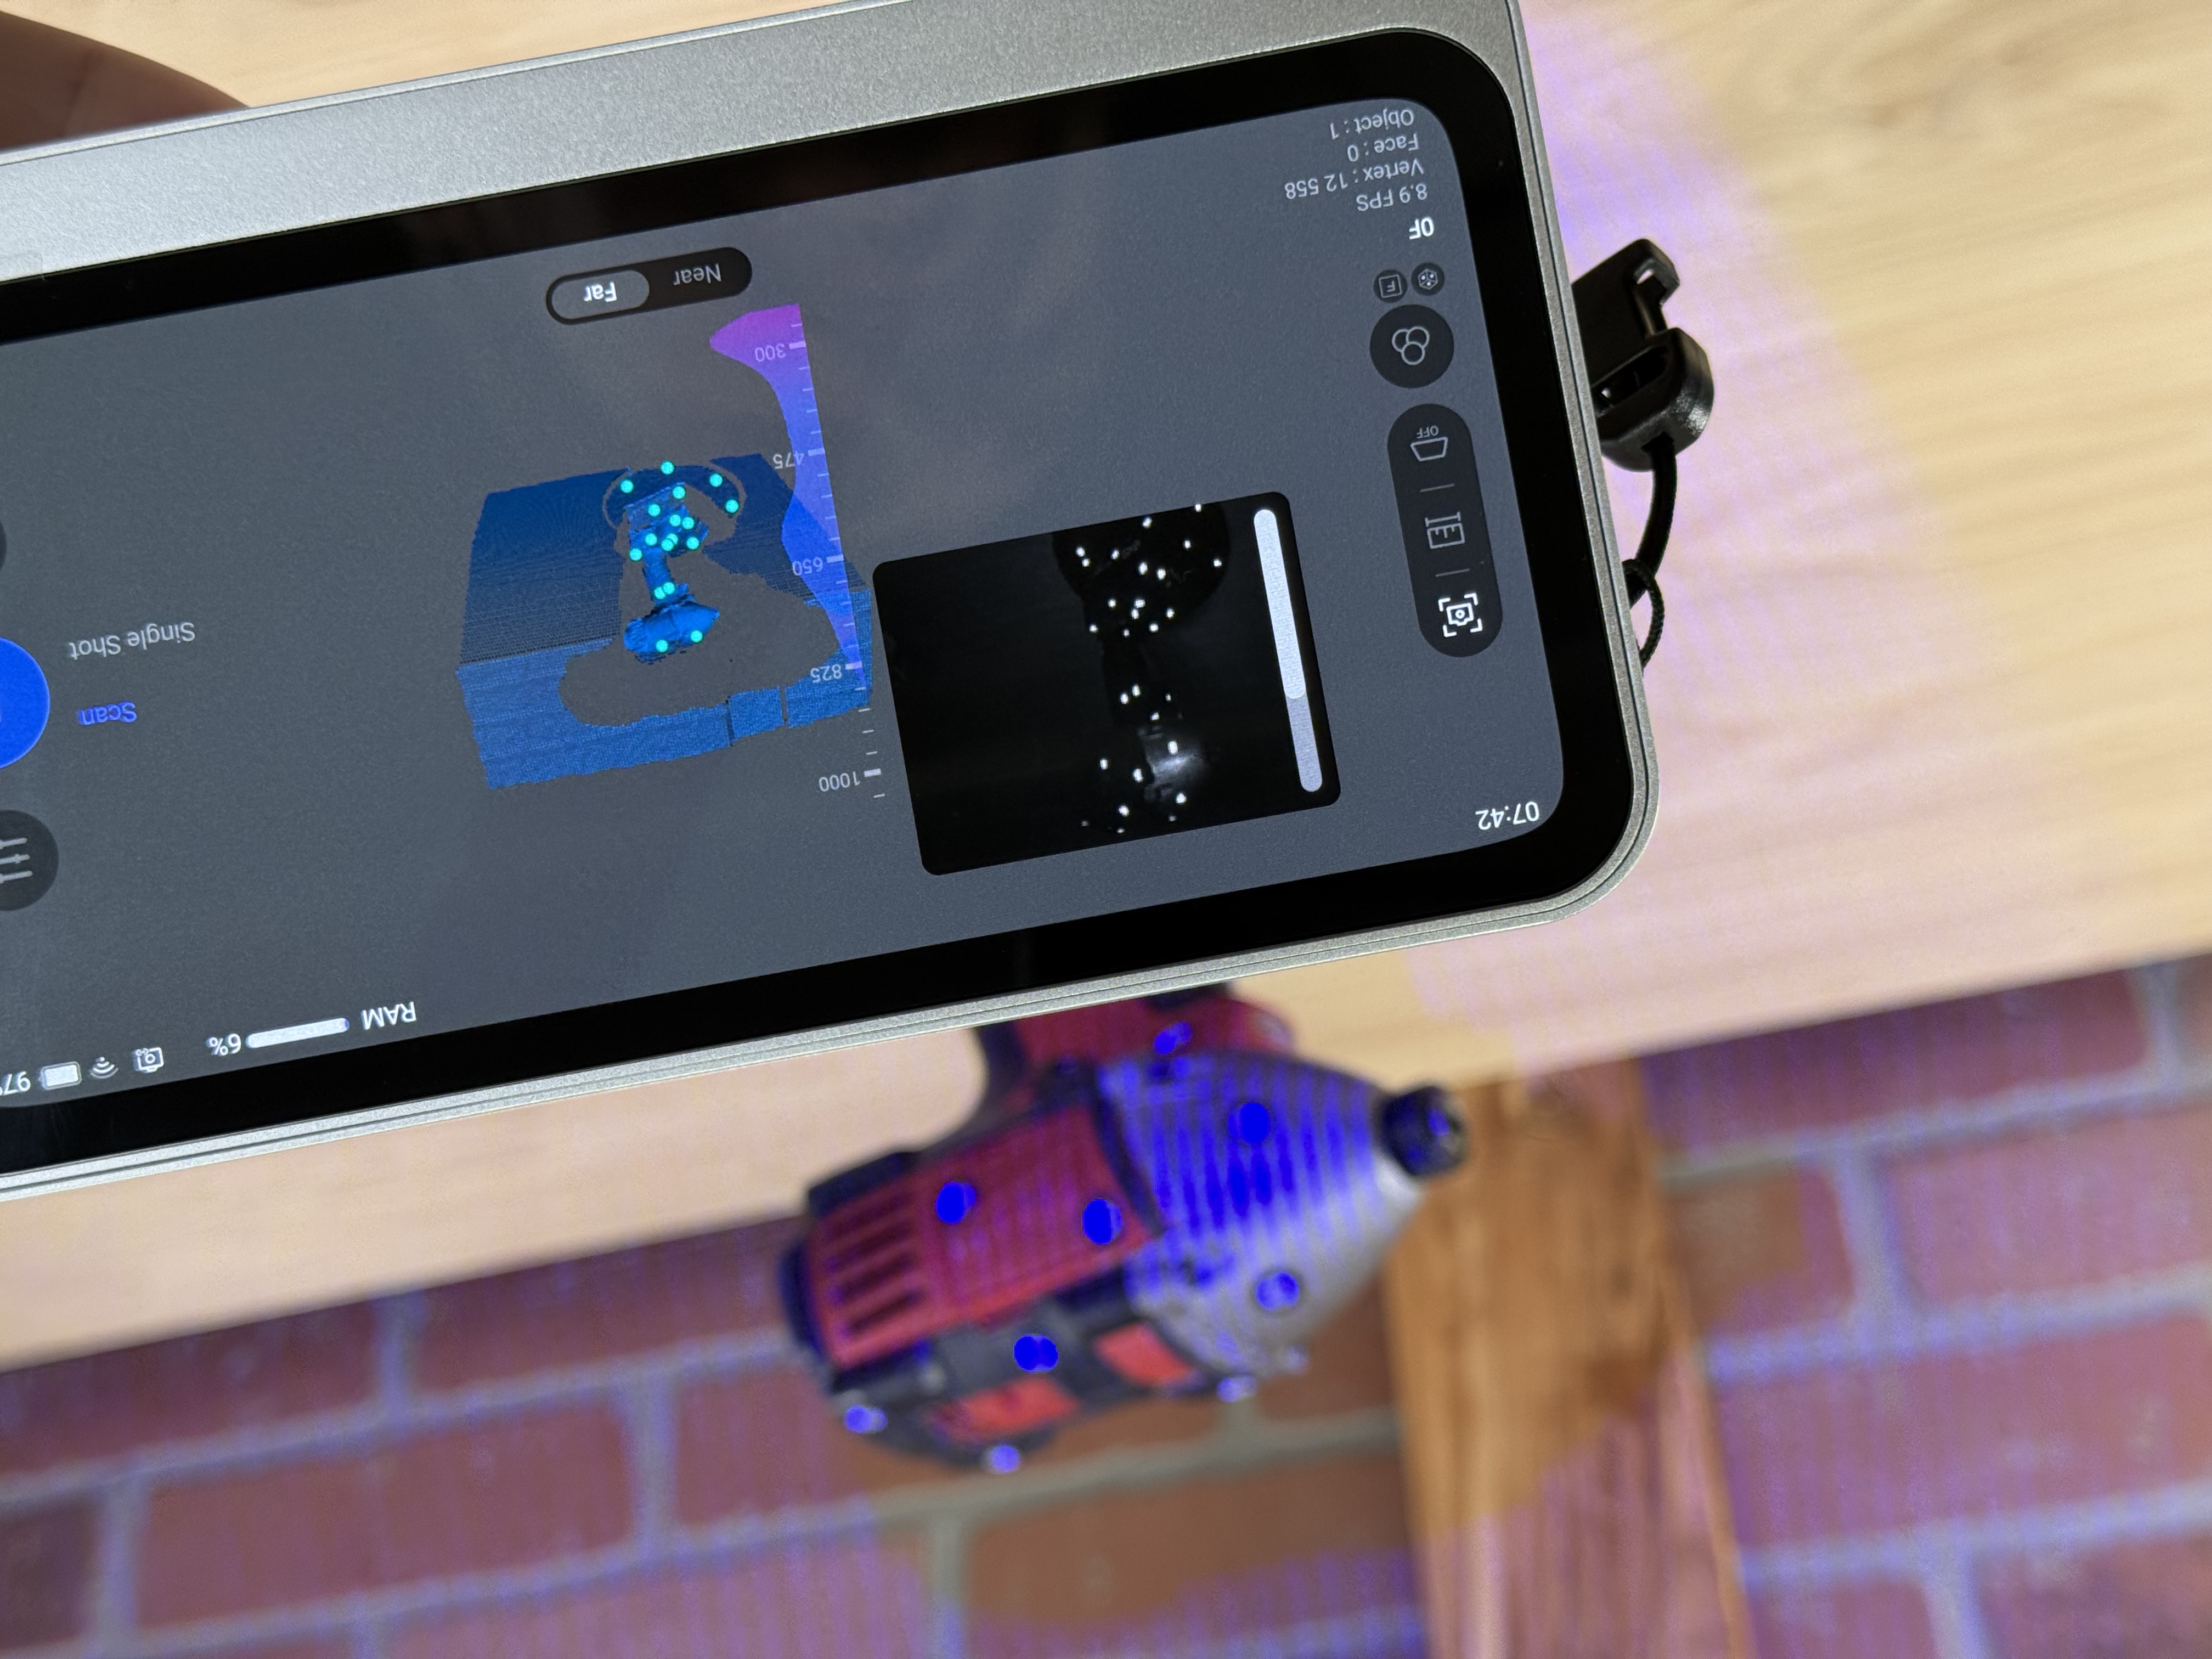
The 3DMakerPro Toucan is also able to capture scans using markers, which are used for alignment on large, complex, or otherwise difficult to capture surfaces. I typically use a Milwaukee impact driver covered in tracking markers as a test because it has curved surfaces, repeating patterns, and multiple flat planes which make it a challenge for most scanners. Using Near Mode, the Toucan failed to register the tracking dots and I had to switch to Far Mode to capture the model.
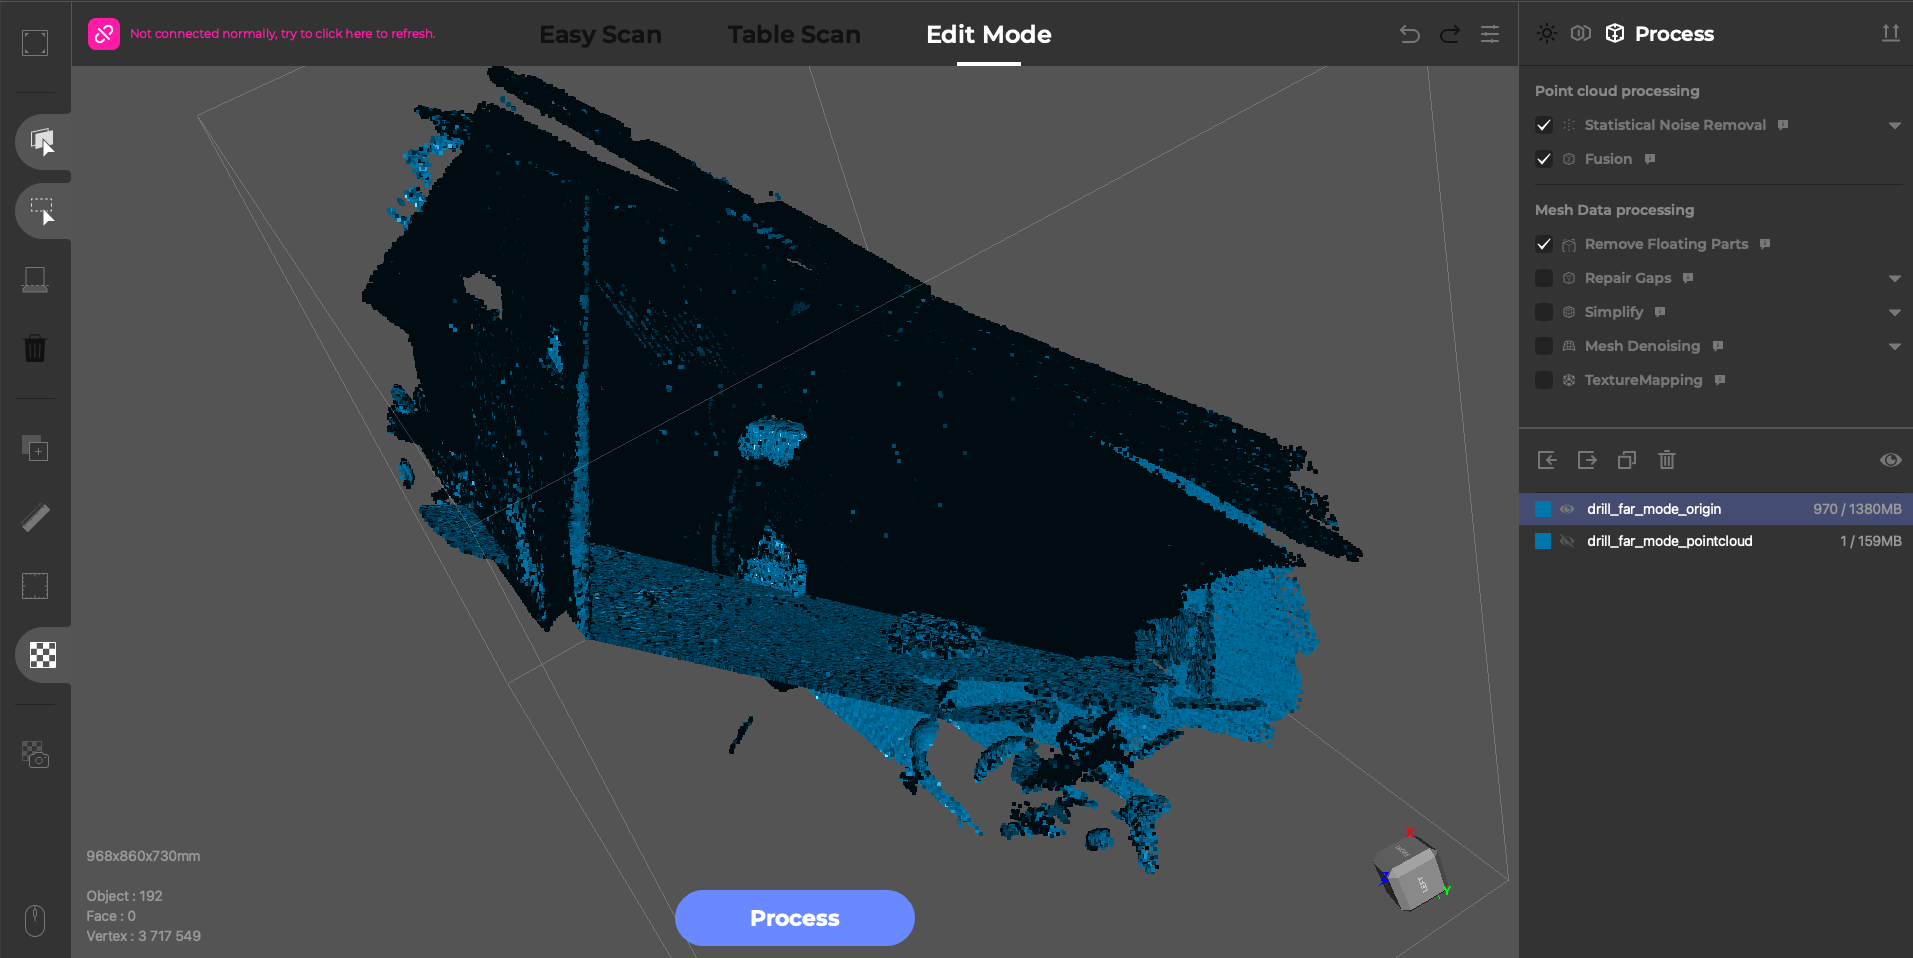
The resulting scan in Far Mode had 3.7 million points, the majority of which were captured from surrounding surfaces and needed to be trimmed away before fusion. After removing the surfaces, the point cloud for just the drill was reduced to 266 thousand points, a fraction of the original point cloud. The resulting mesh lacked sharp detail and was really only useful as a rough form.
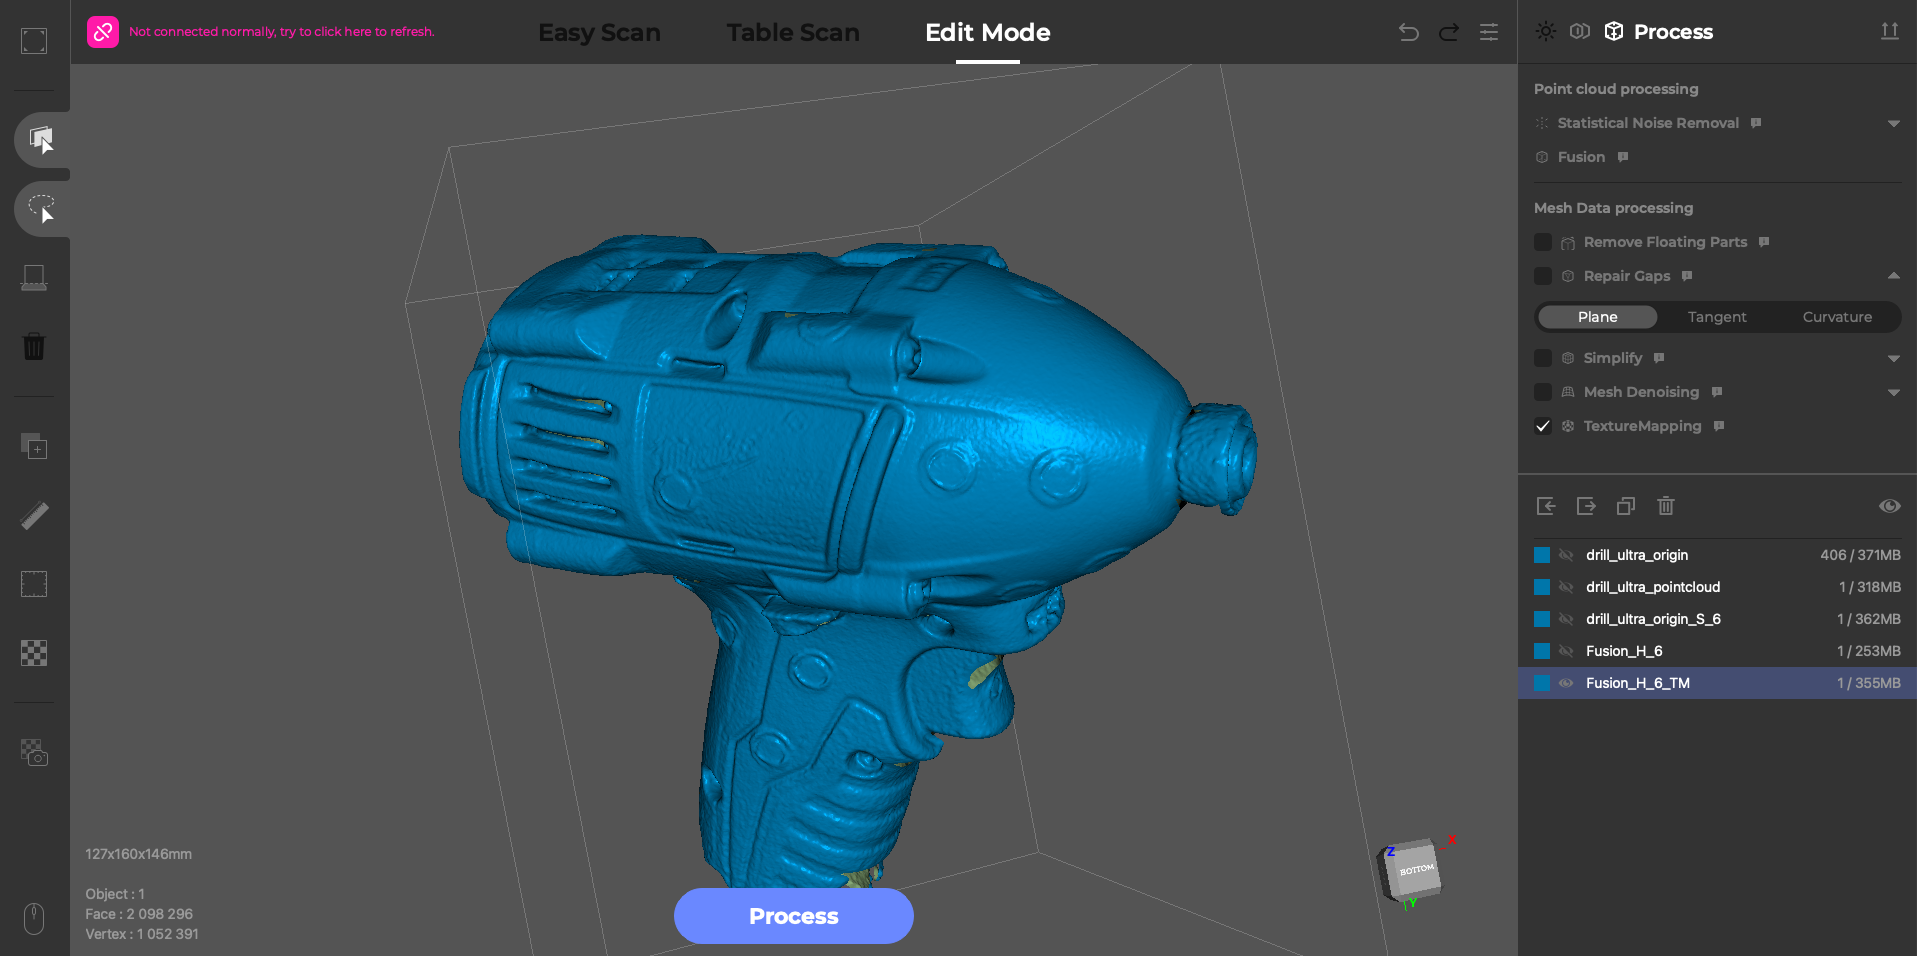
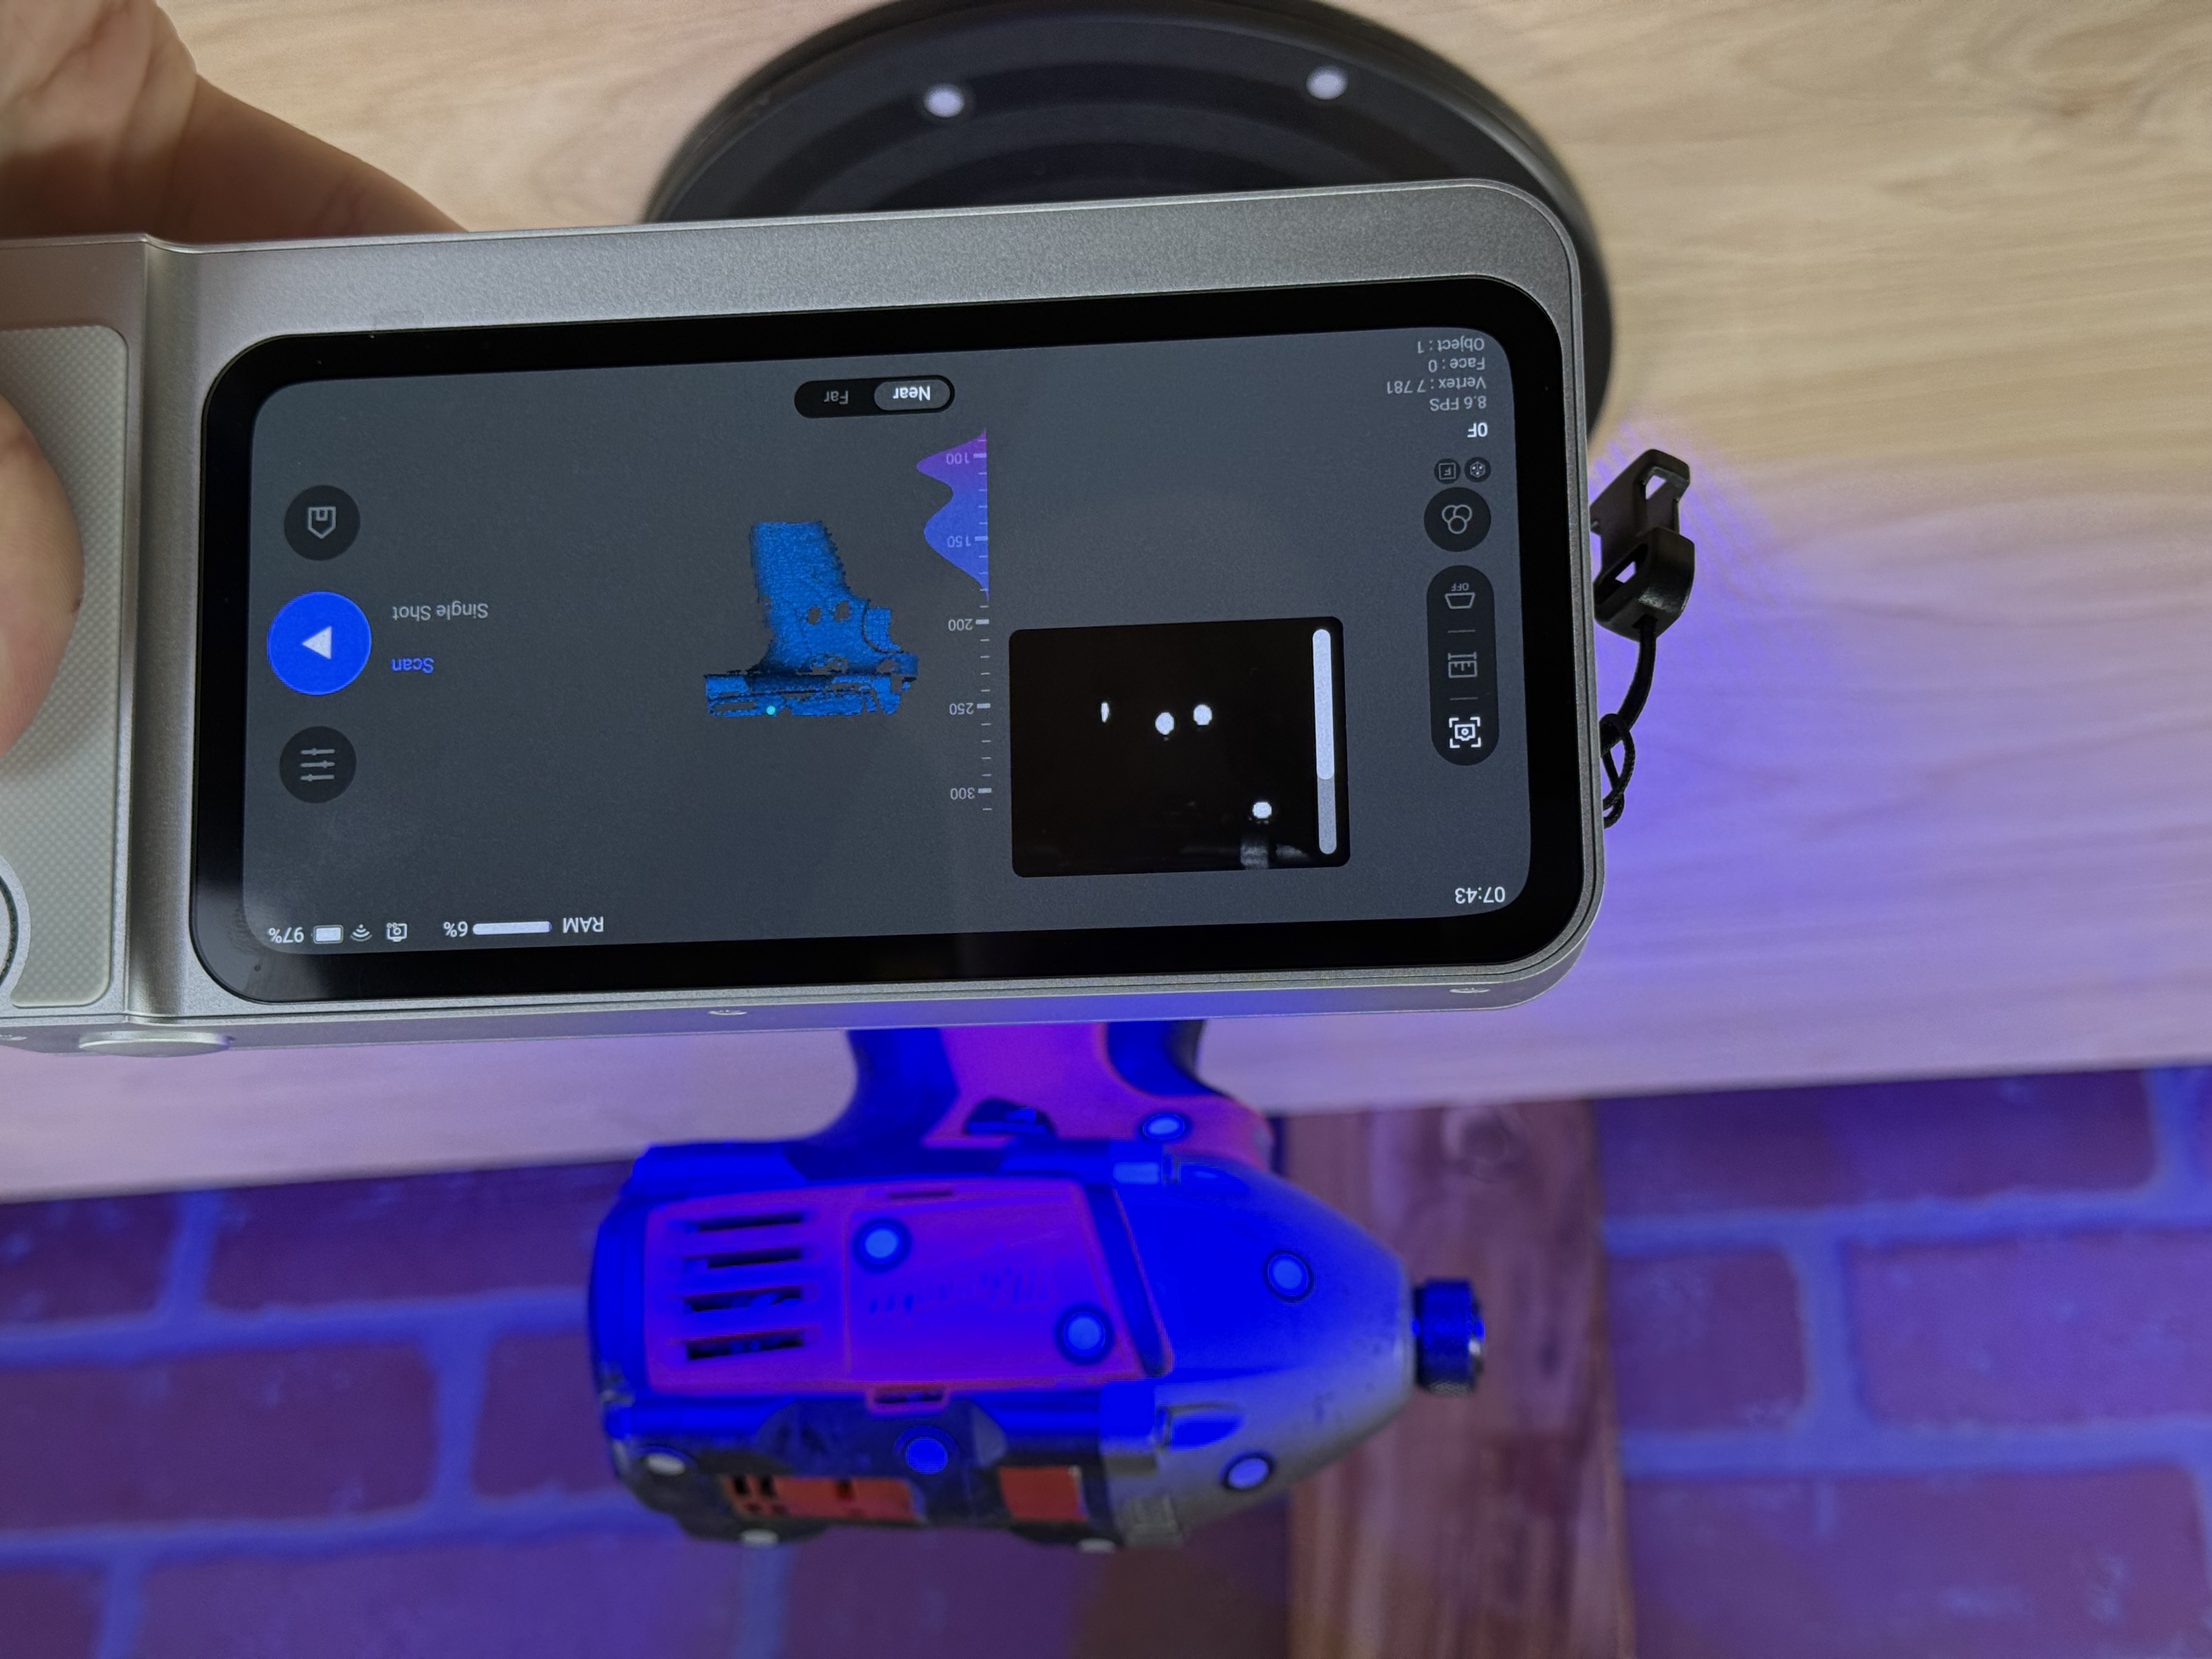
Scanned using the Class 3R laser in Ultra Mode, the detail is significantly sharper and the fused model has multiple sub-millimeter details present. The scan is so accurate that the paper-thin markers are clearly visible in both the point cloud as well as the mesh.
3D Scanning Color Textures with the 3DMakerPro Toucan
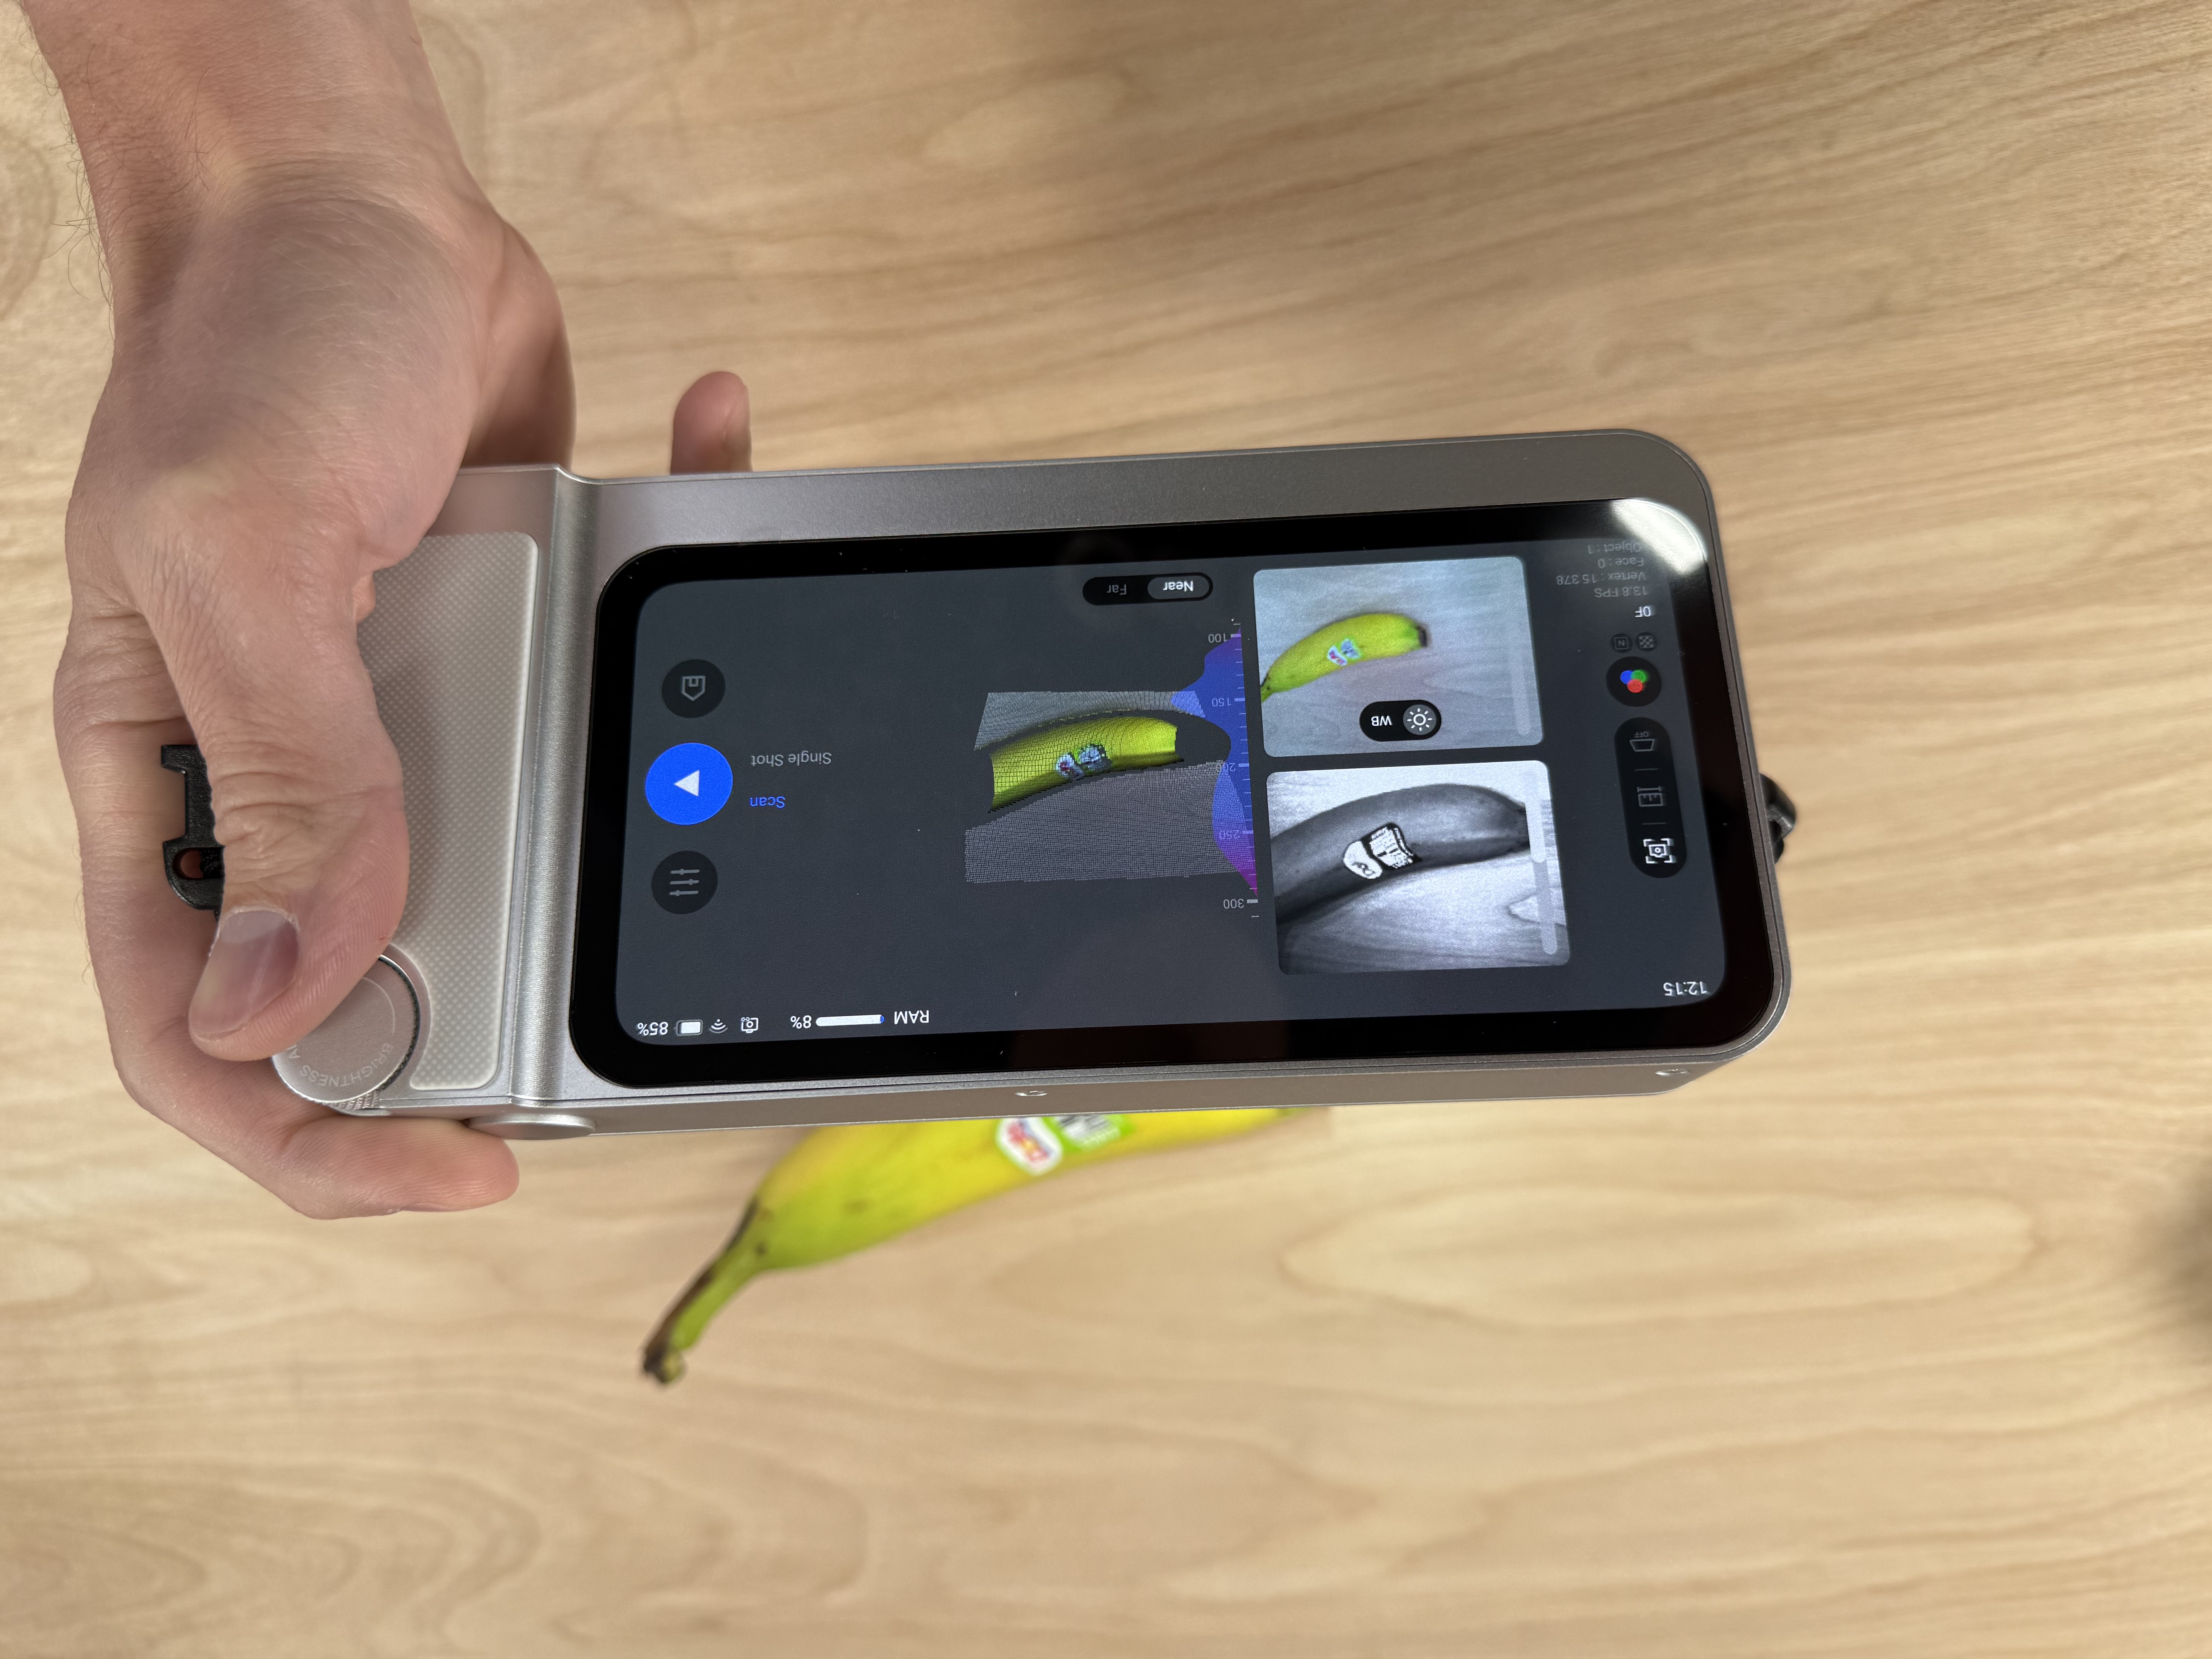
The 3DMakerPro Toucan features a dedicated 48MP RGB camera for capturing color textures, and has the ability to add color textures to a scan by simply enabling the “Color Scanning” option before starting a scan. The captured point cloud appears in full color, which is an interesting way to see a model during scanning. To test out the color texture, I scanned a banana using the “Ultra Mode” scan quality, Class 3R laser, and a high frame rate.
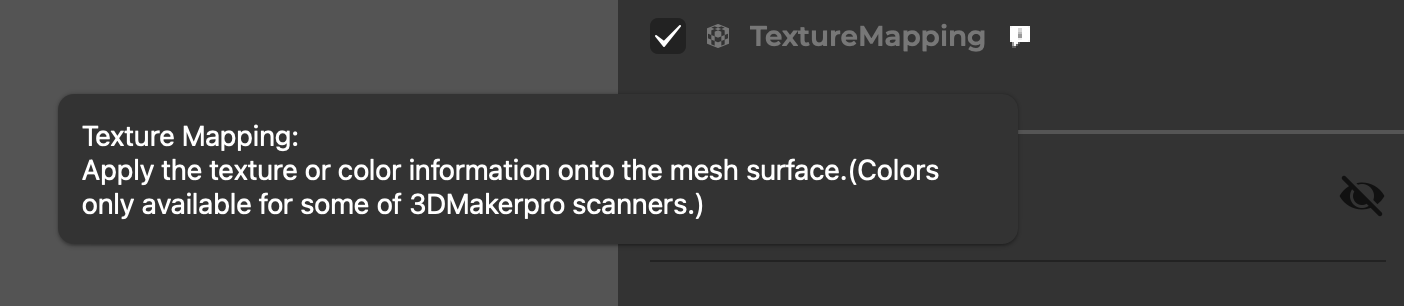
Unlike the other workflow steps, the texture operation on the Toucan has no adjustable parameters. The only thing a user can do is click “Texture Mapping” and hope that everything comes out as expected. There’s no brightness, contrast, UV mapping, etc. and the final texture is not editable on the Toucan.
The “Texture Mapping” operation on the Toucan can take anywhere from 10 to 20 minutes to complete, which can feel like an eternity if you’re trying to quickly evaluate a scan out in the field. The lack of a “time remaining” estimate isn’t ideal, instead there is only a single progress bar that loads in the middle and stays there until the texture is complete. After my experience with the 3DMakerPro Lynx and Mole in the past, it’s disappointing to see that the color texture feature hasn’t been developed further in the JMStudio software.
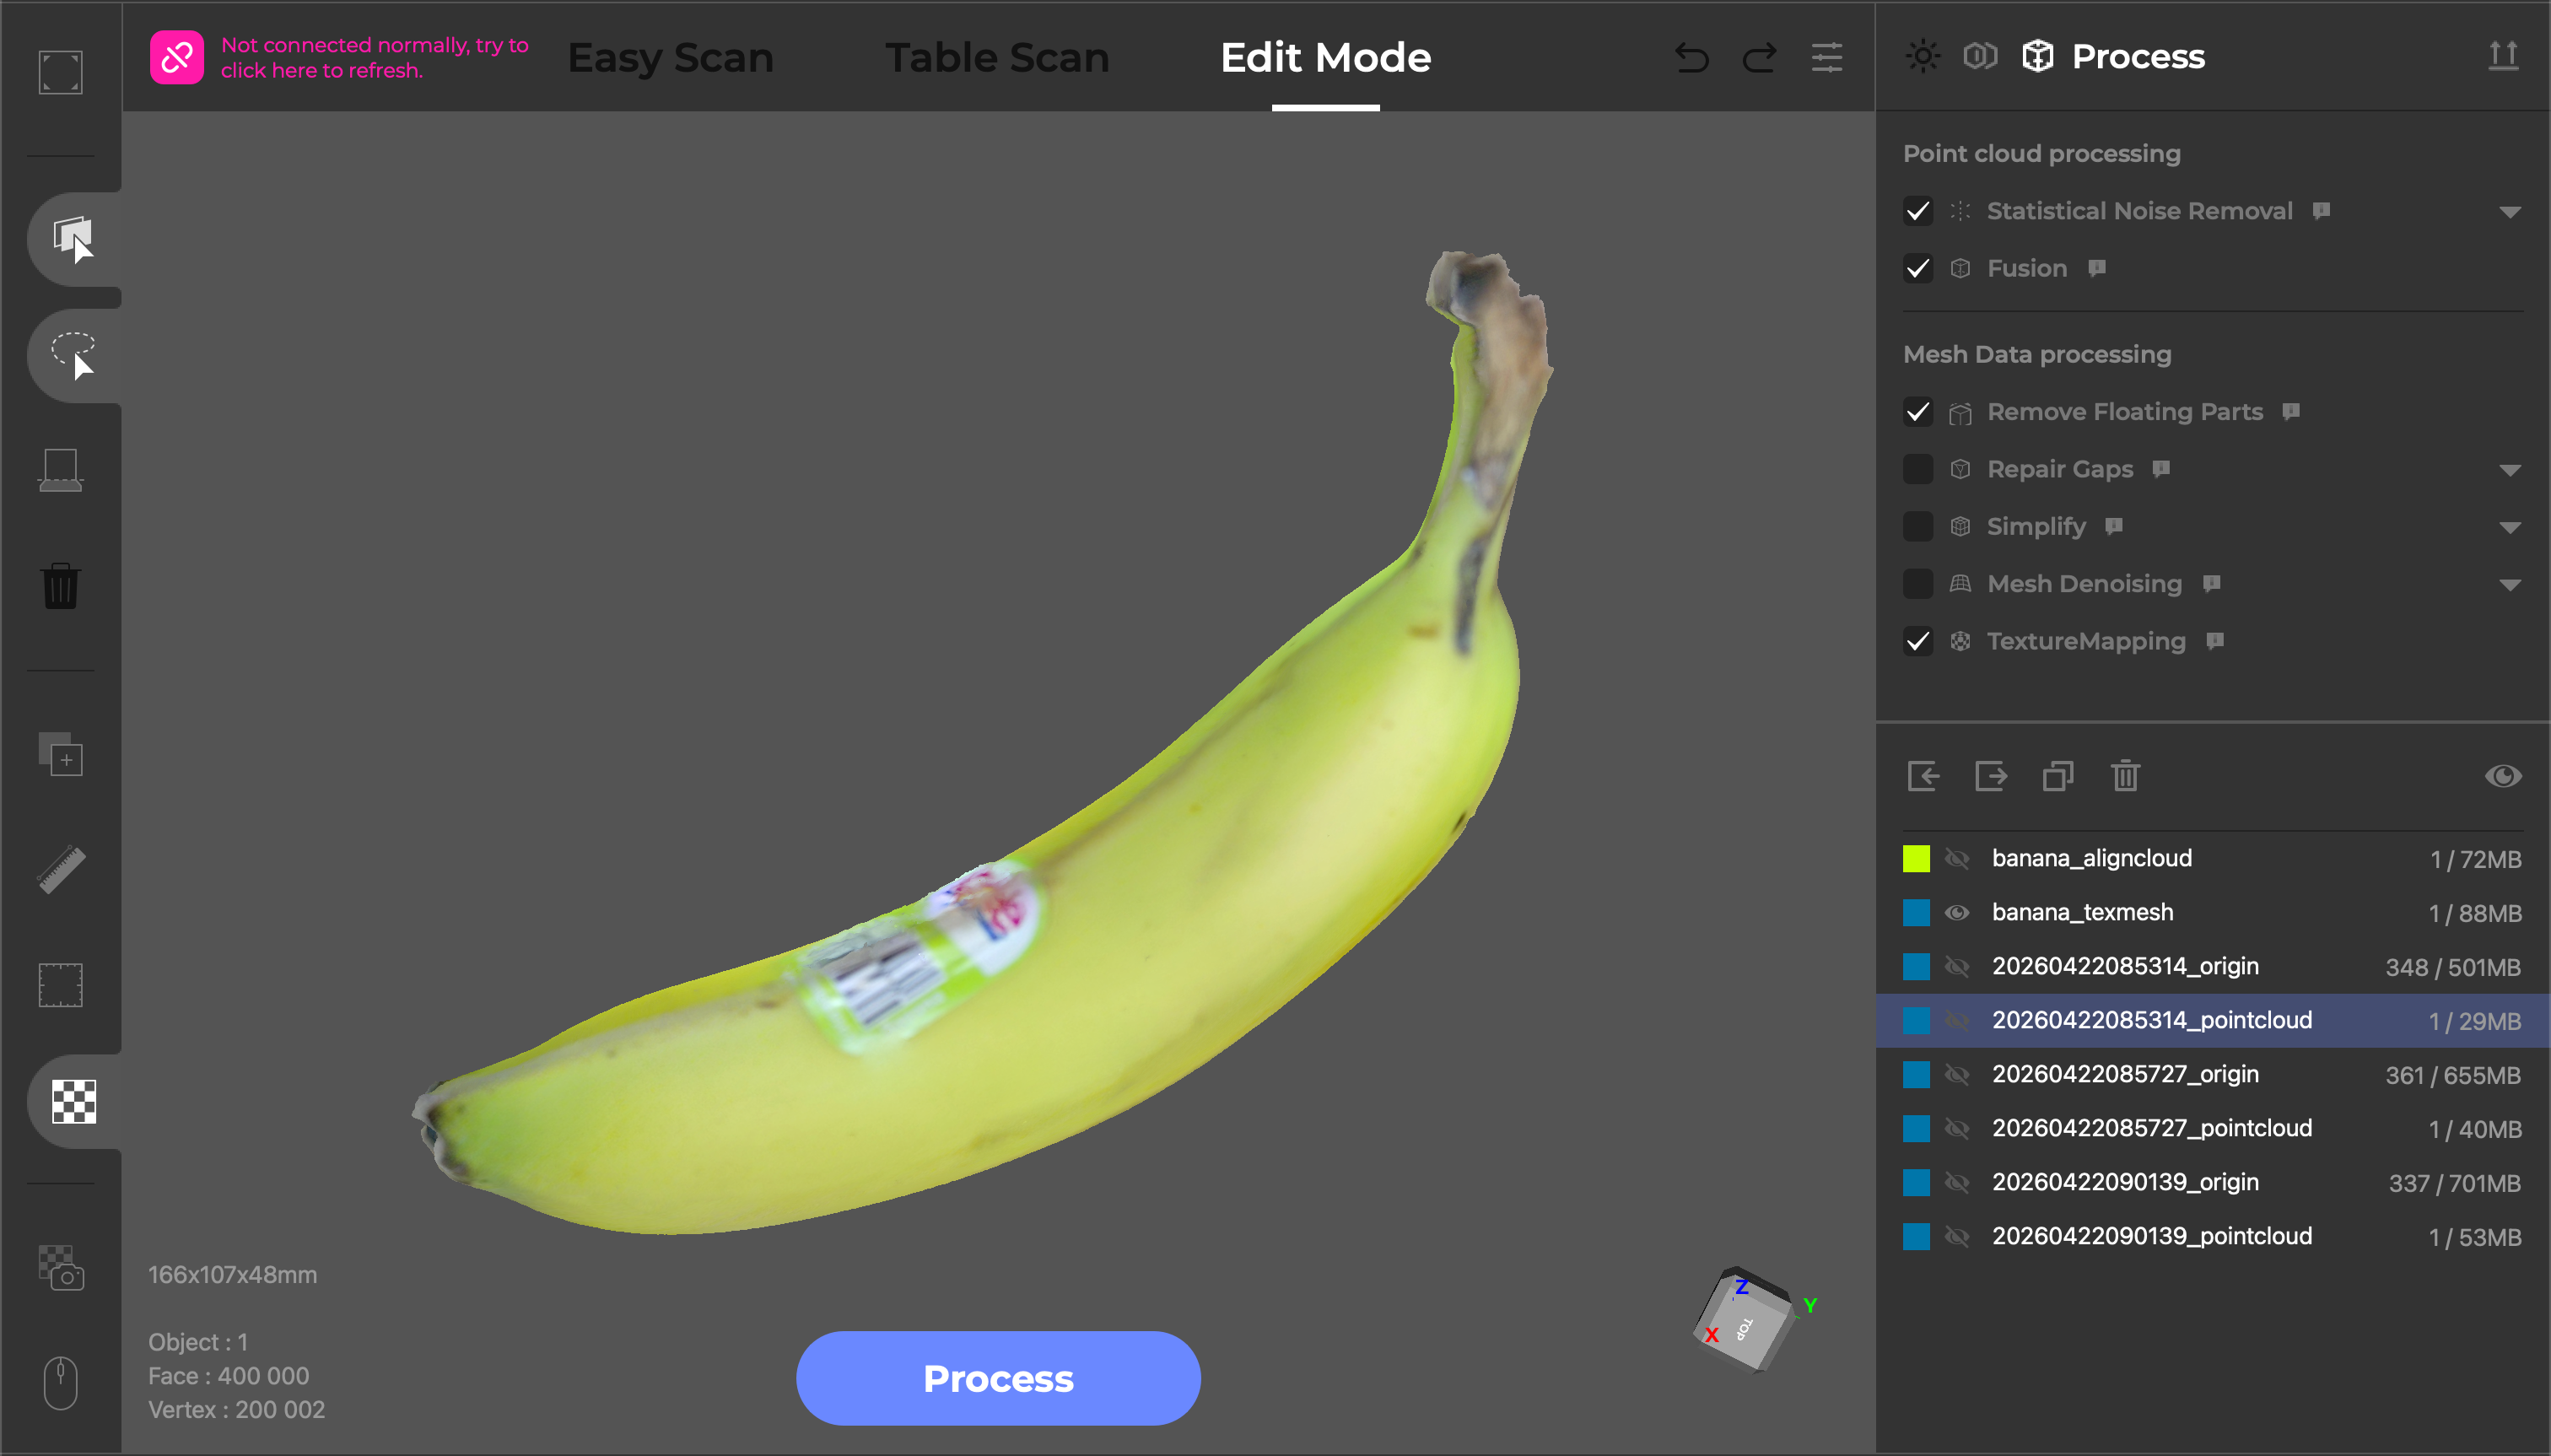
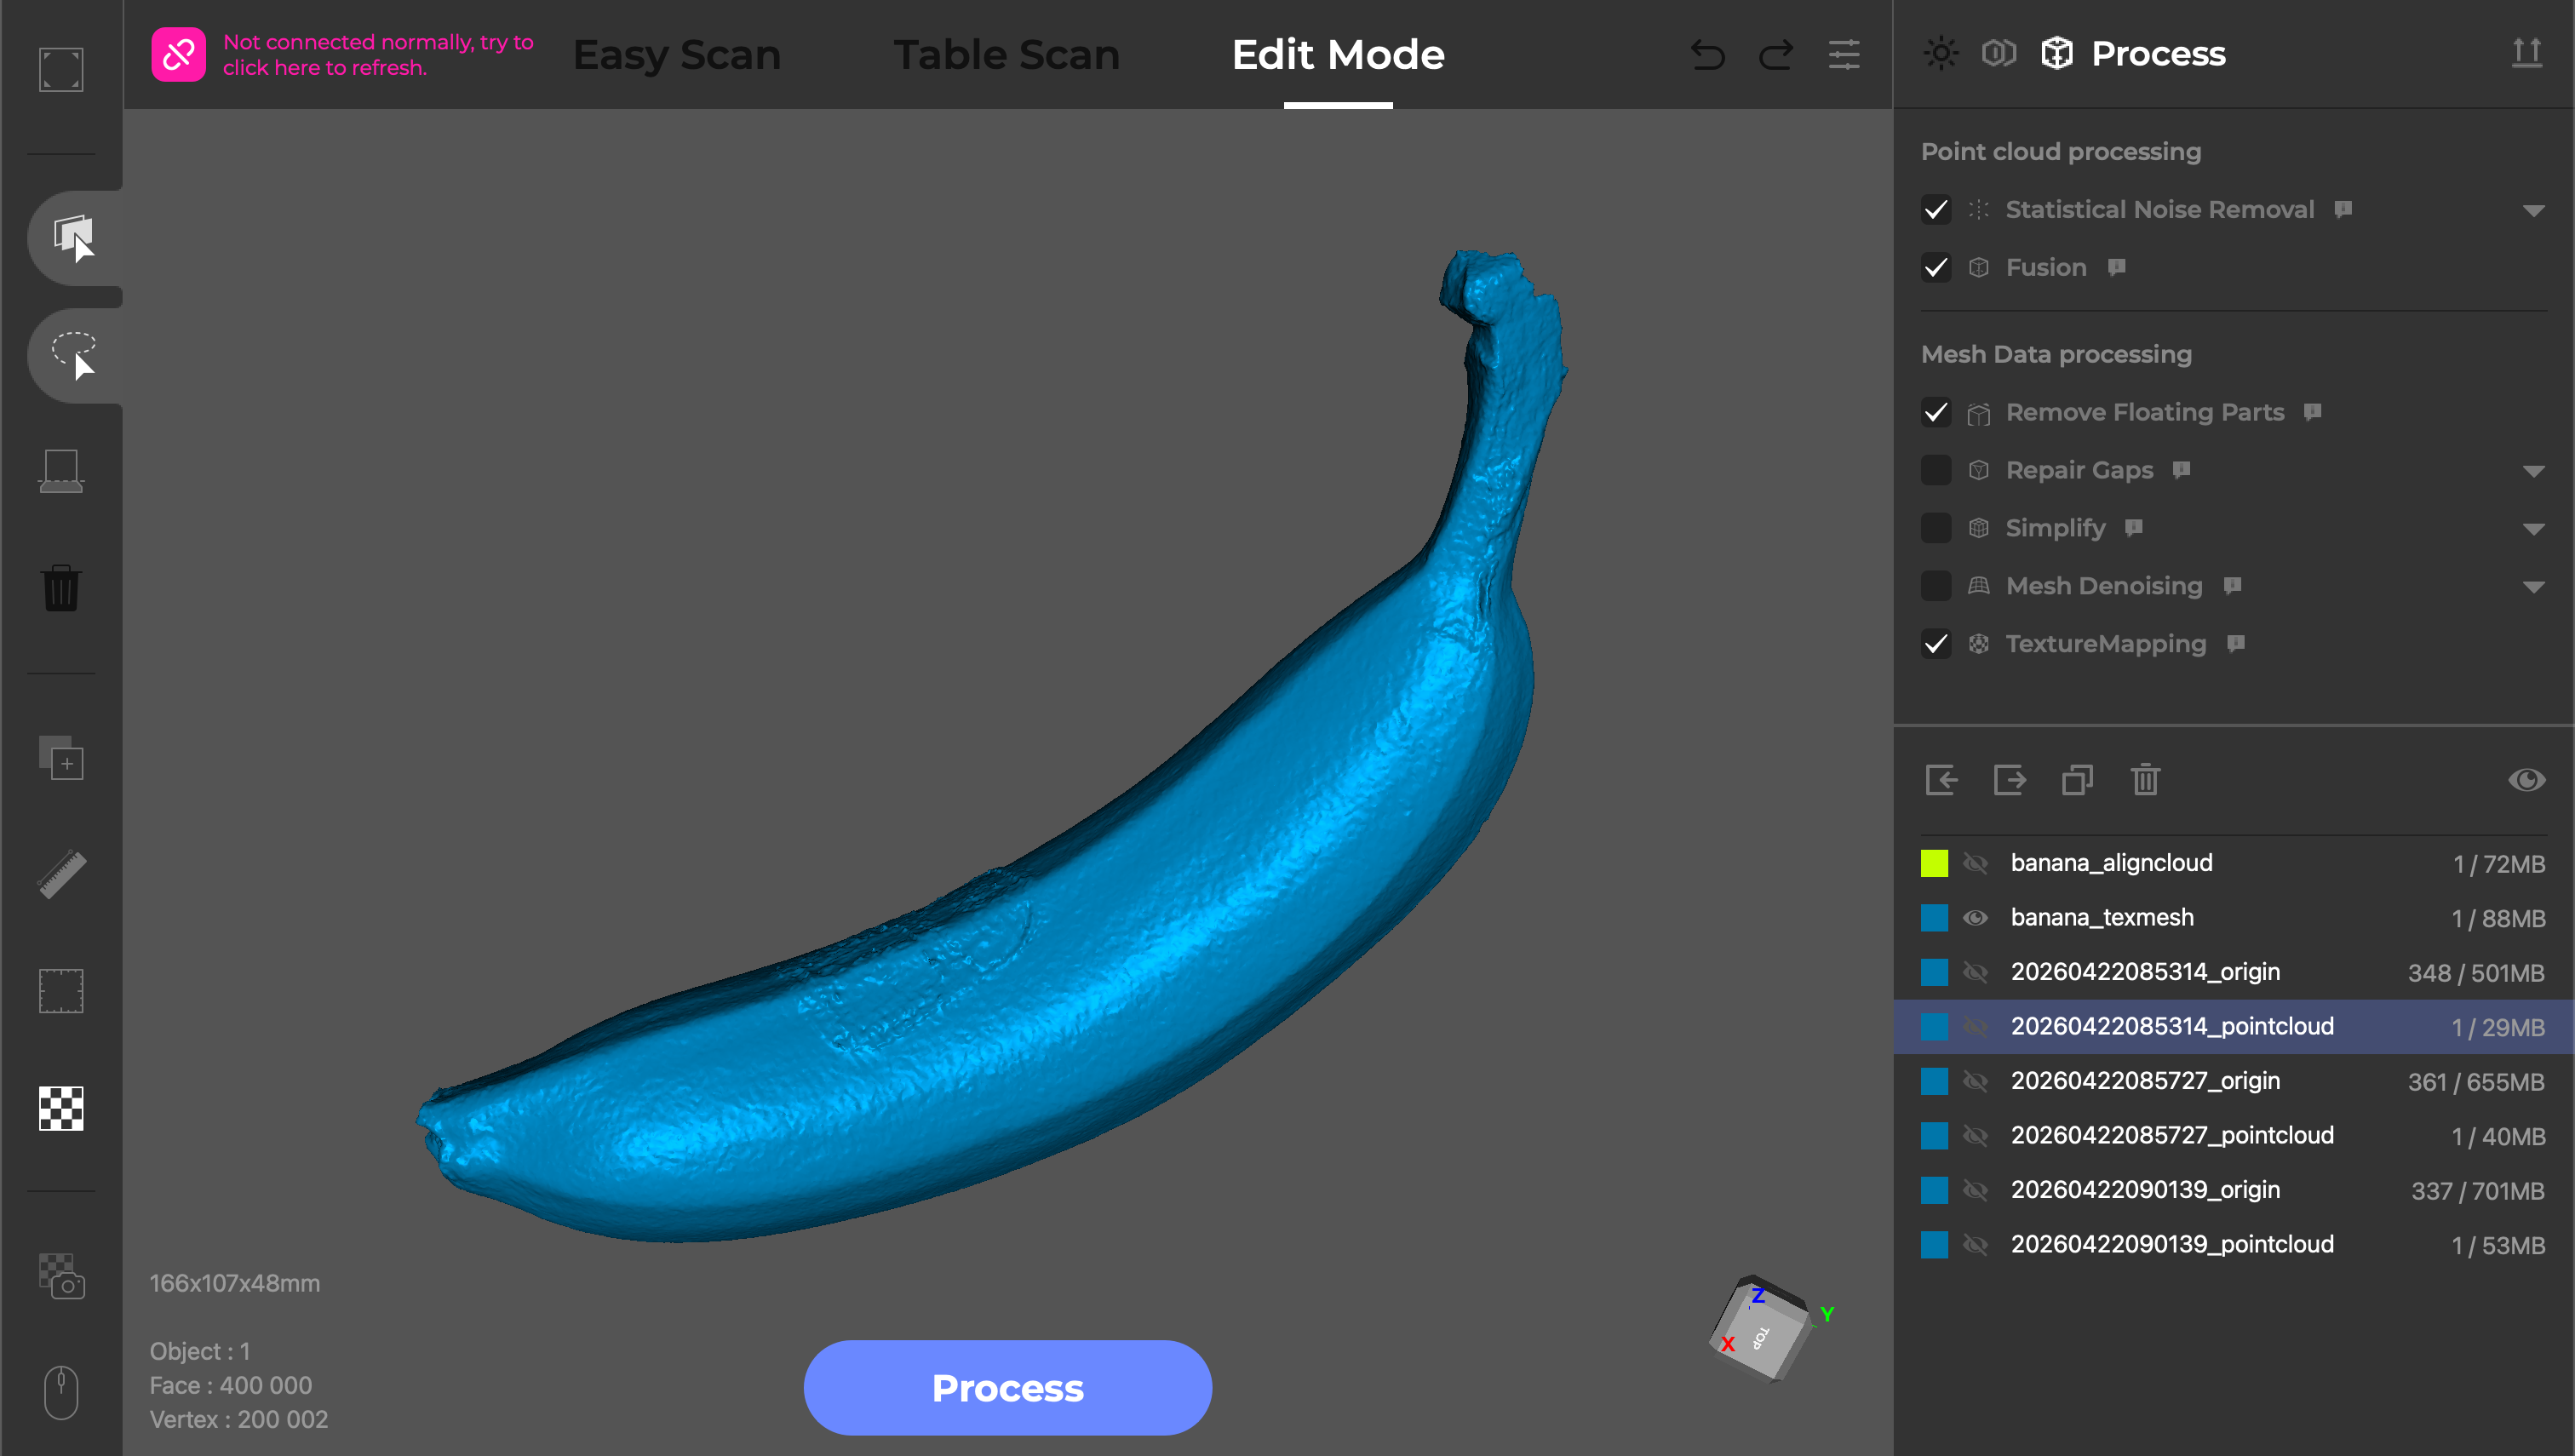
The resulting color texture is blurry and not usable for most applications. The text on the sticker is illegible, and the seams from where the scans were aligned are present and not blended together. Given the amount of time this operation takes, I would expect the output to be at a higher quality or at least have adjustable parameters for the end user.
3D Scanning Outdoors with the 3DMakerPro Toucan
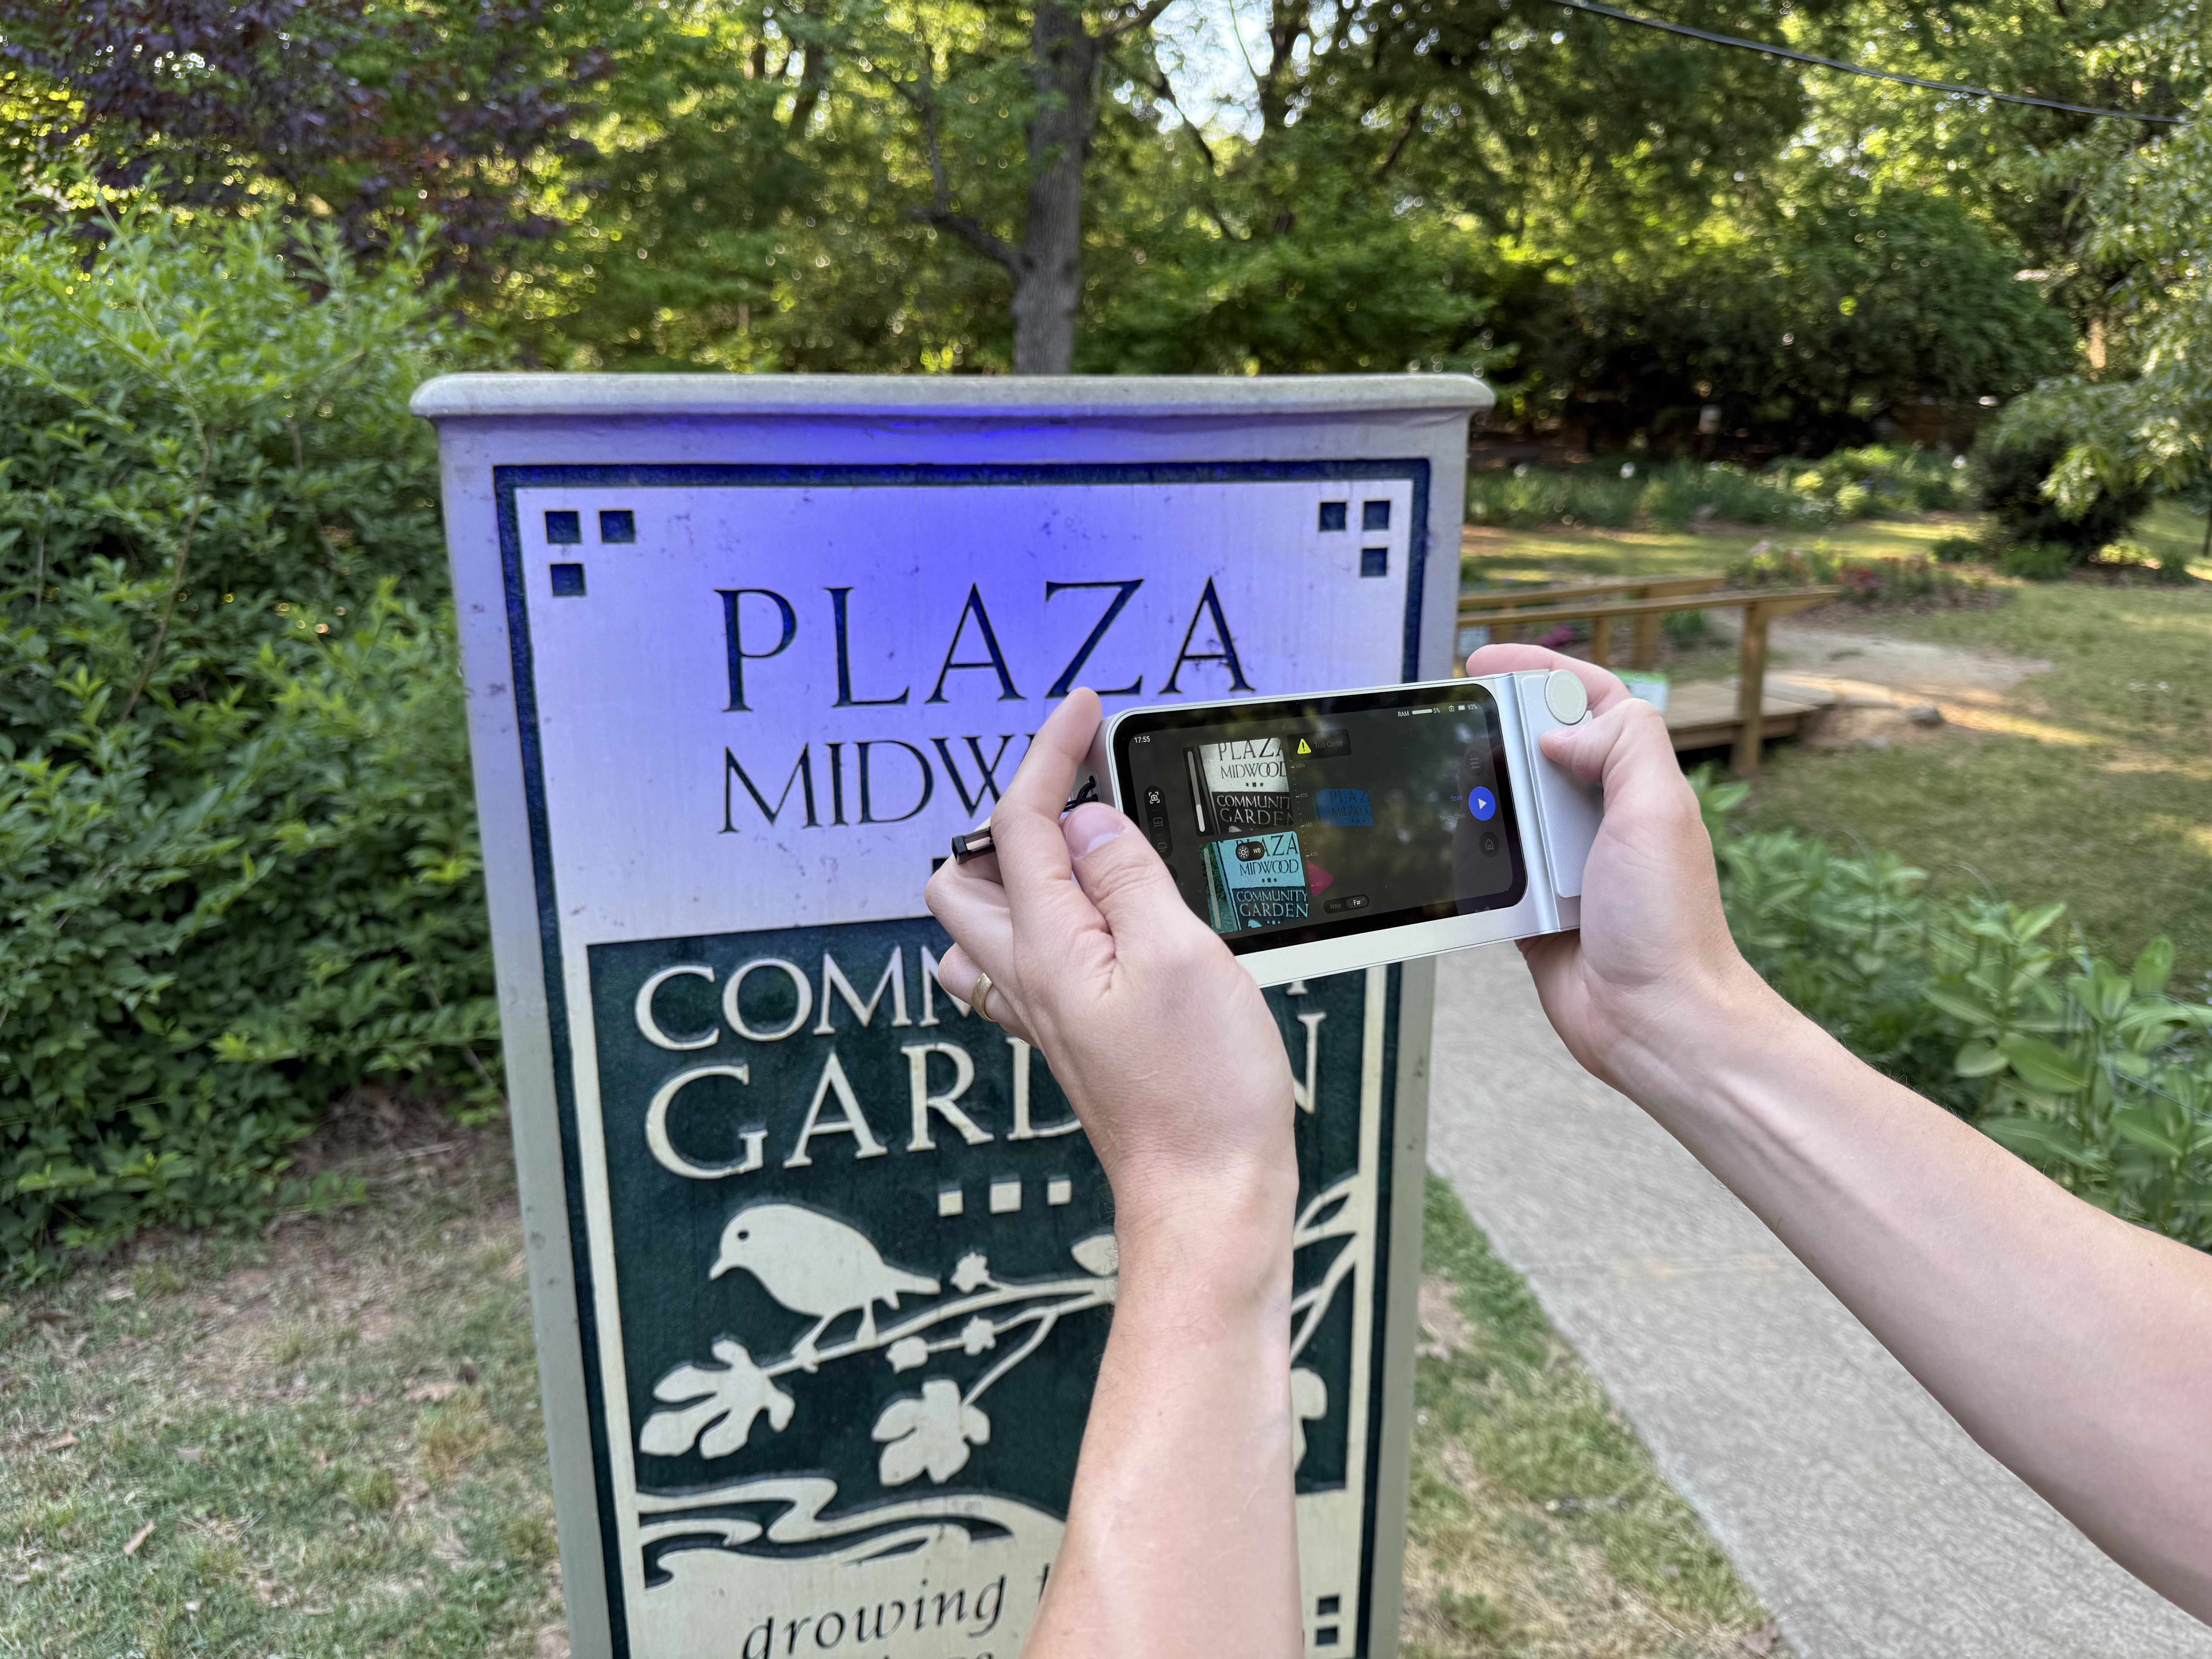
The mobile-first design of the Toucan lends itself well to scanning outdoors, so I took it to a park to test it out. The large wooden sign at the entrance of the park had deep engravings, a rough texture, and looked visually interesting enough to be a challenge to scan. Because I was outside, I used the scanner in the Class 1 laser mode in case anyone walked by or could otherwise see the laser.
The Toucan lost tracking several times during scanning, and it took me five attempts to capture the entire sign using the Far Mode. The scanner was typically averaging about 11 FPS during the scan, and I really struggled to move in a continuous motion without losing tracking. I ran into this tracking issue frequently during testing, and the scanner would sometimes drop tracking even under ideal circumstances.
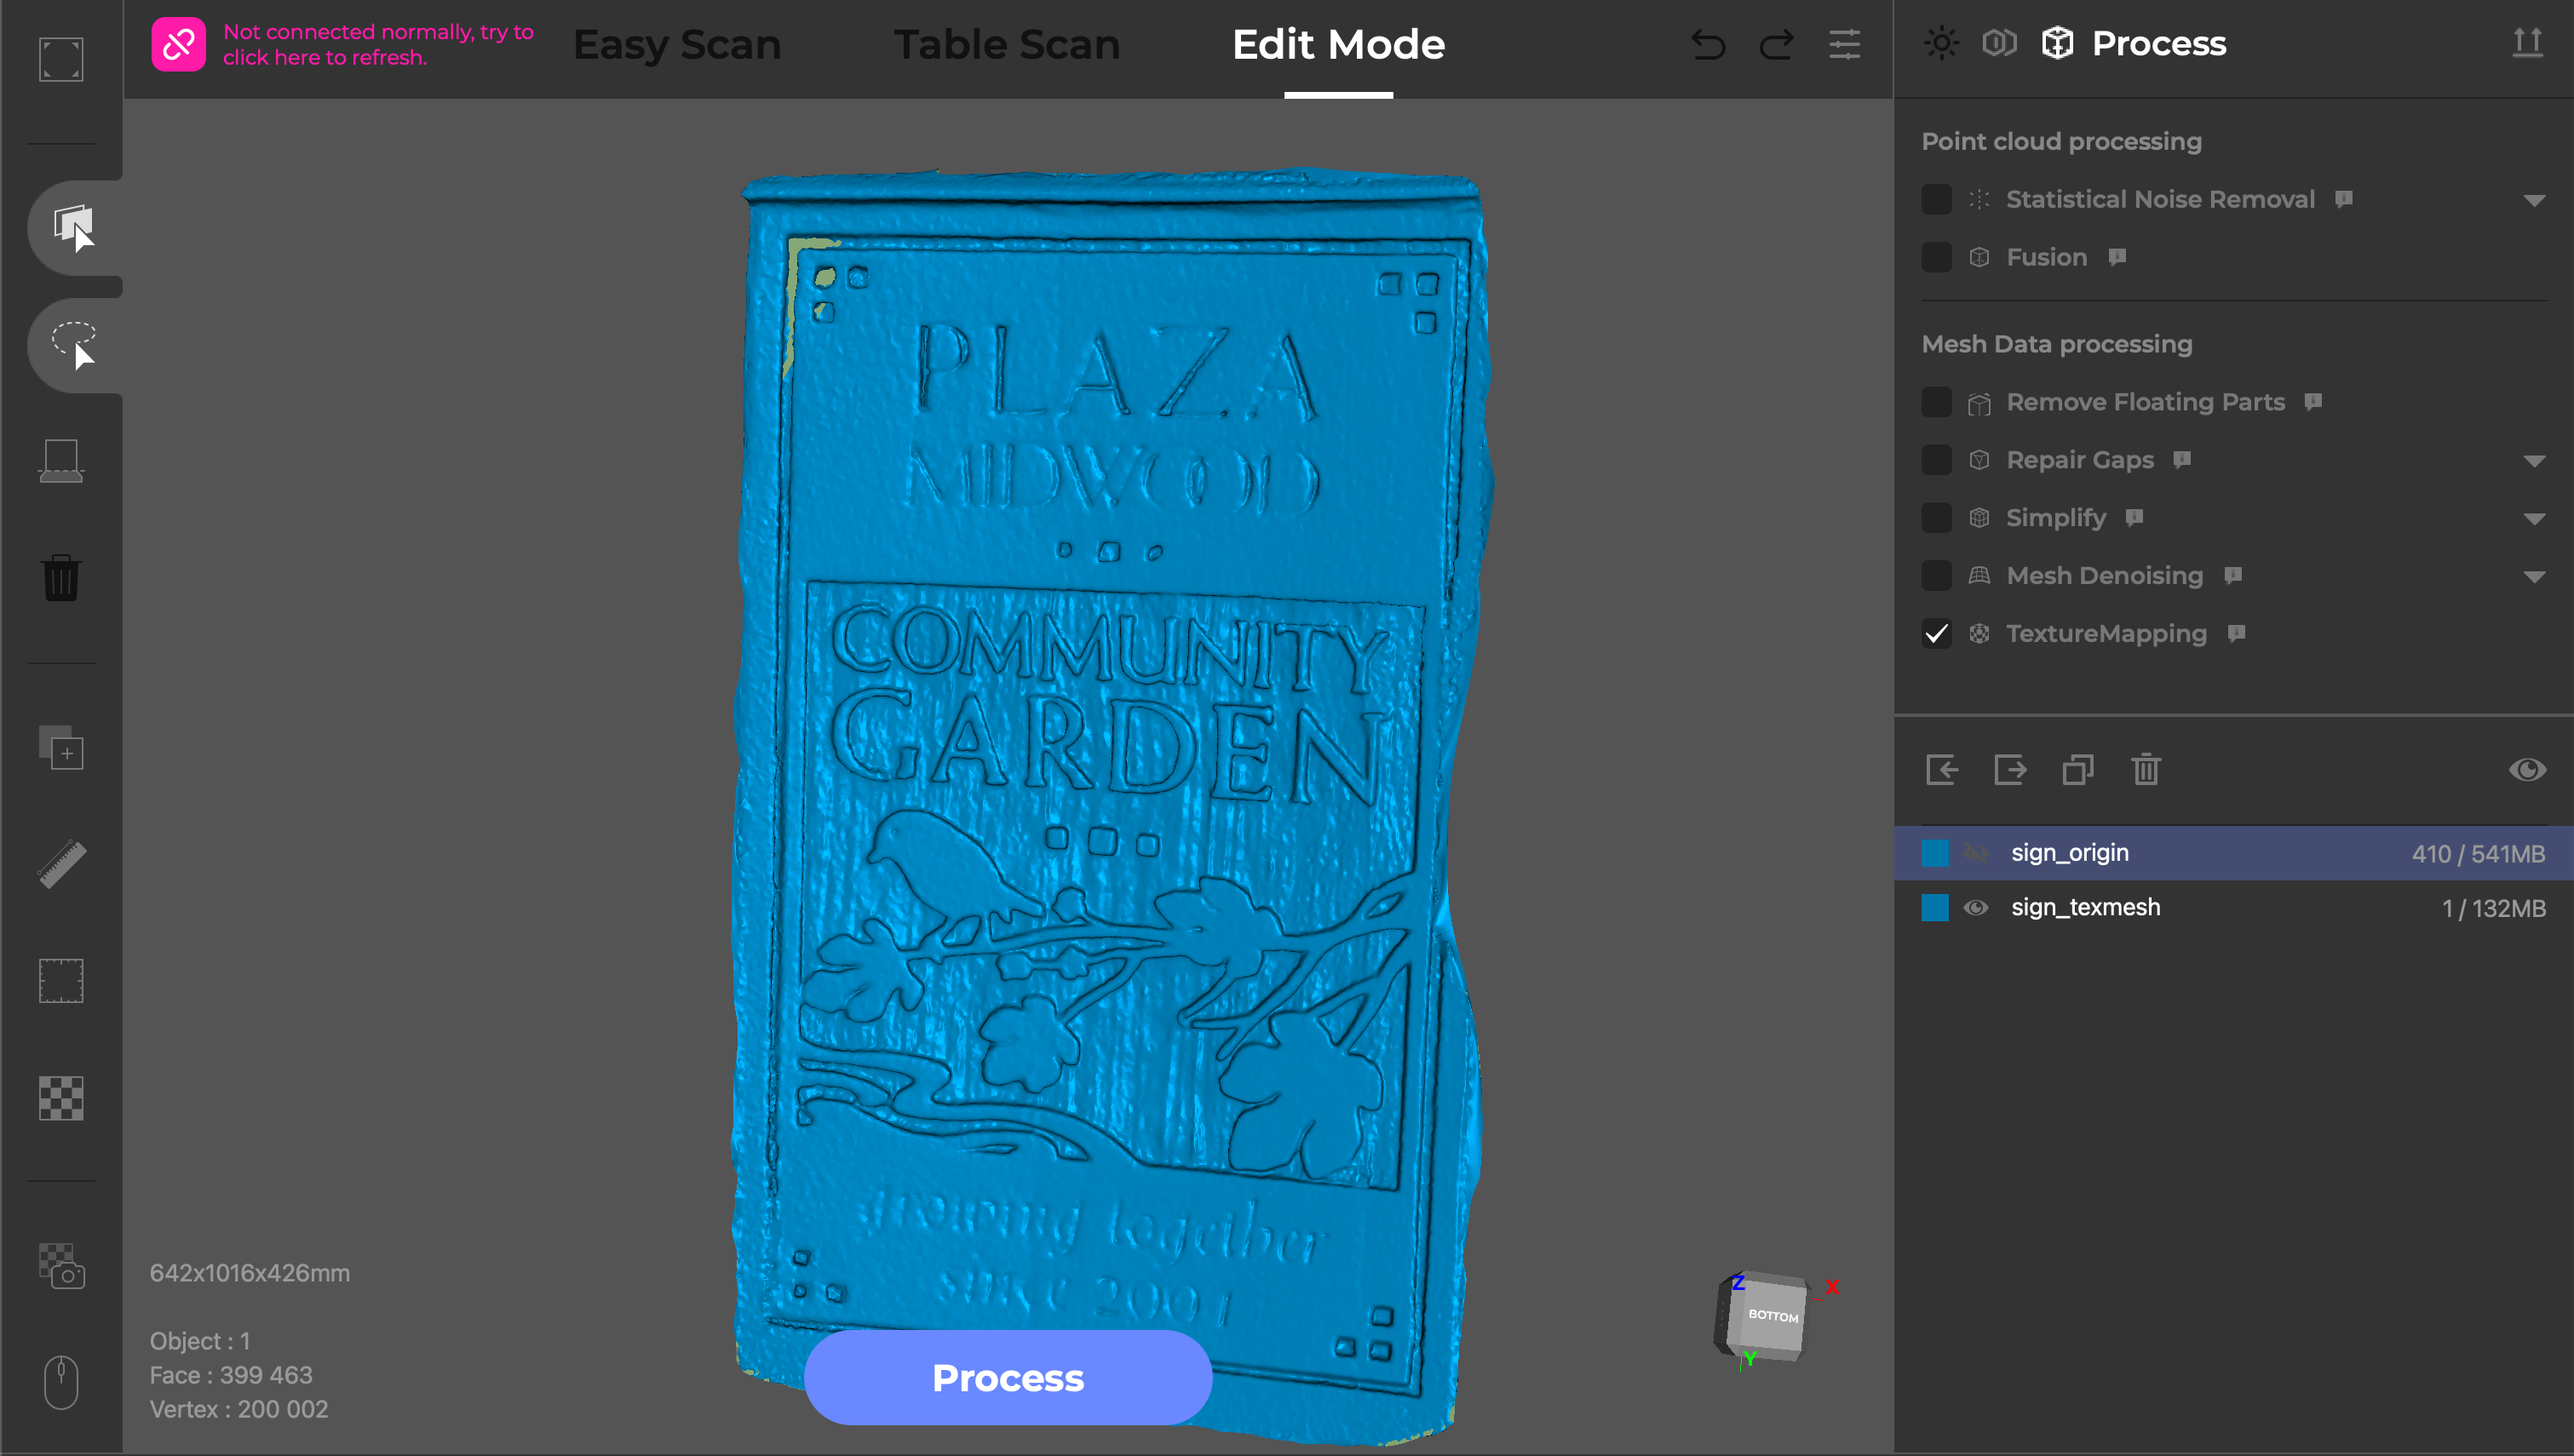
The point cloud is dense and captures the visible surface well, and using the One Click Process feature at Medium quality resulted in a mesh with clearly visible woodgrain and legible text. Given the large size of the sign, the 132MB mesh has an impressive amount of visible detail. I was mostly interested in picking up the fine detail in the woodgrain, and the Toucan did a great job at that.
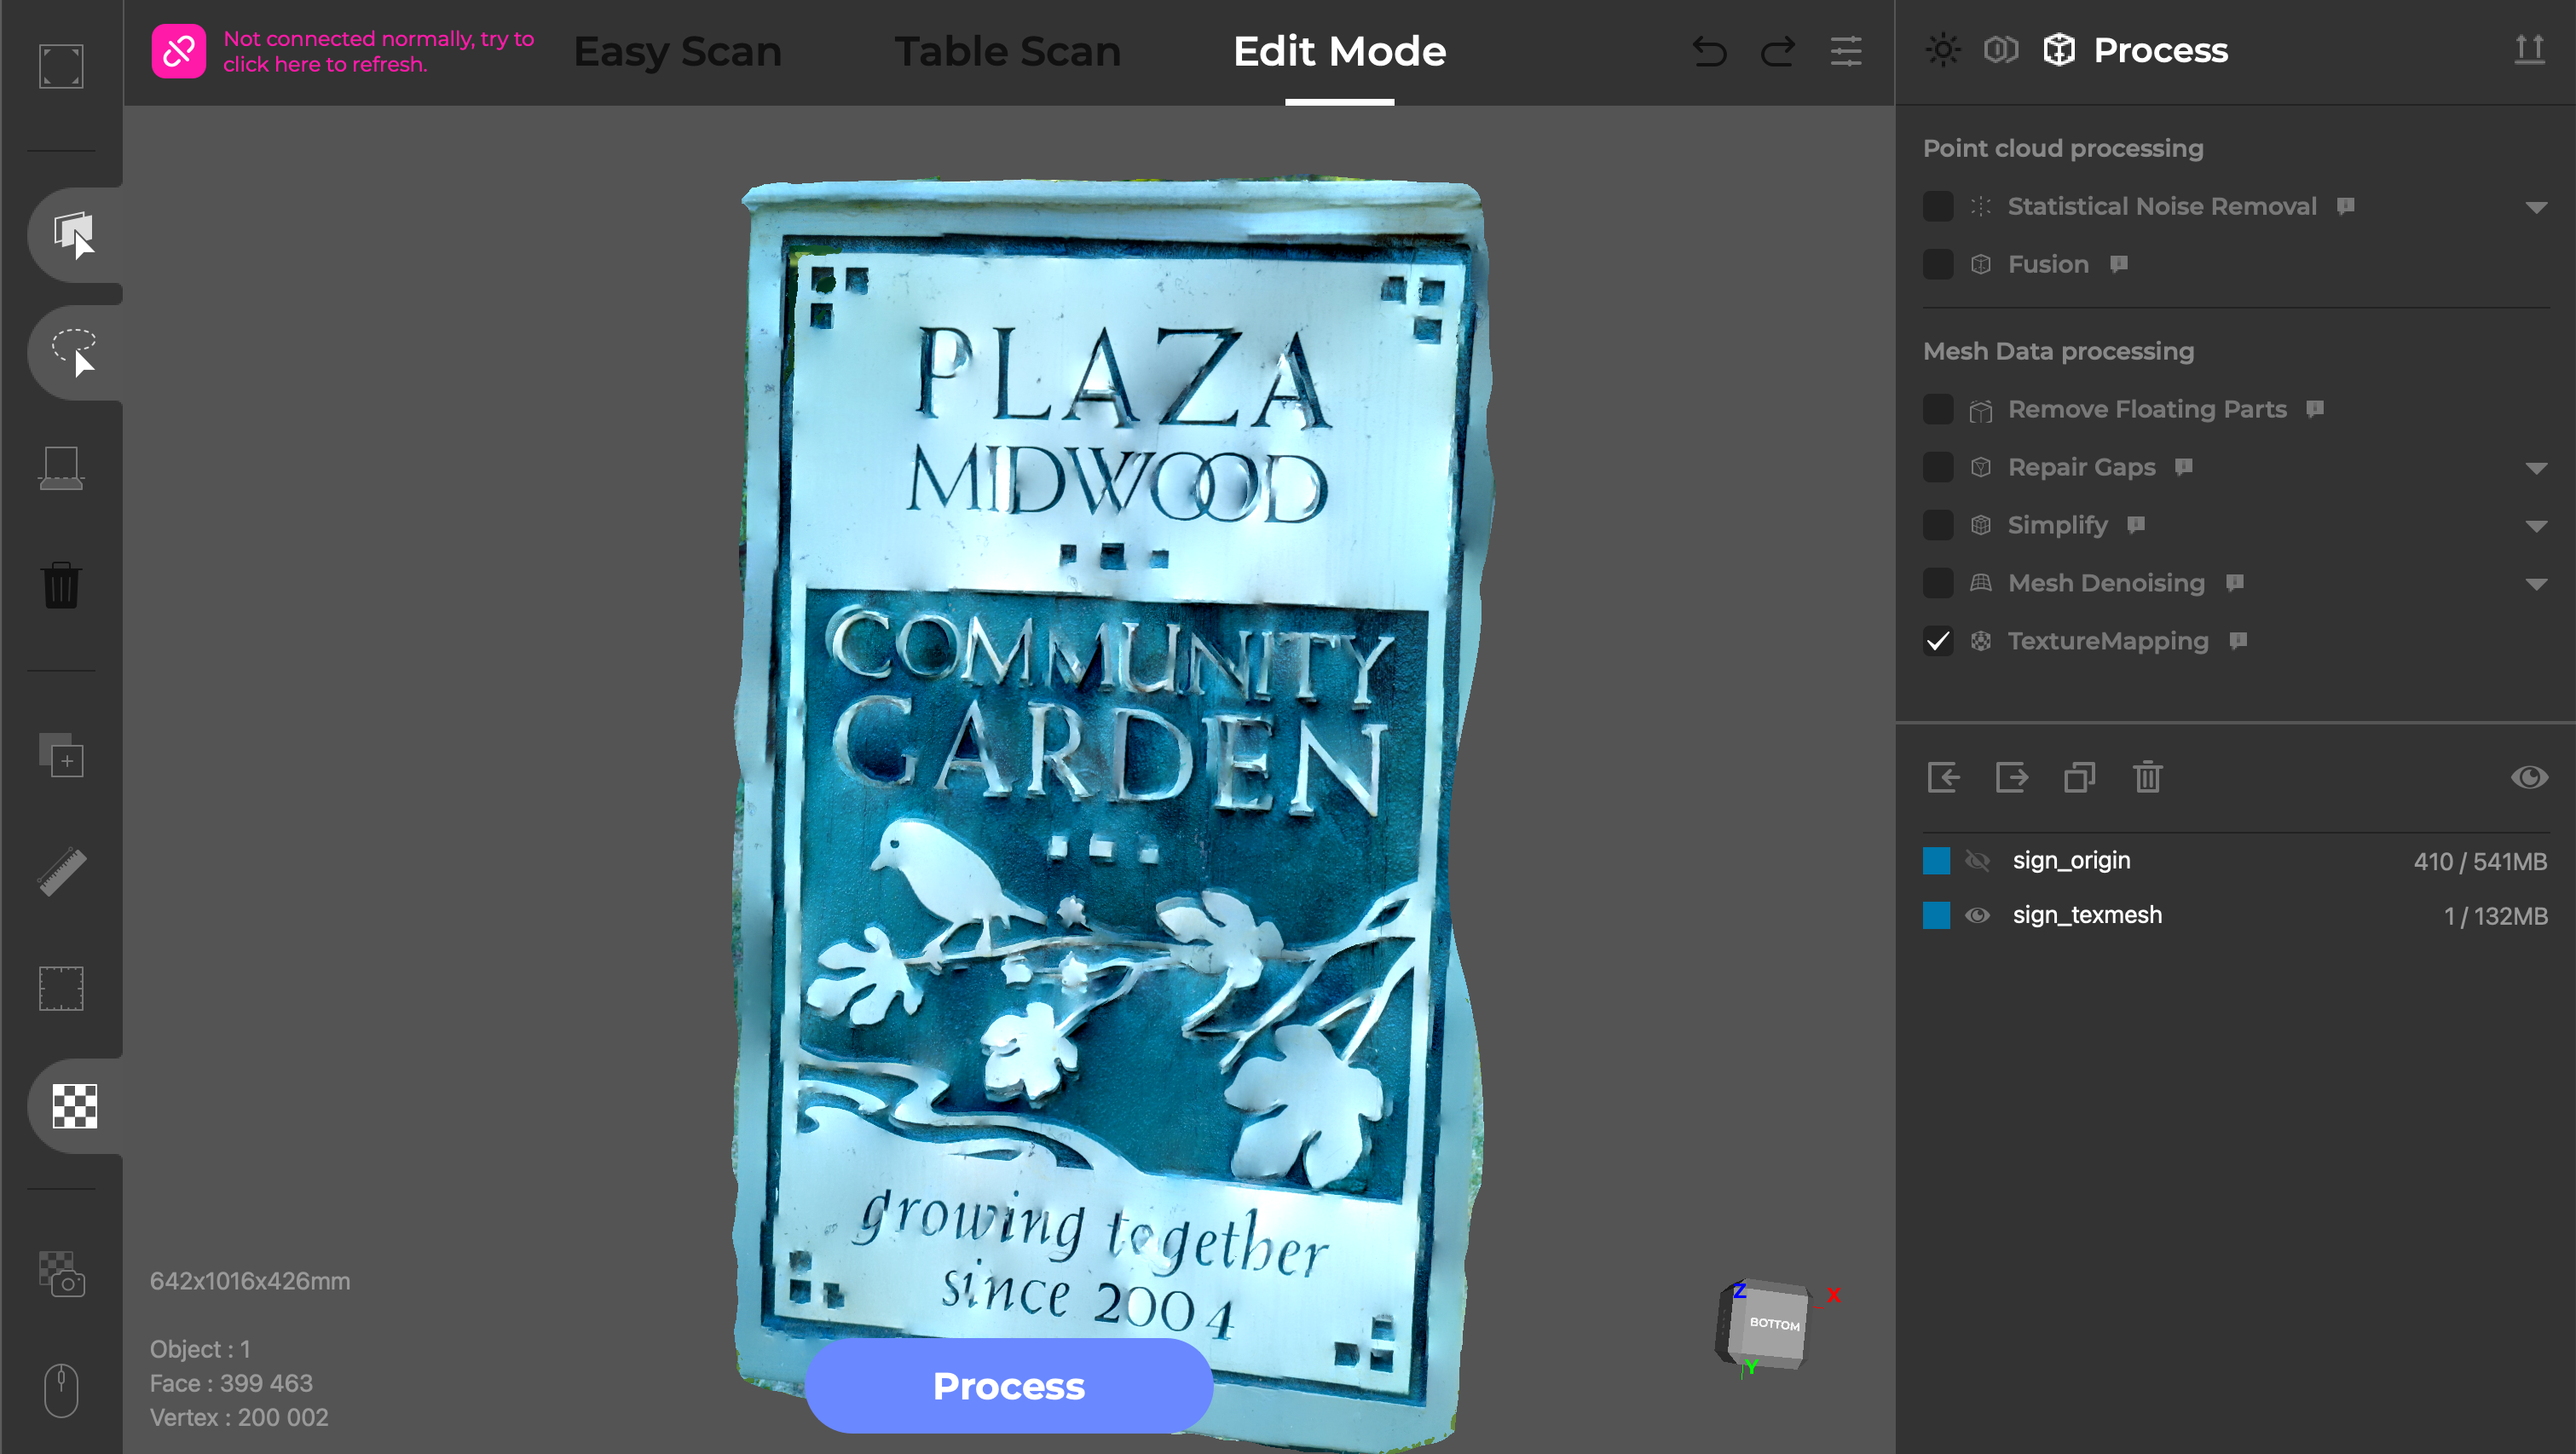
Unfortunately, the color texture was muddy and didn’t capture the woodgrain, paint, or other details I was hoping to pick up. For something simple like this, it would most likely be easier to use a program like Blender or ZBrush to paint color on the model.
Bottom Line
The 3DMakerPro Toucan is targeted at anyone who has used a 3D scanner and wished they didn’t need to be tethered (via USB or Wi-Fi) to a computer in order to capture a scan. The 8-core 2.5 GHz CPU is fast enough to handle most of the processing jobs in under a minute, with the only exception being the surprisingly long texture mapping operation. The onboard storage (256 GB) was more than enough to store dozens of scans, and the LCD made clean-up work and basic mesh editing a breeze. However, the tracking issues and the lackluster color textures are significant limitations for anyone using this in a professional context.
The Toucan is priced at $1,499 for the Standard package and $1,699 for the Premium package, which includes the tripod and carrying case. The $200 difference is worth it if you plan on carrying the scanner with you anywhere, as the tripod and the carrying case are both very useful additions for the price. While the Toucan doesn’t quite make the list of the best 3D scanners, it’s still very capable and worth considering for structured light 3D scanning in the field without a computer if generating a color texture isn’t a priority.
If you don’t need the integrated processing and are comfortable with a smaller maximum scanning volume, scanners like the 3DMakerPro Mole offer a similar workflow for a fraction of the price. The onboard computer and fully integrated workflow of the Toucan are compelling additions at this price point, with the similarly-designed Creality Sermoon P1 offered at $3,299, nearly double the price of the Premium package.


 English (US) ·