
 6 months ago
184
6 months ago
184
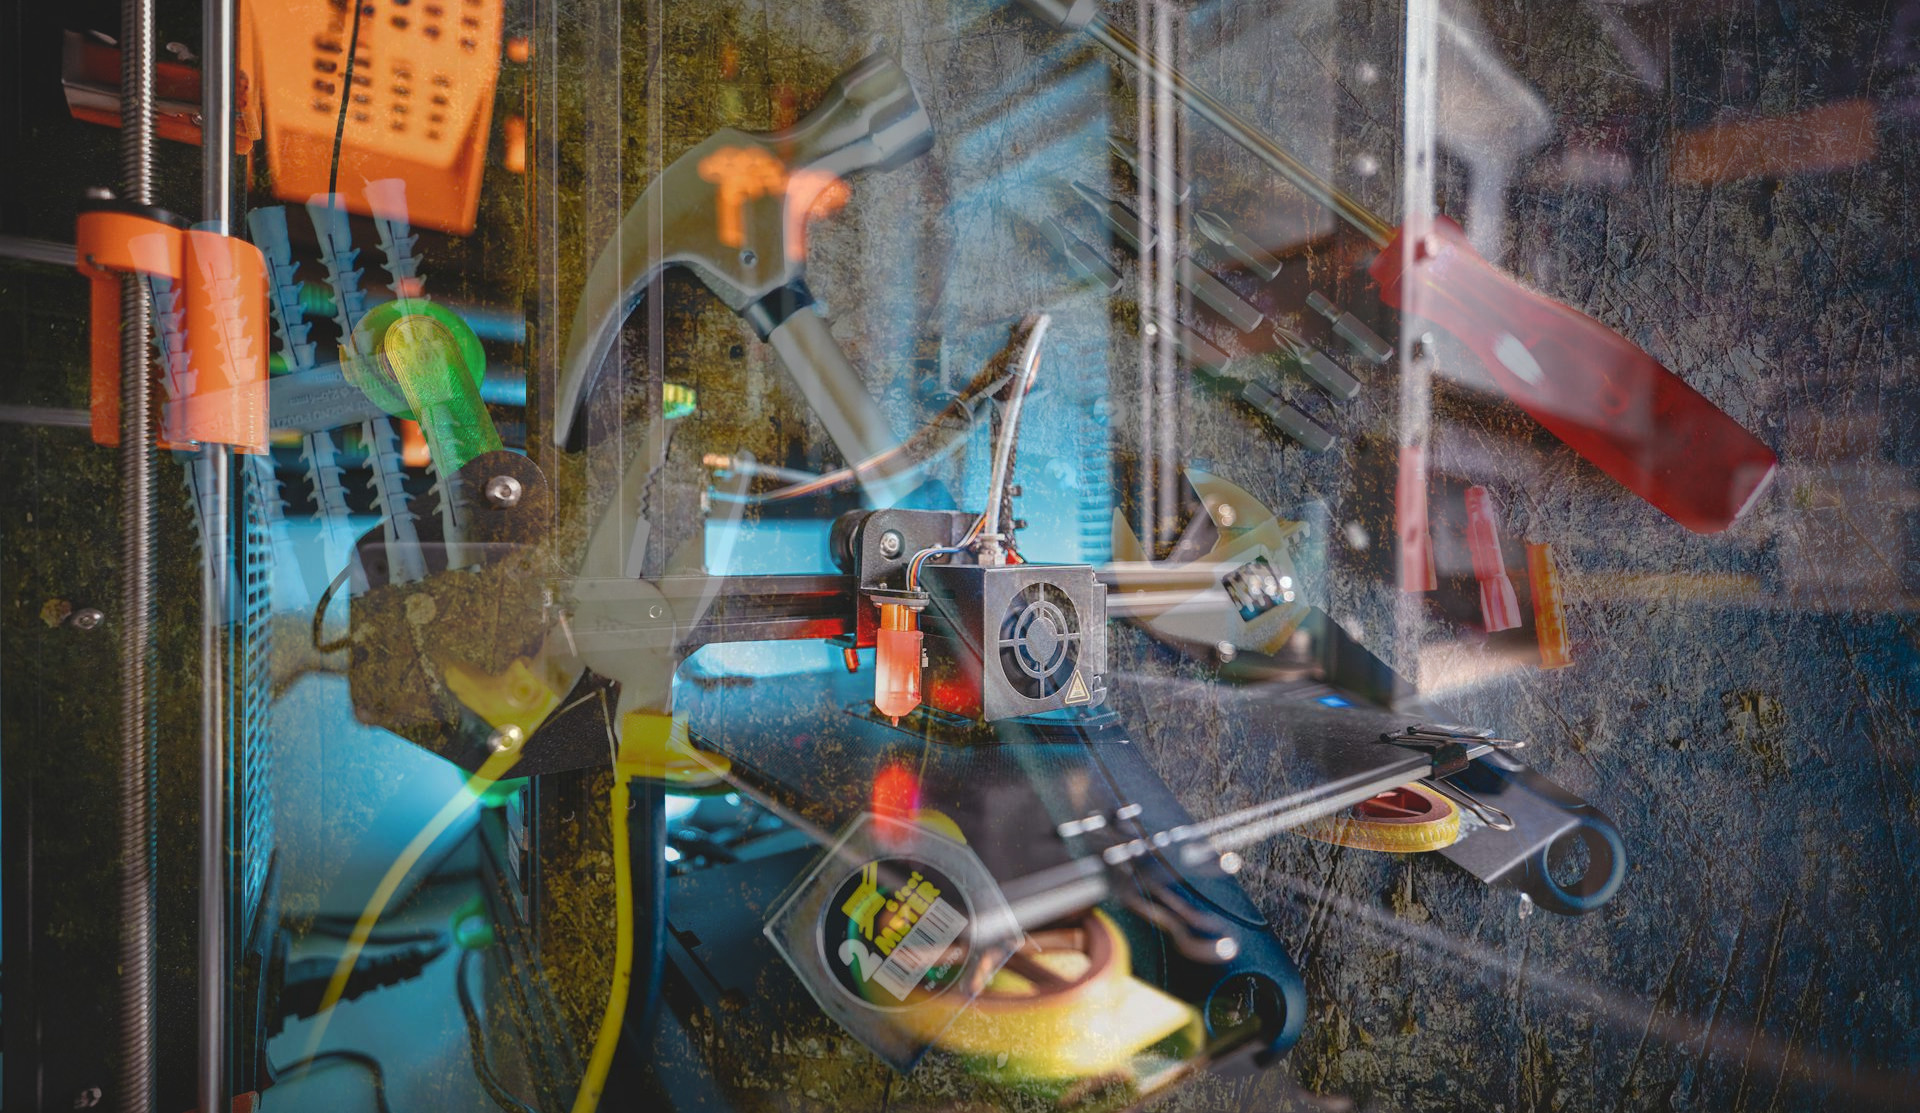
You’ve got your new 3D printer, and whether it's one of the best budget 3D printers, or something a little more spendy (like the Prusa CORE One), you need tools to keep it running smoothly.
Sure you get some tools in the box, but getting a dedicated 3D printer toolkit will make short work of caring for your 3D printer.
I recently passed on my Creality Ender 2 Pro to my nephew, and I created a toolbox to help him maintain his new toy and this reminded me of learning how to use and then maintain my 3D printers. The maintenance ultimately became a hobby in its own right, mainly because I enjoy tinkering with things.
I’m now on my fifth 3D printer.
- Anet A8
- Creality Ender 2
- Creality Ender 2 Pro
- Elegoo Neptune 3 Pro
- Elegoo Centauri Carbon
From the early days I have put together a toolkit that enables me to maintain and tweak my 3D printer. To start with, I used the tools that came with my printer. But, over the years I have made my own kit by replacing the cheaper tools with something that will (should) last a lifetime.
I kept the older tools, and they ultimately now live in the kit that my nephew now uses. Perhaps one day he will upgrade his tools, but he is only eight, and right now 3D printed dinosaurs are a higher priority!
I’ve collated a list of the essential tools for 3D printer maintenance. For each category I’ve suggested a low-cost option, and a more luxurious alternative for those who want to spend a little more.
If you disagree with any of these choices, let me know in the comments. The right tool for one maker, may not be the right tool for you. The beauty of the maker community is that we all tackle the problems with our own solutions, and I’ve gone through multiple solutions to reach where I am now. It is highly likely that there will be many more solutions in the coming years.
1. Cutting plastic is much easier with these great flush cutters
Why you can trust Tom's Hardware Our expert reviewers spend hours testing and comparing products and services so you can choose the best for you. Find out more about how we test.
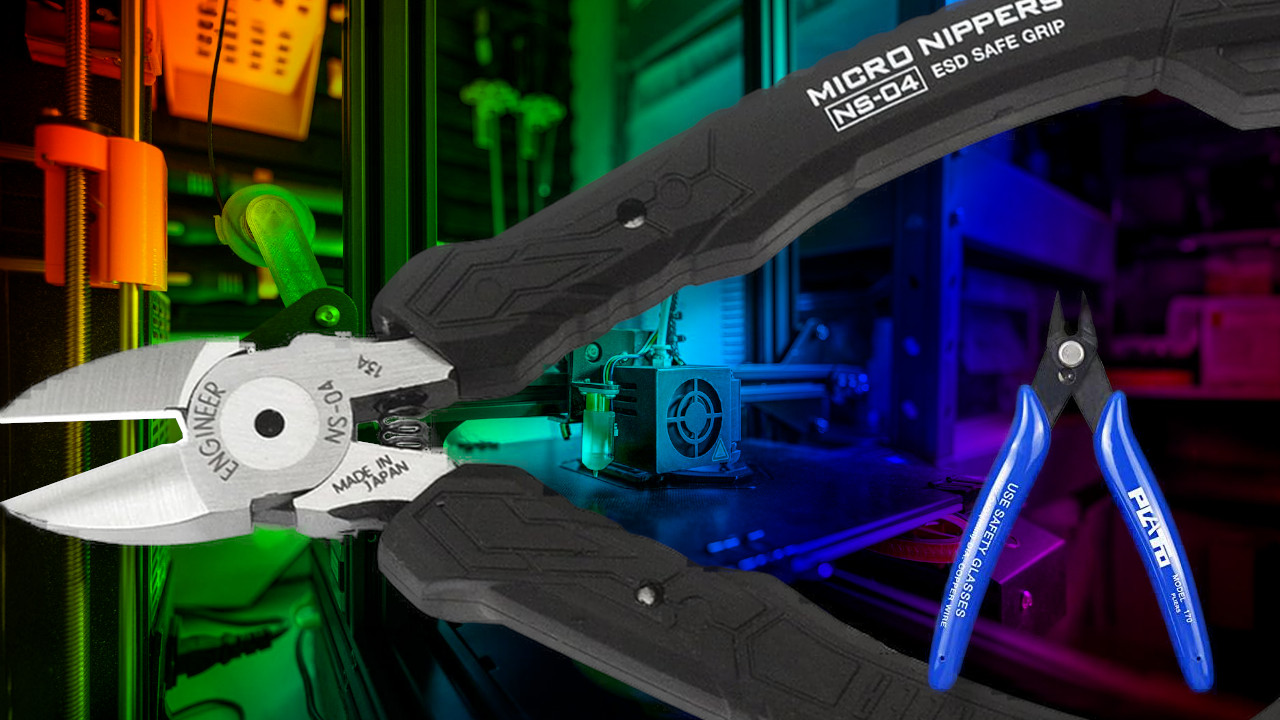
Whether you are cutting your filament, cleaning out supports or removing cable ties, wire / flush / side cutters are an essential part of the 3D printer toolkit. Sometimes you get a pair with your printer, but if you don't, or you need a spare set, then we have two options for you.
⚙ Plato wire cutters (cheap and plentiful)
I’ve got a couple of these. For getting started they are superb. They are useful for 3D printing, electronics and general home maintenance tasks. Sure the metal is a little soft, but for 3D printing they are tough enough.
Being flush wire cutters means that we get a clean edge to our snip. That’s useful when we need to trim some filament to slide down a bowden tube or for removing stubborn supports. Model makers and electronics hobbyists can also use these cutters. Models makers use them to trim parts from a sprue, electronics users will trim component legs and snip wires.
These are cheap and reliable. In fact they are so cheap, you may as well buy a few pairs.
⚙ Engineer NS-04 precision side cutters (if Rolls Royce made cutters)
These are the side cutters that I personally own. I bought them from UK Raspberry Pi reseller Pimoroni about five years ago and they have been in constant use in the many projects that I have created. They cut beautifully and I generally save them “for best”, keeping a pair of cheaper Plato cutters handy for the jobs where damage could occur.
The NS-04 are precision side cutters and using a hex wrench we can slide an angle opening adjuster to set the jaw width. If you don’t need the full bite, this feature will save hand fatigue and reduce the chance of cutting something too big for the jaws.
What I don’t like are the handles. They scream “sci-fi themed handtools” but I ignore this and just concentrate on the great cutting experience provided by these Japanese made cutters.
The Engineer NS-04 is a great pair of cutters, you’ll pay for the quality but they will last you for years.
2. Tightening up Allen and Hex screws is much easier with these
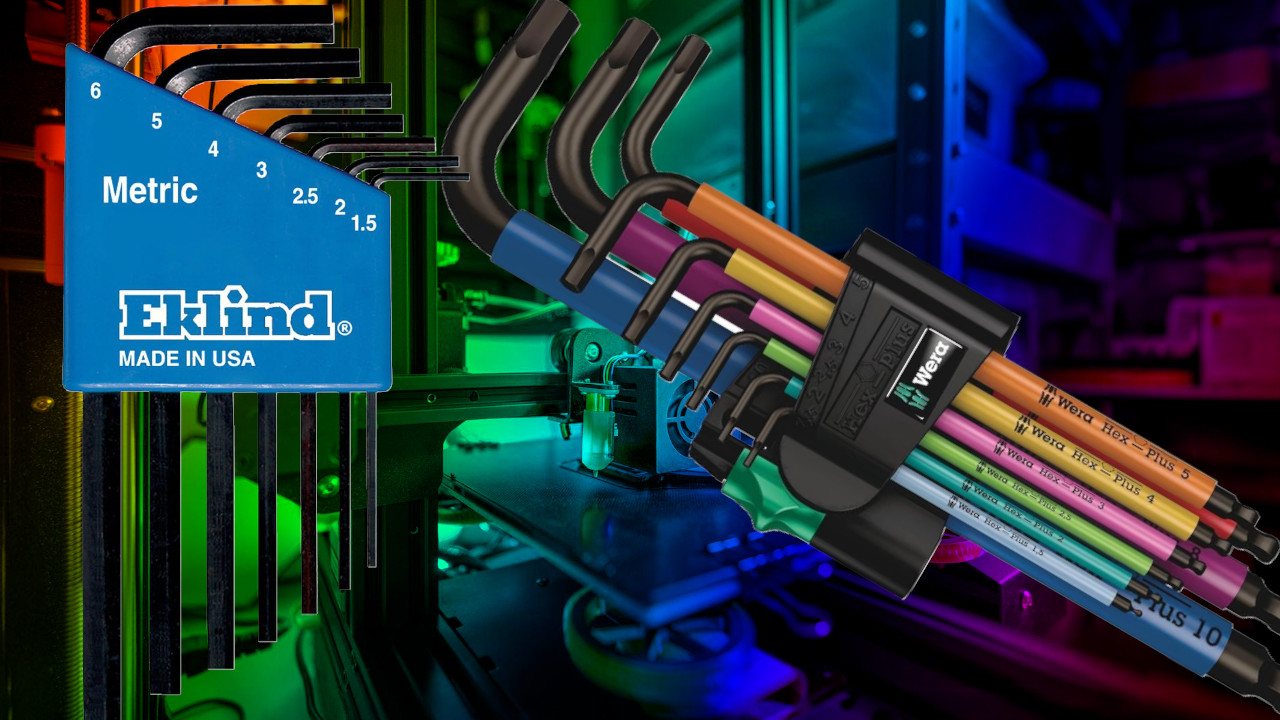
Allen wrenches, hex keys no matter what you call them, are essential but largely unexciting. 3D printers are generally held together by machine screws sporting an allen / hex head. You will normally get a selected set of wrenches with your printer, but having a more expansive set will prepare you for future tasks.
⚙ Eklind Hex Key Set (covering all the key sizes)
If you just need a set of allen wrenches / hex keys then this will do the job, but it will be a no frills experience. This metric set covers sizes 1.5 to 6mm and that is typically all you need for your 3D printer.
Coming in a color coded holster, the metric wrenches are a traditional L-shape, offering a choice between high speed or high-torque screw action. If you need to remove a stubborn screw, then the extra torque afforded by the shorter end is useful, but the lack of a ball-head on the long end means that you will need to be dead on the screw.
They’re cheap and cheerful, and they get the job done. Buy a set and throw them in your toolbox for those moments when you need that specific sized wrench.
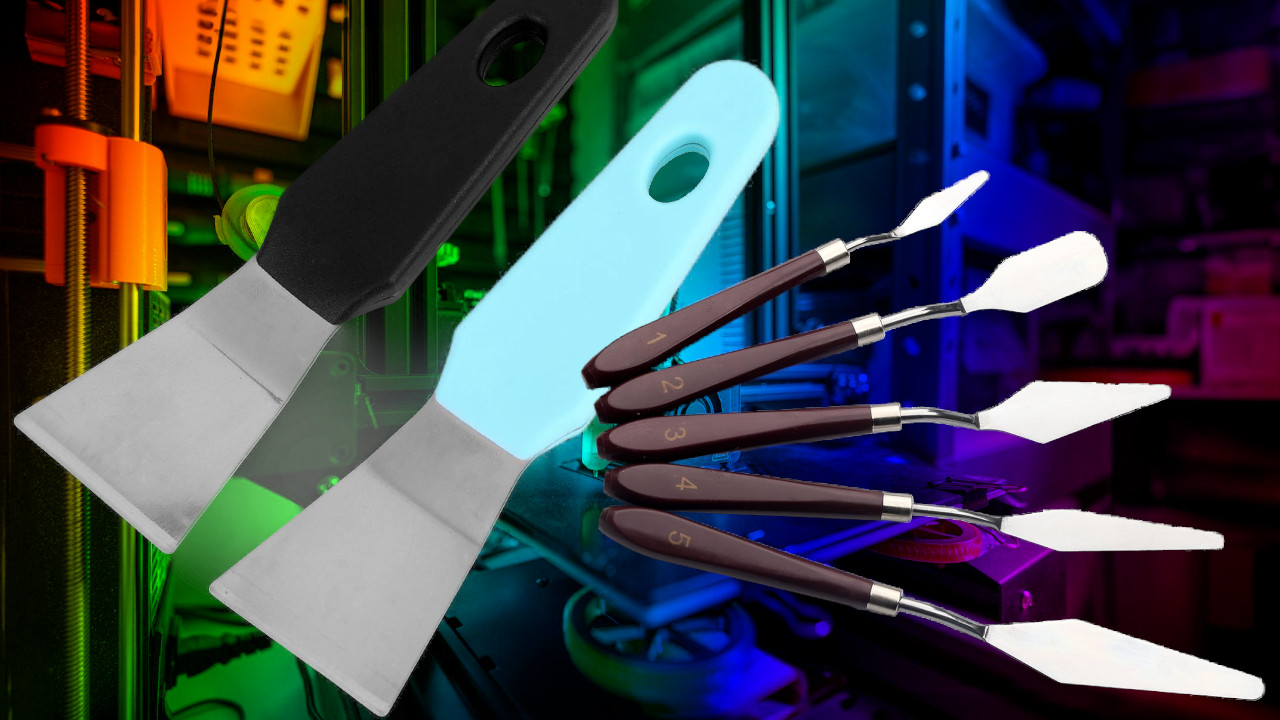
The print bed on my Elegoo Centauro Carbon is super grippy, and I often need to use a scraper to gently remove the print from the bed. In the case of PLA, it cools down and lifts from the print bed in a few minutes. For my new favourite, PETG, it takes much longer to cool down and when I use a brim, the bed adhesion is challenging.
Scrapers are great tools, and your 3D printer will usually come with a plastic scraper, but what if you need something a little better? Here are two suggestions.
⚙ 3D Printer Scraper (two for $5!)
The metal blade is stronger than the plastic versions often included with your 3D printer, and you get two for under $5! With blue and black handles, the scrapers measure 5.5 x 1.57 inches with a generous handle size to enable a good grip.
The thin metal blade is designed to get under the print, or if the print is stuck, to gently lift the brim to break the adhesion. Just make sure that you use it carefully; don’t go cutting into your build plate!
⚙ Palette Knives (no, seriously, they can be used to lift 3D prints)
Credit for this idea goes to Chuck Hellebuyck (CHEP on YouTube) who suggested the use of a palette knife (painter’s knife) as a means to remove prints and detritus from your print bed.
Normally reserved for artists working with oil paints or clay, these knives come in a pack of five, but it is the number 2, square-bladed knife that will lift your prints without damaging your build plate. Just slide the flat blade under the plastic and it will come away from the plate.
4. These screwdrivers will keep your 3D printer running
We’ve all got some form of screwdriver lurking in a toolbox or drawer. We use them to open PC cases, tins of paint and to fix our spectacles and then we throw them back in the drawer. A few months later, we’re hunting for that one screwdriver to do one specific task and then get frustrated because we can’t find it. This is when you need a dedicated screwdriver set for your maker box.
In my office / workshop I have a general set of screwdrivers for general tasks, and a set of Wera screwdrivers for servicing 3D printers and taking things apart. Sometimes I put things back together with all of their screws, often there is one screw left over.
So let's take a look at two screwdriver sets for servicing your 3D printer.
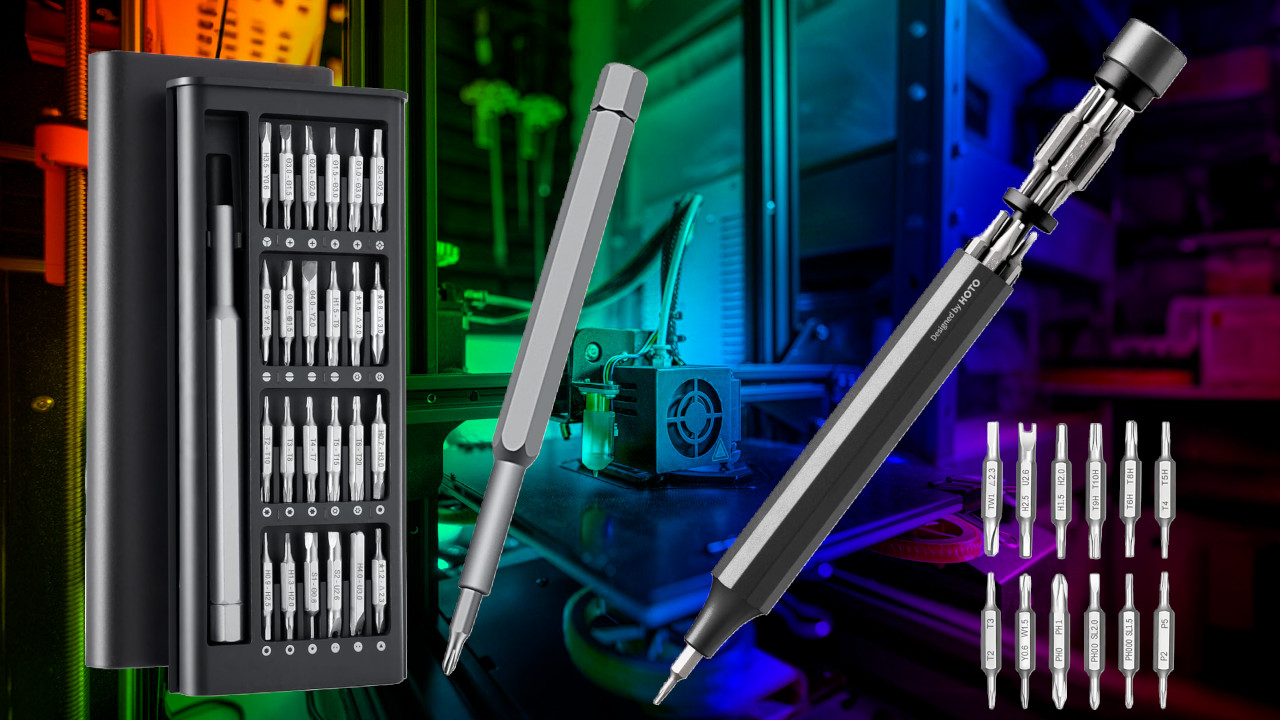
⚙ 9-in-1 Precision Screwdriver Set (fix your printer, phone, life with this cheap set)
If you look on Temu / Aliexpress, there is a proliferation of screwdrivers that look just like this. That doesn’t make them bad, but it shows that the design is popular. This 49-in-1 precision screwdriver kit comes in a rather useful case which contains all 49 bits and the driver handle. The bits are double ended, packing in more bits into the slim case. If you need more bits, then standard 4mm bits should fit perfectly.
The driver handle has a rotating cap, enabling you to keep pressure on the screw head while driving the screw. Bits can be magnetized by the handle, and the case itself has a magnet to firmly grip the stored bits, preventing them all spilling out when you open the case.
For under $8 we get a great selection of bits (Torx, Hex, Security, Crosshead, Triwing, Slot and a 0.8mm needle tip. The driver handle should provide enough grip for stubborn screws, but remember that it is all metal, so your grip may slip for very stubborn screws.
⚙ HOTO 24 in 1 Multi Bit Mini Screwdriver Set (the iPhone of screwdrivers)
This is a great precision screwdriver for most maker jobs. Taking apart or building a project is made much easier thanks to a screwdriver like this. Why? Because of its great design that includes having all of the bits inside the handle!
$20 for a precision screwdriver is a big ask. But the Hoto 24-in-1 offers a great driver handle with a swivel to aid precise movement. Bits connect magnetically to the handle, and the driver will take 4mm bits, but it comes with 12, double-ended bits which should cover most users. I say most, because the hex bits only go up to 2.5mm and that wasn’t large enough for some of the hex screws on my Elegoo Neptune 3 Pro.
As I mentioned earlier, this will take 4mm bits so if you are missing your favorite bit, you can pick it up and add it to the handle.
5. Electric screwdrivers, because sometimes there are too many screws!
Screwing / unscrewing a bunch of screws can get tiring and that is why I have two electric screwdrivers that I use to build furniture, PCs and take apart electronics for repair. I also use them to quickly tighten / loosen screws on my 3D printers, snugging them tight with my allen wrenches / manual screwdriver.
You can get a good USB-charged electric screwdriver for very little money, or you can pay a little more and get something a little more stylish. I started out with a cheap Temu driver and it worked well, but the lure of Hoto’s precision driver soon won me over and I don’t regret it.
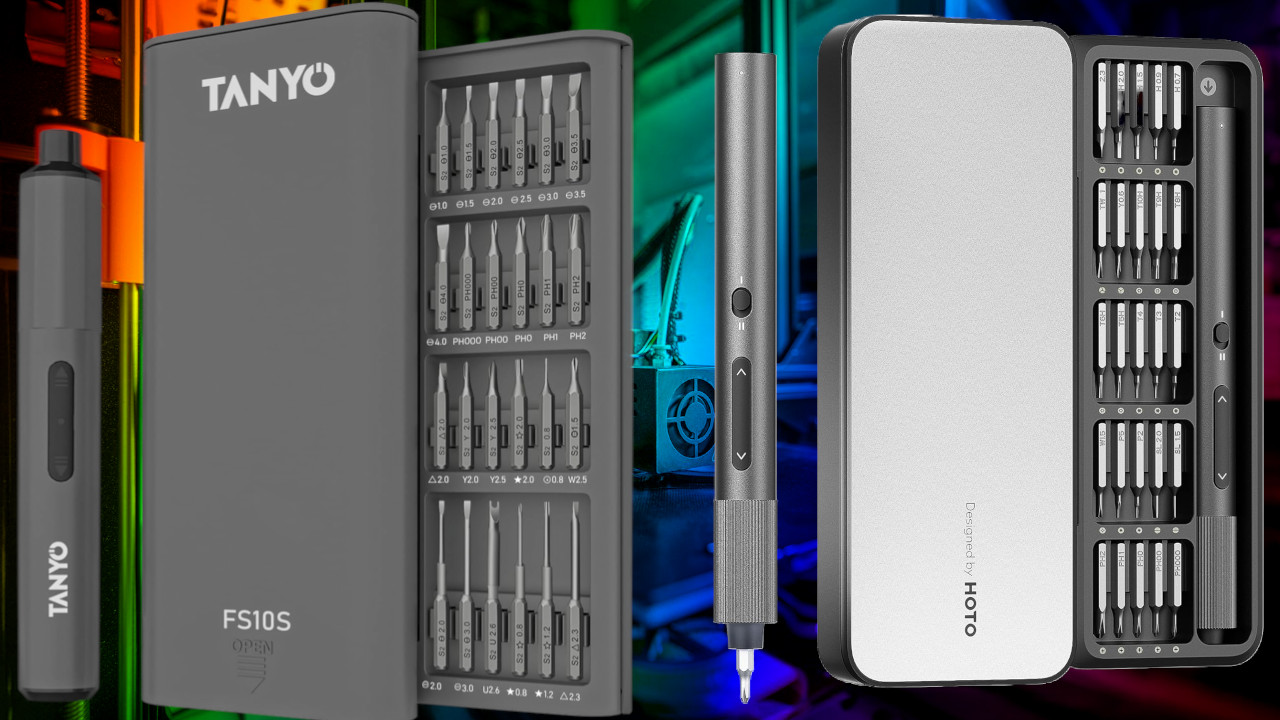
⚙ Tanyo Mini Electric Screwdriver (low cost, low effort screwdriver action)
A USB Type-C rechargeable electric screwdriver was the thing of dreams a decade ago. Yeah we have electric screwdrivers but they were often powered by batteries, or bulky battery packs. Now with Lithium power packs and USB C we have small, powerful tools that get the job done for not much money.
The Tanyo mini electric screwdriver kit sees a 400 mAh powered screwdriver packed in a 4.96 x 0.7 inch (12.6 x 1.8cm) handle. The bits are standard 4mm size, so you can change them with those used in your standard precision screwdriver, and they come in a standard 28mm shaft length, or a longer 45mm shaft for hard to reach spaces.
The range of bits is impressive, Torx, Philips, slot, hex and security bits but there is a downside to this driver. Yes it has forward and reverse rotation, but only a single speed. Not a dealbreaker, but keep it in mind.
⚙ Hoto 25-in-1 Precision Screwdriver (driving my work forward)
Let's get this out of the way. I own this screwdriver and I use it almost every day. Heck I even designed a cradle that hangs the screwdriver from my Ikea shelves while connected to a charger via a magnetic cable. This is a great screwdriver and well worth the money.
The S2 bits are made from a hardened steel which means they won’t chew up and lose their edge. The bits are standard 4mm size, so you can use bits from your other precision screwdriver. The Hoto precision driver only has one speed and the battery capacity is only 350mAh, which provides around 500 operations, but those two things are its only downside. When charging the unit will show a white light next to the USB C port. When it goes out you are fully charged.
The driver is made from metal and the ridges help grip the driver as you work. Button operation is easy; just press and hold to screw / unscrew. The included case is lovely, if a little bulky. I ended up 3D printing a magnetic stand for the bits to accompany the cradle that supports the driver.
All in all, a great electric screwdriver for makers, tinkerers and those eager to service their 3D printers.
6. Unclog your 3D printer like a plastic plumber
3D printers will get clogged. No matter how much money you spend, hot plastic being pushed through a 0.4mm hole is going to cause a clog someday. Dealing with a clog is fairly simple, but you need the right tools as you will be poking around the hot end while it is well and truly hot, around 200C.
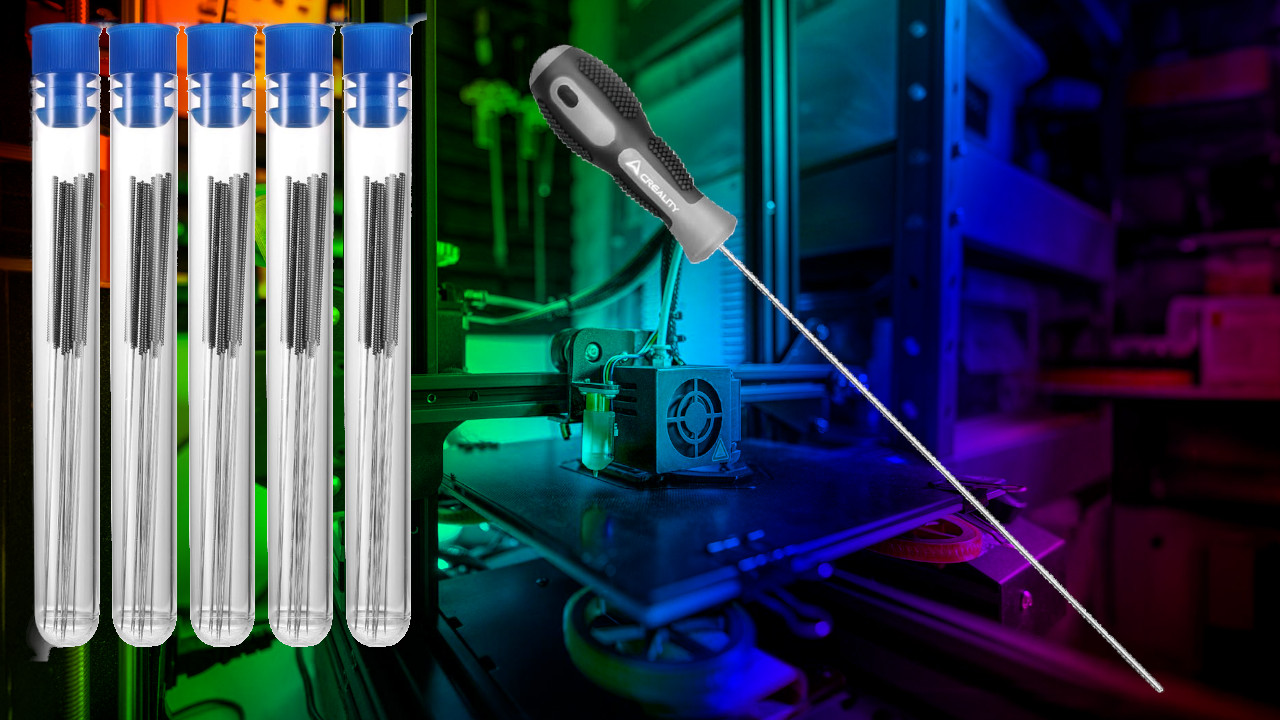
⚙ 120pcs 3D Printer Nozzle Cleaning Kit (deep clean that nozzle)
Cleaning out a clog is never exciting, but it is essential, and for less than $4 you have 120 steel needles designed to unclog your nozzle. The needles measure 81mm and are only 0.4mm wide, and yes, they have a sharp point and I did poke myself with one.
Heat your nozzle, poke the needle into the hot end and the clog should soon be unblocked. Wipe the needle, put it back in the case and carry on printing. If the needle gets too messy, responsibly recycle it. Just watch out for the point!
⚙ Creality Clog Poke (attack that clog from another direction!)
Poking a clog with a thin needle works most times, but when you absolutely, positively need to blast that clog out, the Creality Clog Poke (yes, that is its name) is there to help. Instead of inserting it into the nozzle, we insert the poke into the filament path, specifically the path from the top of the extruder to the nozzle. The 1.5mm needle won’t reach the nozzle, but it will push any plastic trapped inside the extruder. Molten plastic should then pour down onto the build plate.
Using this should reduce the need to completely disassemble the extruder, and make quick work of a blockage. Of course there will be times when you need to disassemble the extruder. About a year ago I had to disassemble the extruder on my Elego Neptune 3 Pro as it had a serious clog. Some pliers and a lot of time later, I was printing again. Perhaps with this tool it wouldn’t have been such a big job?
7. Replace 3D printer nozzles easily, and without burning yourself
The nozzle on your 3D printer is user replaceable, and you can swap it out for a different sized aperture for finer detail prints (0.2mm) or for when you need to print large functional parts (0.6 to 0.8mm). But to remove the nozzle you will need a wrench, so here is what I suggest.
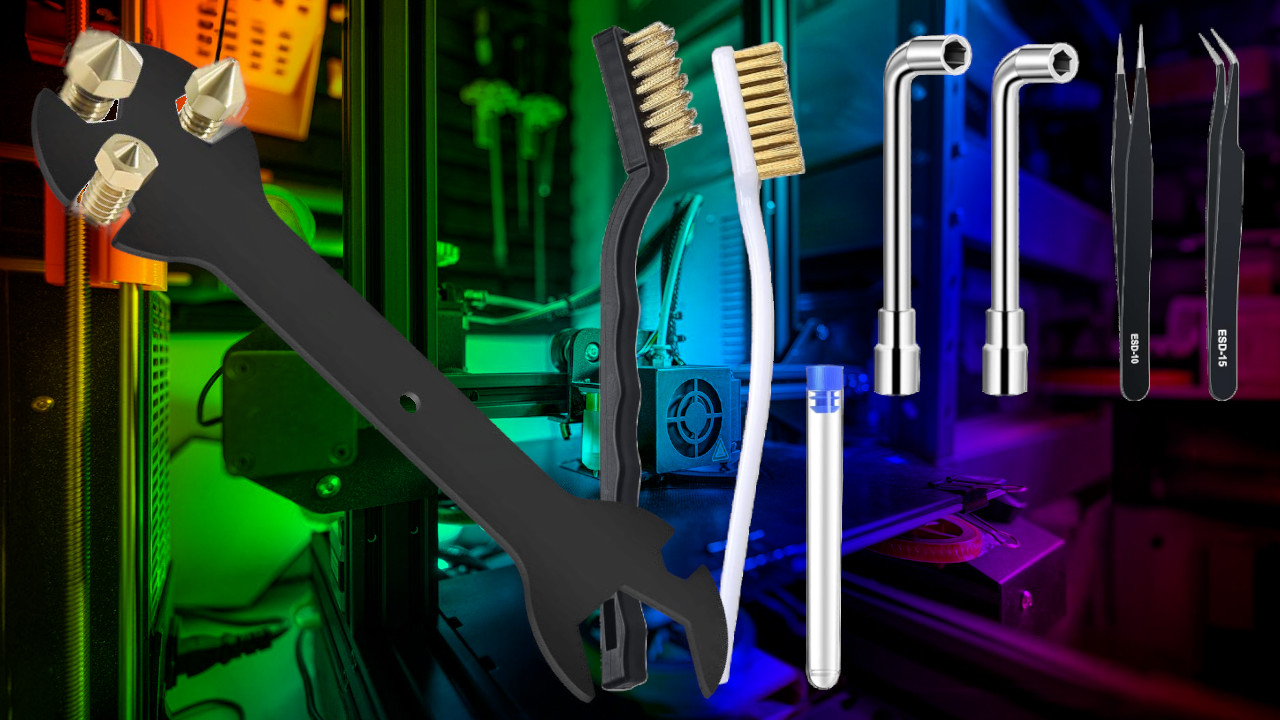
⚙ 5-in-1 Nozzle Wrench (for all sizes of 3D printer nozzles)
For under $3 this is an essential tool. It covers multiple sizes of nozzles, and it can be used to hold the hot end assembly in place when stripping the entire assembly down. The thin metal construction isn’t the most comfortable, but it will get the job done with very little fuss. Honestly, for a few bucks, just grab one. It will be used many times.
⚙ 26 Piece Nozzle Maintenance Kit (all the gear to get the job done)
For less than $10 you get needles to clean the nozzle, brass brushes to remove grime and plastic from the hot part of the nozzle, tweezers to remove detritus without burning your finger. But the best part for me are the two nozzle wrenches. Designed with an L-shape, they keep your fingers away from the hot bit, and give you a little more torque to persuade the nozzle to come loose.
Even after heating the nozzle, it can become stuck, so a little extra force is needed to remove it. The problem is that the heat makes the nozzle too hot to touch. The nozzle is cupped by the wrench, so you just need to concentrate on removing it. Then, drop it on the build plate to cool off.
The extra tools are useful. In fact the brass brushes are extremely useful to clean burnt plastic from the hot end, and I use them to remove a little rust from a long lost pocket knife.
8. Remove excess plastic, and clean-up your 3D prints
Yes, you can just use a scalpel / knife to remove the brim, or neaten up the edges. But, take it from someone who sliced the top of their finger off, buy a deburring tool instead. Some 3D prints need a little post-processing. The edges may need to be cleaned up, common when using a brim for bed adhesion, or if your print squeezed down on the print bed a little too hard and caused an “elephant’s foot”. A deburring tool uses a curved blade with a ball-end. The ball traces the contours of the object, while the blade shaves off a little plastic to neaten up your work.
⚙ Ergonomic Handheld Deburring Tool ($2 wonder tool)
$2 doesn’t even buy you a decent cup of coffee, so can it buy a decent deburring tool? Sure it can. This deburring tool has replaceable heads and comes ready to neaten up your prints. The pen-like design makes it easy to hold, and gives a firm grip necessary when cleaning up a print. Blades are easily replaced, and can be used with soft metals, wood and of course plastic.
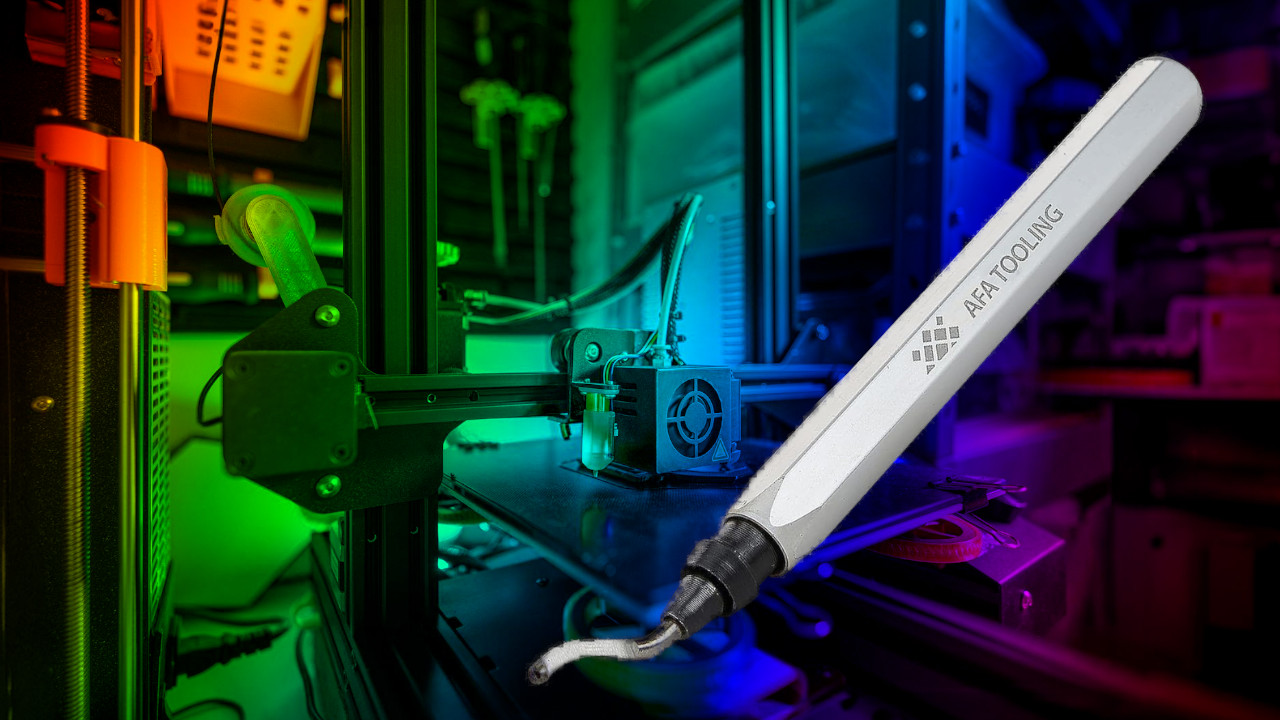
⚙ AFA Deburring Tool (effortless deburring)
This is much more than $2, so what do you get for the money? Firstly, an aluminum handle which feels light and strong. Next we have lots of spare blades, which are easily replaced via a quick change system. This is the deburring tool that I bought and it has been a lifesaver.
I printed some parts in PETG and left the brim option to “auto” then realised I had to cut out so much waste plastic. But there was no problem with this tool. A few minutes later I had a bin of plastic shavings and a clean print. I also learnt an important lesson, don’t trust the auto brim option.
9. Isopropyl alcohol, the ultimate cleaning liquid for 3D printers
It's hard to recommend a chemical, especially rubbing alcohol. As long as you get the percentage right (70% or higher) your print bed will be free from oily hand prints and leftover plastic. Isopropyl Alcohol (IPA) is a key part of 3D printing, because whenever we touch the buildplate, even with clean hands, we leave oils that can impact bed adhesion and turn our prints into spaghetti. So let's get some IPA!
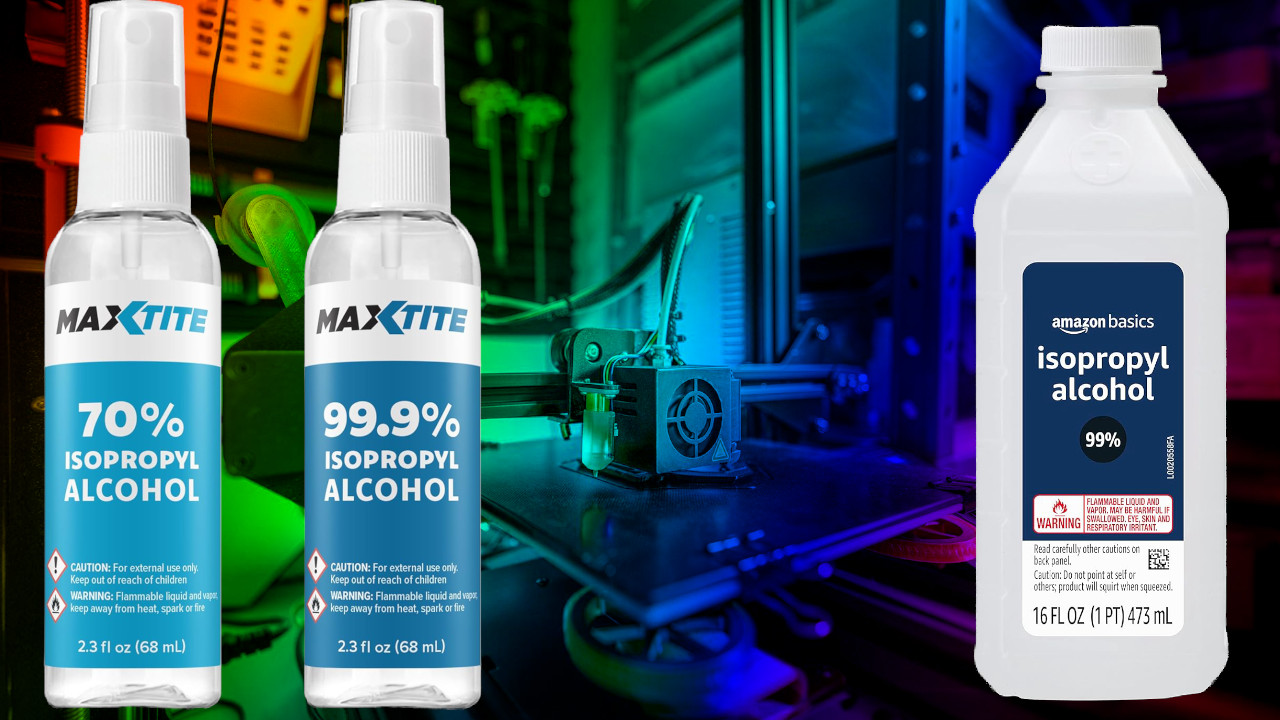
⚙ MaxTite Isopropyl Alcohol Spray Bottles (wash and go)
Two bottles of 2.3 fl oz (68ml) IPA in 70 and 99.9% strength for $6 is a pretty good deal considering the bottles have spray applicators. Get a paper towel, spray the print bed and then wipe the IPA around to remove the oils. That’s it! Start your print and enjoy the improved bed adhesion.
⚙ Amazon Basics 99% Isopropyl Alcohol (bulk purchase power)
I buy IPA in bulk, seriously. I use it to clean my 3D printers, tools and even my PC case, when it's not full of dust. I dispense it into dollar store spray bottles, the ones used when traveling. I mark the bottle to identify it as IPA and just grab it when I need it. Yes, 99% is overkill, heck its medical grade for first aid use, but if you really want to eke it out, get some distilled water and water down your mix to 70%. I don’t because it works well as it is. My top tip though is to not spray it when the print bed is hot. There is very little risk of fire, but it will evaporate rather quickly.
10. With these flashlights, you will soon see the light!
How the heck did a flashlight get on the list? Trust me, when you are working in tight spaces you need as much light as you can get, and a flashlight is really handy to point the light exactly where you need it. You don’t need to spend big bucks on a flashlight, but there are some excellent choices out there.
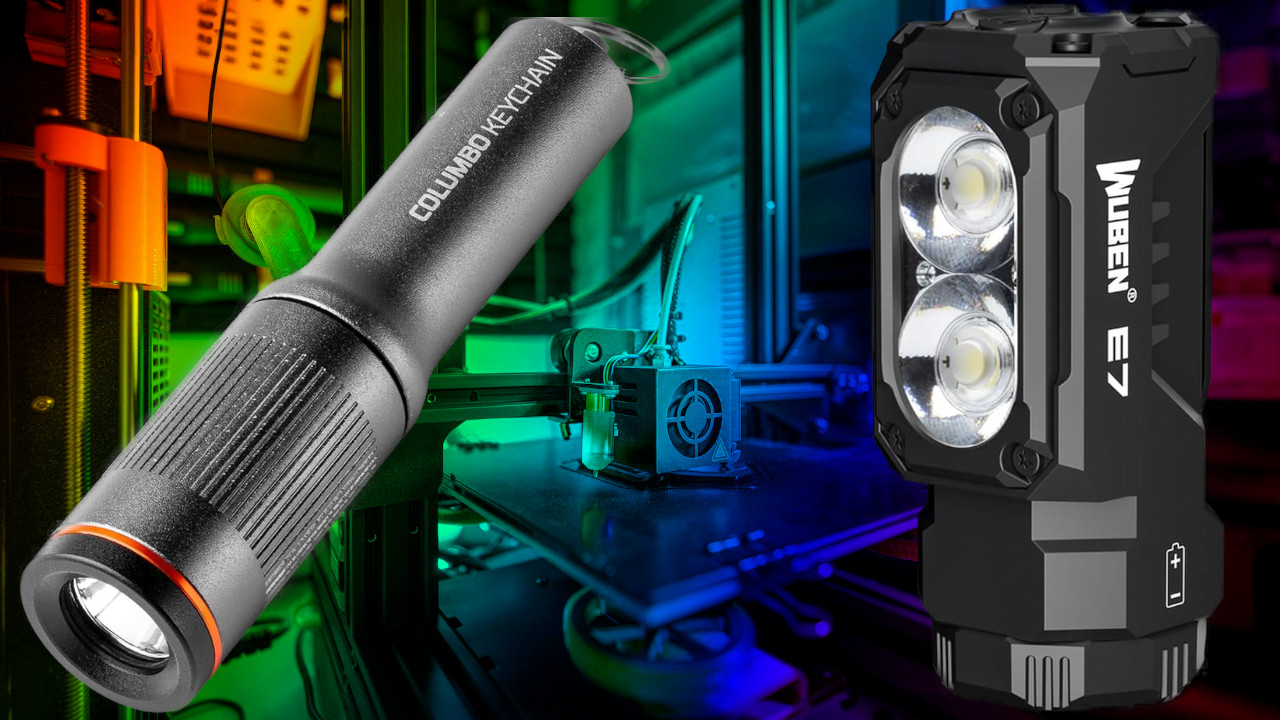
⚙ Nebo Columbo (just one more thing)
Nebo makes great flashlights. I have one in the tool box (a pocket sized Nebo Larry) that has a magnetic base and takes AAA batteries. The Columbo is not named after the famous TV detective, but it is ready to shed some light on the case (sorry). Powered by a single AAA battery, Columbo is a keychain flashlight with 100 Lumens of power, plenty of power to light up a dark corner in your 3D printer. For $10 this is a bargain for a flashlight.
⚙ Ruben E7 (pocket flashlight powerhouse)
I own a Wuben C3 but I wish I had this one instead. With 1800 Lumens of light, USB Type-C charging, IP68 rating, baseball cap clip and a magnetic base this is a great flashlight. The 1800 Lumens brightness is at max power, dial it down and you will get many hours of use. The magnetic base means it can be connected to a metal part of your PC case or 3D printer, leaving you with both hands free to get work done. This flashlight is $30, but it regularly has a discount coupon that takes a chunk of the final cost. Buy this now!


 English (US) ·